Mighty Polymorphin' Power Rangers [Canceled]
 jmerry
Member Posts: 4,213
jmerry
Member Posts: 4,213
Season 1 Opening Credits
And now, time for a new saga: the Mighty Polymorphin' Power Rangers. Join Randy the Red Ranger and his team as they battle the forces of evil to save Faerun!
Theme song
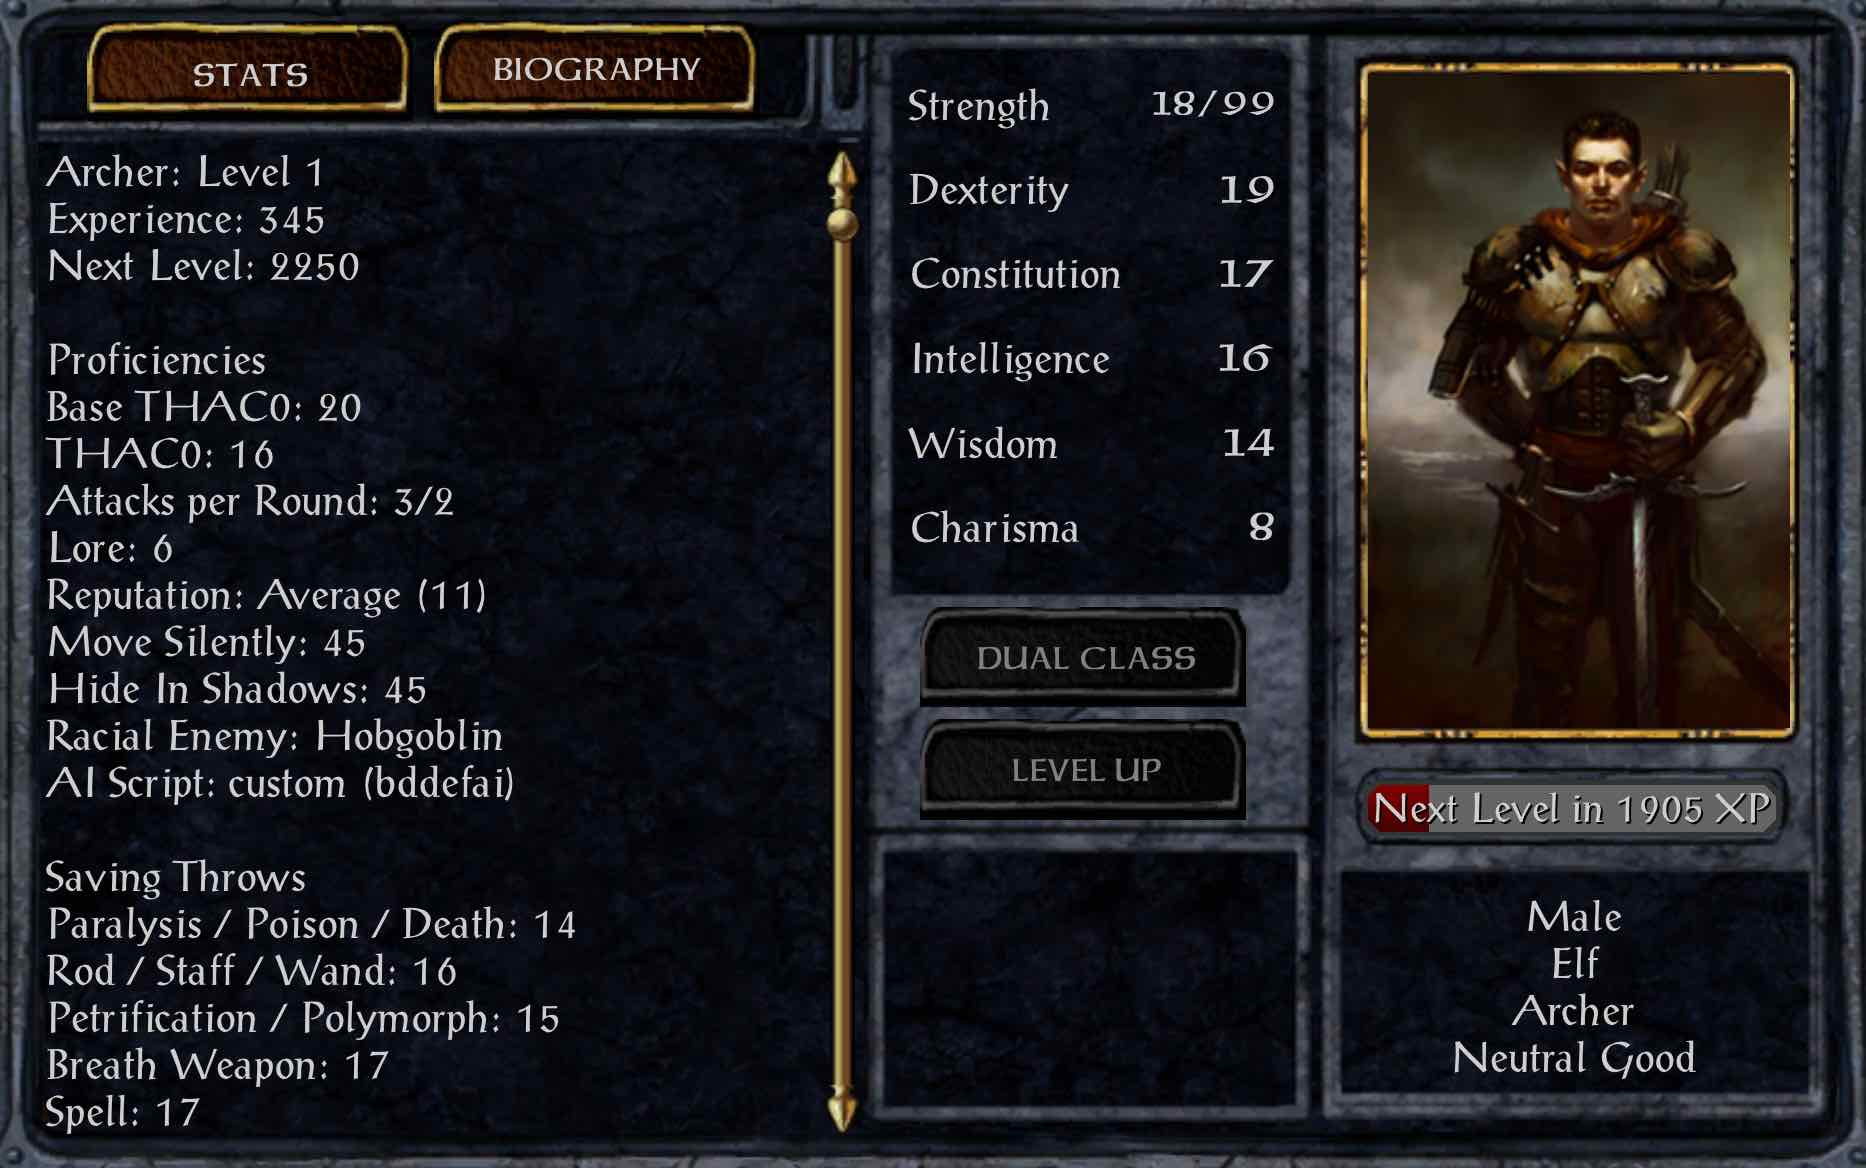
Introducing - the Rangers! First we have Randy. Raised on tales of Rangers past, Randy followed his skill in throwing things to become an archer, specializing in crossbows.
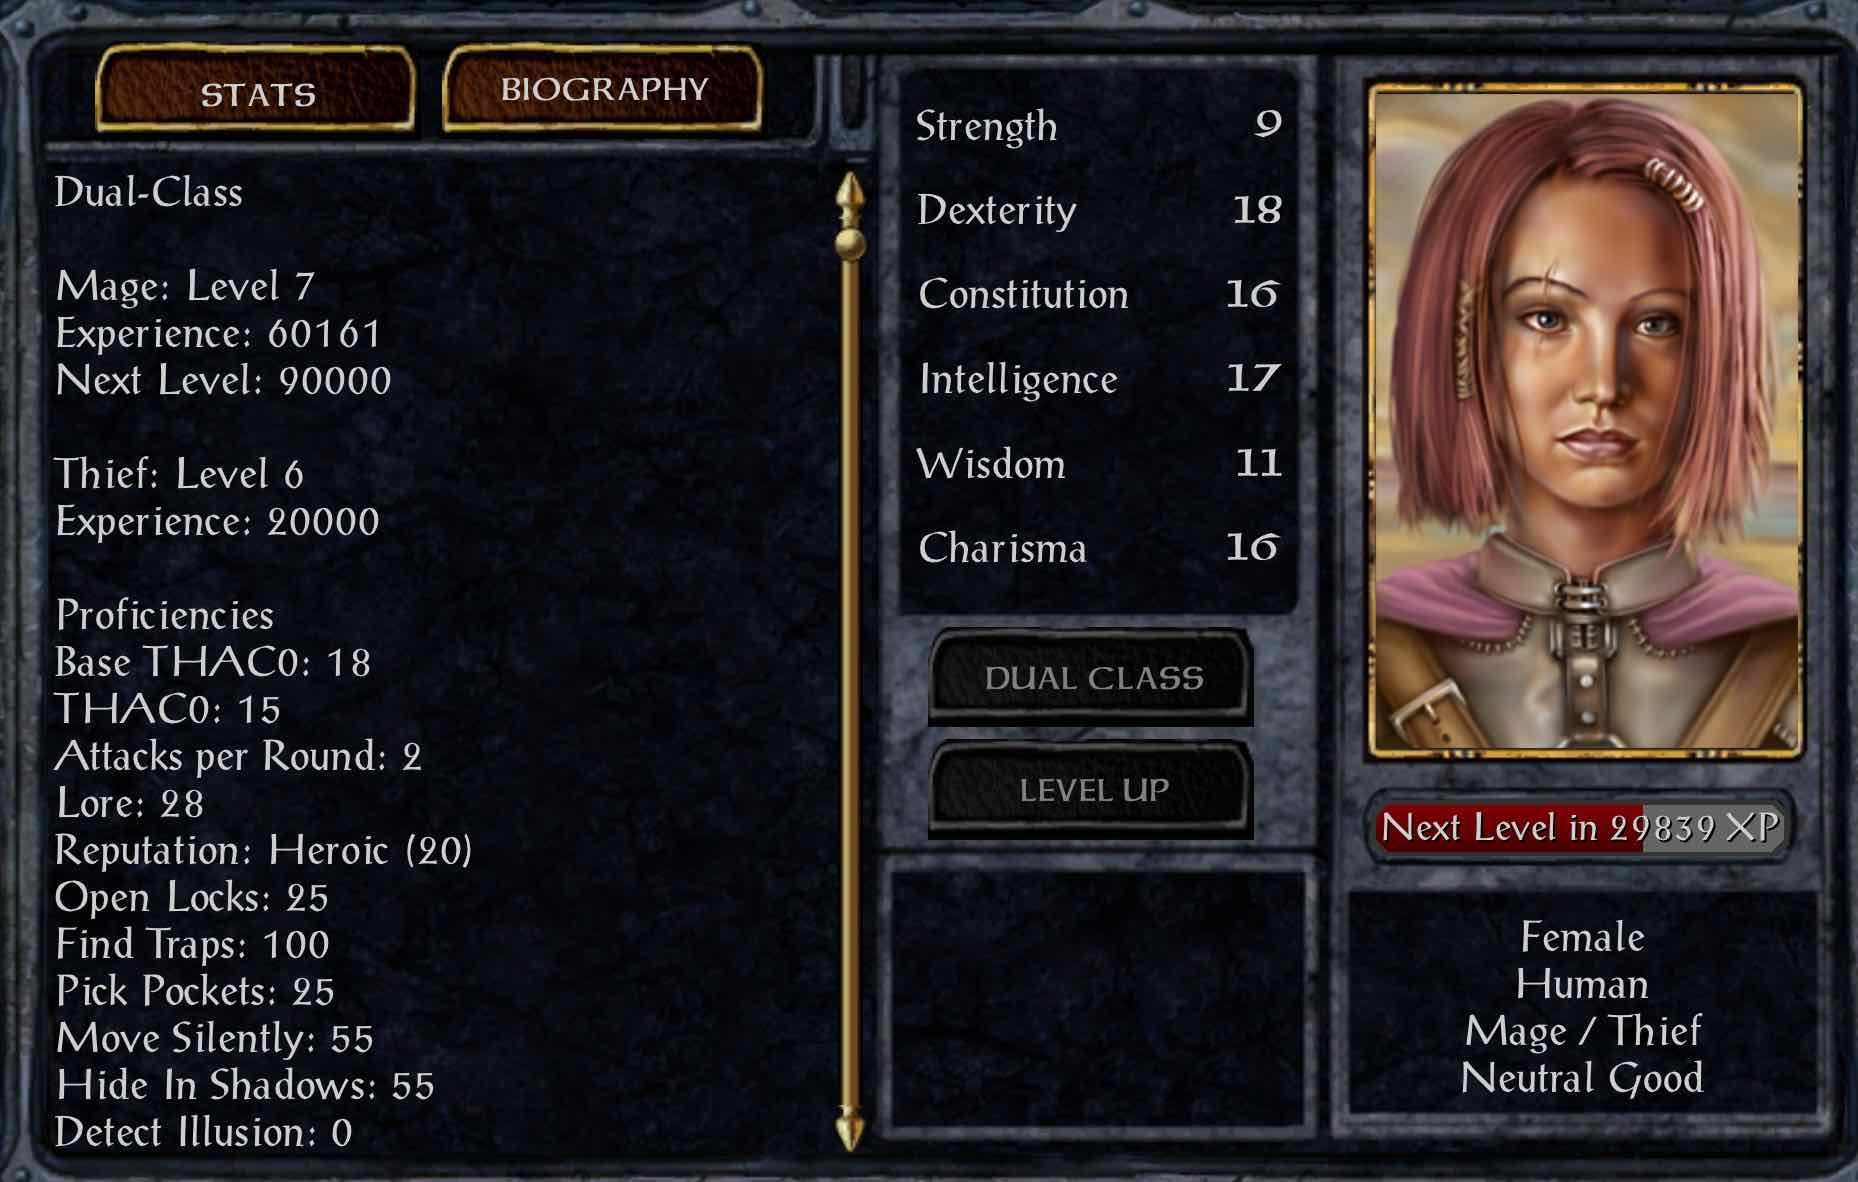
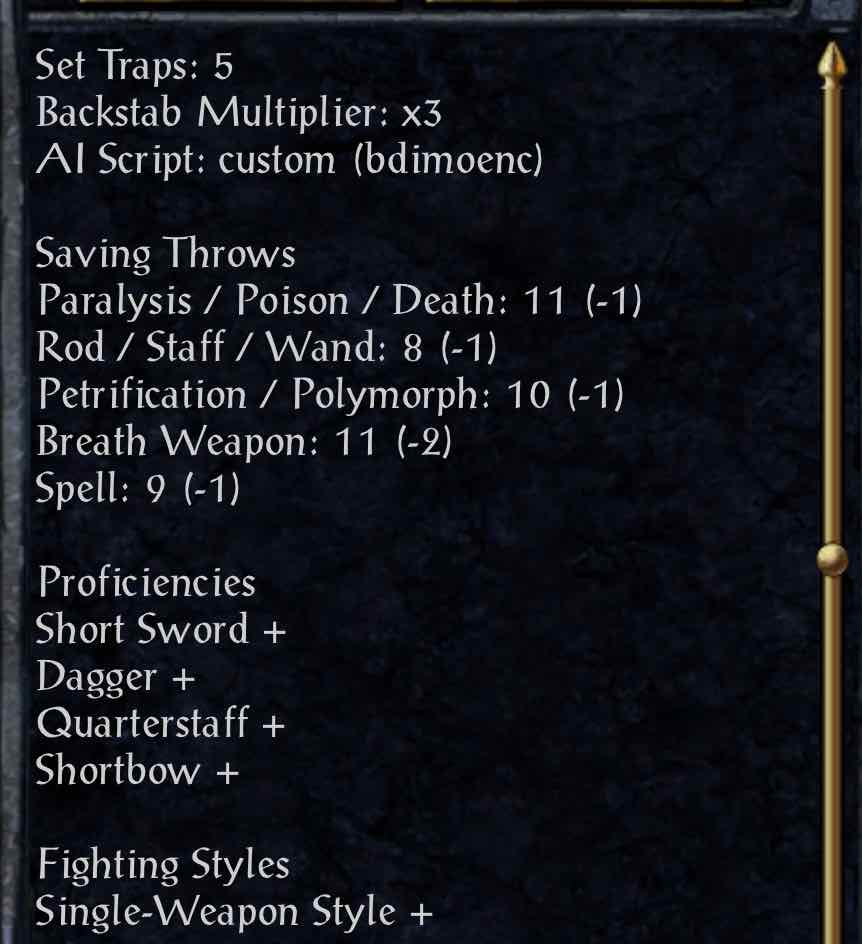
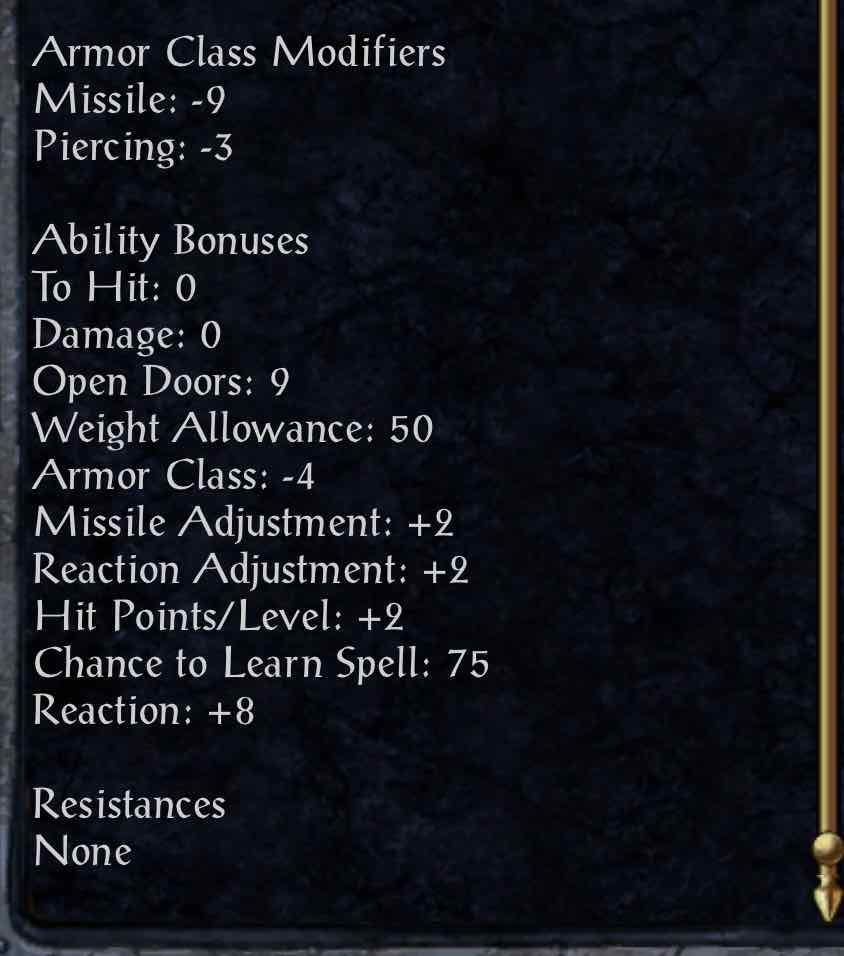
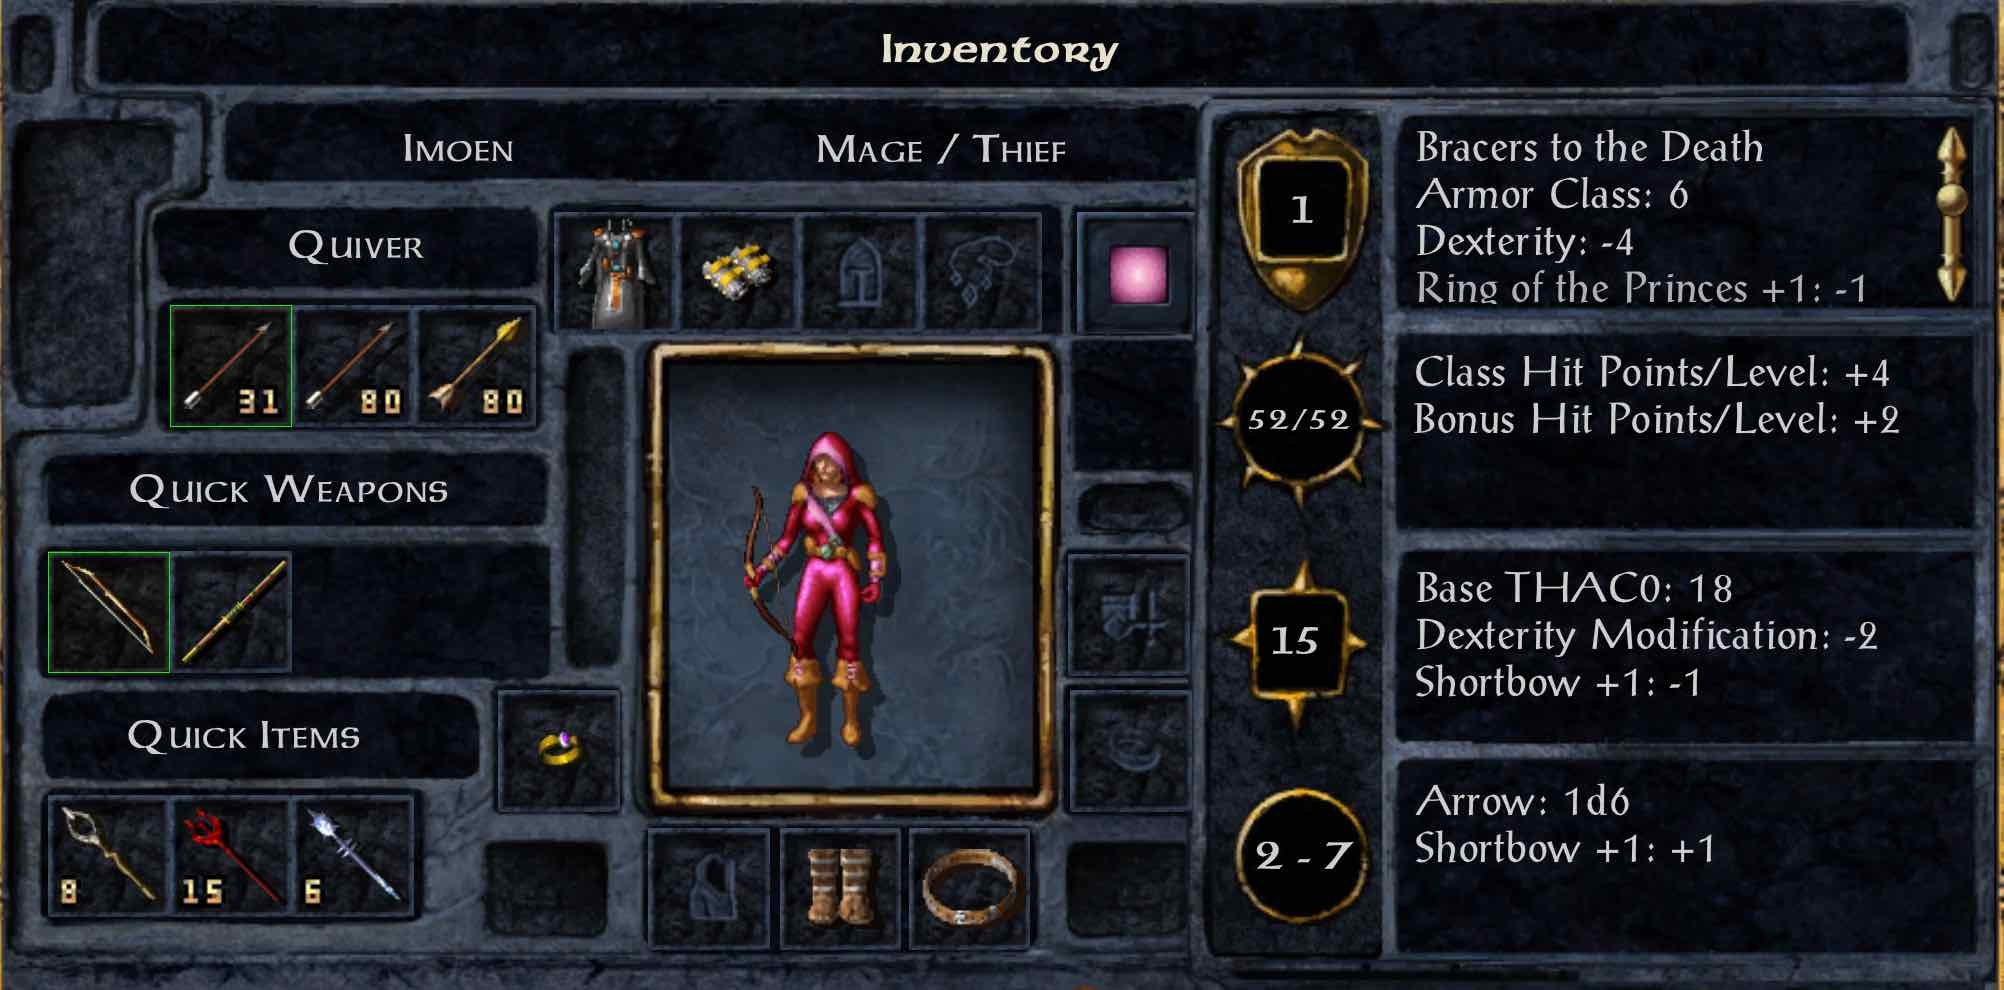
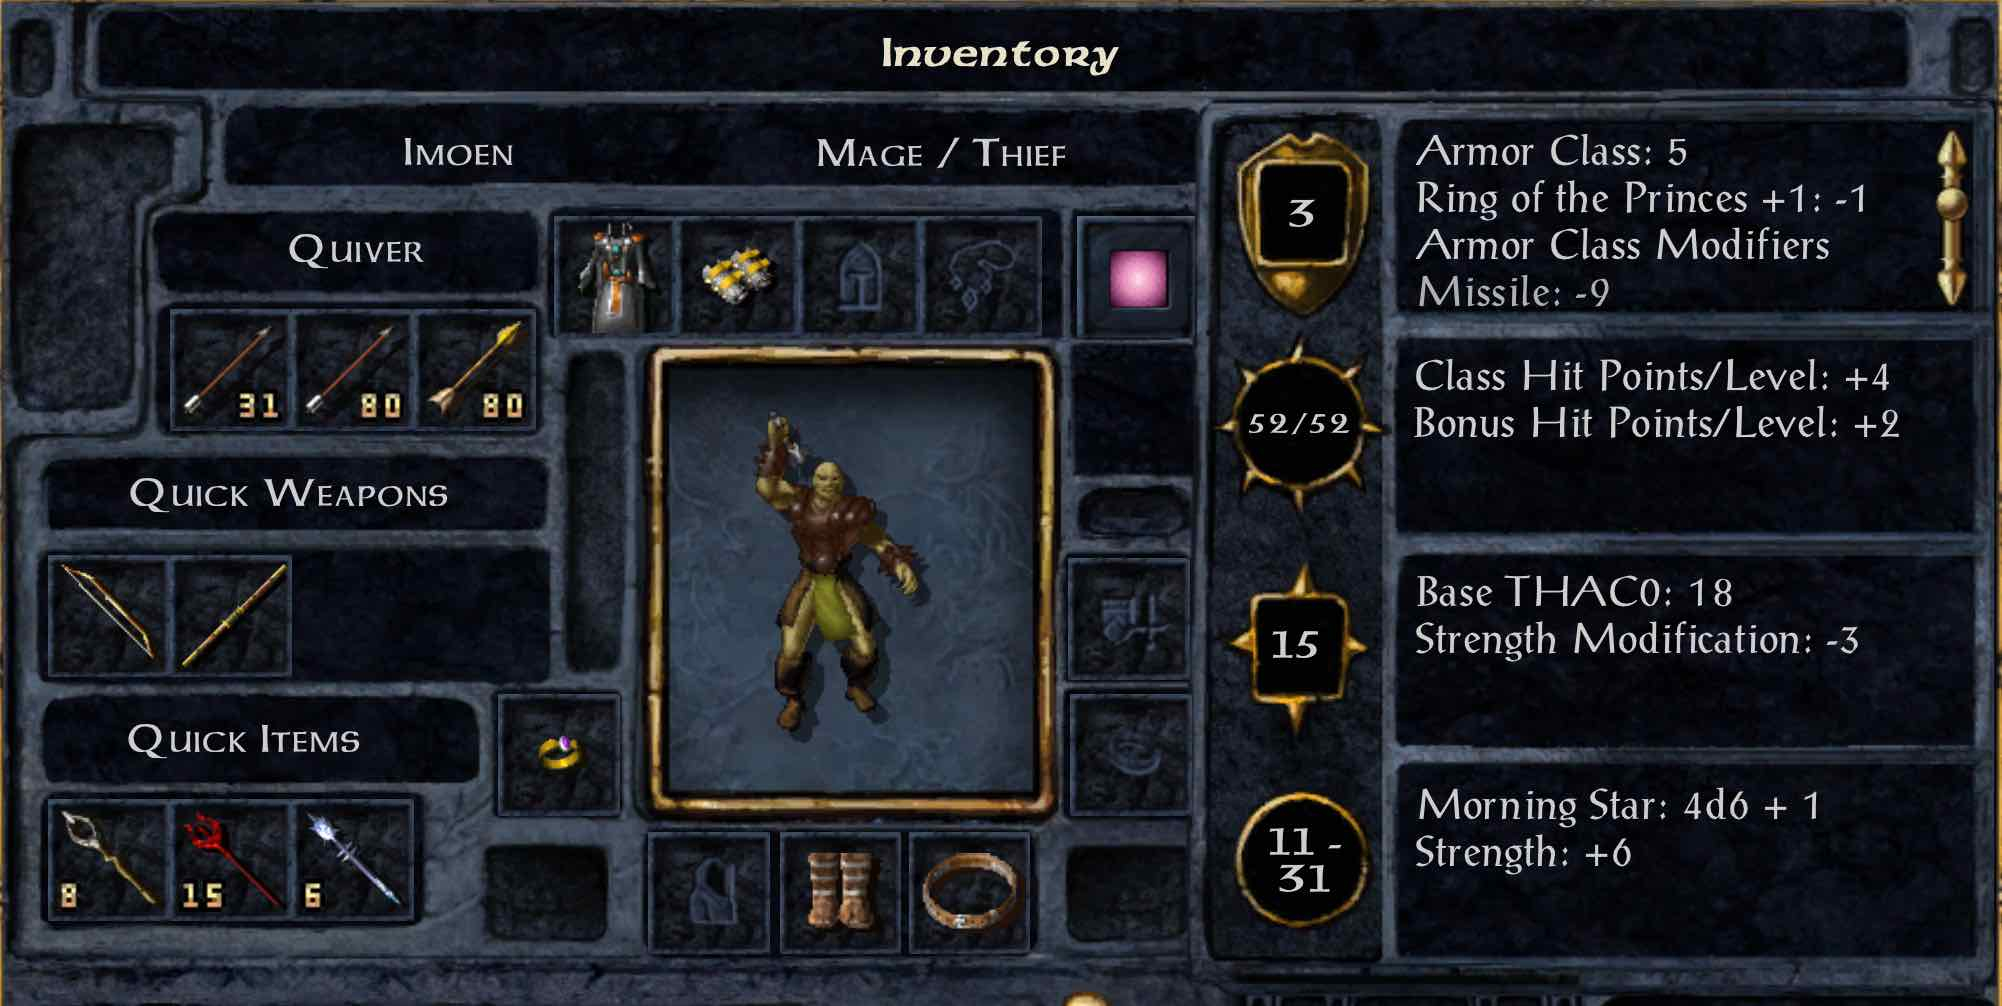
Second, the feisty thief/mage Imoen, the Pink Ranger. She fights with bow and spell, then transforms into an ogre to smash her foes from behind!
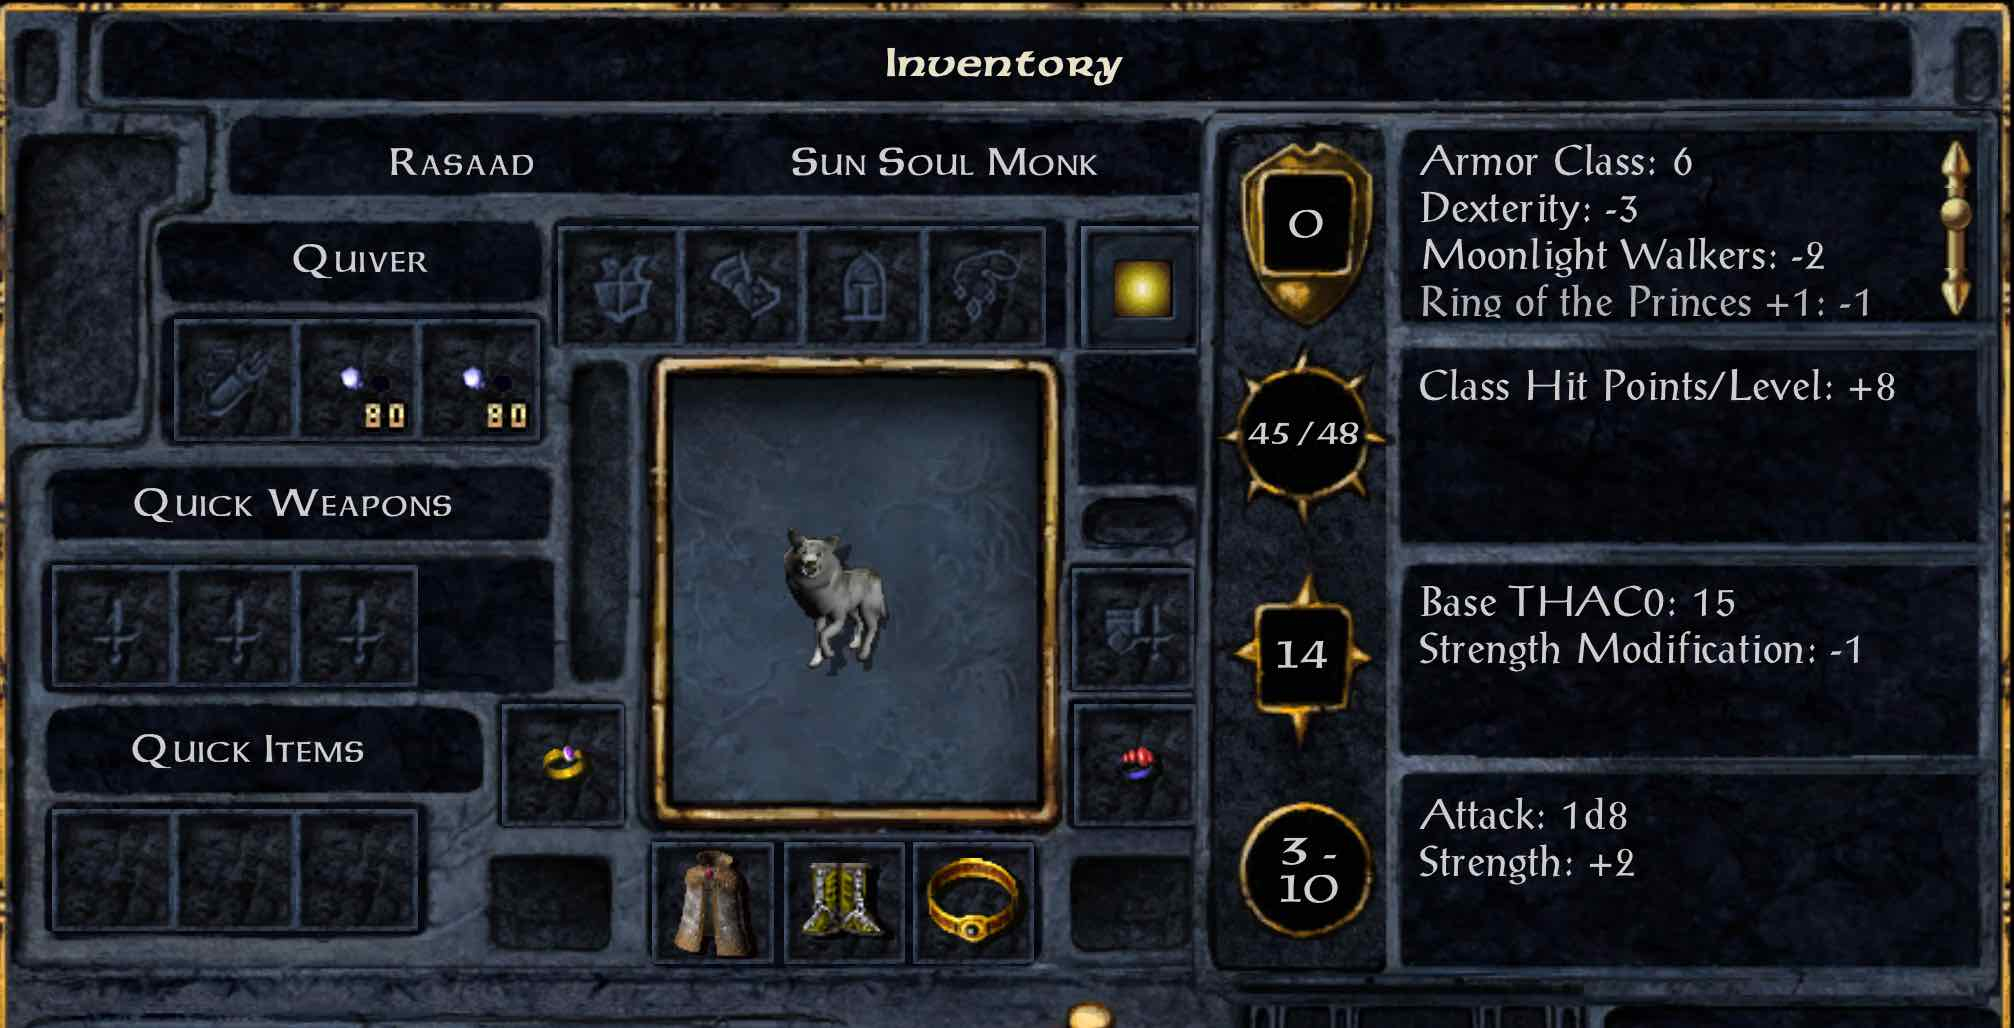
Third, the stoic monk Rasaad, the Yellow Ranger. He fights with fists and fangs, transforming into a wolf whenever he can!


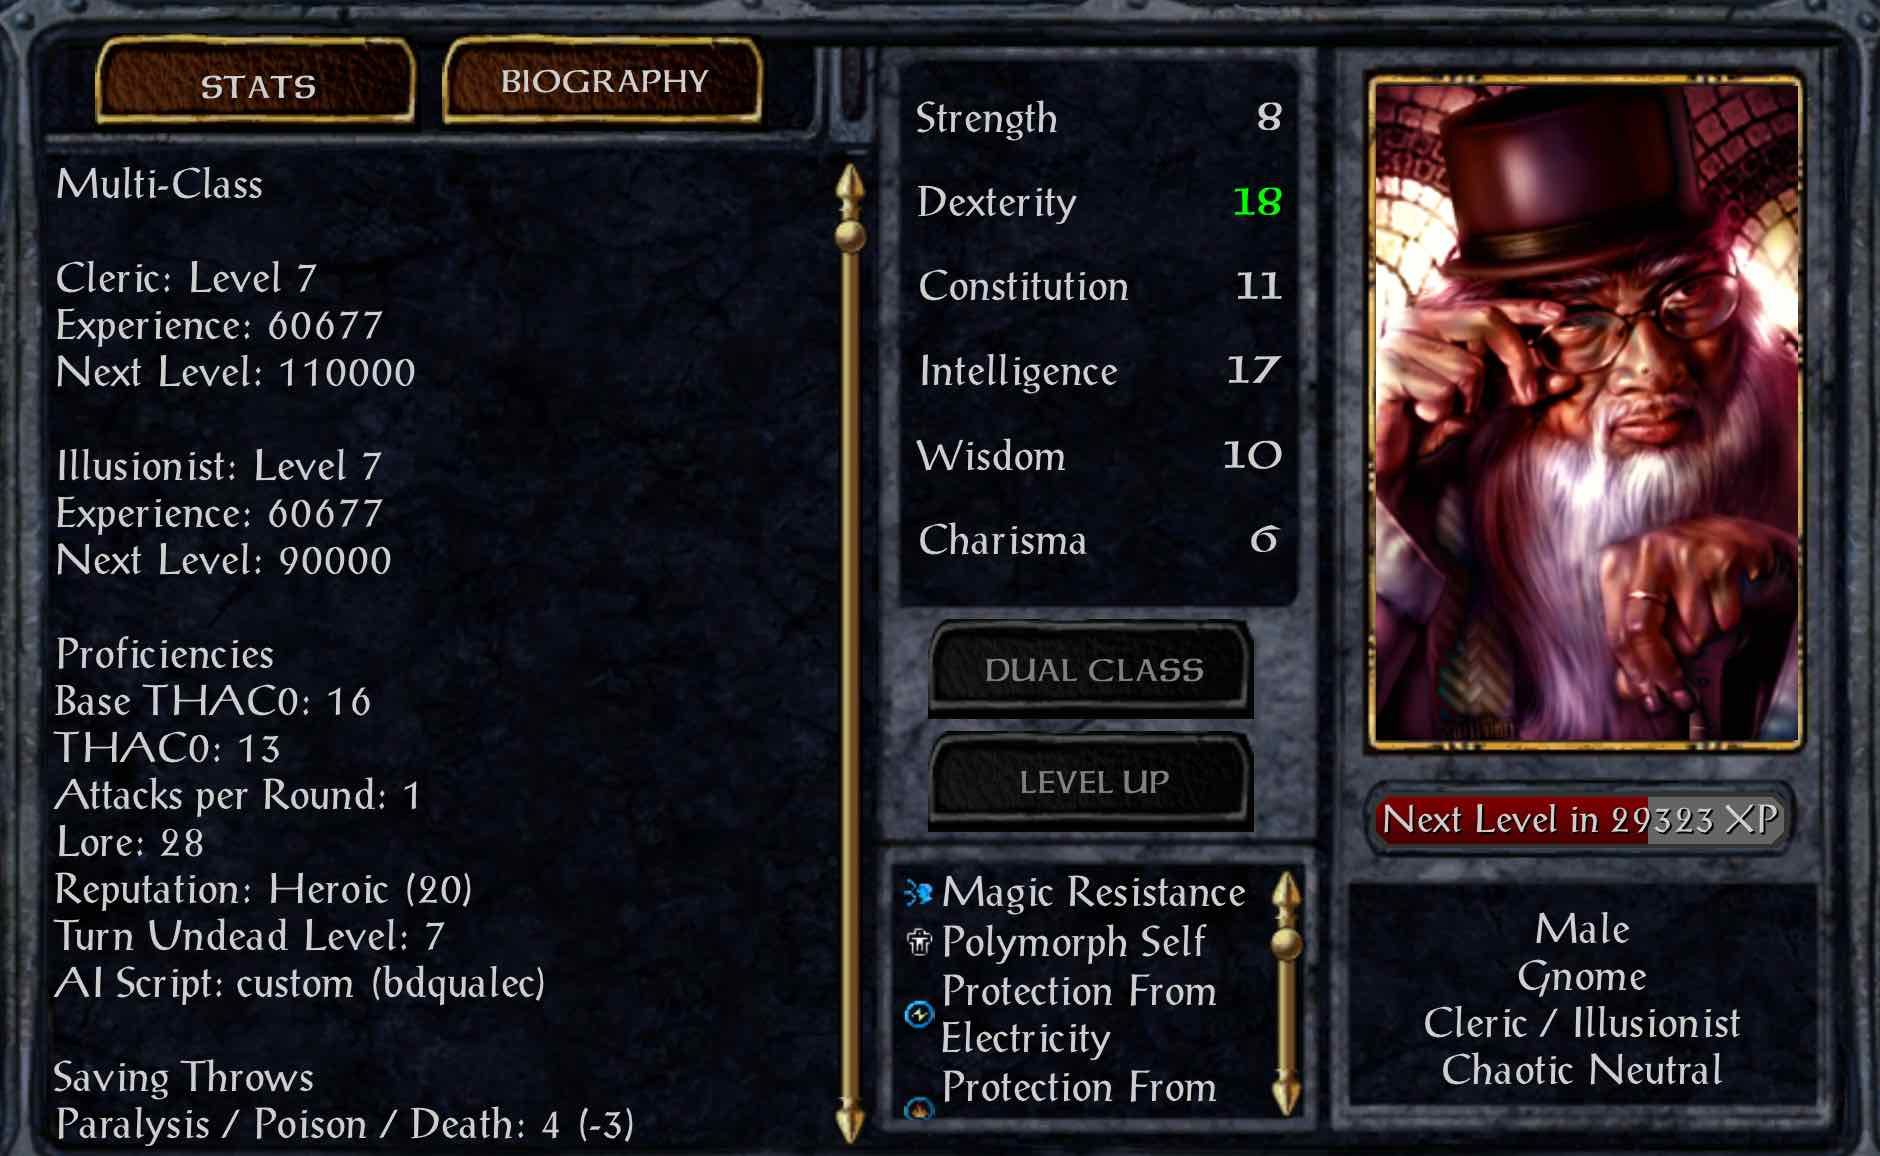
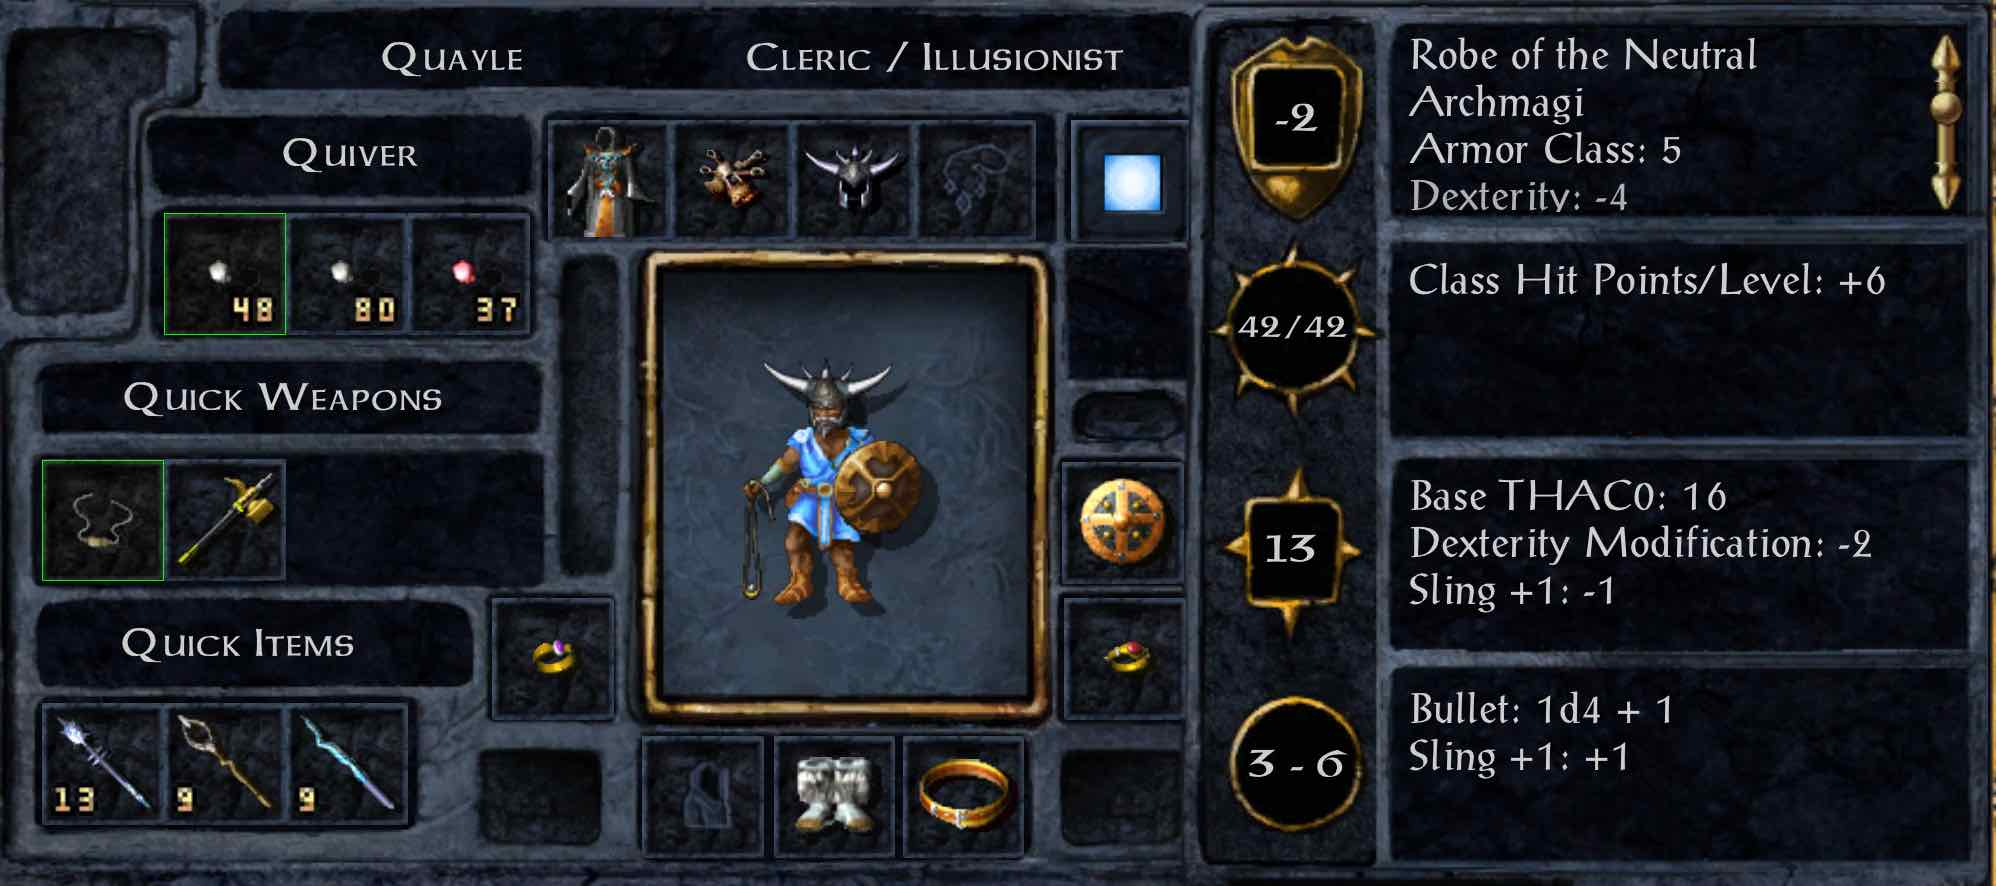
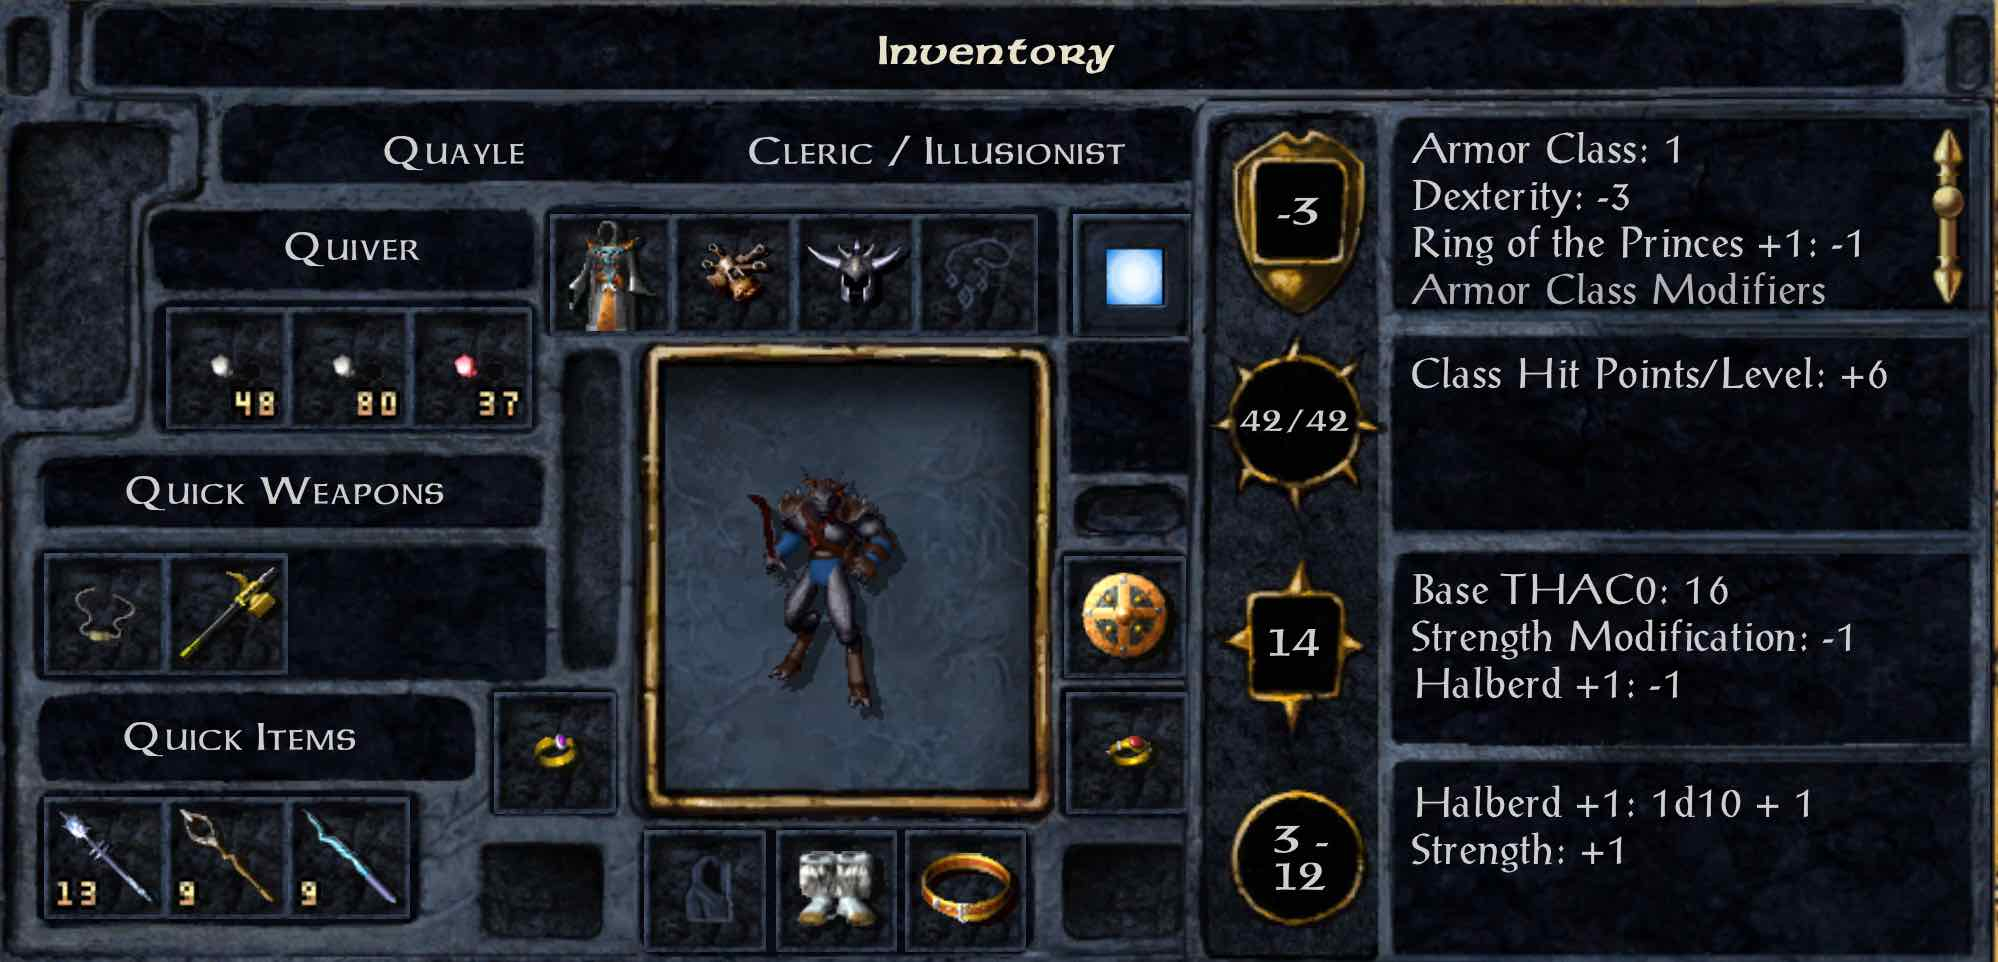
Fourth, the arrogant cleric/illusionist Quayle, the Blue Ranger. He has many spells to cast, but when the going gets tough he becomes a Flind to chop his enemies to bits!
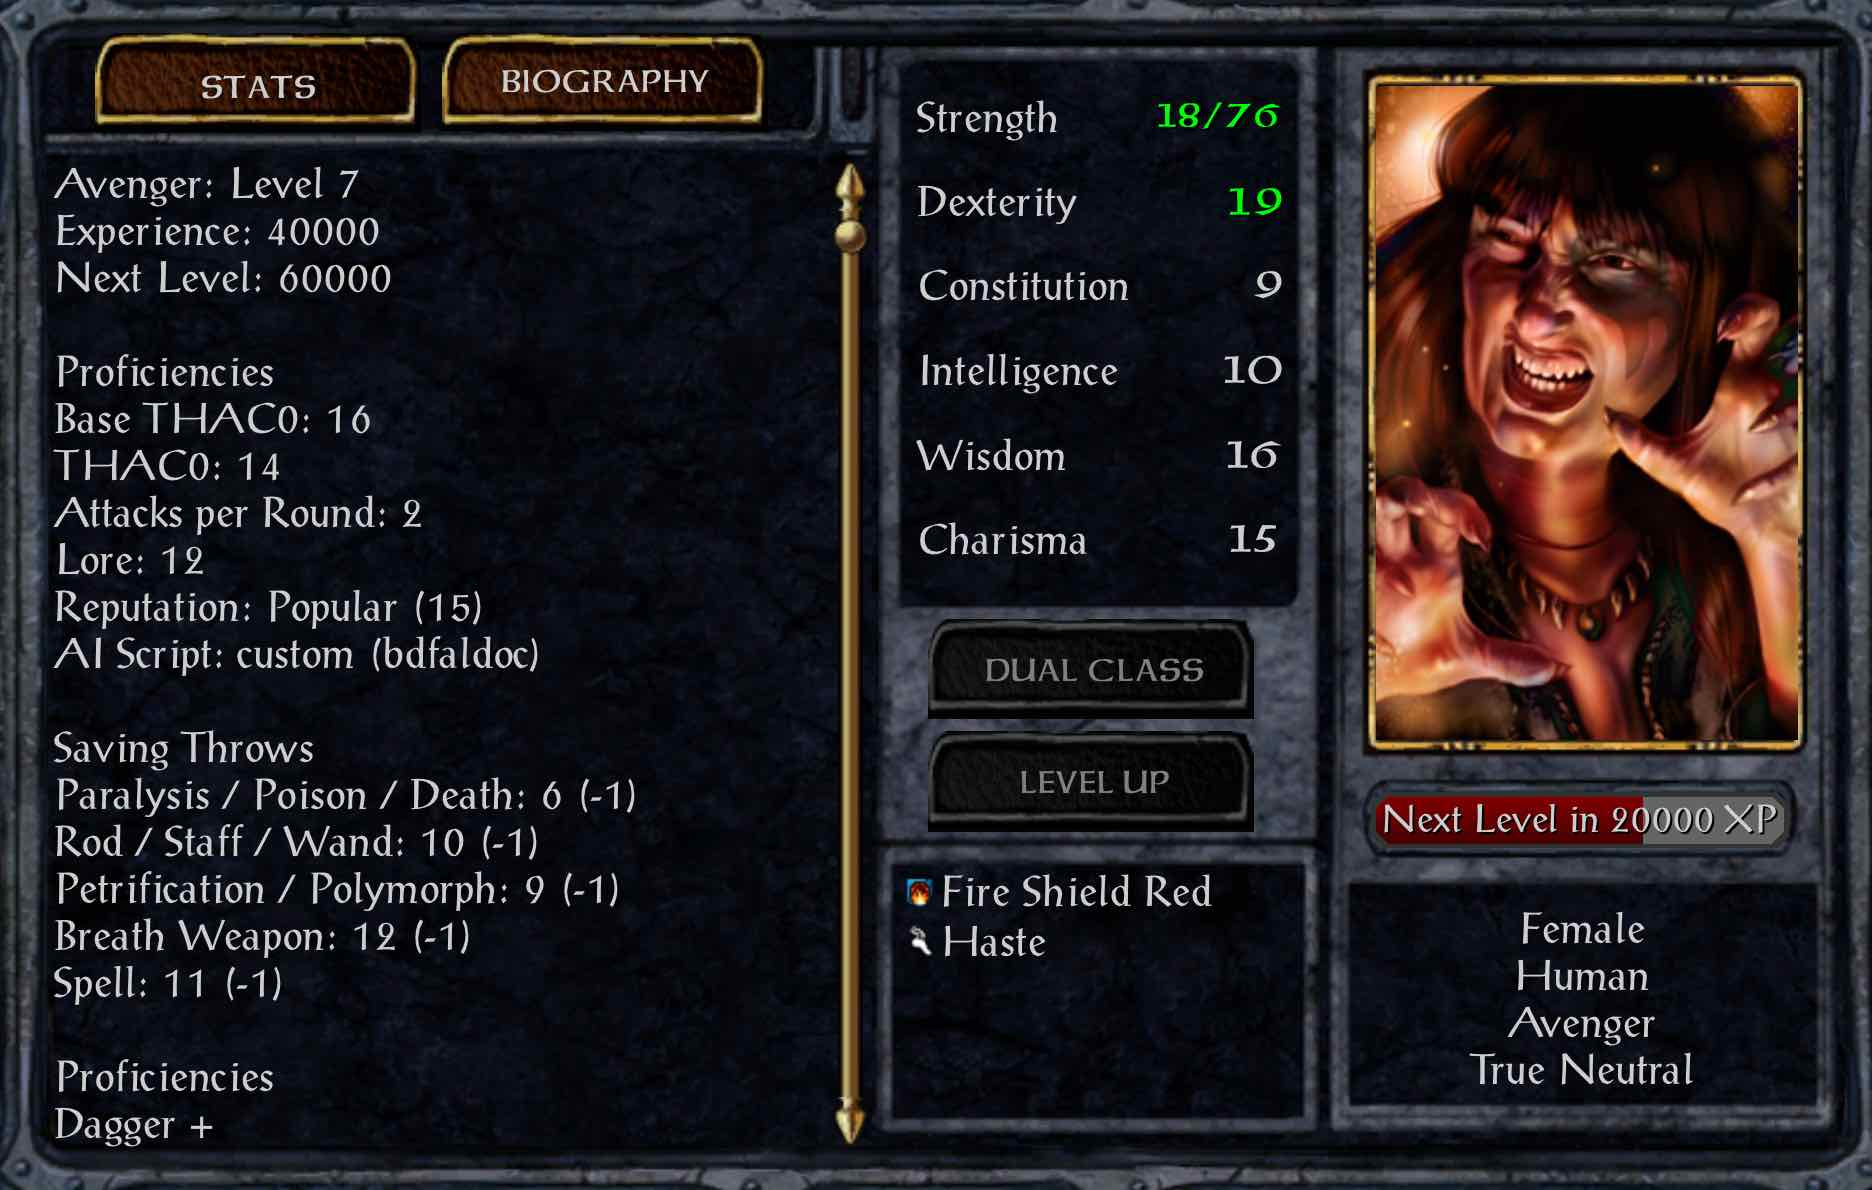
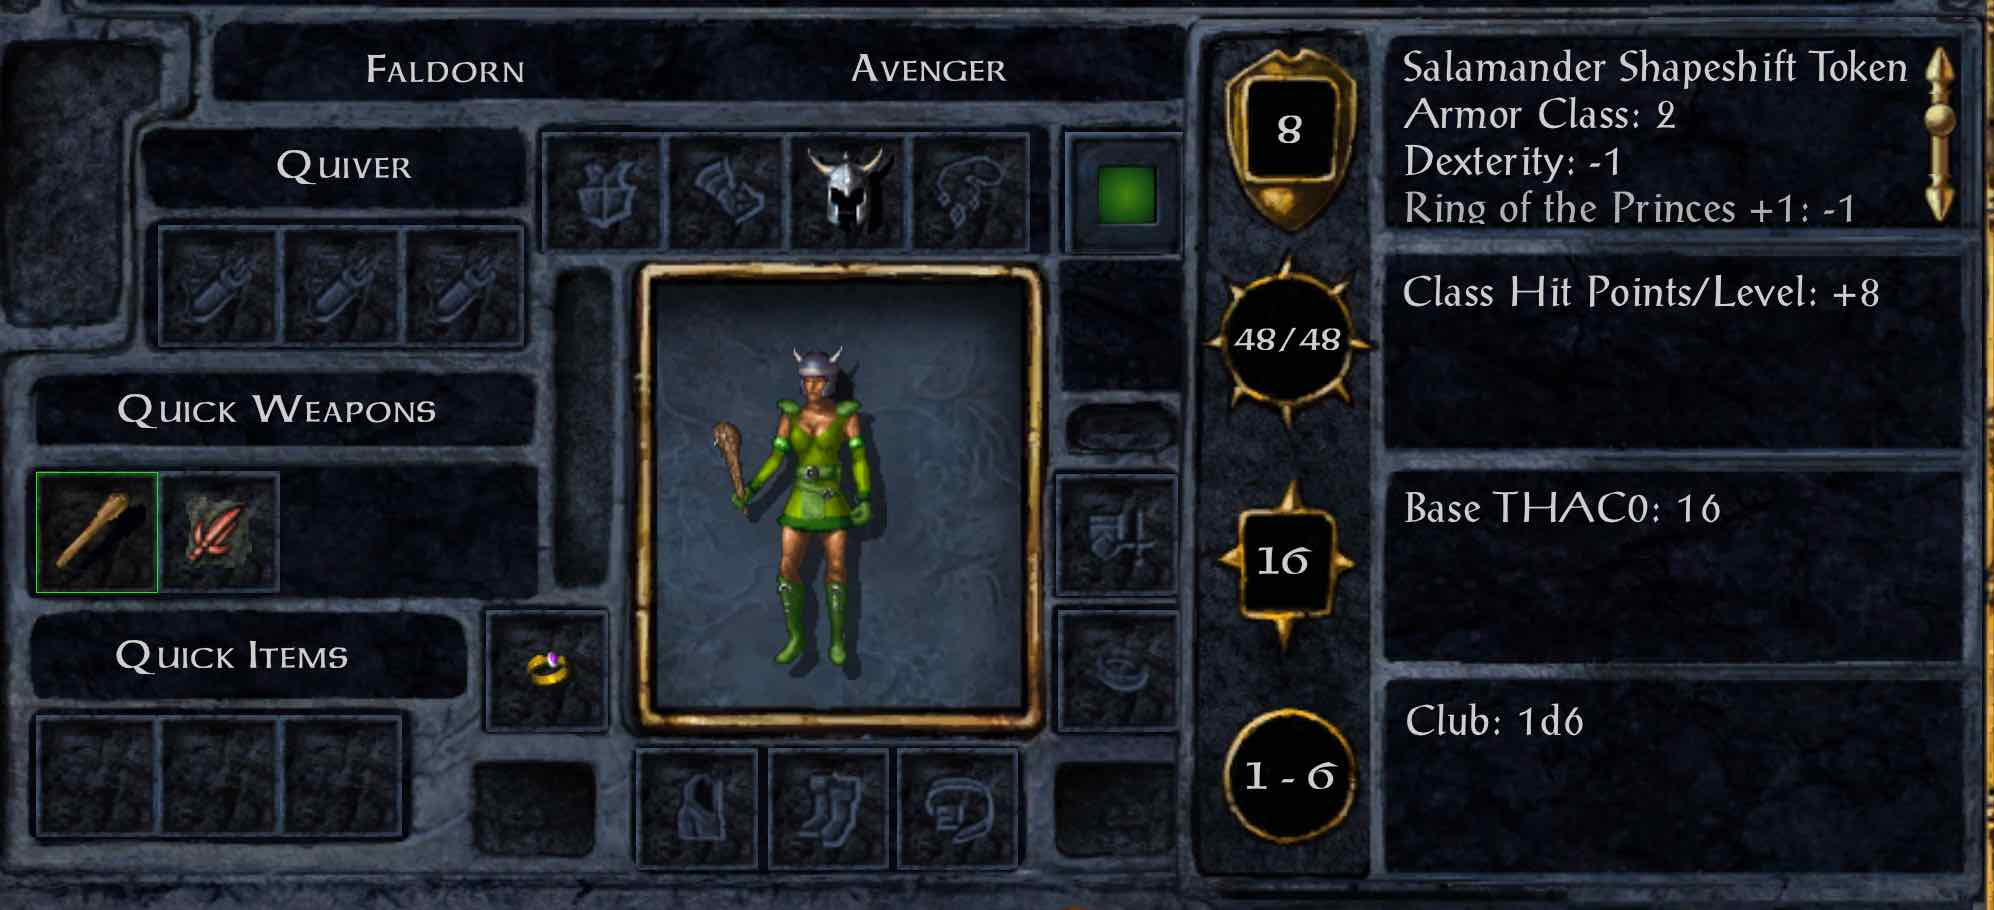
Fifth, the feral avenger Faldorn, the Green Ranger. She draws upon nature's fury to fight, transforming into one of several forms when battle calls!

SCS improved shapeshifting is in effect, so she will be able to transform at will. Unlike in my all-werewolf party, the shapeshift tokens will only be used by their creator Faldorn.
The team, together:
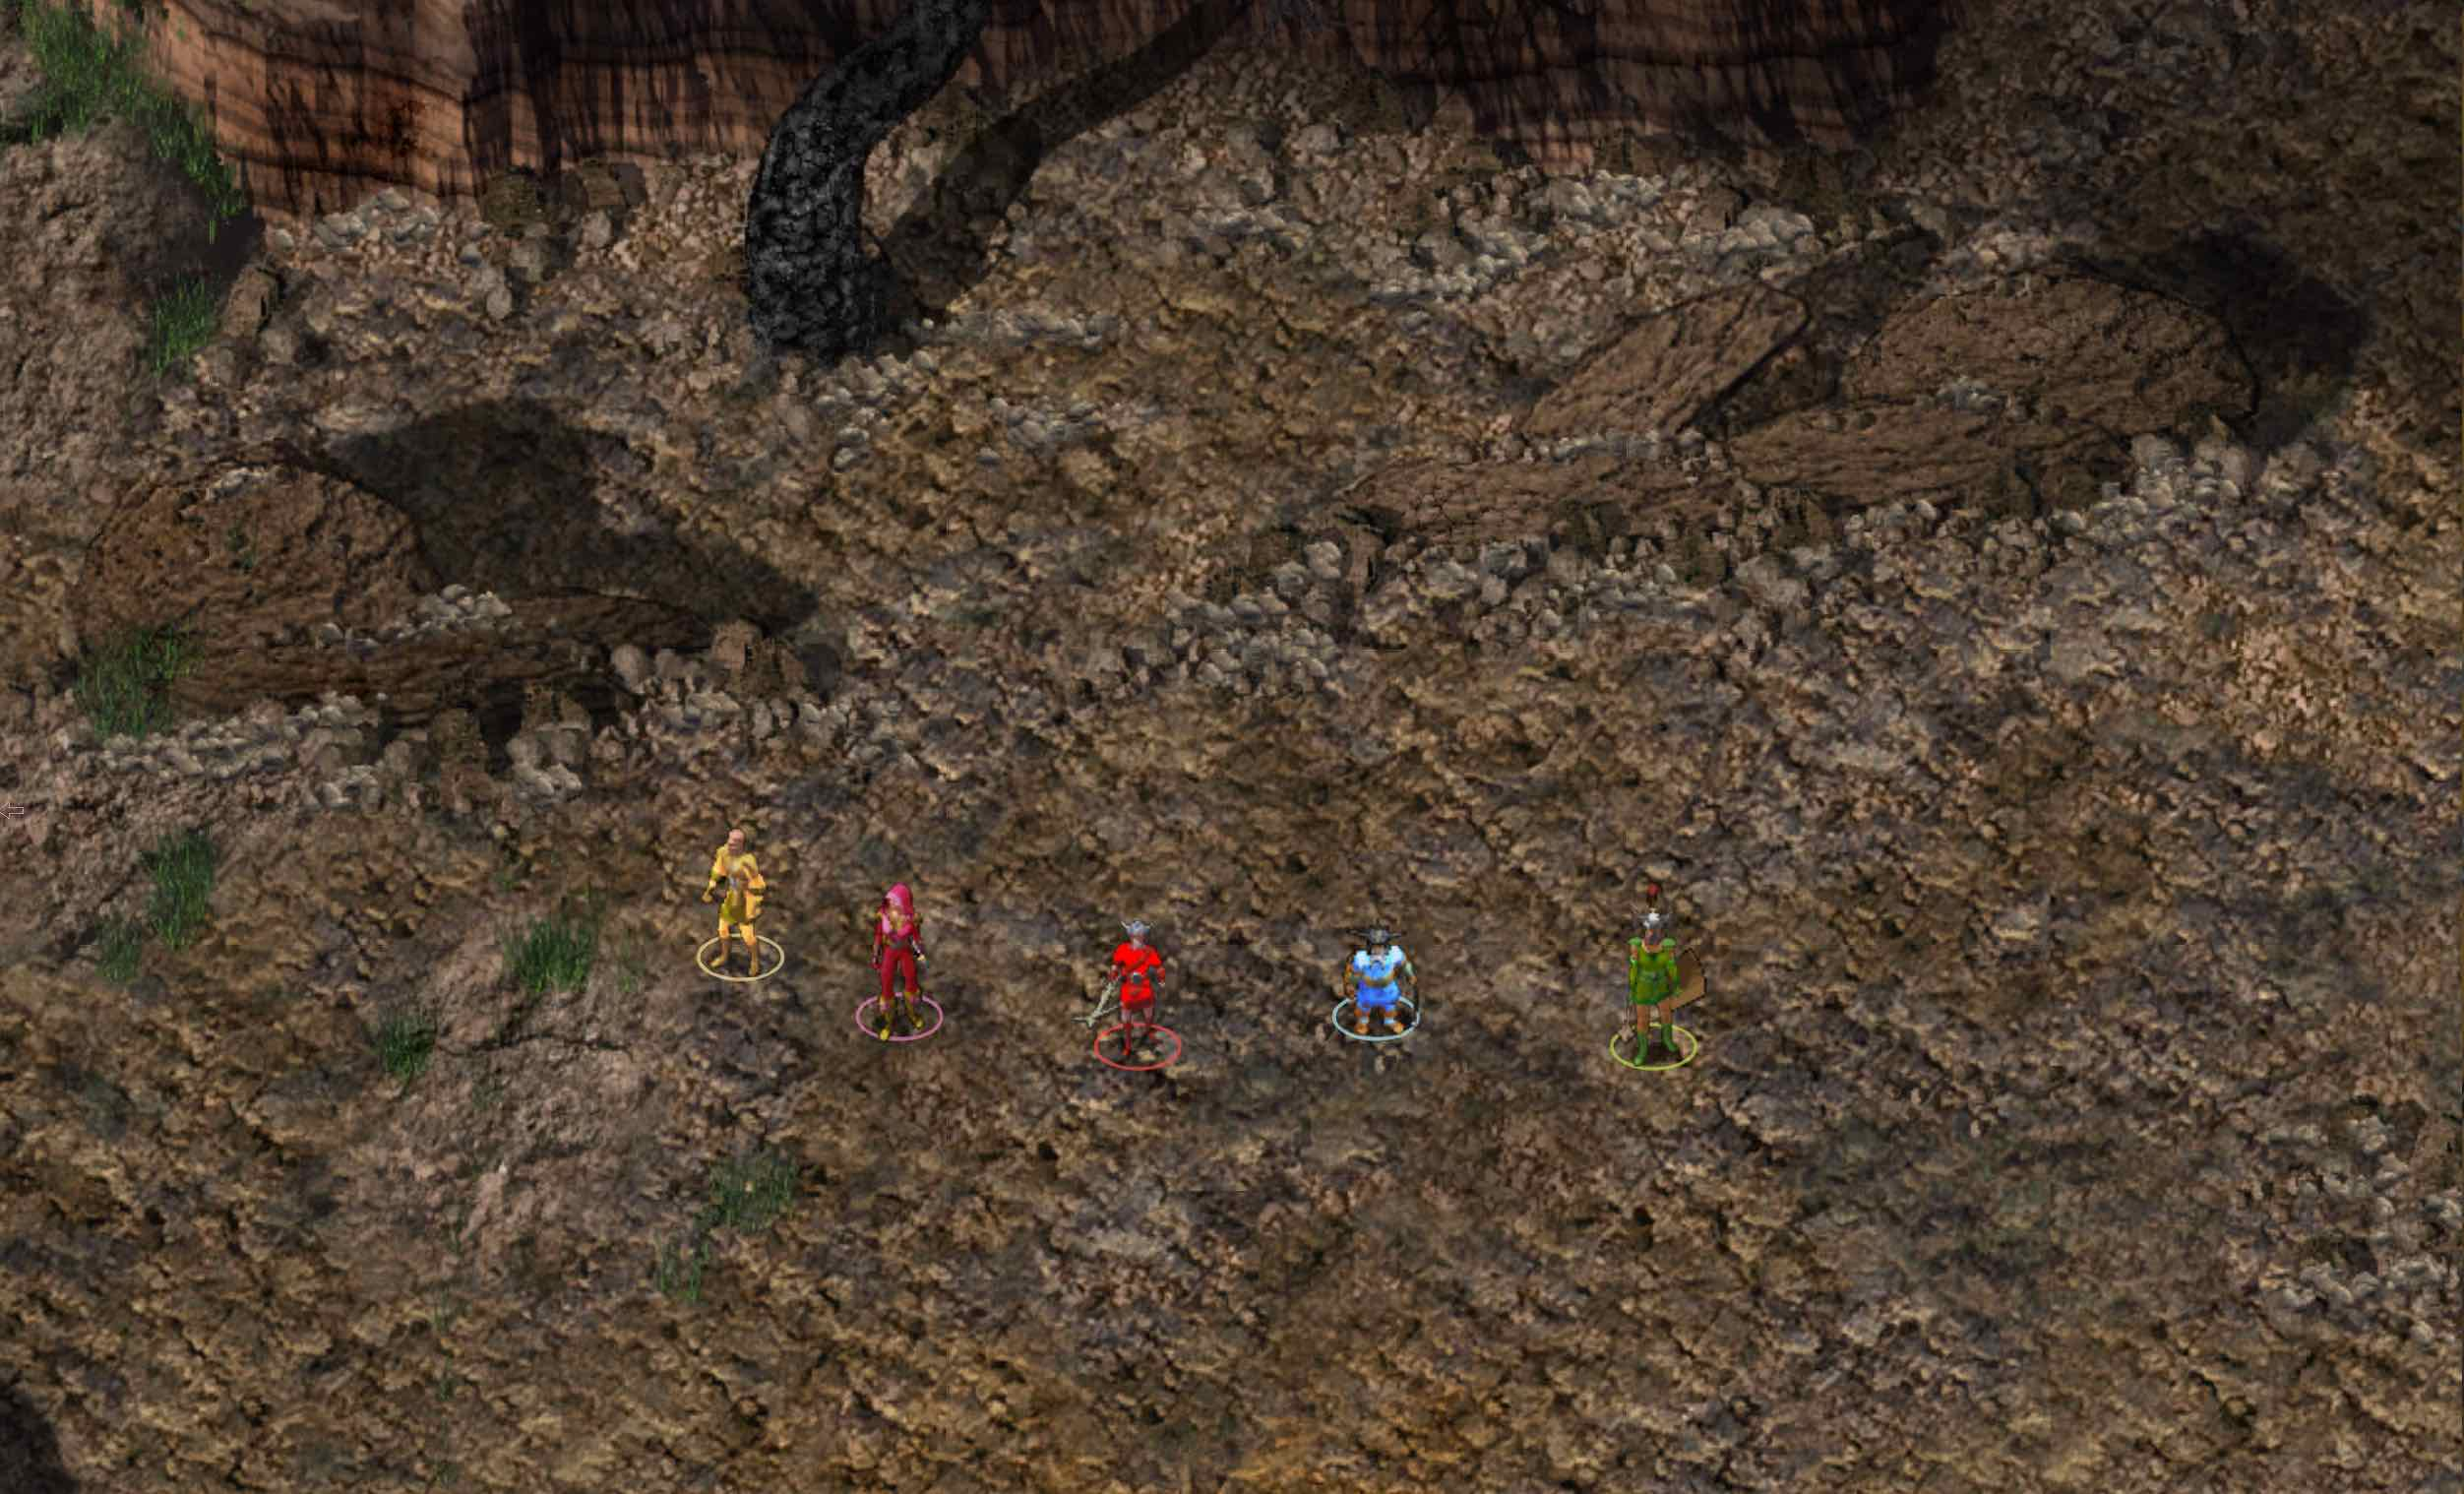
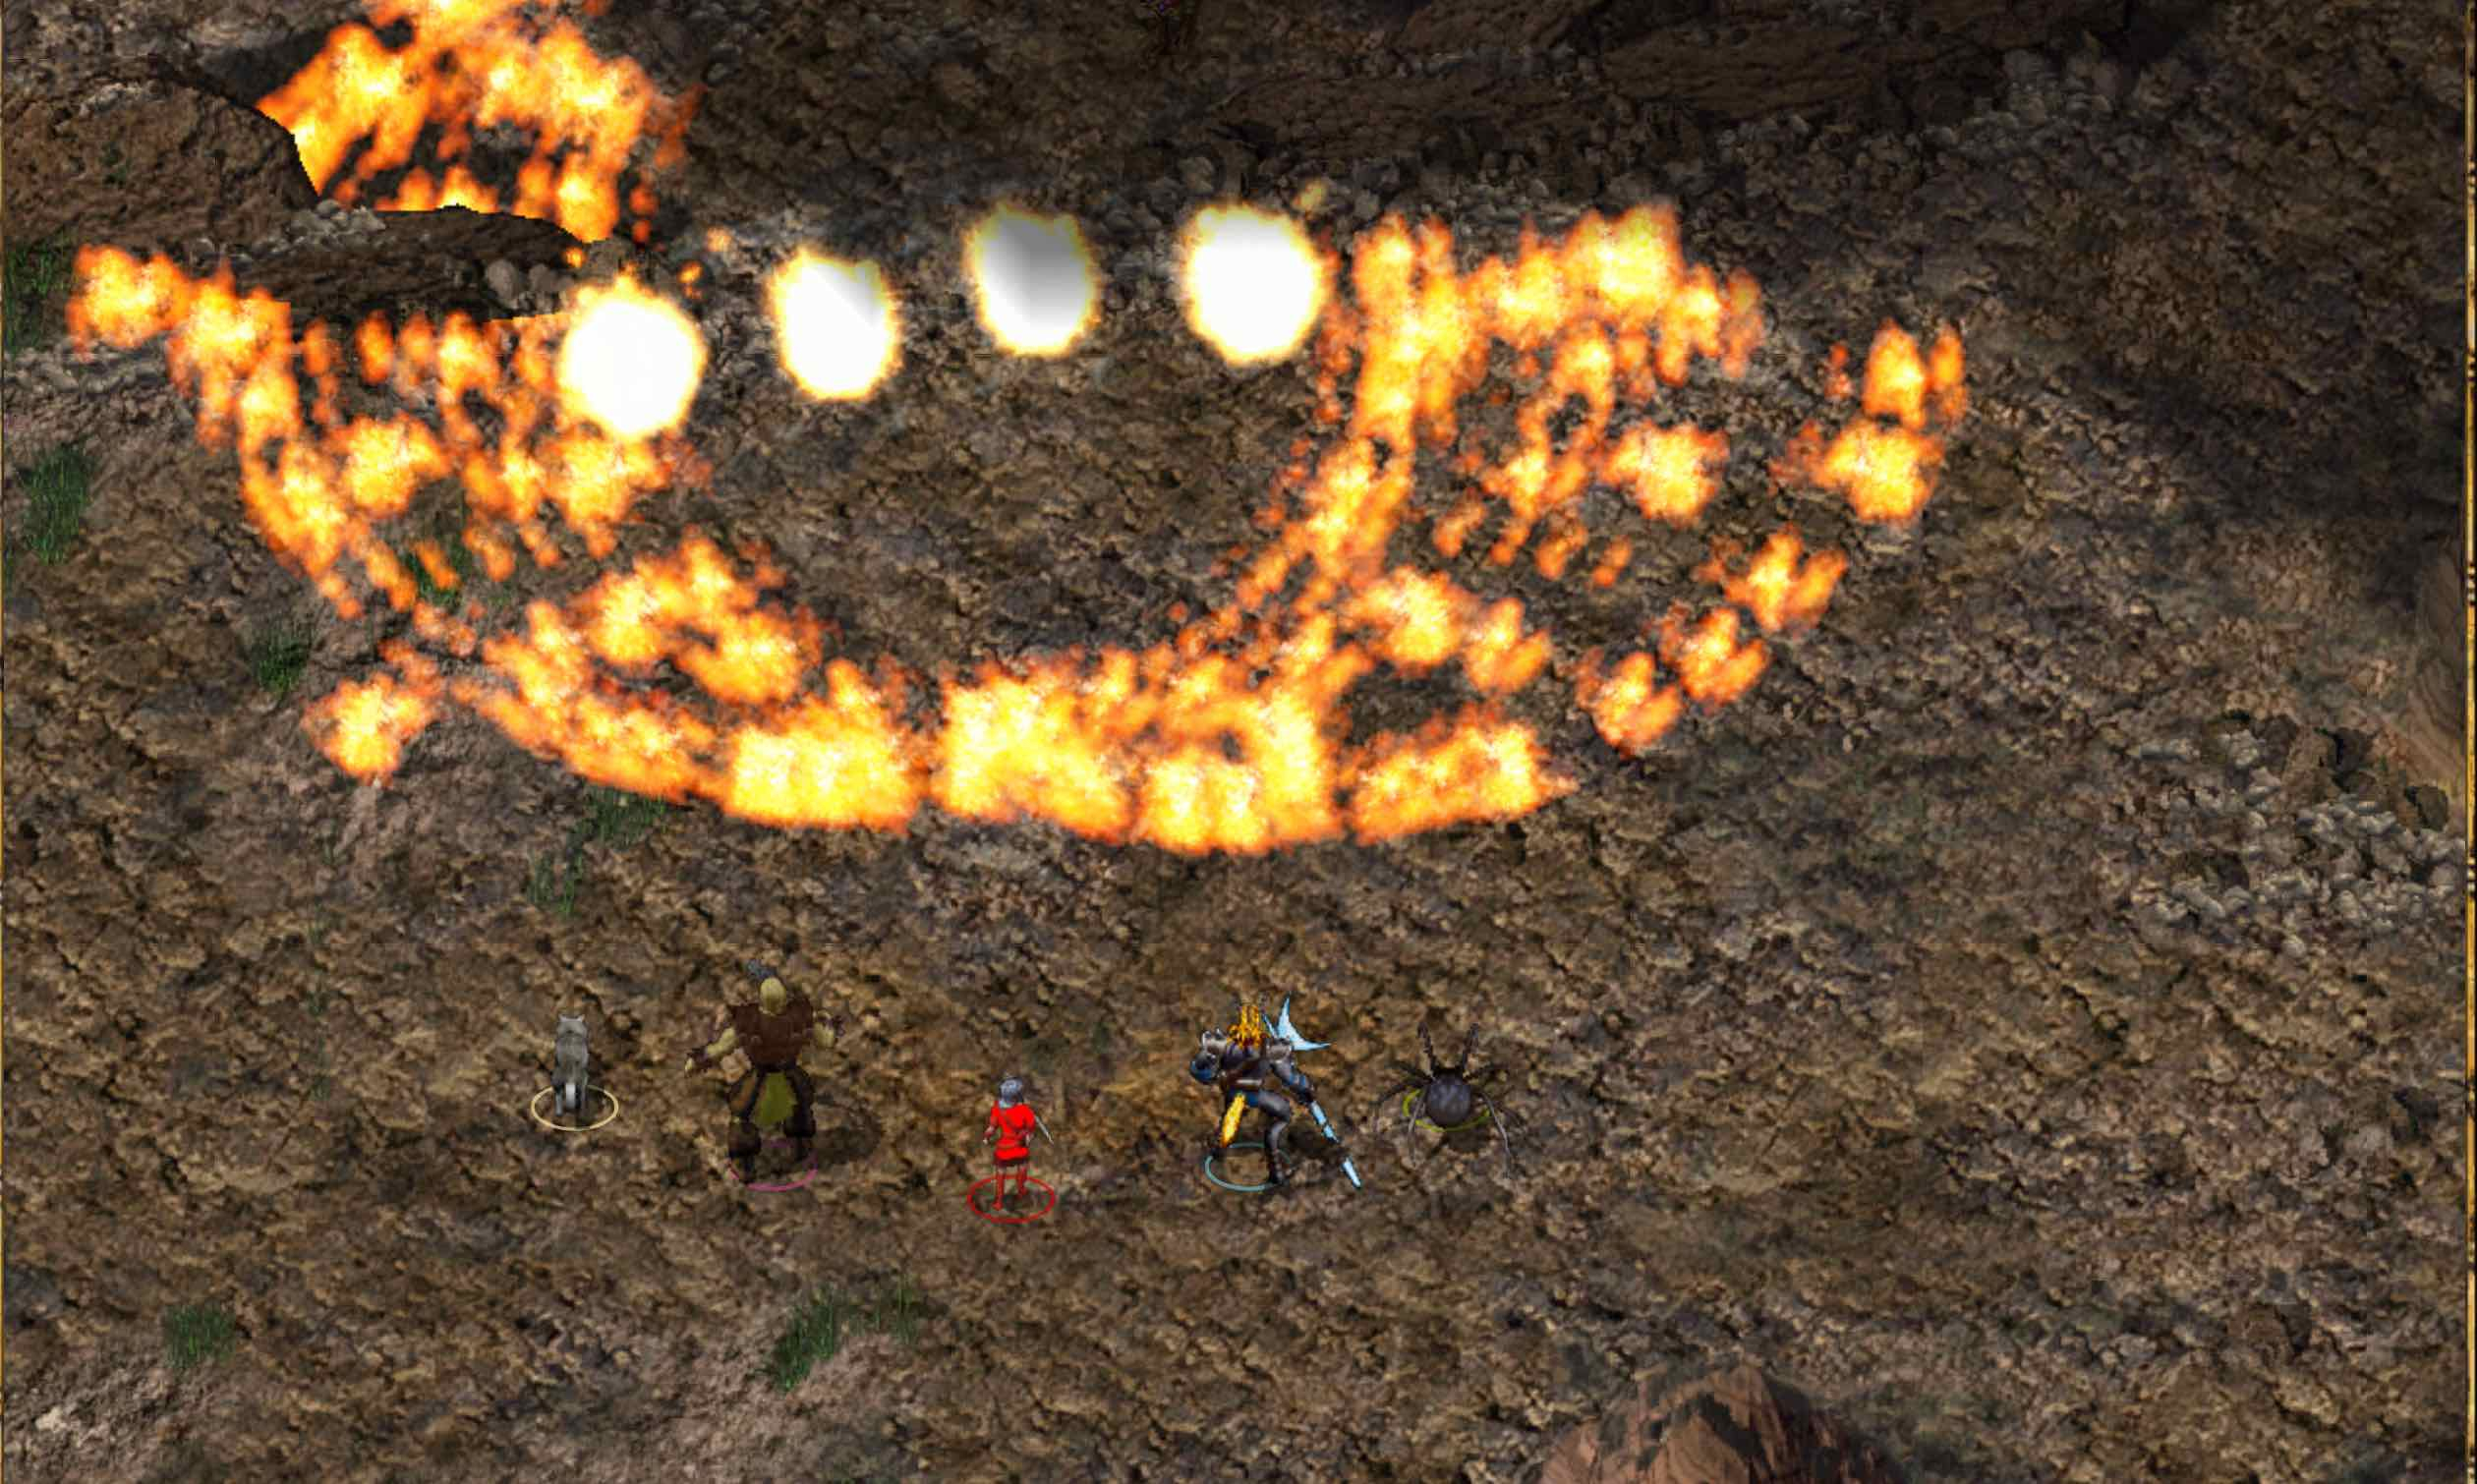
Cut, cut. You're supposed to look away from the explosions, not towards them! ... What? The effects budget ran out? OK, I guess we'll have to use that shot anyway.
And while others will join the party for a time, none will truly be Power Rangers. Gaining the power to morph is a difficult task.
The Mentor: Gorion, a wise and aged wizard, has raised Randy from infancy. He has heard rumors of a new evil rising, capable even of sending agents into Candlekeep! It is no longer safe even in this fortress, so Gorion leaves with Randy, on a journey to gather a team of Rangers to face the evil.
The Villain: Hidden behind a menacing mask, all we see is an armored figure of a terrible warrior. Even his name is hidden from Randy and friends - but the threat he poses is clear.
Footnote:
Randy is named after the great pitcher Randy Johnson, who spent the best part of his career with the Seattle Mariners and then the Arizona Diamondbacks. Left-handed and nearly seven feet tall, with a sidearm throwing motion, he was an utter terror to left-handed batters while still being quite effective against the more common right-handers. His nickname, one of the best of the modern era, was "The Big Unit".
Mods in use: BG1 NPC Project, BG1 Unfinished Business, Portraits Portraits Everywhere, Sword Coast Stratagems.
Mods in use: BG1 NPC Project, BG1 Unfinished Business, Portraits Portraits Everywhere, Sword Coast Stratagems.
Post edited by jmerry on
5
Comments
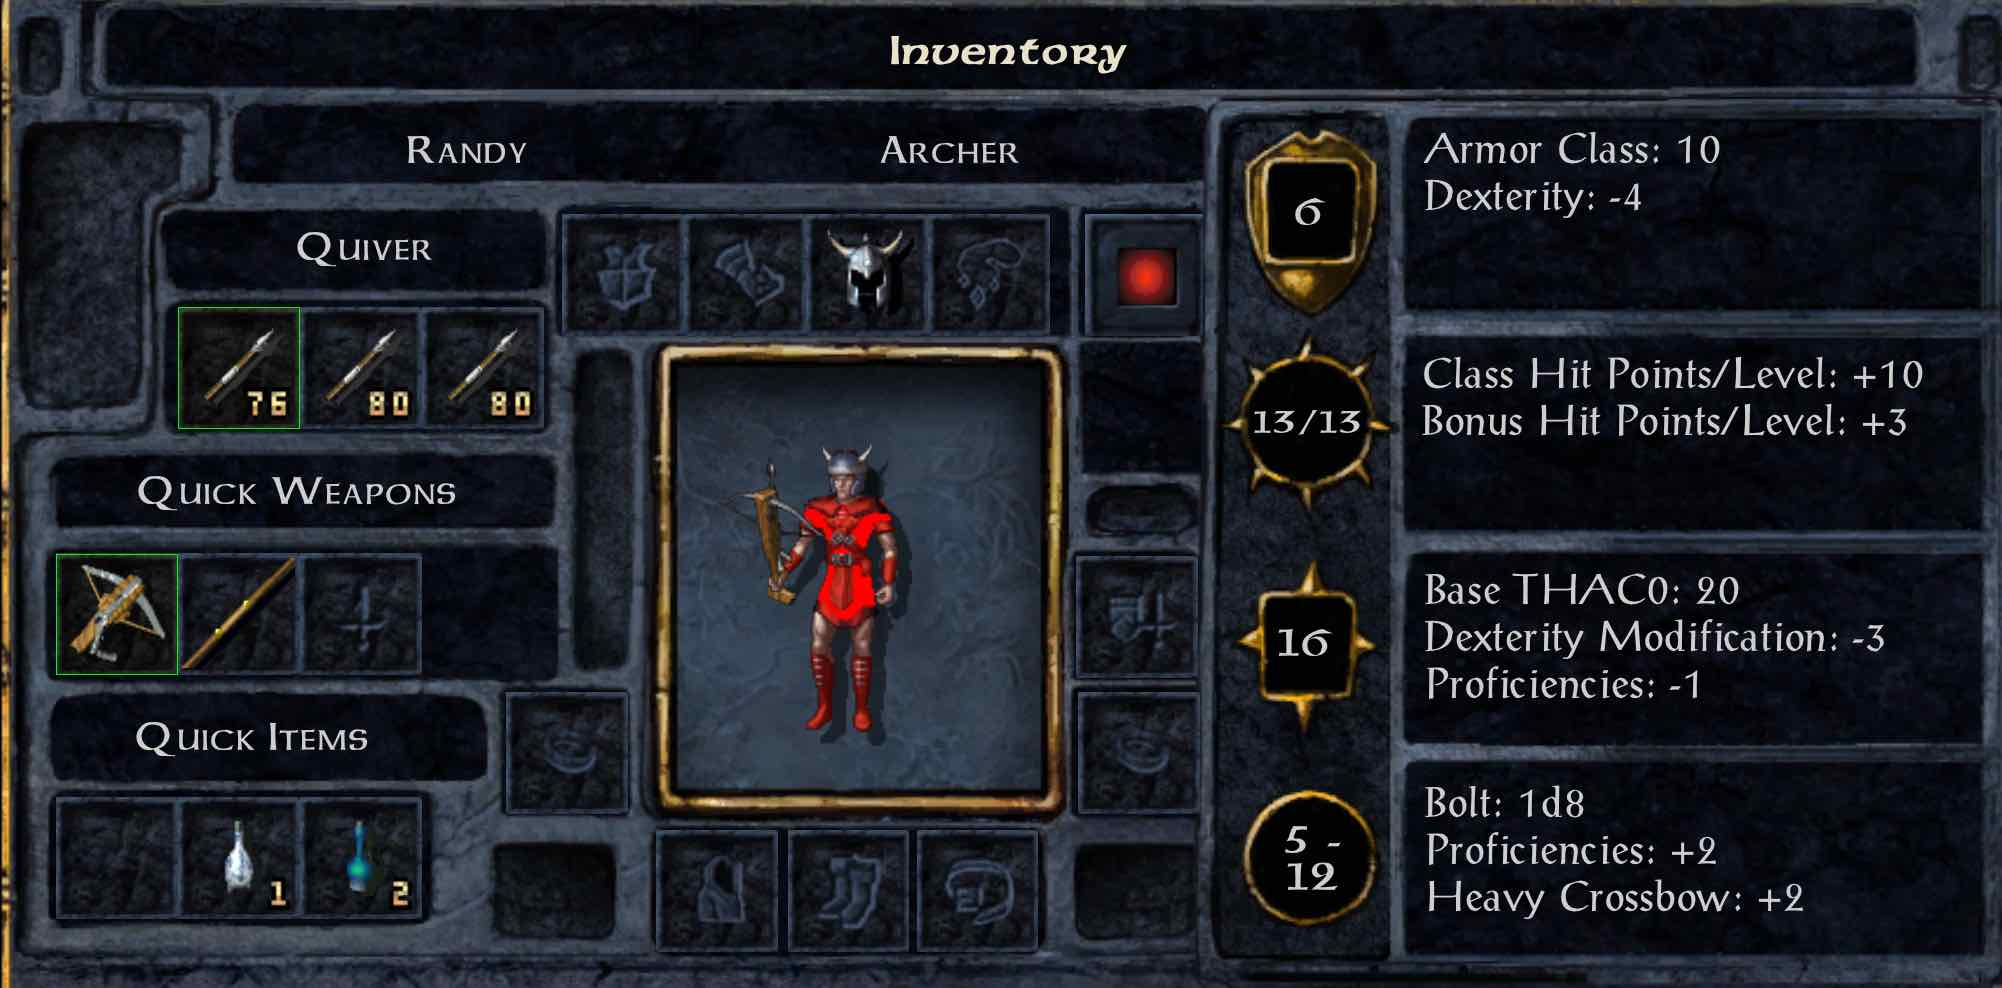
One morning, Gorion comes to Randy with a warning. Danger comes, and it is time to arm himself. With 100 gold, he must buy equipment and prepare to leave Candlekeep. That gold is immediately spent on a heavy crossbow and bolts, along with a helmet. There's not enough to buy decent armor or melee weapons left over, so Randy will need to run some errands as well. He discovers that danger soon - a killer by the name of Shank. Three bolts and a good deal of running later, Randy lands a shot - dead. Then another killer - Carbos goes down on the first bolt. Randy runs into Imoen, who wants to come, but Gorion says it wouldn't be safe enough. She'll have to stay hidden.
Randy gathers another hundred gold with his errands and selling junk, and then wheedles even more out of Firebead. He still doesn't buy any armor, though - he'll likely find something decent enough anyway.
With that, the two leave. Soon after, in a clearing near the Coast Way road, Randy and Gorion are ambushed:
To the east, an old man comes out to greet Randy, then leaves after a brief conversation. He matches the description of an old friend Gorion mentioned a few times; perhaps this is "E"? A gibberling attacks - one bolt and it's dead. Randy picks up a ring - he can't be sure, but it looks like a ring of protection. And then, Randy heads south to Beregost. Following the expected path is far too likely to lead him into more ambushes.
Firebead Elvenhair has somehow made it here even before Randy, and has another errand for him - picking up a book from the inn across the street. On the way to buy the book, Randy meets a belligerent drunk, but manages to calm him down.
With that, Randy reaches Nashkel, and visits the carnival there to buy a scroll of protection from petrification. A nest of basilisks is somewhere nearby, and killing them will make the area much safer.
Back in Nashkel, Randy rests at the Jovial Juggler, and has a strange dream. Some power has blessed him with the ability to heal wounds.
Randy travels east of Nashkel to the basilisk nest, where he finds a friendly ghoul. It is time for his first temporary companion.
To the north, Randy finds the villainous mage that brought these basilisks together. He attempts to force Randy to sleep, but elven resistance comes through. Mutamin! You will make no more statues!
The remaining basilisks are dispatched, but Korax sadly goes mad with hunger, and Randy is forced to put him down. (~28K XP total)
Next, Randy heads north past the Friendly Arm. He talks to the fisherman Sonner, then the priest Tenya, and finally heads north for an excursion shooting zombies.
Returning to Sonner and Tenya, the stolen bowl is returned for another 2500 XP (~32.7K XP total). Randy is now ready to begin gathering a team.
Randy returns to the road outside Candlekeep, and finally meets with Imoen.
She speaks with Randy about his recent dream, and they move on to meet two men on the road nearby.
Xzar and Montaron wish to travel to Nashkel; they're a bit creepy, but there's no reason to deny their wish. We agree, although we will meet Khalid and Jaheira first - to the Friendly Arm it is.
We pick up some stashed gear near the Friendly Arm; now Xzar has a robe and a ring to enhance his abilities, while Imoen has some basic leather armor.
Trouble comes in the form of a mage named Tarnesh. He asks about Randy, then attacks when his identity is confirmed - we were wise not to come here immediately. It's, ah, a very short battle.
Inside, we meet Khalid and Jaheira. Jaheira agrees to help us find potential Rangers, although she says the final decision in companions will always be ours. She even knows two potential Rangers in Nashkel.
We gather some basic weapons for our party, and talk to some of the guests - one calls on us to clear out a spider infestation in their Beregost home. Our gathered scrolls are scribed, with great success (seven new spells) for Imoen.
We head south, stopping at Beregost to pick up a pair of helmets for the warriors. Imoen has something to say about supplies, and Randy comments on her choice in wardrobe:
Elsewhere in Beregost, a villain appears - the Thayan mage Ekandor. He leads a group seeking to abduct a woman, and we cannot allow such evil. Neera's spell misfires and drives Ekandor away, while the party eliminates the minions handily.
Garrick agrees to stay and identify items for us in apology, while Imoen claims the enchanted staff for her use.
Our business in Beregost is done, and we head south to Nashkel. First, a meeting with the mayor; he tells us of trouble in the mines, where disappearing workers and rumors of terrible creatures abound. Then, Jaheira directs us to the potential Rangers she noted - the monk Rasaad practicing near the bridge, and the cleric/illusionist Quayle over at the carnival. We bring them on, leaving Khalid and Jaheira to return to the Friendly Arm to continue their search.
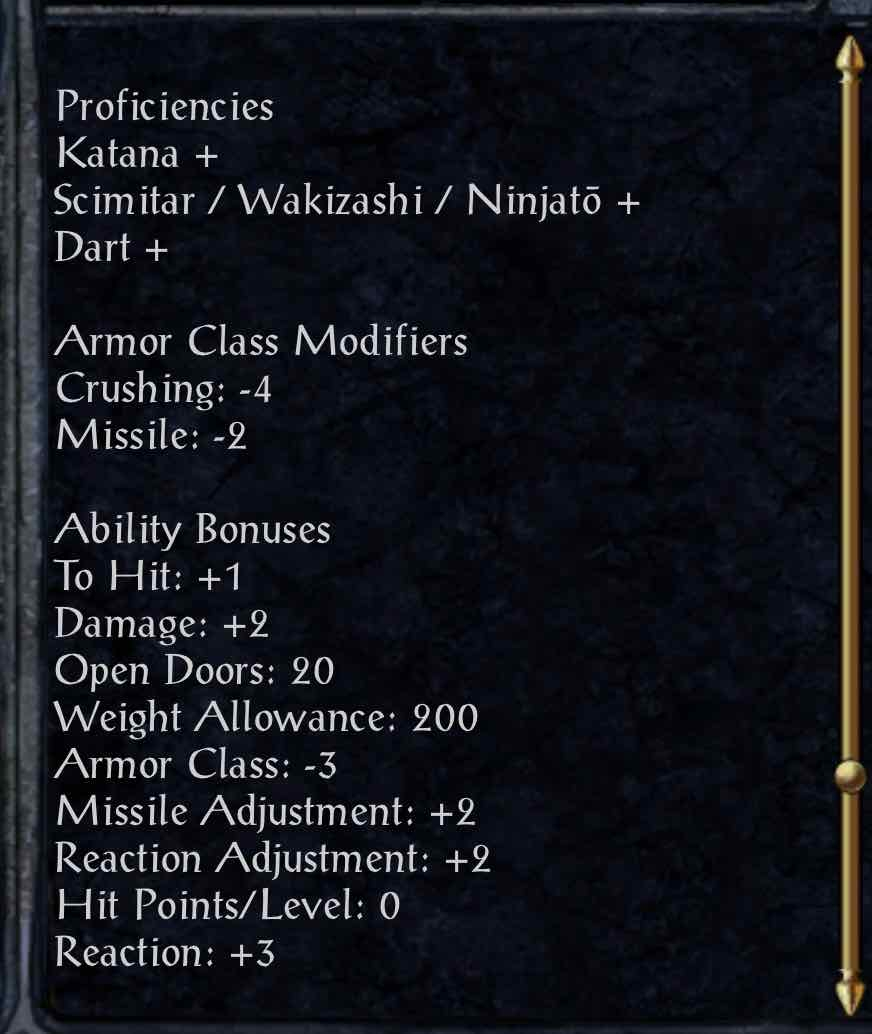
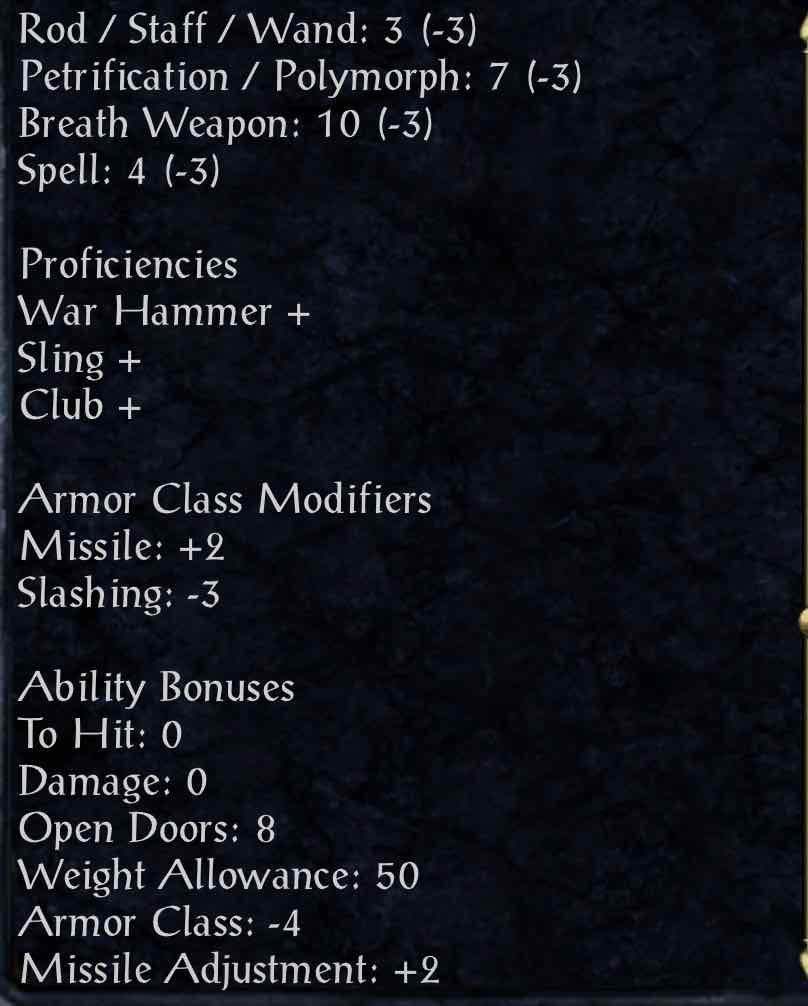
(Rasaad takes dart proficency on leveling up, while Quayle takes hammer proficiency.)
With the party feeling a great deal of fatigue, we head to the inn - and are accosted by another killer looking for Randy. A Command spell from Quayle, and she's doomed; she dies before she can take any actions, or even wake.
Take 2: no Horror spell. Dorn survives and asks to join the party, but we turn him down for now. He returns to the Friendly Arm, to wait for us to change our minds.
We reach the mines, and start exploring the region. Xzar tries blasting a ghast with Larloch's Minor Drain ... no effect. OK, we won't do that again.
We agree to protect the sculptor Prism from a bounty hunter named Greywolf - well, Montaron would rather claim the bounty himself - and get into a fight.
With that, it's time to enter the mine itself.
The miners on the first level have very little useful information for us, although we do run into a few kobolds. Perhaps those are the creatures that have been causing trouble?
The second level brings even more kobolds, although that begs the question - who or what is leading them? Kobolds rarely plan villainy on their own, after all. Randy's stealth shines here, killing kobolds before they're even aware they're being attacked. Soon, the level is cleared and we go farther down.
Here, the kobolds have laid traps; Montaron switches to lighter armor, so he can disarm them easily. The twisted tunnels are perfect for stealth and ambushes, and Randy takes full advantage. There is one incident in which a pack gets away to reach the rest of the party, but they are dispatched with minimal trouble. Xzar amasses quite a collection of kobold daggers, but he declares them too crude to use; their poison is poorly applied, and far too likely to harm the wielder.
And now, it's time to face the kobold leaders - a truly dangerous fight. We unleash a Horror, and all but a guard are panicked - excellent.
The way down opens into a larger cavern, with an underground lake and a stone dome on an island in it. It seems we have found the villain's lair. Kobolds guard the way, but Randy easily dispatches them with stealth. Our slow progress has exhausted Imoen's Armor spell, but we are nearly done. All that remains is confronting the villain in charge of this scheme.
Inside the dome, we find that villain: the half-orc Mulahey. But even he is part of a larger scheme, and Mulahey mistakes us for agents of his master Tazok. We take advantage of this error, but he changes his mind and attacks as soon as we search for evidence. Mulahey yields after we injure him, although his kobolds do not.
The enchanter Xan is nearby; we return his moonblade and send him off to the Friendly Arm.
Mulahey remains there, simply cowering. He thanks us for his mercy, and the party moves to leave...
"Now what did you do that for? He wasn't even hostile!"
"Never leave an enemy at your back. And make no mistake, that man was still an enemy."
(Mulahey is supposed to become hostile again, but the game glitched so he didn't. So then, I decided on an appropriately roleplayed resolution to the issue.)
Back in Nashkel, we return a ring to a widow and report our success to the mayor. Montaron speaks to the bounty officer Oublek, claiming a bounty in the name of Greywolf and then claiming a bounty for the emeralds Prism took. Oublek is not amused at this deception, and Montaron earns less than if he had simply been honest.
"... I ought to kill that lousy, stinking, ..."
"What was that?"
"Nothing, nothing. You won't see me do that again, leader."
Our enemies have stepped up their plans, and sent a much stronger bounty hunter after us. Unlike our earlier opportunistic foes, Nimbul was specifically hired to kill us. A Minor Globe of Invulnerability renders our spells ineffective, and he nearly kills two members of the party with his spells - but we prevail. Rest will be needed to heal our many injuries.
Randy dreams again, of Mulahey waiting to be killed a second time. If Randy would not kill him after surrendering once, why would he kill the man again? Randy's healing power grows stronger.
A man named Minsc is asking for help - his charge Dynaheir has been abducted by gnolls. We gladly aid him, although Montaron and Xzar decide to stay behind and hang out at the Belching Dragon instead.
(Minsc takes longbow specialization leveling up, and gets a composite longbow and the ankheg armor to use.)
We have a "conversation" with the local idiot Noober - until Minsc loses patience and starts shouting in ALL CAPS.
The gnolls' stronghold lies to the west, and we head off into a pleasant wooded region. The first trouble we encounter comes in the form of a dryad and two dimwit woodcutters:
A pair of winter wolves provides enough experience for Randy to reach level 6, and become even deadlier with the crossbow. Their pelts should fetch good coin, too, according to the storekeeper in Nashkel.
Then we meet a gnoll with information - though Ingot's words truly enrage Minsc. Eating Dynaheir? "EVIL, MEET SWORD! SWORD, MEET EVIL!"
We continue west for another day, to the gnoll stronghold itself.
Imoen doesn't hold a grudge, and she offers to give Boo a makeover:
Randy goes off on his own, stealthily exterminating xvarts. He doesn't, however, find an entrance to the fortress hidden in their caves. The magical book he finds is of interest, although none can read it; Quayle has used his Identify spell for the day.
Farther north, Minsc and Randy hunt gnolls together; a pack of elites nearly traps them in a dead end, but they defeat the creatures without taking damage.
The explorations finish, and the party reunites at the main entrance. It is the only way into the fortress we can find, and we will just have to take the gnolls' strength head on. Fortunately, none of them have ranged weapons. Proper tactics allow us to slaughter them without taking any hits.
Soon, the time comes to take on the next tier, where a large group of gnolls awaits surrounding their chieftain. We draw them out, then force them to come down stairs while being shot at. A well placed Sleep spell blocks their path with one of their own, and they're doomed.
The return to civilization is mostly uneventful; we are only disturbed by a pair of ogrillons. The merchant in Nashkel takes a Winter Wolf pelt, but we will have to find other buyers for our remaining stock. Randy increases his charisma, and we let Minsc and Dynaheir go. Montaron and Xzar will rejoin the party for our next moves against the bandits.
Mulahey's letters mention a man named Tranzig, who will be waiting in Beregost. It is time to meet him, and see if he knows where the bandits are based. After a few errands in Beregost - spider hunting, talking to the smith - we enter Feldepost's Inn, where Tranzig waits on the second floor.
And now, with what we've learned from the man, we head to the Wood of Sharp Teeth. The bandits are hiding somewhere in there, and we'll need to flush them out.
Arriving in Larswood, we encounter a large group of gibberlings. Xzar takes the opportunity to unleash a third-level spell - Skull Trap.
Mmm, gibberling gibs. I wonder if I can make anything from them?
An obnoxious drow tries to steal the spotlight, but this isn't his show. A group of bandits, another Skull Trap for them. Then, Blacktalon elites. Even with warning, a trio of them take down Xzar in moments.
We must be more cautious. I'll scout ahead for any more of them.
It still isn't enough to protect us, as the next group of Blacktalons spots the party as soon as we spot them. This time it's Imoen with a Horror spell, Quayle they want to attack, and a full five enemies.
Your quick reactions are much appreciated. My head isn't for shooting at!
You have to admit it's a big target, Quayle.
Thanks for the compliment, Imoen.
We find a group of wolves, interested in something other than attacking us. They're easy to take down, especially from the north, and Nim Furlwing rewards us for protecting his hounds.
A hobgoblin ambush on the way... they drop two scrolls of Shield, and Quayle fails to learn both. So much frustration.
After raising Xzar, speaking to Landrin, and a good night's rest, the party returns to the wilds. Peldvale awaits.
Naturally, Xzar is mauled by a bear almost as soon as he arrives; it ran right past the stealthed Rasaad, and the ranged members of the party didn't scatter well enough. We rescue Viconia and send her to a cave on the Nashkel road.
Then - ooh, a Wraith Spider. Too bad we don't have any magical ammunition we can use. Randy hits it with Varscona, and then the party brings their melee weapons to bear when it webs him. Thankfully, it's slow to attack the webbed Randy, and deals Strength reduction rather than damaging poison.
As we discuss the matter and try to plan our next move, Jaheira approaches. She has an idea - we will seek out the Yellow Morpher, and strengthen Rasaad with it. It is hidden in a pirate's stash, near a lighthouse south of Candlekeep.
(Edit note 4/13 - Quayle's color updated. No change to content.)
Before setting off, we head to Beregost for some shopping. Imoen sweet-talks Taerom into a discount (Friends spell), and we buy the Army Scythe crossbow for a mere 8400 gold. The party also picks up two stacks of +1 bolts. and two stacks of +1 bullets, since we've started seeing monsters that are immune to normal weapons. After all of that, countered by selling bandit scalps and gems, the party has just under 2000 gold.
We then head west, toward the coast. First, High Hedge. A pack of skeletons drops throwing daggers for Xzar and gives enough experience for Quayle to reach mage level 5. Now, if only he had some good level 3 spells.
We enter the mage's tower next. A thief named Permidion Stark tells of "horrid flesh-beasts" that are impervious to normal weapons - so Randy gets out his enchanted bolts. Nine shots later, the flesh golems are destroyed.
A gnoll outside carries a shortsword, marked with a name.
Perdue? Huh, we'll have to look for him. Maybe in Beregost?
Perdue is found in the Red Sheaf, along with another bargain-basement bounty hunter. He is at least willing to pay a little gold for his sword back. After a rest and some healing, the party heads southwest; the coast directly west of High Hedge is rough, but there is no lighthouse there. No trouble finds us, and we soon reach the vicinity of the Seawatcher lighthouse.
While fatigue is catching up to the party, we still have nearly all of our daily spells; we push on. Randy uses the cover of night to sneak up on some hobgoblins, with lethal results:
This time, Randy takes out the whole pack on his own. A warrior that hits on a 2, gets one-hit kills, and avoids retaliation by going invisible - no hobgoblin can stand against Randy.
Dread Wolves, however, are much better at the chase; against a pack of three, one catches up to Randy and bites him for a good chunk of damage. Montaron levels up to thief 6 (85 OL, 75 FT) and it's time to rest.
We meet sirines; the first one goes down easily to stealthy arrows, but the next two cause trouble. Rasaad gets both poisoned and charmed. A pair of carrion crawlers gets Xzar to level 6, and then we face Sil's group. Randy tries to solo them... poisoned. He's a glutton for punishment. The second sirine is handled much better; she only gets to shoot one arrow.
Finally, Sil herself... poisons Randy again. He's got a bit of a problem there.
I just reacted without thinking there. Once I had a moment, I made some space and started shooting.
Soon, the obstacles are gone and we can reach the treasure.
Rasaad tries to morph... then Imoen and Xzar get into a conversation, and the party rests instead. No, I didn't hit the rest button. What?
Then Xzar notices a ring we picked up - he's interested in enchanting it.
That's party treasure. I don't trust anything you'd make, Xzar
I don't even have what I'd need yet. When I find it... You'll see.
The party returns to Beregost, stronger than before and ready to take on the bandit camp.
And now, an informational sidebar: the Cloak of the Wolf, Relair's Mistake.
The cloak allows a player to transform into a wolf at will. Each transformation lasts two turns (20 rounds) or until canceled, and you can renew immediately after it wears off.
Wolf form gives you strength 18, dexterity 17, and base AC 10 (or better based on armor, monk levels, or other AC-setting effects). The wolf attacks in melee twice per round for 1d8 piercing damage (base). This attack hits at +1, but gains no bonus to hit.
Wolf attacks are considered one-handed, and the player therefore benefits from shields or single-weapon style. They are treated as unarmed strikes for the purpose of bonus attacks; warriors get bonus half-attacks at levels 7 and 13, while monks do at levels 3, 6, 9, 12, 15, and 18.
Most characters won't get much out of this. Spellcasters might hit a little harder, but the form blocks spellcasting; if you need a spell, you'll need to transform back and then wait a full round just to start casting it. Warriors can hit harder and nearly as often with conventional weapons, due to specialization bonuses and exceptional strength. The big exception? Monks.
At level 6-8, a monk's unarmed attack deals 1d10 damage with no attack bonus, hitting as non-magic. Turning into a wolf grants an extra attack per round and the ability to hit otherwise untouchable enemies, with a minimal loss of 1 average damage per hit. If you haven't optimized the character's attributes (say, because you're using Rasaad and his 16 Str/16 Dex), then you'll gain bonuses to hit and damage from the attribute boost. This cloak is a fantastic way to boost the effectiveness of a monk in Baldur's Gate 1, so that they keep up with other warriors.
You can override the form's strength with various items. I've had issues with the cursed 19 Strength belt not working reliably this way, but there are plenty of strength potions out there to use instead when you want to really hit hard.
Then, when it comes time to post, I edit the log, rewriting segments and inserting BBcode markup. Upload the pictures, copy the post into a second text file, and send it in. There may be considerable time between these two stages; my log goes up to episode 27 as I post this, and I might split a couple of those episodes in two. With three weeks of buffer on the daily posts here, I can keep this rate up for quite a while. For this playthrough, my starting time was dictated by the "opening credits" - I couldn't post that until all of my Rangers gained the ability to morph. That was late March, so I waited a few more days for the meta-joke of posting on April 1.
And one more thing: I've decided to use italics, set off by empty lines, for the "film crew". When a reload is needed, or something went wrong with the pictures, they'll have something to say.
After a rest, the party returns to Peldvale. About half of the map is cleared; we just have to take care of the other half. The first encounter, is, naturally, a group of Blacktalons - and it's daytime, so stealth isn't a good option. They focus their attentions entirely on Rasaad, nearly killing him - but he lives, and the party mops up the panicked foes.
While we're out, Randy dreams of playing sniper - can he take on the whole bandit camp by himself?
On the way there, even in his dream, trouble catches up.
We arrive at the Bandit Camp, and Randy scouts around the edges as he waits for nightfall. Some zombies hanging around ruined buildings are shot, but he's not going to engage the bandits yet.
Except - oops, he did. One bandit sentry spotted us. He's dead now, but the alert is out.
In Peldvale, stealthy scouting works well. Our next two encounters are merely spiders, and Randy just shoots down one. The other, a giant spider, does call for bringing up the party. Naturally, it webs and poisons Quayle, the only party member who can cure another's poison.
We open the battle with two Horrors (one from a wand) and a Skull Trap.
Cut! All right, let's do that battle again. Places, everyone.
On take 2, we go for a triple-Horror. Imoen can't be saved (too many arrows, plus poison) and the enemy mage gets off a Slow, but the rest works out better. Quayle drops to 1 HP before he can drink his elixir of health, but that leaves us with no enemies that aren't panicked. A painful victory.
Fine then. We've learned what we needed to around here. Xzar, are you coming with me?
But I wanted to ... oh, all right. These folk are far too wholesome for my taste anyway.
And now, we have to get out of this camp. That won't be easy. Taurgosz Khosann accosts us outside the tent - and goes down to a flurry of attacks. We pick up his stuff, and run.
Uh, boss? A roll of film is missing.
What? Oh, bother. We've already packed up the sets, too. All right, edit around that bit. We're not missing much, are we? (I intended to have some pictures here, but they were lost, or possibly never taken.)
On second thought - I'll try to fight this one out rather than just retreating. It's not too bad; Rasaad goes down to friendly fire, but the oil of burning and skull trap combine to take out a mob of bandits.
We rest at the Friendly Arm, and another dream comes. Randy can now cure poisons. Consulting with Jaheira, she points us to a potential Ranger in the Cloakwood. Jaheira is not welcome among the Shadow Druids where Faldorn makes her home, but Faldorn herself would gladly join our party. We will also need a thief to deal with traps, and the hunter Coran is available not far in.
Neera is temporarily recruited to boost the party's numbers. Randy mugs a couple hobgoblins for their helmets, some stuff is stashed (including that set of full plate nobody can wear), and the party heads west into the forest.
On our way forward, we are ambushed by ettercaps - a nasty one, since they start with some already in melee range. Imoen is injured fairly badly, but the enemies fall before us.
On arriving in the next area, Neera talks about her past - shunned and exiled for her unreliable magic. We also pick up a quest to find a man named Chelak, but that can wait.
And - ouch, 45 FT isn't enough to detect the web traps. Coran boosts his Dex with Imoen's artifact - maybe 50 will do the trick? Yes, it does. Passing through the spider zone by the shortest path, we head for the druid grove - and are found by a gang of bounty hunters.
Our opening volley of two Horrors, a Hold Person, and some missiles is wonderfully effective.
Coran then has a story of prejudice:
And now, we enter the Shadow Druid grove. One of them accosts us - Laskal, who is glad to hear we oppose the Iron Throne.
Faldorn levels up and reaches level 7, taking dagger proficiency. This awakens her shapeshifting ability - she is the Green Ranger.
Both Coran and Faldorn have things to say to Peter:
The party rests, and then moves on to the next area. Faldorn had to get some better spells memorized, and we were pretty much out of healing anyway.
On the way, we are ambushed by giant spiders. Faldorn transforms into a spider to protect herself from their webs, while our mages cast Sleep.
Battles against assorted monsters like baby wyverns go very well; it makes a huge difference having Faldorn's negative (transformed) AC out front.
And then - one goes badly. Faldorn gets poisoned, the poison is accelerated by her haste, and she dies.
The second time around, we don't take any wyvern poison outside. Then, the time comes to enter the wyvern cave. We open with shots from the wand of fear and the wand of paralyzation - success. Both adult wyverns are disabled.
Thanks. I try.
There's a giant spider ambush on the way to the next area; Faldorn gets webbed and poisoned, so Randy has to cure that. At least her fireshield keeps working.
Faldorn greets us with an impressive rant upon arriving at the mine:
Informational sidebar: Druid and Avenger shapeshifting
With the mod, the daily transformation abilities are replaced by the ability to create a shapeshift token. When equipped as a weapon, that token applies the transformation effect and stat changes. All of these tokens are two-handed dagger-class weapons that grant dagger proficiency, deal slashing damage, prevent spellcasting, and can be used by any druid, monk, or shaman. Warriors and monks gain bonus half-attacks with them at levels 7 and 13, and warriors can gain additional bonuses through dagger specialization or more. The way these tokens are implemented, you can swap between forms at will, any number of times per round.
Generic druids have two forms, each achieved at level 7 (35K XP).
Wolf form deals 1d8 base damage at two base APR, and counts as a +2 weapon. It sets strength to 17 and dexterity to 18, while granting base AC 6 if you don't already have something better.
Bear form deals 1d6 base damage at two base APR, and counts as a +2 weapon. It sets strength to 18/00 and dexterity to 12, while granting base AC 7 if you don't already have something better.
In the absence of better equipment, wolf form is the defensive option and bear form is the offensive option. They're excellent for a pure druid (in BG1) and still decent for a fighter/druid, especially if you invest in dagger specialization.
Avengers can use these forms, and add three more at the same level.
Sword spider form deals 1d4 base damage at three base APR, and counts as a +2 weapon. It sets strength to 16 and dexterity to 16, while granting base AC 0. The spider is permanently hasted and immune to Web spells, and its attacks poison enemies (2 damage per round for 6 rounds) on a failed save.
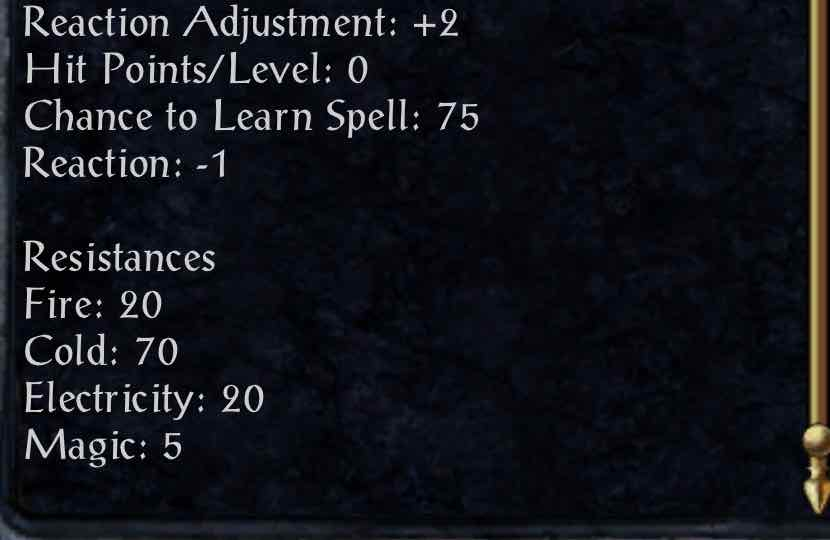
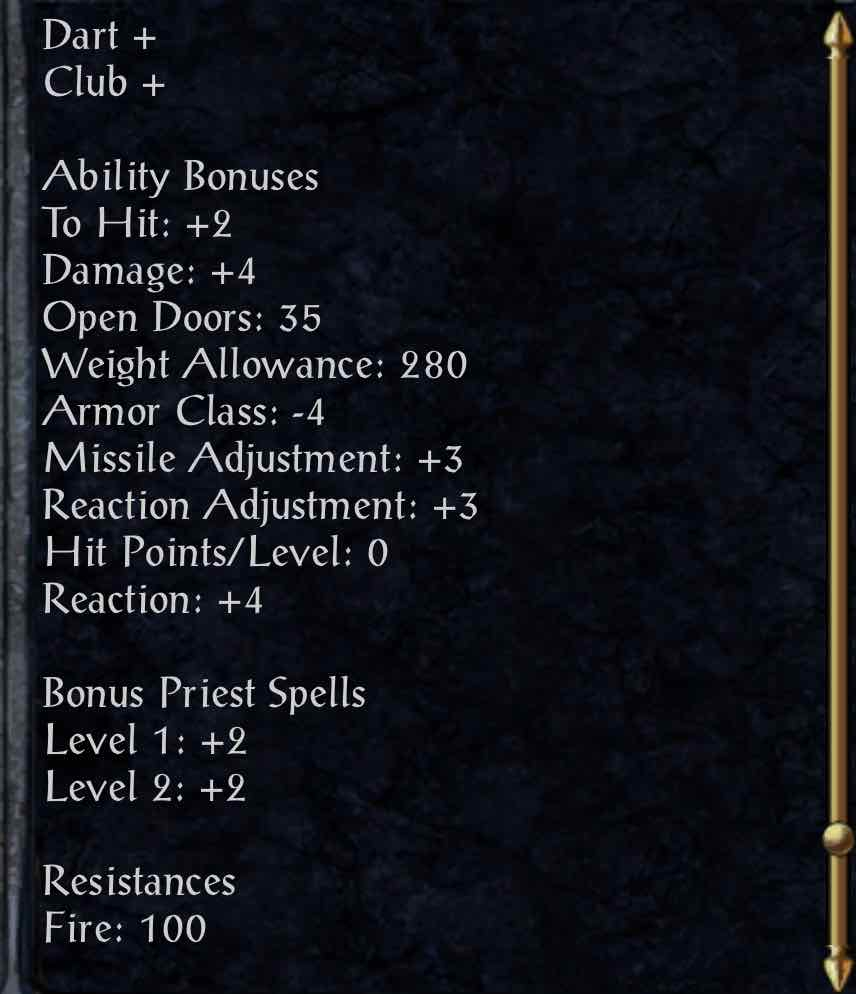
Fire salamander form deals 1d8 base damage at one base APR, and counts as a +2 weapon. It sets strength to 18/76 and dexterity to 19, while granting base AC 2. The salamander is permanently hasted and immune to fire, and has a permanent Fireshield (Red) active.
Baby wyvern form deals 2d4 base damage at two base APR, and counts as a +2 weapon. It sets strength to 18/76 and dexterity to 17, while granting base AC 3. The wyvern's attacks have a 25% chance of dealing 3 poison damage.
These forms are, of course, much better than wolf and bear forms. Wyvern form is rarely useful; you might pull it out when you haste the whole party, but most of the time the other forms are better. Salamander form is good for general use, plus tricks with the fireshield and immunity. Sending a salamander into battle with a pack of carrion crawlers ... even if they paralyze you, they'll kill themselves before they kill you. Spider form has the real power potential later on. Give the Avenger the gauntlets of ogre strength, and that's four attacks per round that deal significant damage, plus poison to wreck enemy mages. Then web up the field, and revel in tearing up helpless enemies.
[Edit - sidebar corrected 5/12/2020]
Before entering the mine, we'll clear the area around it.
Lakadaar gets the truth from us, and gets killed along with the guards he calls up. Then... I screw up against a group of Blacktalon elites, and get Faldorn killed. Grr, reloaded.
All right, let's do it differently. This time, I scout the area invisibly, then have Faldorn lay a web in front of them. She'll fight in spider form, once the web has already landed.
For the fight at the entrance, I go for subterfuge - scout invisibly, web before they even see us.
It doesn't quite work; Faldorn is spotted while casting her spell, and Drasus drinks a potion of magic shielding for web immunity. Still, Genthore and Rezdan are held.
And - nope, Faldorn died. Acid arrows from the mage that wasn't held.
"Cut! Let's take this battle from the top."
"Uh - the camera broke, too. We weren't actually filming that."
"OK, fix the camera, then we take it from the top."
On take 2, Drasus goes down before he can do anything. But this time, it's the mages who are free - Imoen dies.
"Cut! You're just not getting this battle right. Also - is that camera even on?"
"Oops."
Strategy update: two webs now.
Take three - still not the charm. It's Quayle who dies this time, because of a mage with a Globe of Minor Invulnerability.
No, still not good enough. The mages escape. Even through poison, they're set to inflict a ton of damage.
On take four, Faldorn gets charmed - but Quayle hits her with a Hold Person before she can do too much damage.
All right, let's try that fight fully rested and healed. I give it a good try... and one mage coming out from under the Web with a Minor Globe is too much. All right, there's only one thing left for it - summon a nymph. I need spells that a Minor Globe can't stop.
Naturally, the nymph gets webbed trying to apply them.
Six takes. I really need to stop underestimating that battle, with the SCS improvements.
There are a few guards we clear out, and then we're down in the mine. The first level is a lull; some guards to kill, but no real threat.
One of the slave workers calls for guards, and Coran has something to say about that foolishness:
I do hope that cook makes it out of here before we flood the place. I'd like to catch up with her later.
You said it, brother!
Down to the barracks level now. The first room has guards and hobgoblins. Faldorn nearly dies, and we're out of healing spells - time to rest. I'll head up and do so on the surface. The rest is undisturbed, and we head straight back down.
Most of the floor is uninteresting - a lot of hobgoblins which die easily. The chests with scrolls and potions are nice, and there's a +1 studded leather that Randy actually wears for now.
The mage Natasha? She's dangerous; Stoneskin, Minor Globe, and PfNM. Unfortunately, no illusions, so cold arrows will disrupt her. No, wait, there was a Mirror Image. She gets off a Cone of Cold that hits nearly the entire party - ouch.
And - whoa, the ogre mage dropped three Stoneskin scrolls!
And now, we come up on the boss fight, Davaeorn himself.
The idle moments as we prepare and disarm traps prompt Faldorn to say she sees a beast in Randy:
Then Davaeorn goes active before I'm ready, Coran gets webbed, and everything goes wrong. The Battle Horrors are trouble for this ranged-heavy party. First plan: haste the party and run past the troublesome intersection. Nope, not fast enough - or, rather, the one double-hasted party member triggered things too early. Second attempt: take off the boots, and Rasaad gets a potion of freedom. Nope, didn't work. There was a straggler. Attempt 3: hide in a corner, Faldorn bolts the horrors. We got them, but then...
This time around, I'm hasting up and using both potions of magic blocking and that potion of freedom. And... Faldorn's lightning bolt missed. Ack.
Another try... nope. Let's try that other strategy again.
We get the Battle Horrors - then Davaeorn comes up, and fireballs everybody for way too much. I cut it at two dead.
Another run, and it's looking better. Horrors down, entrance webbed, Davaeorn on the run.
"Seven takes. I'm just relieved we finally got that right."
Now we just have to clean up the reinforcements and we'll be on our way. Only a few soldiers actually came through, which is nice. The mustard jelly doesn't last long, either - they're vulnerable to slashing attacks like Faldorn's spider form. Coran's skills unlock everything, and we head up to the surface.
Yeslick is invited into the party to oversee flooding the mine, as Quayle takes a break.
The two big battles here, against the Drasus party and against Davaeorn, represent the peak of the game's difficulty as I'm playing it here. That is, at least in part, a consequence of coming here relatively early - but I could hardly do anything else when I've got Coran and Faldorn in the party. Every bit of delay puts them farther behind the protagonist in experience.
My internet connection hates me today - so many failed uploads on those pictures...
In better news, gameplay for season 1 (BG1) is complete. Play for season 2 will start shortly - and for that season, the whole party will be able to transform.
A dream comes, full of red. A flow of blood threatens to overwhelm Randy, but he retains his will. More power comes to him; the ability to cure poisons more often. The mob of tasloi that startles him awake is a bit of an annoyance, though.
After resting properly, the party returns to the spiders' domain. It's time to take care of them. A fight with some Phase Spiders brings Imoen to mage level 6, and she takes dagger proficiency.
And then, we enter the Spiderdome. Centeol is willing to talk, but the spiders and ettercaps are set on fighting. A Command spell deals with the sword spider, a Sleep spell takes out most of the giant spiders, and we're in good shape.
... Fine. As long as you don't expect me to use it.
The remaining spiders in the area are no trouble, and the party returns to the Friendly Arm without incident. Randy needs more bolts anyway; he's down to his last quiver.
Selling the loot brings the party to over 35K gold, and it's time to pick up Dorn. Rasaad temporarily leaves the party in his place. A trip to Beregost gets us a helmet for Dorn and a 2000 gold bounty on a wyvern head. Then, it's south to Nashkel, to talk to Taris. We are considerably more diplomatic than Dorn, and she points us to the mage Dorn is looking for.
Really, Dorn. You could have just asked her, and she would have been happy to talk. Are violence and intimidation the only ways you know of interacting with people?
Then we rest, and Dorn tells us to talk to Taris. A little backward, there.
Traveling east, we are attacked by skeletons. Kryll must be close. Randy tries to turn the conversation toward Dorn's power, but he is unwilling to speak of such things.
Kryll's opening Horror spell is easily countered with a Remove Fear, and we follow up with a Web. With our melee being Faldorn in spider form and Dorn with Spider's Bane, that's a serious advantage.
Crossing the bridge to Baldur's Gate brings a meeting from Scar, and a new quest to investigate some troubles with a merchant organization. That will have to wait, though. It's time to confront Simmeon... from too far away to see him. Oops.
I'm sorry, but we just can't stay with you. Taking down villains like your old companions is fine with us, but that patron of yours - we just can't work with the likes of him, or the orders he's likely to give. We're leaving you at the Friendly Arm, Dorn.]
Guest starring Jaheira.
Back at the Friendly Arm, Jaheira has news for us; she has heard of trouble brewing among the druids of the Cloakwood. We drop off Faldorn so Jaheira can rejoin us, along with her friend Khalid. Rasaad has gone back to Nashkel for now.
Exploring the first area of the Cloakwood soon leads us to a pack of tasloi holding a cloak - this must be Gurke's missing cloak. Then, we find a hunter named Aldeth Sashenstar being threatened by druids. It takes some difficult negotiation, but we come to a peaceful solution.
Of course we'll find them, Seniyad. And if this is foul play, we will deal with the perpetrators. I do not often see eye to eye with the Shadow Druids, but they are usually wise enough not to make war on their brethren.
Finding Beador requires us to go far deeper into the woods, nearly to the mines themselves. On the way there, we are waylaid by wyverns:
After a rest, it's another wyvern waylay, and another successful save against the illusionist's Spook (nat 20). Jaheira takes several hits, but none are poisonous.
It is foul play. We find a group of druids gathered around Beador - here, have some Horrors.
After a rest and yet another wyvern ambush, we arrive at the druid grove.
Andarthe was wielding an enchanted spear, and she surrenders it to us. Maretha is rescued (rep to 18). Then comes the return to Seniyad, to tell him the good news.
Outsiders among the shadow enclave, driving them to violence against other druids? I understand why you had to fight them, but I am glad you didn't force me to join you there.
After picking up Rasaad, we go over to the carnival. Quayle thinks he can duplicate the "exploding ogre" trick... until Oopah goes crazy and we have to put him down.
And ... oops, that's an interesting bug. Faldorn apparently loses access to her kit-added spells when she's not in the party. We have to re-memorize several instances of Chromatic Orb, Web, and Lightning Bolt.
A mad wizard named Zordral threatens a woman - we try to get him to back off, but he kills her before we can react.
A woman is petrified; rather than buy Zeke's overpriced scroll, we pick up a pair of scrolls from the nearby temple of Helm.
After buying a few foodstuffs, we head north. We have traveled this road before, but only a narrow path along the road itself. Bandits and monsters may lurk nearby, and they should be dealt with so that travelers can be protected.
We meet a gnome named David Jansen, who seems to have gotten into trouble with a pair of ogres - unfortunately, the ogres aren't interested in the food we brought.
Near a group of hobgoblins, we find a slaughtered family and a necklace. It looks to have far more sentimental value than monetary value; we should look for any relatives in Beregost.
A bit farther north, and we meet a Flaming Fist patrol looking for bandits. We easily convince them that we're not bandits, and they go on their way.
Some random hobgoblins drop a mind focusing potion - that'll be nice when we go on a scribing spree soon. We find Viconia's cave, and the five healing potions in a chest.
And then, back to Beregost. We have several people to meet, and some assorted items to identify and sell.
Gurke doesn't want his cloak back, so we keep it. Zhurlong turns out to be a pickpocket; he gets his boots back, and pays us a 100 gold finder's fee. Mr. Colquetle gets his amulet back, and the party reaches 20 reputation.
Next, we clear out the area around the temple to the east. Word of a dangerous wolf pack has spread, and that's something we should be taking care of.
Soon battle is joined. Faldorn is paralyzed by a Vampiric Wolf, but her fireshield still strikes back against the pack.
Finally, we head north. The crossroads between Beregost and the Friendly Arm is still mostly unexplored. Bandits are common here; first a group of ten archers, then a quartet of bandits at the caravan they raided.
We find an ogre, and drop him with a Command. He carries two magical belts; one useful, one cursed.
And now, to the west. The road to Candlekeep still needs a bit of clearing. Since nothing worse than a few hungry animals and gibberlings live here, it goes quickly. Northeast to the Friendly Arm, then. Joia wants her ring back from some hobgoblins - easy enough, even with fatigue catching up to the party.
After a rest, it's time for shopping. We're looking to buy scrolls, and Halbazzer's shop in Baldur's Gate has the best selection at 4th and 5th level - including 20 scrolls of the crucial Polymorph Self.
On the way there, we are greeted by old "E", now revealed as Elminster - and he has momentous news. While Gorion is dead, his spirit remains, trapped in a crystal. Elminster is working on a way for him to communicate with the outside world; when we can find a place to act as the Rangers' central base of operations, that will be a welcome addition.
I don't get it. What's the big deal about some old wizard?
He was an uncle to me. And a father to Randy.
Gorion set me on this path. He's the reason I'm interested in being a Ranger, and putting together a team. Getting the chance to consult with him again, now that I have that team - it's exactly what I wanted and needed.
Even the wisest among us can benefit from a mentor. You would do well to listen to such advice, Quayle.
I'm the smartest. Why should I listen to some lesser intellect pontificating ...
Grr... Shut up, gnome.
Checking the Elfsong Tavern first, we pick up a quest to deal with some ogre mages and Imoen gives Randy a protective amulet. The shopping spree eats up about half of our gold reserve; we also pick up some +2 ammunition and a few potions. Then it's off to Ulgoth's Beard, for still more scrolls, the +3 staff, and the cloak of displacement. Finally, we head south to High Hedge, for the last scroll-shopping step and the scribing session. Each mage drinks a potion of genius and a potion of mind focusing, for 24 total Int and certain scribing success. The remaining gold is enough to buy one set of archmage robes; the second will have to wait until we can gather some more gold.
After mugging a band of skeletons for their throwing daggers, the party heads west to the coast. They have to deal with some hobgoblin bandits on the way, but such ambushes are no trouble now.
A nereid approaches the party requesting aid. While Randy is happy to help, he draws the line at a kiss.
While we heal, Coran and Faldorn have a conversation on beauty:
Probably not. I've heard that the elven kingdom in the forest of Tethir stays really isolated. They hardly ever let any outsiders in.
Hardly ever is still sometimes, Randy. Besides, I'm an elf. When I go back there, they'll be sure to invite me in.
The gnome Mad Arcand wants a ring back, so we go for it. It's guarded by Carrion Crawlers which paralyze our front line - but they don't deal much damage. Faldorn takes 4 and hits back for 19 with her fireshield, over three attacks. Arcand gives us an oil of burning in exchange, along with some disturbing words.
Wait, is he saying that ring was cursed?
I'm not an expert in deciphering madmen, but I think so. Good thing none of us tried to put it on.
Next come a group of ogres. With the berserkers included, we go for ranged attacks as they chase the double-hasted Faldorn.
A man calling himself the Surgeon heals us. While that goes on, we tell him of our defeat of his brother Davaeorn, and he is glad to hear it.
A trio of sirines doesn't deal any damage to us, but they do charm Rasaad. A slight adjustment to minimize friendly fire - Faldorn switches to spider form, and puts on the girdle of piercing. No retaliation damage, and Rasaad can only hit on a natural 20.
That wraps up this area, and it's time to go back inland, to the area south of High Hedge. We are waylaid by mixed undead on the way - no real threat.
A bit to the east, we find a hungry wolf and a talking chicken. The chicken claims to be Melicamp, an apprentice of Thalantyr - but he sounds unsure if the man will help restore his natural form. Still, we'll try at least.
Turning to the south, we encounter an unusually well-equippped group of hobgoblins.
Finally, we reach the mad cleric Basillus. According to the priest Kelddath Ormlyr, there is a bounty on him, and it is easy to see why.
We go with simple tactics - attack, then slow the undead.
Bassilus eventually goes down to our two melee attackers, and the remaining undead collapse after that. Also of note, I believe this is the first time I've picked up any bolts at all from enemies. Bassilus drops the hammer Ashideena - which, in addition to its powerful +2 enchantment and elemental damage, requires slightly less strength to wield than a standard warhammer. Perfect for Quayle and his 8 strength. Two nymphs of healing later, and everyone's in the green. Time to return to High Hedge for Melicamp.
We soon learn why he was reluctant to return to Thalantyr:
A moment of silence, then, for one unlucky fool. You can't save everyone.
We return to Beregost and collect the reward for taking down Bassilus.
Imoen will soon regain her thief abilities, so we buy a +1 bow for her. And then, we're off. Two steps south and one west, to a previously unexplored area.
The first threat we encounter is a small group of half-ogres.
Next come some bandits. They haven't noticed just how much stronger our party is.
A lone hobgoblin threatens us with the might of Chill; we laugh, and kill it.
Chill? We've already been to their camp, and wiped out their leaders. They're no threat to us.
Coran and Faldorn have another amusing exchange:
I prefer it when I can open up some distance when things go bad. If I still had to travel with her after a ... breakup, I'd worry about her cutting off my nethers.
I wouldn't do that. I'd turn into a spider and bite them instead. Venom coursing through, turning them to mush...
(Shudder) I get the point. Just ... stop talking now.
And then, we run into the famous Drizzt.
Then, for a greater challenge than any of the fixed battles on the map, we encounter a quartet of ogre berserkers. Faldorn is seriously wounded, but kiting wins the day.
A group of Carrion Crawlers, and Imoen reaches mage level 7. Thief abilities regained, and she can also cast level 4 spells now. The Pink Ranger has awakened.
Imoen could wear the elven chain mail, but it would both inhibit her thief skills and cover up too much of her pinkness. Incidentally, she is getting the AC bonus from Single-Weapon Style when morphed; it just doesn't display properly in the detail box. Her stealth skills are terrible in ogre form, but that's what invisibility spells and patience are for. Anyway, she tries it out against the three worgs at the lighthouse.
One drawback of the whole thing? Ogre form has poor initiative for its attacks. If the enemy can retaliate at all, they'll probably strike first.
Anyway, we talk to Ardrouine for the reward, and move on southeast to the next area.
We help out Charleston Nib at his dig, but things go horribly wrong.
I think we should inform a temple. The curse on that idol isn't something we know how to handle.
Agreed. I know a basic curse-removal spell, but I don't think it would work on something that powerful.
Some minor monsters, a small tribe of gnolls - and then we find the guardsman Brage. Fortunately, he is willing to talk, and the priest Nalin in Nashkel can break his curse.
Informational sidebar: Polymorph Self
When you cast the spell, you gain a set of temporary innate abilities allowing you to transform at will between your base form and several other forms. These abilities stay with you for the spell's duration, ranging from half an hour at level seven to a little over an hour at level 20. The main drawback of the transformed states is that they block both mage and priest spellcasting - and, since transforming uses "aura", you'll have to wait a round after turning back to human to cast anything, then another round if you want to transform again. When the spell expires, the abilities are removed and you are automatically transformed back to your base form.
Also of note, neither the Polymorph Self state nor the forms can be dispelled. Many later enemies like to throw around dispels, but they can't force you back into your base form that way.
Polymorph Self cannot be cast if Shapechange (level 9 spell) is active, and vice versa. You only get one set of transformation abilities at a time. Most transformed attacks count as one-handed weapons, benefiting from shields and one-handed style. Two-weapon style doesn't work with them, as off-hand weapons are prevented from attacking (despite what the inventory screen says). BGEE allows you to put an item in the off hand while a transformation is active, while BG2EE does not.
When attacking in shifted form, you don't gain proficiency bonuses or take non-proficiency penalties. This applies even to forms that appear to use a manufactured weapon, such as the ogre's morning star or the flind's halberd. Those are still unarmed-class weapons for proficiency purposes.
I've noticed that transforming from a non-base form directly to another non-base form results in unequipping all items - watch out for this if you've got stuff like jewelry that adds spell slots. They still appear to be in the spots, but you'll have to pick up and re-equip them if you want their benefits.
And now, the details on the forms.
Wolf: Str 15, Dex 18, AC 6. Attacks twice per round for 1d8+1 piercing damage. Counts as a one-handed +1 weapon. Base resistances of 100 cold, 50 electric.
Black Bear: Str 18/00, Dex 12, AC 7. Attacks three times per round for 1d6+1 piercing damage. Counts as a one-handed +1 weapon. Increased movement speed, since bears are normally slow.
Brown Bear: Str 18/00, Dex 12, AC 6. Attacks three times per round for 1d6+1 piercing damage. Counts as a one-handed +1 weapon. Increased movement speed, since bears are normally slow.
Mustard Jelly: Str 14, Dex 9, AC 4. Attacks one per round at range for 5d4 crushing damage, inflicting slow (200 sec) and/or poison (3/round for 5 rounds) unless the target saves. If you can increase those stats (most likely with potions), you gain attack bonuses from both strength and dexterity. Counts as a ranged one-handed +3 weapon. This form also gains a host of immunities - immunity to stun, sleep, poison, fear, petrification, confusion, charm, paralysis, and non-magic weapons. It is 100% resistant to magic and to electric and piercing damage. It is 30% resistant to slashing, 60% to crushing, and 85% to missile damage. And, finally, it's 50% resistant to cold. Mustard jelly form is large on the ground, and cannot fit through some narrow passages and doorways.
Spider: Str 15, Dex 17, AC 4. Attacks twice per round for 1d4+1 piercing damage, inflicting poison (3/round for 5 rounds) on a failed save. Counts as a one-handed +1 weapon. Increased movement speed, and immunity to Web spells (but not the Web Tangle ability of giant spiders).
Ogre: Str 18/00, Dex 9, AC 5. Attacks once per round for 4d6+1 crushing damage. Counts as a one-handed weapon, +1 in BGEE and non-magical in BG2EE.
Flind: Str 17, Dex 17, AC 1. Attacks twice per round for 1d10+1 slashing/piercing damage and 1 fire damage, with a +1 attack bonus. Counts as a two-handed +3 weapon. Increased movement speed.
While there's something to be said for the bear's damage potential, I've mostly stuck to the more magical forms. Mustard jelly form is great for defense, spider form's web immunity allows for some vicious tactics, ogre form can deal massive damage especially on a backstab, and flind form is generally strong in combat.
Some of the details here feel like bugs, particularly the unequipped items and the mismatch in the ogre weapon.
Edit note: sidebar updated 5/13/2020
After a rest, the party heads west to an unexplored hilly region. The lower area is calm, and soon the party must traverse the lone upward path. The path is protected by xvarts, who attack immediately and set their bear on us.
A suspicious-looking man named Borda offers a variety of underpriced wares.
And then, it's another step west to a new area.
Imoen tries out ooze form against a group of hobgoblins and ogres:
Then we move on. Neville and his bandits go down, Imoen switches to ogre form, and we hit some ogrillons.
To the south, a panicky man named Jared tells us of a bear coming this way - sure, we'll handle it.
Heading west of the river, we come to a paladin on a gibberling hunt. She suggests fire magics? All right, Quayle, you've got a fireball prepared.
Next, back to the southeast and a partially explored area. Drienne's dead cat is returned, some gnolls are put down, and we move on. Now, it's an area we barely touched on before, passing through while avoiding encounters.
A boy named Albert asks us to find his dog, but Faldorn smells something unnatural. Alerted, we examine the chew toy... it appears to be the mangled remains of a warrior's arm. A "dog" that would chew on such a thing is not a beast we can allow to roam free.
Larry, Darryl, and Darryl - Randy gets an autograph.
At least they didn't attack. I'm tired of having to kill every kobold and xvart we see.
Rufie appears to be a dire wolf, and attacks on sight since we dumped the chew toy. Good riddance.
Then it's Sendai and her band - hunting people? Not on our watch!
A return to Albert, and ...
I told you he was trouble.
Finally, we return to Nashkel. Nalin chooses to raise Laurel so that she can continue her good works:
Nice bit of improv there. I'm glad we didn't drop that take.
As penance for contributing to Laurel's death, Nalin has tasked us with clearing out the restless dead from some tombs to the east. It will be done.
Traveling there, we soon find a skeleton-guarded tomb bored into a cliff face. It contains a mere ghoul, easily dispatched.
Then we meet a trio of ankhegs - no problem. Other minor monsters abound as well - kobolds, gnolls, wild dogs.
Next comes a mage, Narcillicus Harwilliger Neen. He seeks to control oozes...
Then we switch to melee weapons for the mustard jellies, since they're highly resistant to missile weapons. Sadly, they're entirely immune to the piercing damage Rasaad deals as a wolf; he can't hurt them in either human or wolf form. The rest of the party, at least, is enough to take them down.
Then comes another skeleton-guarded tomb. We enter:
And then... Faldorn is struck by lightning. Ouch.
Well, that's Nalin's penance done. Where to next?
I've always wanted to see Firewine Bridge.
Any objections?
...
OK, we're going north to Firewine Bridge.
Upon arrival, Coran claims he saw a woman, vanishing into the mists to the east ... but there's nowhere to go there. A mystery.
Coran ... there's nothing to the east. We have to go around to the west, so that we can go north to get anywhere.
All right, I got turned around - she might have been to the north.
Skeletons haunt this place, and soon we find something worse - an ex-paladin Svlast, stalked by the spirit of a man he murdered.
We caused the death of an innocent woman recently ourselves. But we didn't just stand around moping! We returned her to a temple to be raised, and then accepted the penance the high priest laid on us. A paladin should strive to do better!
To the north, we meet a priest of Ilmater, seeking converts and preaching the evils of sorcery.
You're just jealous of my awesome powers.
Then we cross the bridge, and listen to Poe's tale. Coran has one of his own in response:
We find that woman, named Amelia, at the entrance to the dungeon ... and merely voicing suspicions has Coran leave the party? Oops.
Beginning of the area, boss.
Take two begins...
Cut! You're supposed to acknowledge the kill, Svlast! I don't care if you didn't see the revenant!
OK, take three. This time, we get through things and agree to take Amelia's roses to be restored. Coran stays with the party.
To the north, we meet the swordsman Meilum, who takes a trivial insult as an excuse to fight. It doesn't go well for him.
And now, Kahrk.
Oh, yes, witnesses. You'll just have to die, then.
We open with a Spell Thrust and two Webs. And... he charged right past the webs, then cast a Sunfire killing Faldorn.
For take two, we add a pair of nymphs and don't go for webs. He hits hard, first with a 2x Magic Missile sequencer on Faldorn (too bad he wasn't quite in fireshield range...) and then with a pair of melee hits on Imoen. But then, a Hold Monster lands and the battle is won.
Out in front of the temple, Rashel the Sunray is willing to restore the flowers for a small fee - but she also notices a faint aura of evil. For a little more gold, she casts a blessing to clear that up.
Her pretty face hides a treacherous heart, then? I'll keep an eye out for trouble when we get back there.
We didn't even see her face ... how do you know it's pretty?
I have a sixth sense for beauty.
Author's note: Sealed evil in a can dumpster jar gets released, with this run's theme ... I just had to use that line.
First, a bit of shopping. We have some junk to sell at the blacksmith, and then we'll hop over to High Hedge for the second set of archmage robes. While we're at it, we also buy the Claw of Kazgaroth (given to Rasaad for now) and a wand of fear to replace the nearly depleted one Faldorn has.
Rather than return directly to Firewine Bridge, we travel through some other areas on the way. First, Ulcaster. A short fellow tries to sell us a "gem of true seeing" for 1000 gold - nah, we're not trusting that offer.
After Borda - no way I'm trusting that sort of offer again.
The first real threat is a group of kobold commandos on a small hill.
There are also some hobgoblins around, which we easily clear out. We reach the plateau where the school is located just after sunrise.
There, on the plateau, we encounter a skeletal warrior:
Rasaad takes two hits, dropping to single-digit HP; he has to retreat. And then, the mages' spells pay off; Imoen turns into an ogre and Quayle makes her invisible, setting up a backstab:
Thanks, I couldn't have done it alone.
And then, time moves again. Dawn breaks over the ruins, and the party needs to rest. That attempt draws the attention of a mob of kobolds, which we hit with a Sleep - and then the nymphs follow up with a Confusion each.
Pink elephants on parade...
After dealing with the kobolds, the next attempt brings zombies. Finally, the party rests on the third try.
A friendly ghost offers us a quest, and down we go.
A few more wolves, many empty corridors, and we approach the end. The party prepares; a Remove Fear, and Imoen casts Polymorph Self. She goes ogre, then starts sneaking...
Hey, Quayle, can you throw me an Invisibility?
Cleaning up the remaining foes is routine, as is recovering the book Ulcaster seeks. Now, we head up and find where Ulcaster has wandered off to... Not too bad.
Gullykin comes next, after daling with some ghasts that waylay us. The area outside the village doesn't hold much; just a few kobolds, skeletons, and wolves. Enough of a reason for the village to have a wall, at least.
The mayor Gandolar Luckyfoot directs us to an entrance to the Firewine Ruins hidden in the winery basement. It's not much of a secret if they're willing to just tell any passing adventurer, but we're fine with using it.
In the winery, Coran asks Randy to join him for a drink:
Come on, live a little!
No. And not you either, Imoen.
We enter the ruins, and Imoen starts working on the traps. Then Faldorn and Quayle start shouting at each other:
There are ghostly knights here, bound by an ancient vow. None shall leave until all are one... we'll try to do something about that.
A bit farther on, we meet a group of kobold commandos, and the missing undead knight. We must strike him down to reclaim the armor.
See those bodies? That's why I asked you two to be quiet. I don't think that was all of them, either.
Eh, it's just kobolds. I'm not worried.
The exploration continues, and Quayle pokes at Faldorn again:
*nods*
Then we come to a larger room, and a substantial gathering of kobold commandos. This calls for a sleep spell.
Amelia goes down quickly - but the swarm of kobolds that suddenly appears is less welcome.
That fight puts us over two full stacks of fire arrows, so I switch our archers to them for a while. A pair of nymphs heals the party, and we're nearly out of healing for the day. Now, we just have to deal with that last wing of the ruins.
(Incidentally, the multicolored powders we pick up from this? 50 pounds weight, goes in the scroll case. Some odd choices there.)
There are a few more kobolds inside, and then we come to something different.
His mage minion Lendarn and his ogrillons go down first; Faldorn's Lightning spell helped with that.
The ogre mage drops an Invisibility 10' scroll - something Quayle certainly wants.
And then, we find another passage up. Follow it...
Still, we've removed the threat to the village, and that's enough for a modest reward from Gandolar.
I'll pass. You three can go ahead.
After a stop at the Friendly Arm to sell some things and buy bolts, the party moves on to the city of Baldur's Gate.
We are invited to the thieves' guild, where a thief named Narlen Darkwalk recruits Coran for a bit of burglary:
Just keep it nonviolent.
Oh, of course. They'll never even see me.
Exploring the city, our first step outside the starting area is to the north - where a pair of Iron Throne assassins are waiting.
I identify the tome ... wait, Randy only has 18 Dex? I must have made a mistake back in character creation... OK, I'm shifting a point from Charisma to Dexterity. Start with 8 Cha (the elf minimum) and 19 Dex instead of 9 and 18. Note that this means Randy has been giving away a point of ranged THAC0 for the entire game so far.
We need a reshoot - next time we get a chance, fix that shot in the credits.
Coran opens a door... trouble. Jacil and his blink dogs attack.
This "Ragefast" must die! No man should ever hold a nymph captive!
We'll deal with him. We just need to gather more information first - you wouldn't want to charge into a mage' sanctum unprepared, would you!
Then, we find an abandoned shop, full of rabid chickens for some strange reason. Well, we can put down the fowl easily enough.
Next, the docks. Time suddenly leaps ahead, and a trio of Dark Moon monks emerges to attack Rasaad.
Wait, they turned day into night? How is that possible?
The Dark Moon order has the favor of Shar - but that should be far beyond them.
Maybe they're drawing on the power of some artifact, or a ritual to empower their members
If so, it'll be at their monastery. We'll need to track down this "Sorrem" to find it. He'll be at the Blade and Stars.
We'll be there, once our current business is done. We can't go off after that monastery while we're still poisoned, after all.
A sailor speaks of a "New World" across the sea - that might be nice to see sometime. Faldorn is struck by lightning on the way to the temple, and stops for a moment to heal.
The high priestess wants a "book of wisdom" in exchange for the geas removal scroll; we agree, although we'll look for an alternative.
Since it's night and the hall is deserted, we take the opportunity to steal the telescope.
Then we run into a boy asking for aid. It seems the priests of Umberlee killed a curious child, and the priest Tremain Belde'ar wants the body back so he can raise it. We will be glad to help.
These priests of Umberlee are truly vile. Killing children for simple curiosity? We should remove their blight!
We take what we want by force, then? That should work.
Yes, let's do it.
All right, you've convinced me. Force it is.
It's an easy fight - they don't get off any offensive spells.
Upstairs, Lothander has brought a group of thugs - clearly, he intends to renege on his agreement. Well, we can fight dirty too.
Sorrem is here too. He offers to guide us to the Dark Moon base in town, but now is a bad time. We'll wait.
Heading over to the Blushing Mermaid, we are accosted by the ogre Larze, another killer out for Randy's head.
Randy drinks the antidote, and the poison is cured.
Now that we have some breathing room, what next?
It's dark - a good time for some thieving.
We need to free that nymph!
The Dark Moon gathers. We need to stop them!
All right, you've all got good points. Coran, you're up first - as you said, it is a good time. Faldorn, we'll save that nymph next. We'll need to ask another local mage about Ragefast's defenses first. Rasaad, we'll take on the Dark Moon once those are done. I doubt their monastery is close to the city anyway.
Coran heads out for Narlen's heist, where he plays lookout and warns the thieves.
With that done, Coran agrees to another job right away - stealing a jewel from a fence. He's in and out without getting spotted.
Now, for the guildmaster's heist. This will require more subtlety. Coran removes his armor and weapons, then infiltrates by requesting a servant position.
Resar wasn't carrying it - I don't think he was ever planning on paying up.
Well, good riddance then.
Tremain gets his son's body back.
Euric gets his amulet, but he's not going back to his mother. Well, we're at least going to tell her where he is. She can fetch the boy herself if she needs to.
A visit to a warehouse - Nadarin says there's a basilisk on the loose? OK, we'll take care of that. Faldorn goes in to deal with it; she would prefer seeing it released, but even she sees the necessity here.
Another warehouse, and Noralee gets her gauntlets back.
Brevlik gets his telescope, and that's enough for Faldorn to reach level 9 - our party's first level past the original BG experience cap.
Nadine rewards us with an amulet, and we head into the north central sector.
Rinnie wants a book - we'll keep an eye out for that one. Petrine wants her cat's favorite ring - Coran should be able to handle this one easily enough.
Well, I picked up some gold for myself, too.
We consult with the mage Ramazith at the base of his tower - he wants the nymph Ragefast holds, and is glad to tell us how to get past his defenses.
We're not giving him the nymph.
Of course not. Ramazith definitely has something nasty planned for her. We'll come back for him when we're done with Ragefast.
Ragefast flies into a rage as soon as we mention Ramazith's name, and we are forced to kill him.
Cut! She isn't supposed to die, people! Start that one over again and do it right!
Take two goes smoothly.
The sun rises, and Coran runs into some trouble from his past.
Hey, I know what entropy means. It's a measure of chaos...
Exactly. It doesn't have anything to do with "bedroom activities". But no, you just had to act like a fool and get us in a fight.
The other damage there? A point-blank Wand of Fire hit.
The new gauntlets, at least, are useful. Faldorn switches to spider form with the gauntlets, for twice as many attacks while maintaining high damage.
Then we reach Yago. He tries to fight, but there's just not much he can do.
Oh, I'm not like a crow?
No. Crows care for their chicks. You're more like a trout, spawning without any thought for the resulting children.
And now, to confront Ramazith. He hides at the top of his tower, and invites us to run the gauntlet. First floor: two mustard jellies. They're tough, but Faldorn handles that easily enough. Second floor: ghasts. Quayle takes a hit, but saves against the paralyzation. Third floor: hobgoblin elites. Quayle gets poisoned and drinks an antidote. Fourth floor: kobold commandos. Randy is still blinded from the Vay-ya/Desreta fight, so I wait...
The idle time leads to Faldorn sharing a story with Imoen:
And now, the top floor and Ramazith himself. Two hits, and he's dead.
What did you expect, Coran? It's a history book for general audiences. They don't put salacious tales in those.
Over in the southwest, Aldeth Sashenstar wants us to investigate his partners in the Merchant's League - OK.
Inside, Aldeth's partner Irlentree invites us to a party on the third floor - strange, Aldeth didn't say anything about that. We enter Zorl's office, and open his locked desk - treachery. Zorl and Irlentree have been killed and replaced. This is something to report right away.
... I didn't think of that. You were using your crossbow anyway - it wouldn't have made a difference for you.
I know, but your guards could have used the help.
With the party already exhausted, the first duty is rest. We head to a nearby inn, where an overzealous paladin scans us.
After that, we enter the house next door to point out their door is open... Sunin calls us thieves for that. How rude.
Cut! That's no good. We need Rasaad. Let's redo the scene - places, everyone.
For the second try, we add an Insect Plague spell after the first round's actions. That doesn't care about invisibility, as long as it targets one of my party members first. Sunin dodges it by having a pillar in the way, but that's OK; most of the party saves against the Chaos, leaving only Faldorn (in spider form) confused.
And then ... well, he gets lucky with a Lightning Bolt.
Still not good enough. Take three, everyone
On the third try, I have Imoen precast a Stoneskin - which baits out a much less dangerous Remove Magic instead of the Chaos. Add in a successful Insect Plague, and things go much better. Sunin even failed the dispel check on Imoen.
A store visit to sell some stuff, and then it's off to the Blade and Stars so Sorrem can take us to the Dark Moon meeting place.
I thought the Dark Moon capable of more - have I been overestimating them?
We head upstairs, and eliminate the remaining monks and Sorrem. Sorrem drops a letter which tells us of a Dark Moon monastery in the Cloud Peaks. We have a target.
Agreed. We're with you.
We stop in Beregost so Garrick can identify our stuff, and then head to Nashkel. Randy uses the two tomes (Int and Wis) and the party rests.
We go south from there, to the hidden monastery in the Cloud Peaks. Outside its gates, a vile scene awaits:
It's the thought that counts.
The snow trolls and winter wolves nearby fall easily with the aid of our fire arrows. Then, on the path up to the monastery, we encounter a number of Dark Moon monks acting as guards. They are immediately hostile, so we kill them. Finally, at the gates, there is Gamaz - and he has turned to the darkness.
That's good. You've taken a first step away from the lies of Shar.
Applicants, kill my brother!
Somehow I don't think he's going to see reason here.
The applicants are entirely ineffective.
Then Rasaad opens up about his past - he held back in training against Gamaz, letting him win in spars. Gamaz came to resent this, and the Sharrans capitalized on that resentment.
I think so. I'll still try to talk, any chance we get.
I wouldn't expect anything less.
Inside, more Dark Moon followers await, and are easily handled. We move slower to deal with traps, and soon come to a hall where Gamaz waits with a group of acolytes. Rasaad tries to plead with him again:
(It's a large damage boost for now. The next session, it stopped working for Rasaad - the wolf transformations reset his strength to 18 every time. If he's using the cloak of the wolf, strength potions are the way to go.)
The next area is a roughly worked cavern, with cages full of beasts and lesser monsters. Presumably, the Dark Moon acolytes train by fighting them.
Then we find two prisoners, caged by a riddle. Randy's intelligence is more than enough to solve the riddle and free them - but it turns out one was a Dark Moon agent.
We will have to watch our backs.
And now, we emerge to the peak, for the final confrontation with Gamaz.
Gamaz! Your schemes end here! Your rituals will never again warp time!
Rasaad takes some nasty hits, but soon all the minions die and only Gamaz remains.
Expecting the spy Bassano to attack on the way out, we have Imoen transform into a mustard jelly to bait his attack. He doesn't fall for it, and instead hits a blinded Faldorn with a 21-point backstab. Then, made visible, he is quickly killed.
Guest Starring Neera
Fatigue catches up to the party, and they rest out in the snow. The first two tries are interrupted by trolls, but the third succeeds. The party then returns to the partially explored area where they fought Kryll:
Interesting - is that what the Iron Throne has waiting for us?
Further explorations lead us to a Flaming Fist mercenary - who seeks Samuel as a deserter. We try lying, but he won't accept it.
Cut! Do things in the right order this time, people!
And on the reload ... oh great, Rasaad's strength goes down to 18 when he transforms now. Better move that belt over to Coran, once we get the opportunity to memorize a Remove Curse.
Killing a group of Winter Wolves brings Rasaad up to level 8; Single-Weapon Style taken, to work with his wolf form. And now - he's got a wand of missiles in his quick bar, even though the real item was unequipped due to low Int and transferred to Coran. Oh, the bugs.
The party's next destination is an unexplored wilderness area northeast of Nashkel. After a twice-interrupted rest, Rasaad gets decursed and the Big-Fisted Belt is moved over to Coran.
Some ogres are dealt with, and then we meet Sarhedra:
Some minor trouble lies nearby; the half-ogre bandit Arghain wants our iron.
Then comes some more bickering between Faldorn and Quayle:
A farmer asks for help protecting his cow from a group of xvarts; a Sleep spell does the trick.
Probably the meat. You've seen all the hungry wolves out there; it makes sense that the xvarts wouldn't be eating well either.
More bandits, led by an Ioin Gallchobhair ... easily dealt with.
With that, we're done with the area. The Friendly Arm is next.
After a rest, we pick up Neera. She has a mission for us: to find the wild mage Adoy, and seek his help controlling Neera's wild magic.
We are immediately greeted by a cawing squirrel - perhaps Adoy has not cured his wildness.
I don't know, what do you see?
These look like kobolds, only they're dressed up as goblins.
Yes, I see that too. Well, at least they're not attacking anyone?
Anyway, we follow the idiot. A detour to see the "crazy" up north - a ranger named Magreb. We promise to find out what happened to his wife Rilsa.
A moose somehow summons an ogre, which we put down - is wild magic infectious?
He has to be ... it's the only way ... I hope.
A caged bear, driven mad - dead now.
Sadly, the peaceful path ends when we reach the caves. These "goblins" are meaner, and maybe a little smarter.
Humanoid, too. This bunch are definitely a menace.
Were a menace. They're just dead now.
We find Rilsa's body next, and bury it.
I didn't. Those idiots came up with that all on their own, before I even got here. Bunch of useless tunnel rats - won't even fight unless I'm there to give the orders. Speaking of orders, attack the intruders!
The fight is short; Rogdok doesn't even get off an attack. The "goblins" under his command are slightly more effective, hitting Neera with a backstab.
(The archer goblins here are level 1 thieves, equipped with composite longbows and short swords. Accordingly, the SCS AI makes them hide with automatic success and stab.)
For this upcoming boss fight, I'll buff up. Imoen casts Polymorph Self and hastes the party.
We meet Adoy, but he cannot give Neera what she wants. A bit of conversation, and then - trouble. The Red Wizard Ekandor returns.
The warriors in this fight are barbarians and a berserker. As such, the disabling spell we'll go for is Slow.
With us hasted, them slowed, and Ekandor poisoned, it's easy from there.
A well-equipped party makes a lot of things easy. Besides, we were ready for trouble.
Then Adoy returns to human form, and offers some wisdom:
No!
I expect he'll be back before too long. He has some "goblins" to guide anyway, now that Rogdok is out of the way.
But ... he didn't help control my magic.
I don't think there are any easy answers for wild magic. You'll just have to learn to live with it.
We report back to Magreb; he's relieved by what we've done, and hopes to negotiate with the "goblins" now that they don't have Rogdok telling them what to do.
(On that goblin/kobold thing - I'm riffing on a quirk of the game here. Goblins didn't exist in original BG, so when BGEE introduced them for Neera's quest and Rasaad's quest it had to give them everything. Copying goblin graphics over from BG2 was easy enough, but for the internal race the game just used an existing race and made them kobolds. Then PPE sees these goblins with lines and assigns them a portrait ... using that internal race label to choose. And so, we get goblins with kobold portraits. Or, as this run interprets it, kobolds dressed up as goblins.)
For the first stage of this trip, we return to the bandit camp. The bandits themselves have been slaughtered, but there's still a decent chunk of the map to explore. Aside from some ruins inhabited by hobgoblins and low-level undead, though, there isn't much to see.
That's it? From the tales I've heard you tell, I thought this camp would be so much more.
It was, the first time. It looks like the monsters didn't come back.
Next, we head back to Larswood. This is where the ogre mages Shilo Chen spoke of are, and I decide to get in a bit of backstabbing before the party enters the fray. Ogre versus ogre:
We head south next, to where basilisks once roamed. And ... darn it, we're not carrying a Stone to Flesh for the statue. We'll have to come back another time for her.
Then we come to the center of the map, which we had avoided the first time.
She just rubs us in all the wrong ways. It's a fight, which we open with a Slow and a Horror. All four of them fail their fear saves.
(Quayle reaches mage level 7 from the experience, and memorizes a Polymorph Self for the next day)
And now, we hit the last fully unexplored wilderness area, in the eastern Cloakwood.
A man named Fahrington offers to "brighten our karma" if we retrieve a scroll - sure, why not.
And then we face a group of spiders. The giant spiders' web attack ensnares Faldorn despite her spider form, dropping her deep into the red.
We return to Fahrington, who lets us keep the scroll...
I told you so.
Then, we come to a group of Red Wizards. They want to kill us? It's a fight.
Boss? Looks like this reel got overexposed. We'll have to reshoot if we want anything here
Well, OK, it's not perfect. One of them gets free and hits Faldorn with a Spook (Quayle's Remove Fear misses). The one that had defenses up hits our party with a Slow, affecting Randy and Coran.
And somehow, after all of that, the webs run out and Faldorn gets killed. ...
This time, I'm going to do the sensible thing and rest. Quayle needs to show off his new transformation powers, anyway. It takes five tries to rest - four spider interrupts in a row.
Uh-oh. Looks like another reel went missing. We don't have the shots for the new Blue Ranger transformation.
We took some later, right? Just add them in post. We use stock footage for transformation scenes anyway.
We win the fight, taking minimal damage.
I'm the best spider, and you know it.
Only when you remember to transform.
With that, our journey into the eastern wilderness is complete. The party returns to civilization, visiting the merchants of the Nashkel carnival to sell their stuff.
After a rest, we approach the farmhouse and speak with the distraught Farmer Brun. We will find his son, even if Faldorn objects to his religion.
Good work, and I'll trust that you stuck to the quota.
We were already over just from taking down the ones that attacked us, weren't we?
Don't worry. She didn't notice.
Returning to the farmhouse, the tracks lead to a large pit - uh-oh. As we expected by now, the pit leads to a network of ankheg burrows.
And then, we find the body, among a pile of treasure. It's something of a surprise that Brun's body hasn't been eaten, but at least we'll have something to show his father.
then
It's the farm that threw off the natural balance. Kill off one kind of predator, another booms.
And after that boom, they run out of food and their population crashes anyway. The ankhegs have a better shot around here after our culling than they had before when they were eating everything in sight.
We return to Brun, and talk the proud man into accepting a bit of gold to compensate for his loss.
Of course, when we arrive, it's night. Oh well, it's about time to rest anyway. While we're here, we turn in a few bandit scalps and tell Officer Vai that the threat has been cleared out.
That "elsewhere" is, naturally, Sorcerous Sundries. We now have full stocks of +2 ammo, and I've even bought a few special arrows - dispelling and detonation. Shilo Chen rewards us for killing the ogre magi with some gloves of pickpocketing - I actually have a use for that soon.
And now, off to Ulgoth's Beard. A rest, and then we go past the inn for the first time. The wizard Shandalar greets us, and asks us to perform a "simple" task ... sure.
Looks like it. When we get back, I'm having words with Shandalar.
Inside, we find winter wolves - and then, hostile wizards. Drat.
And ... I see an opportunity. There aren't any precast Stoneskins up, and that means there's an opening for some backstabbing. Imoen, time to go ogre.
Imoen tries to switch to jelly form - nope, disrupted by a double-Chromatic Orb sequencer.
And then - a lightning bolt hits Imoen twice. Dead. She tried to dodge, but was under the influence of a Slow spell.
Cut! You need some new tactics there.
The second time around, we don't go for backstabbing. Instead, Faldorn lures them out and then switches to fire salamander form for the dueling fireshield trick - every time she hits, that mage (Beyn) gets hit with her fireshield.
With his two buddies down, Andris hides somewhere under invisibility. Eh, we'll find him eventually.
That, or he'll teleport in. Oops, looks like it's time for a fight.
Up next, we face Garan. He is just as unreasonable as the three greeters, and sends a quartet of ankhegs after us.
How many of these mad wizards are there?
Too many. Did you hear what that Andris guy said about this place being a trap from mages?
Then comes Cuchol:
We return to the large chamber near the entrance, where Quayle accuses Coran of stealing his moves.
Isn't there a frat party somewhere that the two of you should be in?
Why would I restrict myself like that? As I see it, all men are brothers. Don't you agree, Rasaad?
Don't bring me into this.
Hey, weren't we supposed to have a picture there?
Camera glitch. Sorry about that.
A fireball trap goes off despite us searching with Imoen right there... grr, reloaded. Then it's Tellan's turn to fall - no pictures, since he wasn't much of a fight. We don't even need the (evil) archmage robes he drops.
A few more winter wolves, and we're on to the second level. This area is populated by still more winter wolves, and our pelt collection continues to grow.
Then, we come to Dezkiel, the last of the mages trapped here.
It doesn't take long to break through his stoneskins; with the aid of Faldorn's poison, he doesn't even get a spell off. That just leaves the snow golems, and we're free to leave.
May he find peace in the afterlife, as he never did here.
Amen.
Upon returning to the surface, Shandalar teleports us back.
Don't worry. All those ankheg shells and winter wolf pelts will bring in some good coin. It's not like we came away empty-handed.
True enough. Where to next, fearless leader?
Beregost to sell our acquisitions. Then we're overdue for a return to Baldur's Gate. We still need to investigate the Iron Throne, after all.
While we're in Ulgoth's Beard, we take care of a few things. We agree to rescue Therella's son, buy out a merchant's remaining stock, hire a tour, and talk to Mendas.
Shouldn't we find out all we can about him before doing his job?
Don't worry. If he tries to cheat us, we'll just improvise like always. We usually make a big profit on those jobs
Now, we head south to Beregost to sell some things. Feldepost buys 16 wolf pelts, and Thalantyr buys the other 11.
We sort out a few more things, and return to Baldur's Gate. It's time to get on with things here.
Upstairs at Sorcerous Sundries, we run into some troublemaking mages:
Ordulinian wants us to steal some trinkets from a pair of necromancers? We'll check them out first to see if they really are that bad. If they are, that sounds like a pickpocketing job.
Now it's time to look for the sea charts, so we check in with the Merchants' League. We bluff our way in, and find the captain wants some swill for the journey. OK, we'll pick that up. We do, but we have to pay off his 900 gold bar tab first. Ouch.
And then ... he just hands us the charts.
That easy? And here I thought I'd have to steal the charts.
I'm not about to look a gift horse in the mouth.
Then it's time for Nemphre, who wants Arkion's bloodstone amulet ... yeah, we're going through with Ordulinian's plan.
Maybe... but there's no way I'd let other thieves do it!
That battle brings Coran to fighter level 7.
Then comes Ghorak - sure, we'll cure his curse.
Over at the Three Old Kegs, the priest Quoningar wants a potion of mind focusing. Sure, we can spare one.
We've got more of them. Just wait until you're ready to learn more spells.
Upstairs, we meet a noblewoman troubled by a blackmail plot - OK, we'll deal with the creep.
Over 200 ziose gems? Impressive.
Agnasia takes the skull, and Ghorak's curse should be lifted now.
We talk with a few people; Entilis Fulsom points us towards Scar and Duke Eltan, while Belgin seeks a gnome with a big attitude - wait, not Quayle?
No. Now go away, stupid gnome.
I'm the smartest gnome around. Don't call me stupid!
I don't care. You're not who I'm looking for.
Then there's a stranded sirine - we try to help, but she's not taking it.
She acted according to her nature. All I see here is senseless death.
Over at the Splurging Sturgeon, we make a bet with a drunk about killing oozes - and then Coran's conscience finally catches up to him.
Don't worry. It'll be fine. And we even got a new potion case out of it.
Next comes Cyrdemac. We try to talk, but he's not interested.
We head down into the sewers looking for a body, and stumble on something more - an ogre mage and his pet carrion crawlers.
After he got away last time, I was expecting more out of that halfling.
Why? He was a coward that liked working for bigger and scarier patrons.
I suppose so. But a returning villain really should be something special.
Well, this was just a returning minion.
Arkion gets the body, and it's time for some pickpocketing. Coran puts on the pickpocket gloves and drinks a potion of master thievery - 100 PP. The ring and amulet are ours on the first try, and we return to Ordulinian.
Probably offer them back to their owners - if they agree to stop the feud.
From what I've seen, he'll probably need to threaten lethal force, too.
Now, it's finally time to investigate the Seven Suns. We are warned of shapeshifters, and a merchant on the ground floor speaks very suspiciously...
Hmph. Doppelgangers. They're just no good in a real fight.
They don't need to be, to cause trouble in a business like this.
Then it's off to the Flaming Fist headquarters to speak with Scar.
Ah... I stashed it when we were giving the other body to Arkion. You know, so we wouldn't give him the wrong body by mistake.
Sorry about that, Scar. We'll be right back with her body.
The body is delivered, and we head farther in. Fergus wants an angel skin ring, which provokes Faldorn to speak out against love:
It's not love that has you walking around with a baby on your back. And when I want one of my own, I won't need love for that.
After that is taken care of, Scar brings us to see the Grand Duke.
Are you sure? The Iron Throne is a big organization. They could just have more mercenaries waiting for us.
You could be right there. I remember what that astrologer said. We'll have to be prepared for a battle when we get up there.
I took Sunday off from posting, and I think I'll keep doing that in future weeks as this continues. It helps me catch up.
We still have a few things to do in the city; we'll start in the southwestern district.
Checking on the building the Dark Moon had used before, we find an ambush by a group of thieves instead.
Then it's an inn, where slimes are rising!
The north central district comes next; we've dealt with most of the highlights, but there are still a few houses to look into. We open the door to one of them, and ...
Upstairs, we meet Drelik's master, an equally arrogant man. He is unwilling to accept the fact that his butler started the fight as an excuse, and we must fight him as well.
What terribly unreasonable people. We offered to leave peacefully, but they just had to fight.
The other houses nearby hold little of interest, and we finally turn to the last sector of the city.
A gnome named Quinn has lost his friend Nester to ankhegs nearby, and asks for something to bury - sure, we can do that.
How do you know that?
Way back before I picked you up, I dodged around it on my way to deal with some zombies. I never came back to kill it, until now.
The ensuing battle is short; the party slaughters the ankheg before it can even attack. Nester's dagger is returned, and Quinn rewards us with a gem.
A nearby unlocked house holds nine-year-old twins, who have a problem their parents don't believe.
The mage Gervisse emerges, and accuses the druid Voltine of polymorphing ... yeah, we're not taking your word for it without some real proof.
Gladly!
Gervisse goes down before he can even react (four hits, 44 total damage). Voltine rewards us with a unique wand, while the children give us a basic scroll.
Next, it's the Silvershield estate. We show the pin we found some time ago, and the guard bids us to speak to Lady Silvershield.
A few more houses...
I'm surprised. I thought you were always up for burglary.
I've got a child now. I have to set a better example.
And now, Degrodel's house. It is guarded by dangerous creatures - Doom Guards, Invisible Stalkers, and Helmed Horrors. With their general immunity or extreme resistance to missile damage, they deal some serious damage.
We deal with the two remaining monsters inside, and Randy reaches level 8 - he can cast a spell now. It's time to talk to the master of the house.
While we release all of them, Vail is the one who tells us where to find the helm - along with the hiding place of another artifact.
We've got some technical difficulties here. Can you wait while we fix the camera?
OK, then, back to the beginning of the scene.
(Game crashed, reloaded at autosave)
The answer? Badly. Caturak is outside the area of influence, while the other four are immediately held.
I experiment a little gathering data on polymorph forms - and it crashes again. Very unstable today, I see. And a third time ... what, is it the brown bear form that's the problem? The enemy aren't all held in take 3, and the nymphs spend a few more spells, but we still don't take any damage. Brown bear form crashes the game again... well, OK, we can just use black bear form if we really feel like it. It's almost exactly the same.
Fortunately, we saved after the fight this time. The helm is retrieved, and we head back to Degrodel...
I knew he was trouble.
Oh well, have a web while the spiders attack. Quayle and Imoen take a bit of fire damage form Doom Guard hits, but their stoneskins hold. We have recovered the helm and defeated Degrodel's minions, with considerably less pain than the first batch despite Randy and Coran spending most of the battle webbed.
Now it's off to the Undercellar for that other artifact. A guard demands a 10 gold entrance fee, but he relents when we say we'll leave. Coran sweet-talks Quenash, and the Cloak of Balduran is ours.
Oops. Lost a shot there.
It wasn't too important. Just leave it.
It's been a long day and our spells are rather depleted, so the party rests at the Blushing Mermaid.
It is nearly midnight when we wake - a perfect time to infiltrate the Iron Throne and find out what they're up to.
The tower is still populated, but we face little resistance on the way up - even the guards can sense something is wrong.
So do I.
Destus Gurn gives a long-winded explanation of the simple fact that the Iron Throne is negotiating an agreement with the Grand Dukes - along with the names of their leaders and ... hey, that's a typo! (Almost certainly in the BG1 NPC Project)
With the coming battle upstairs, we prepare the spider and Web attack. This time, we'll add Haste for the party and potions of freedom and strength (22) for Rasaad.
What! The camera broke again! I thought I was paying for quality here! How much did we lose?
The whole tower, boss. We'll have to reshoot from the bottom.
(Another crash. See note at the end of today's episode for more.)
Up the tower again, repeat, and we're ready for the fight.
I don't think the doppelganger is part of the main group; it's just here for a moment before assuming its disguise.
Probably that emissary. She did come up right before us.[color]
We open with the sequenced webs, ensnaring most of the enemies. Add a Detect Invisibility (cast from an item) and the hidden thieves become visible.
Then Rasaad gets dire charmed - a waste of a spell, since he's already confused and not following anyone's orders. An ogre is summoned on top of Coran, so he switches to melee.
We take down the ogre, then Rasaad kills the enemy doppelganger and Quayle gets confused. A very confusing battle.
The most valuable piece of loot, of course, is the ring of free action. Rasaad takes it, and now we can make all of our melee forces immune to Web without using consumables.
That leaves us free to explore the rest of the floor, where we find Emissary Tar's body.
This is no time to gloat. A woman is dead.
Thaldorn tells us where to find the remaining Iron Throne leaders, and we take pity on him - he can go to the Flaming Fist and be arrested.
We also find a number of letters, which make the truth of the matter clear - the orders in this scheme come from Sarevok. We will have to face him before we can truly solve the region's problems.
Scar wants to meet with us, but we still have one more piece of unfinished business in the city - clearing out the sewers. We have dealt with one bit of trouble down there, but the bulk of the sewers remain unexplored.
Carrion crawlers and phase spiders abound, but nothing we can't handle. We move on to the next section, and a kobold tries to hold us up? Dream on.
On to the next section, where an ooze calls itself king.
A nearby corridor is filled with eggs, and more phase spiders emerge here. We will have to report this to the authorities so the nest can be properly cleared out.
We stop at some shops to buy consumables (including some Greater Malison scrolls) and sell junk, then head off to Scar.
Uh, boss? We have a problem here. This reel's labeled wrong; it's just a copy of another one.
And it's too late to reshoot? Fine, we'll have to cut it out.
(The picture meant to be here was replaced by a near-identical copy of the previous one)
I agree that we have to confront the leaders in Candlekeep, but watch out for Sarevok, too. He's the one who hired the bandits and brought in the doppelgangers. Whatever he's planning, it's bad news.
With that, Scar sends us away to Candlekeep.
And now, the technical difficulties. Basically, despite how fun a spell it is, Polymorph Self is very good at crashing the game. It gets worse in BG2, as I've generated saves that immediately hang if you try to load them. The more party members polymorphed, the more likely you'll run into something that breaks.
A few episodes into BG2, after a session with multiple crashes and then a hanging autosave just before the boss, I had enough. This run's theme causes the game to crash way too much. Even limiting myself in certain ways to avoid the crashes wasn't enough to prevent them; there are too many triggers. As such, all future play on MPPR is canceled. I'll post what I've already finished, but I don't intend to continue beyond that.
Unless patch 2.6 has some fixes to polymorph effects, which eliminate or greatly reduce the crashes. I might pick it back up then.
It was fun, though, while it lasted, and I look forward to reading whatever gameplay you have left to write up. Thanks for enduring as many crashes as you did, and if you come back at some point to start over with a different theme, I will definitely check it out.
And now, on to the episode. This one gets a content warning for nudity and discussion of male anatomy. Viewer discretion is advised.
Upon arrival at Candlekeep, we are immediately set on by a group of ogre magi. Our bounty has grown dramatically.
Wait a minute, there were supposed to be five of them. Faldorn, would you do the honors?
Nope, True Seeing doesn't help; the fifth isn't hostile so it isn't revealed. OK, time for some brute force - charges from a Wand of Fire. I'll go with Scorcher mode, targeting Faldorn in fire salamander form. Three shots later, I still haven't found the invisible enemy. Oh well. Let's just go in.
For the baby's sake, yes, we can rest. We can afford a few hours here and there.
All is not well, though. Doppelgangers have infitrated Candlekeep, and we are forced to kill one in the priests' quarters.
It's probably something to do with the Iron Throne leaders. But are the doppelgangers here to help them or to hurt them?
Now I'm really worried.
After a few more talks, we enter the central keep. Quayle takes the opportunity to ask Faldorn what "benefit" there is in being a druid:
Oh? How would you know? You're not a druid.
No. I'm a monk of Selune, and you're a cleric of Baervan. We were called to serve our gods, just as Faldorn is called to serve hers.
Karan delivers a warning, and then some of the old monks share some reminiscing ... Randy running around naked? Should we really be talking about that? I mean...
Relax. We haven't even filmed any flashback scenes. You'd know if we called you for them.
Not if they were childhood scenes! You'd need a different actor for those.
We haven't filmed any childhood flashback scenes either. Now get back on set. We've got filming to do.
Two more floors up, and Imoen engages Quayle in a conversation about nose size.
Oops. I just get too much into my character sometimes.
Noses? What do noses have to do with anything.
It's a metaphor for a ... lower ... appendage.
That still doesn't make any sense. It's not like penis size is important.
Of course not - but a lot of men are silly about it anyway.
The fourth floor brings another doppelganger, the strongest yet. The false Shistal doesn't last long, but he does give enough experience for Imoen to reach level 9 as a mage. We have a bit more experience to gain, but there will be no more levelups in BG1.
So that's what it was all about. Well, I'm glad Gorion raised you well - you haven't been feeling any murderous urges?
A great destiny? I am honored to play a part in it, and help keep you on the right path.
You still bleed like any other man. Does it matter if a god was your father?
Quayle, advisor to a god's son. That has a nice ring to it, doesn't it?
Destiny? Don't let it distract you from the good things in life.
Tethtoril and Ulraunt are on the top floor; Tethtoril speaks warmly and asks for a longer conversation about Gorion later, but Ulraunt is curt and dismissive.
Back down to the second floor. Unable to find Randy, "Koveras" chants prophecy:
"In the year of the turrets, a great host will come from the east like a plague of locusts. So sayeth the wise Alaundo"
What's with that weirdo chanting prophecies in the middle of the library?
That must be "Koveras". Let's just stay away from him.
What's so bad about ... oh, right, he's Sarevok. Why do baddies always think that a simple anagram can hide their name?
Or not. As we leave, a Watcher accosts us with a terrible accusation:
We move slowly in the catacombs, checking for traps regularly. Still, the rewards are great - Randy reaches wisdom 16 and strength 19 from tomes, and the party picks up a +2 cloak of protection.
The next section brings ghasts, and the first kill there brings Randy to the experience cap.
The next area brings more doppelgangers, now impersonating Candlekeep residents we're pretty sure are still alive. Arkanis and Deder are down here too, and willing to help.
Leaving the main hall brings us to a group of doppelgangers, impersonating Elminster, Gorion, and Tethtoril.
When their impersonation fails to draw the desired reaction, the trio attack. They don't do any better than the other doppelgangers.
On to the next section, and we buff up in preparation for the battle to come. Spider forms again, for maximum effectiveness with Webs.
We then deal with a spider infestation, and move on to the next threat - basilisks.
On the way out, Quayle boasts of his intelligence...
An acquaintance of Sarevok named Diarmid comes in, and briefly mistakes us for Prat's band:
As we exit, Coran has something to say:
Coran leaves to drop off the baby with Brielbara. We'll follow shortly so he can rejoin.
We deal with that last ogre mage using fireballs from wands - two suffice.
At the Splurging Sturgeon, Coran greets us simply: "Back to adventure!" Indeed. Now, we head south to Durlag's Tower. On the way, we stop by an area we have already cleared to free a woman from her petrification:
The party faces a Battle Horror, and its AC proves troublesome. With the entire party ganging up on one, the Horror gets in three hits (on Faldorn, the best-protected party member) before we even land one.
Then a second Battle Horror emerges.
Let's do this one the easy way.
There are only a few doppelgangers after that - and these ones aren't even trying to impersonate anyone.
Strange. What are doppelgangers doing here? These clearly aren't the ones that Sarevok has recruited.
We reach the gates, and the bridge over the dry moat protecting the tower. Ike is getting impatient with our delays.
I honestly didn't think of it. Having her was just so ...
I've never felt it myself, but I think I understand. Parenting is just something special, isn't it?
Inside, Ike continues his tour, telling of the diabolical traps.
And then, it all goes wrong. Evil has laid claim to this tower, in the form of a demon knight!
We head back out to deal with the battlements, where many skeletons await. Add in a Doom Guard and a Battle Horror, and we've used all of our Cure Medium Wounds spells by the time we're done.
The ground floor has no active traps or enemies, so we head up. The second floor brings ghasts, which are no match for our high-powered archery; their corpses pile up in the doorway.
Here, we meet a ghost with a grudge:
And, he follows us. Down to the first floor, even. We head back up before he can get a spell off. Simple tactics, really - we head down to get some attacks in, and dodge up the stairs any time we hear a spell being chanted.
And then, all of a sudden, Daital's protections collapse.
He calls himself a thief? He didn't even open the chest in the room he was standing in!
He didn't do anything about the traps, either. Poser.
Randy now has 17 wisdom.
The fourth floor holds more ghasts, and then worse - a fiendish woman.
Incidentally, auto-pause on enemy sighted is very annoying when you're hiding from a charmed party member on another floor. You see, that party member spotting the enemy that charmed them sets it off, even though that enemy isn't currently hostile to them and you can't select the charmed party member to see what they see.
Eventually, the charm wears off and battle resumes. Faldorn resists the next charm attempt, and starts hurting the succubus. The party rejoins battle just in time to finish the fight.
Just leave already. There's nothing left up here for you to loot.
Down, then, to the cellar. After dealing with some ghasts and traps, we speak with a man named Bayard. He offers a warning, and then mentions his companion Dalton:
Scouting ahead for traps, Imoen finds a bug...
Our next kill is a phase spider, and Faldorn reaches the cap with that kill. From now on, there's only the hidden accumulation past the cap which gets reset every time you load a save.
For the triple-doppelganger battle, we spend a Haste spell. It works.
Then a few undead go down, and we read the deeds of Durlag's Pride. A strike on the gong, and the mallet's purpose is complete as well.
Imoen misses a fireball trap...
And then, after some mustard jellies, a much nastier trap. Three lightning strikes, and Rasaad is dead.
Treasure found, skeleton warriors and flesh golems killed - we're well on our way to completing the level's puzzle. Randy reactivates a machine...
Now... what happened to Avarice? Ahh, he ran off into a side corridor. Activate that Detect Invisibility... no effect, still not fighting.
We head up to the cellar to rest, since that second Haste fatigued us and most of the party needs healing. Two ghast interruptions later ... all right, make that the ground floor. The gem bag is full, so we stash things. And now, back down.
We look for Avarice ... it's just broken this game. It unleashes a Cloudkill and goes invisible, then runs off to who knows where. It doesn't even try to attack.
Let's just ignore Cowardice. We've got what we need to go down and take on the next level.
And then, Avarice finally attacks. Imoen gets backstabbed for 24 points, but we finish it off.
Dusty books lie strewn on the floor, telling tales of Durlag's fall. Doppelgangers impersonated his family, driving him to madness. The doors nearby are sealed - we will have to find some way to open them.
We do, by manipulating a statue. Then Faldorn finds a way to open another door - and "Durlag" appears. The doppelgangers are still here, it seems, and still acting out their game long after it has ceased to be relevant.
After so long alone, could these doppelgangers have gone mad themselves?
The doors then open into a large hall, and we find doors with merely ordinary locks. Randy picks up a bloody goblet of healing and a helmet that protects against fear. That helmet is the trigger for more doppelgangers. "Durlag" is joined by "Fuernebol" and "Islanne". Rather than fight in a Stinking Cloud or worse, we wait it out:
The party sets on them after the clouds clear, and quickly finishes them off.
The next room brings doppelgangers that fight as if they were the dwarves they imitate; the false Islanne is a dangerous mage.
Manipulate some levers, and it's on to the next large room. The enemies aren't playing it smart for some reason, and this "Islanne" goes down without casting any spells.
Mice got into the film storage? Stop giving me excuses and give me film instead!
That doesn't change the fact that we're missing this shot. Unless you want to call everyone back to recreate the scene exactly, we're not getting it.
Fine. We'll throw in a bit of a reaction scene instead to cover it.
This time, rather than raising her out here, we'll head back to Beregost. We're pretty much out of daily healing anyway. After a rest, we buy some ammo and Kelddath's scroll of Raise Dead.
I would have preferred a proper reincarnation. Restoring the dead as they were is ... unnatural.
You're our best front line fighter. After a reincarnation, who knows? We need you as you are.
I understand, but that doesn't mean I like it.
Back in the tower, another "Kiel" awaits just beyond the red room. We try Wands of Paralyzation - save, twice. Fortunately, brute force takes him down before he can cast anything.
Next, Dwarven Doom Guards. Imoen softens them up with a Wand of Lightning before retreating.
*Blows imaginary smoke away from wand tip*
Nice shot, Imoen.
Thanks.
Kiel's gear? No use. The berserking morningstar has a serious drawback (and nobody's proficient anyway), plus Imoen would rather use Single-Weapon Style than equip Kiel's buckler.
A few ghasts in the furnace hallway - no problem. After that, it's only traps that Imoen handles easily. Down we go.
Faldorn uses her salamander form to ignore the danger of the fireball room and open the doors. We head to the dragon room next. That is, after accidentally attracting the attention of some archer skeletons.
I choose Tarnor - so, naturally, the enemy goes after Faldorn and Rasaad first. Tarnor goes down on wyvern #3, and our front line takes serious damage - but we're clear now.
We clear the back corridor, and the garden comes next. Imoen and Quayle put up their stoneskins.
The first ashirukuru rolls a 4, and misses Faldorn. We attack in retaliation ... four misses, and it goes invisible. These things are aggravating.
The second ashirukuru gets two backstabs on Faldorn. Well, at least they're not going after my archers and getting bonus damage. Bala's axe is recovered, and we hunt down the last of those little backstabbing buggers...
And that leaves the archers in the middle section. I'm not going to even try to fight "fair" here - it's all about the fireballs (from wands, wielded by Imoen and Quayle). Many skeletons die, and their arrows are recovered.
On to the level's final challenge - the elemental rooms. Some masks offer cryptic advice first:
Before taking on the fire room, we head back up to stash some things. There's enough junk in our inventories to make that worthwhile, and travel in the tower becomes more annoying after this.
Back down, and we prepare for a serious fight.
They focus single-mindedly on Randy and pound him badly, so he uses Durlag's goblet as soon as possible. That also frees up our aura to send out more fire - bishop down, then pawn and rook. Two more fireballs catch the king in their radius, although he still lives. The remaining knight continues hitting Randy - another Durlag's charge used. Then we finish him off with a triple hit from our Wands of the Heavens.
This fight is a cool idea, but I just don't think its implemented well. The enemy doesn't have any movement restrictions, so that erodes the gimmick. And then, SCS has the enemy AI immediately charge the protagonist, who can't even run away without setting off traps - you pretty much have to use massive healing or invisibility to survive.
We are greeted by the ghost of Durlag himself.
The first path we follow takes us across a bridge to a large room that has been colonized by spiders.
Then, a statue questions us - have we learned from the history above?
Then, we face a pair of helmed horrors in order to claim a wardstone and open the next passage. New goodies come from that - a +3 sling for Quayle, and a +2 large shield that he can equip merely by casting his DUHM spell. Compared to his old +1 sling and +1 small shield, it's a huge improvement.
Now, on to the final path. We leave the worked stone hallways and enter an acid-etched cavern. Randy uses a pair of Protection from Acid scrolls, so that he can walk safely in difficult places.
Our party deals with the greater ghouls and crypt crawlers easily, soon coming to the cursed Grael. The demon did this to him?
I pray that this cursed soul can find peace at last.
He held a wardstone, which it seems we will need to open the way.
And then, we enter a worked hallway once again. Two new weapons are there; a staff and a sword.
Finally, we reach a treasure room, holding a great wealth of gold and gems. This is what the wardstone protected, what remains of Durlag's legendary treasure.
A final quiz, and Durlag opens the way forward. We go to face the Demon Knight.
Spiders? Really? That's your plan against a demon knight?
We turn into spiders and web the place up, then attack. The demon knight can't move in the webs, but we can. It's obvious.
And what about the mirror?
If it summons help, they won't be spiders. They'll get trapped in the webs too. It'll be fine.
I still think you're underestimating the demon knight. Sigh. I suppose nothing will deter your folly - just go.
The Demon Knight opens with a Remove Magic, targeted on Imoen. She loses her Stoneskin, but not her morph; Polymorph Self and its transformations cannot be dispelled.
Fear takes Imoen out of the fight, while Coran foolishly charged into the web. Randy gets blinded, and we unleash wands on the weakened foe:
We then speak to Dalton. Randy would just let him go, but Faldorn guides him to do more and have his mind healed.
You pulled it off? I'm impressed.
It got messy, but at least none of our people died. That demon knight was way too good at resisting our webs.
As you said, at least it worked. Did you find Dalton down there?
Yes. He didn't stick around once we said the way out was clear.
Good. Now I can leave too.
(The demon knight doesn't have great saves - his saves are in line with a level 13 or 14 fighter, including 8 versus spells. The problem is his 85% magic resistance - and there's no way for a BG1 party to lower that. He's also 85% resistant to the elements, so you pretty much have to beat him with physical attacks.)