Kill it With Fire! [BG1 + BG2 playthrough, complete]
 jmerry
Member Posts: 4,205
jmerry
Member Posts: 4,205
Kill it with Fire!
Or: How I Learned to Stop Worrying and Love the Fireball
Or: How I Learned to Stop Worrying and Love the Fireball
In honor of the new year, some fireworks. And in light of the traditional New Year's Eve concerts from the Vienna Philharmonic - some inappropriate music for the occasion.
Music
This explosive playthrough has a simple theme. We will try to kill as many enemies with fire as possible. We will use all those wonderful spells like Fireball and Fire Storm to devastate our foes, while making our own party immune so we don't have to worry too much about placement.
Also, I must acknowledge a major source of inspiration: the Children of Fire playthrough of BG2 on this forum. I've looked into making my version of that concept for quite a while, and this is the culmination of that. With plenty of difference, of course. That run used a variety of methods to achieve immunity - fire resistance, magic resistance, the Cloak of Mirroring. For what I plan, only 100% fire resistance is good enough. Fire Storm ignores magic resistance, and I'll be using that. Enemy mages can cast Dragon Breath and Comet - those ignore both magic resistance and the Cloak of Mirroring. And everybody can potentially use some kind of party-unfriendly fire spell; the Cloak of Mirroring doesn't protect against spells you cast yourself. With all of that, this run's party will only overlap with that one's in the protagonist and one companion - and I'll be doing something different to protect that companion.
Fortunately, the Dragon Disciple isn't the only class that gets fire resistance as a class feature. Half of our party's resistance in the endgame will come from class abilities, and some of the rest will come from personal equipment.
For BG1, we'll settle for less; just a fire-immune front line so we can use fireballs freely on melee foes.
Difficulty: Insane, no increased damage. No maximized HP rolls.
Mods in use (BGEE):
BG1 NPC project 24.9
BG1 Unfinished Business 16.0
Isra 3.4
Sword Coast Stratagems 33.7 - all tactical and AI components, only a few rule changes
Tweaks Anthology 9 - only the NPC moves and sending NPCs to inns.
Portraits Portraits Everywhere 1.01
Bigger Bard Song
Informal tweaks (my own work): Imoen has "base class" kit. Innate sequencer and contingency abilities don't pile up and give you multiple instances. Detect Illusion has range. Playable character scripts changed; Shar-Teel knows how to use thieving, Dynaheir/Xzar/Ajantis know how to use Turn Undead, automatic bard song activates even out of combat unless the bard is invisible, automatic Turn Undead actually happens when undead are nearby and takes priority over auto-attacking.
I choose to go with two PCs for BGEE. First, the protagonist.
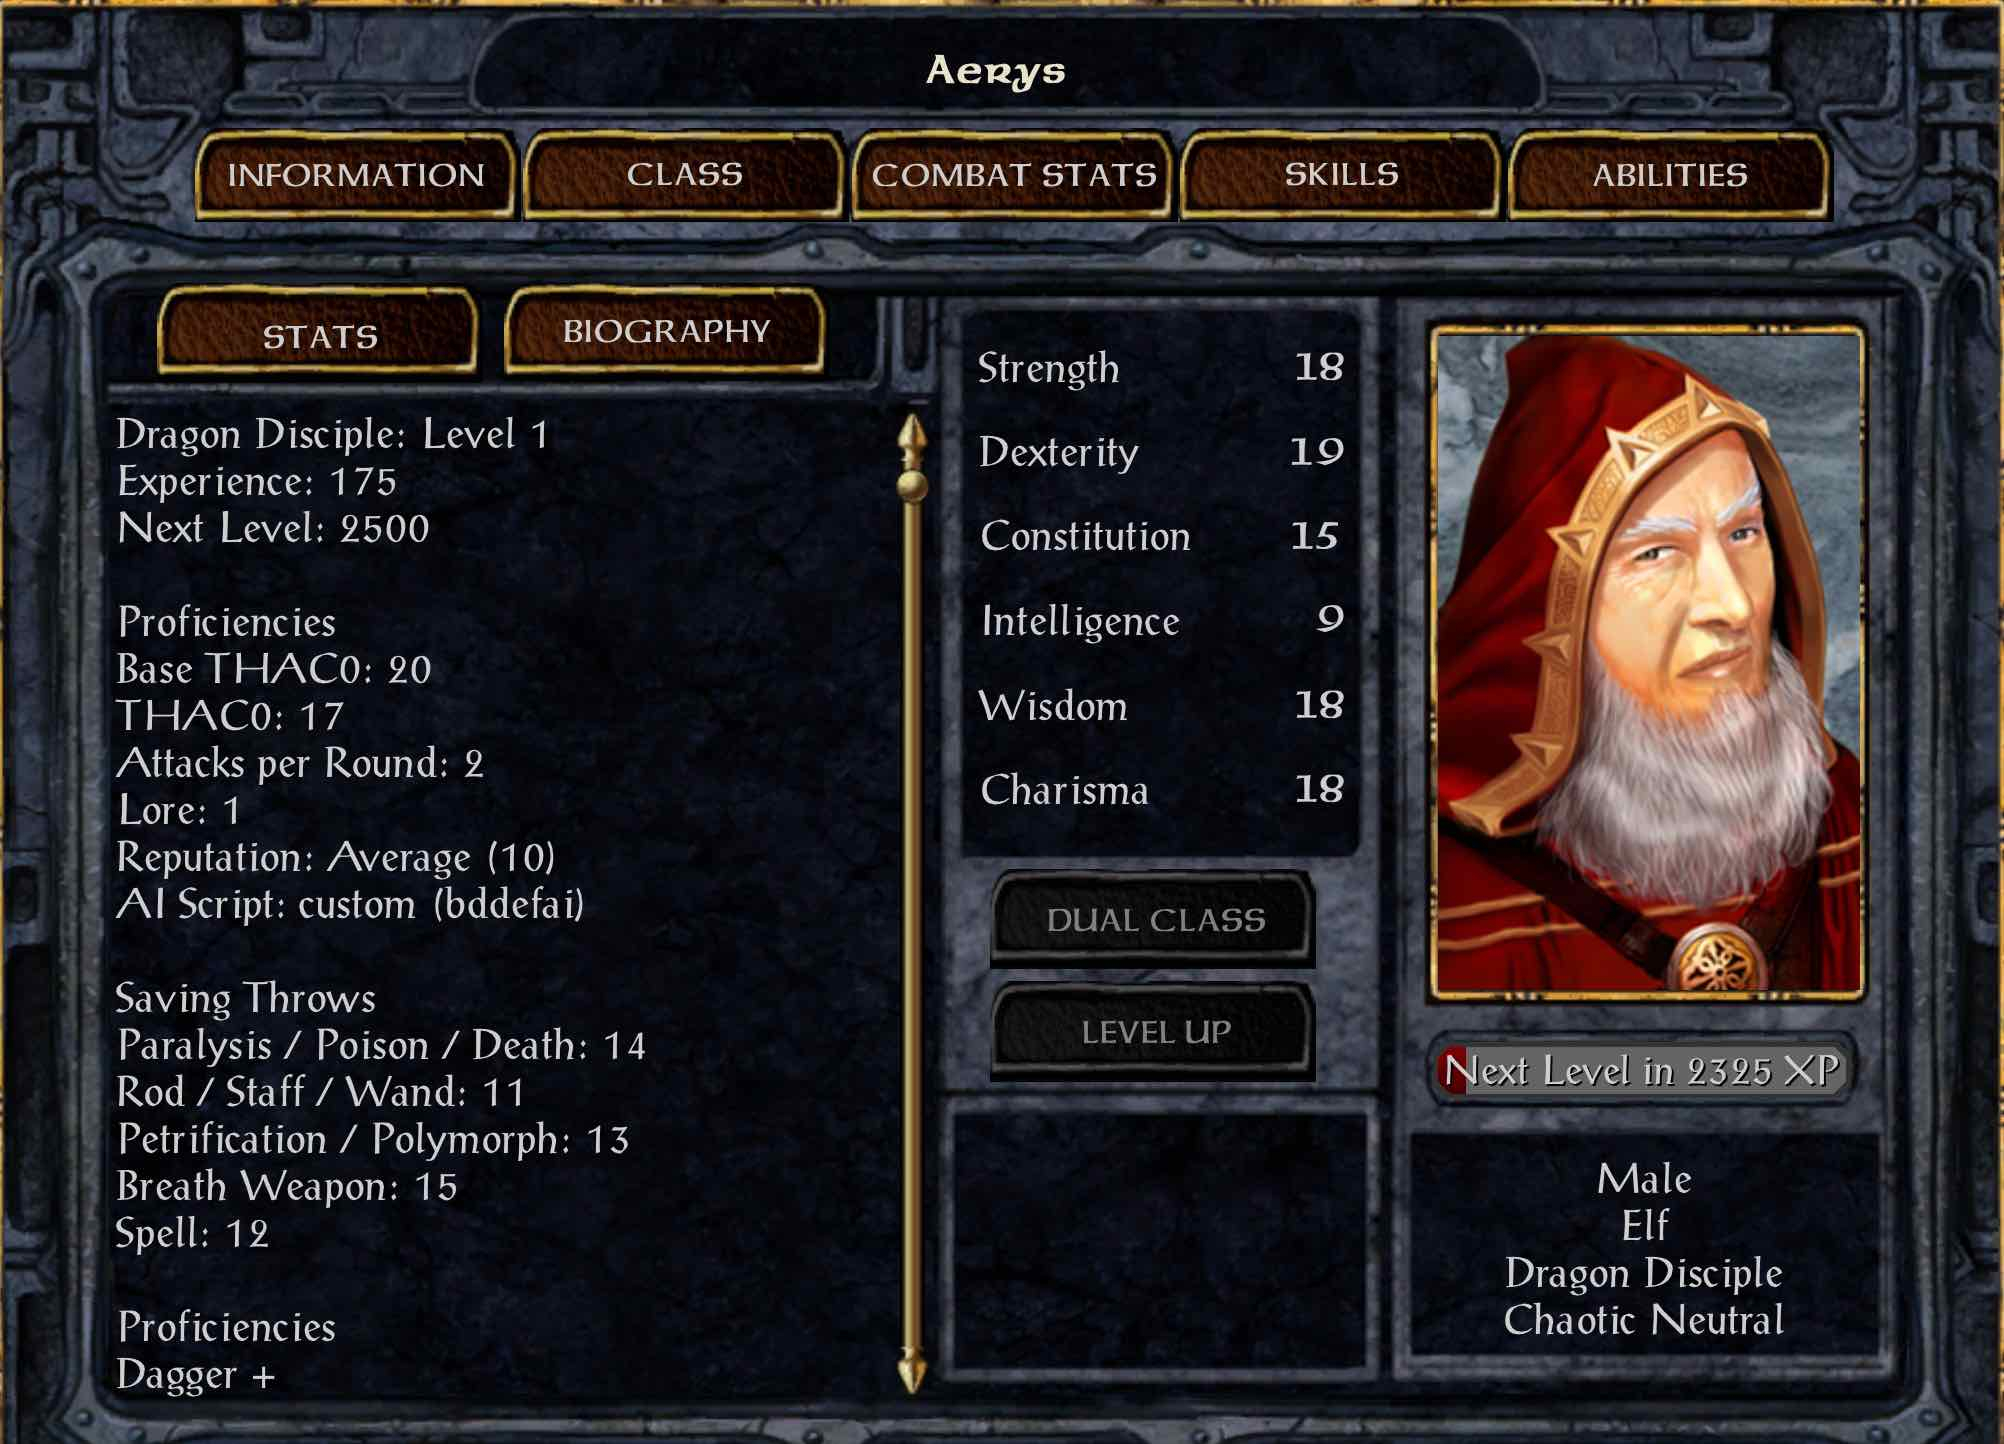
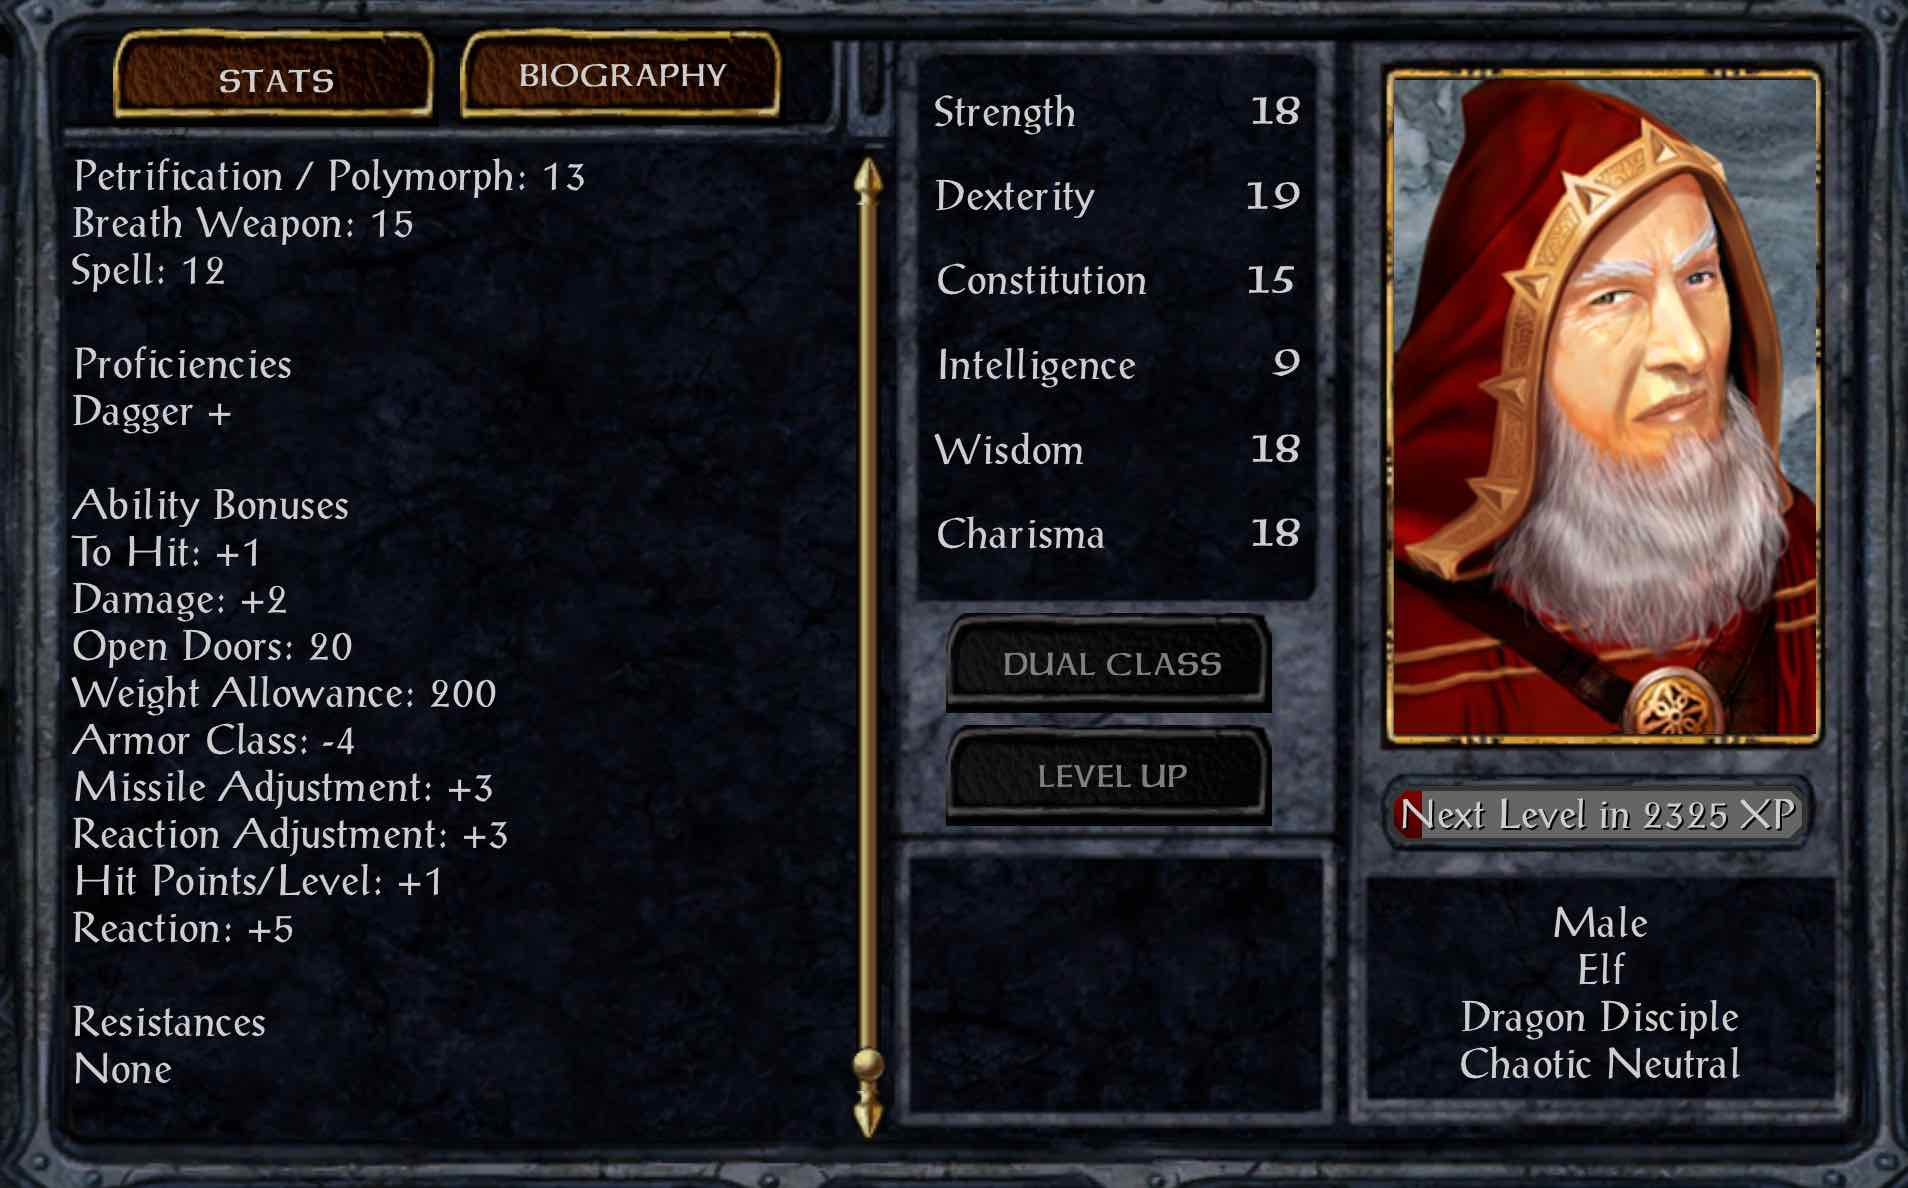
Aerys is a chaotic neutral elven Dragon Disciple. I rolled a 97 for him, so he starts with fantastic stats: 18 Str, 19 Dex, 15 Con, 9 Int, 18 Wis, 18 Cha. Why a Dragon Disciple? Because arcane spellcasting is the best way to deliver massive fire damage, and the class gets innate fire resistance eventually increasing to 100%.
He starts with Sleep and Burning Hands as his two known spells.
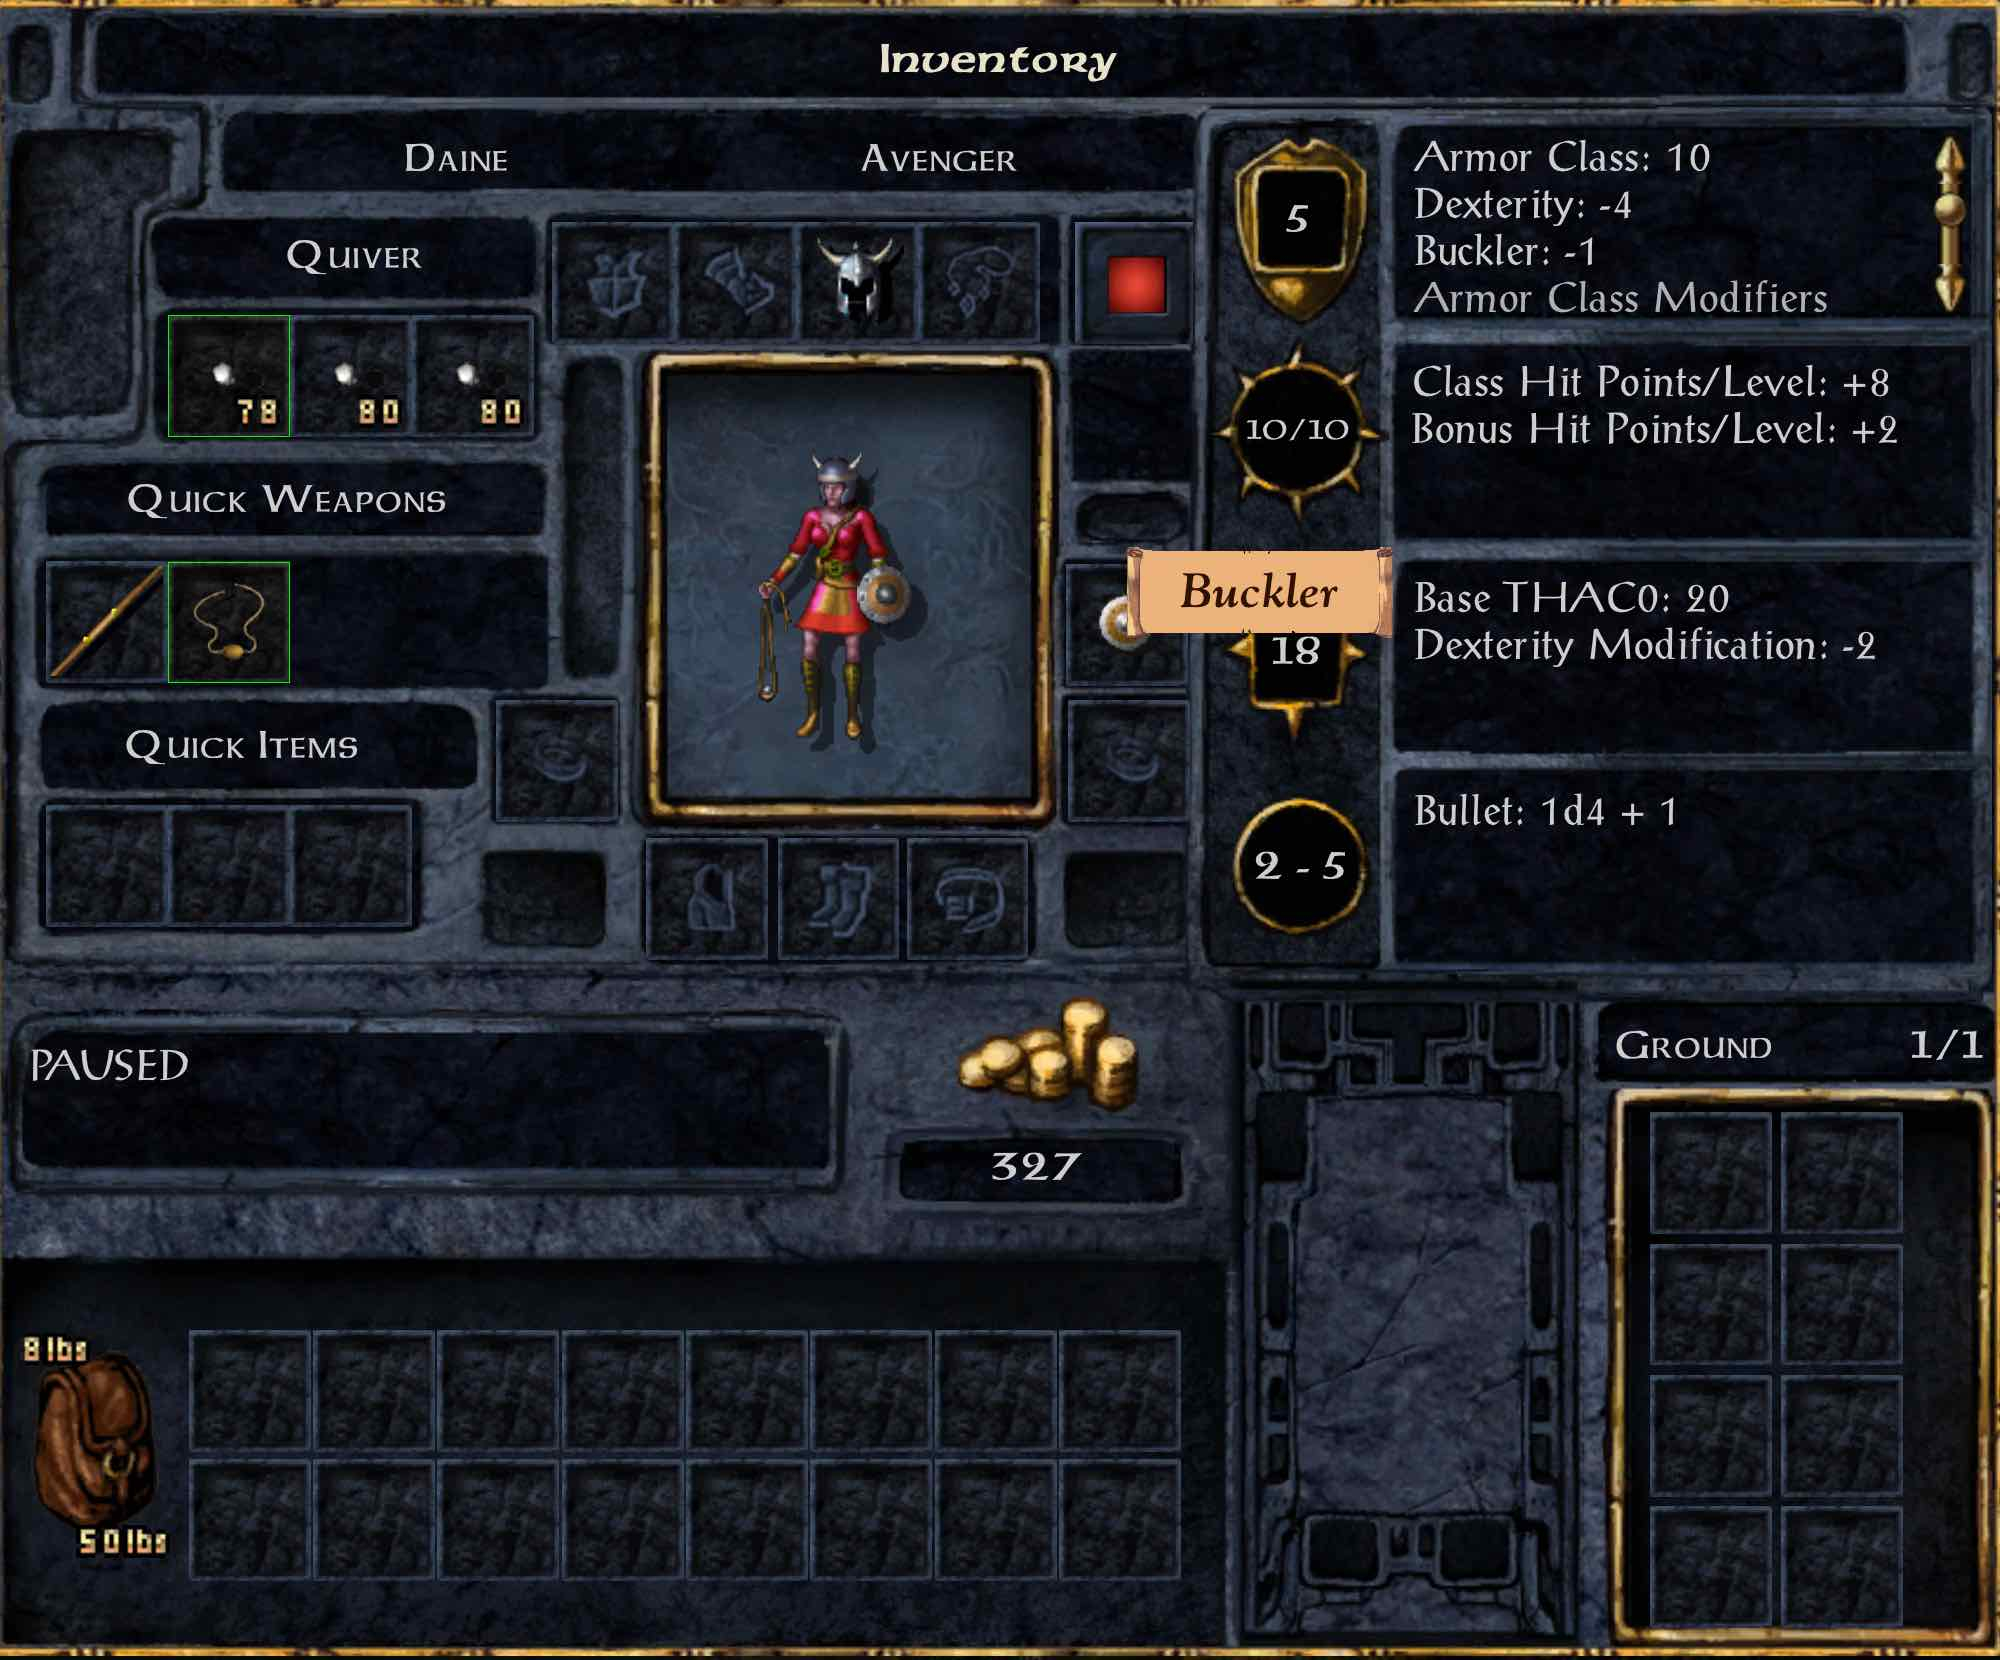
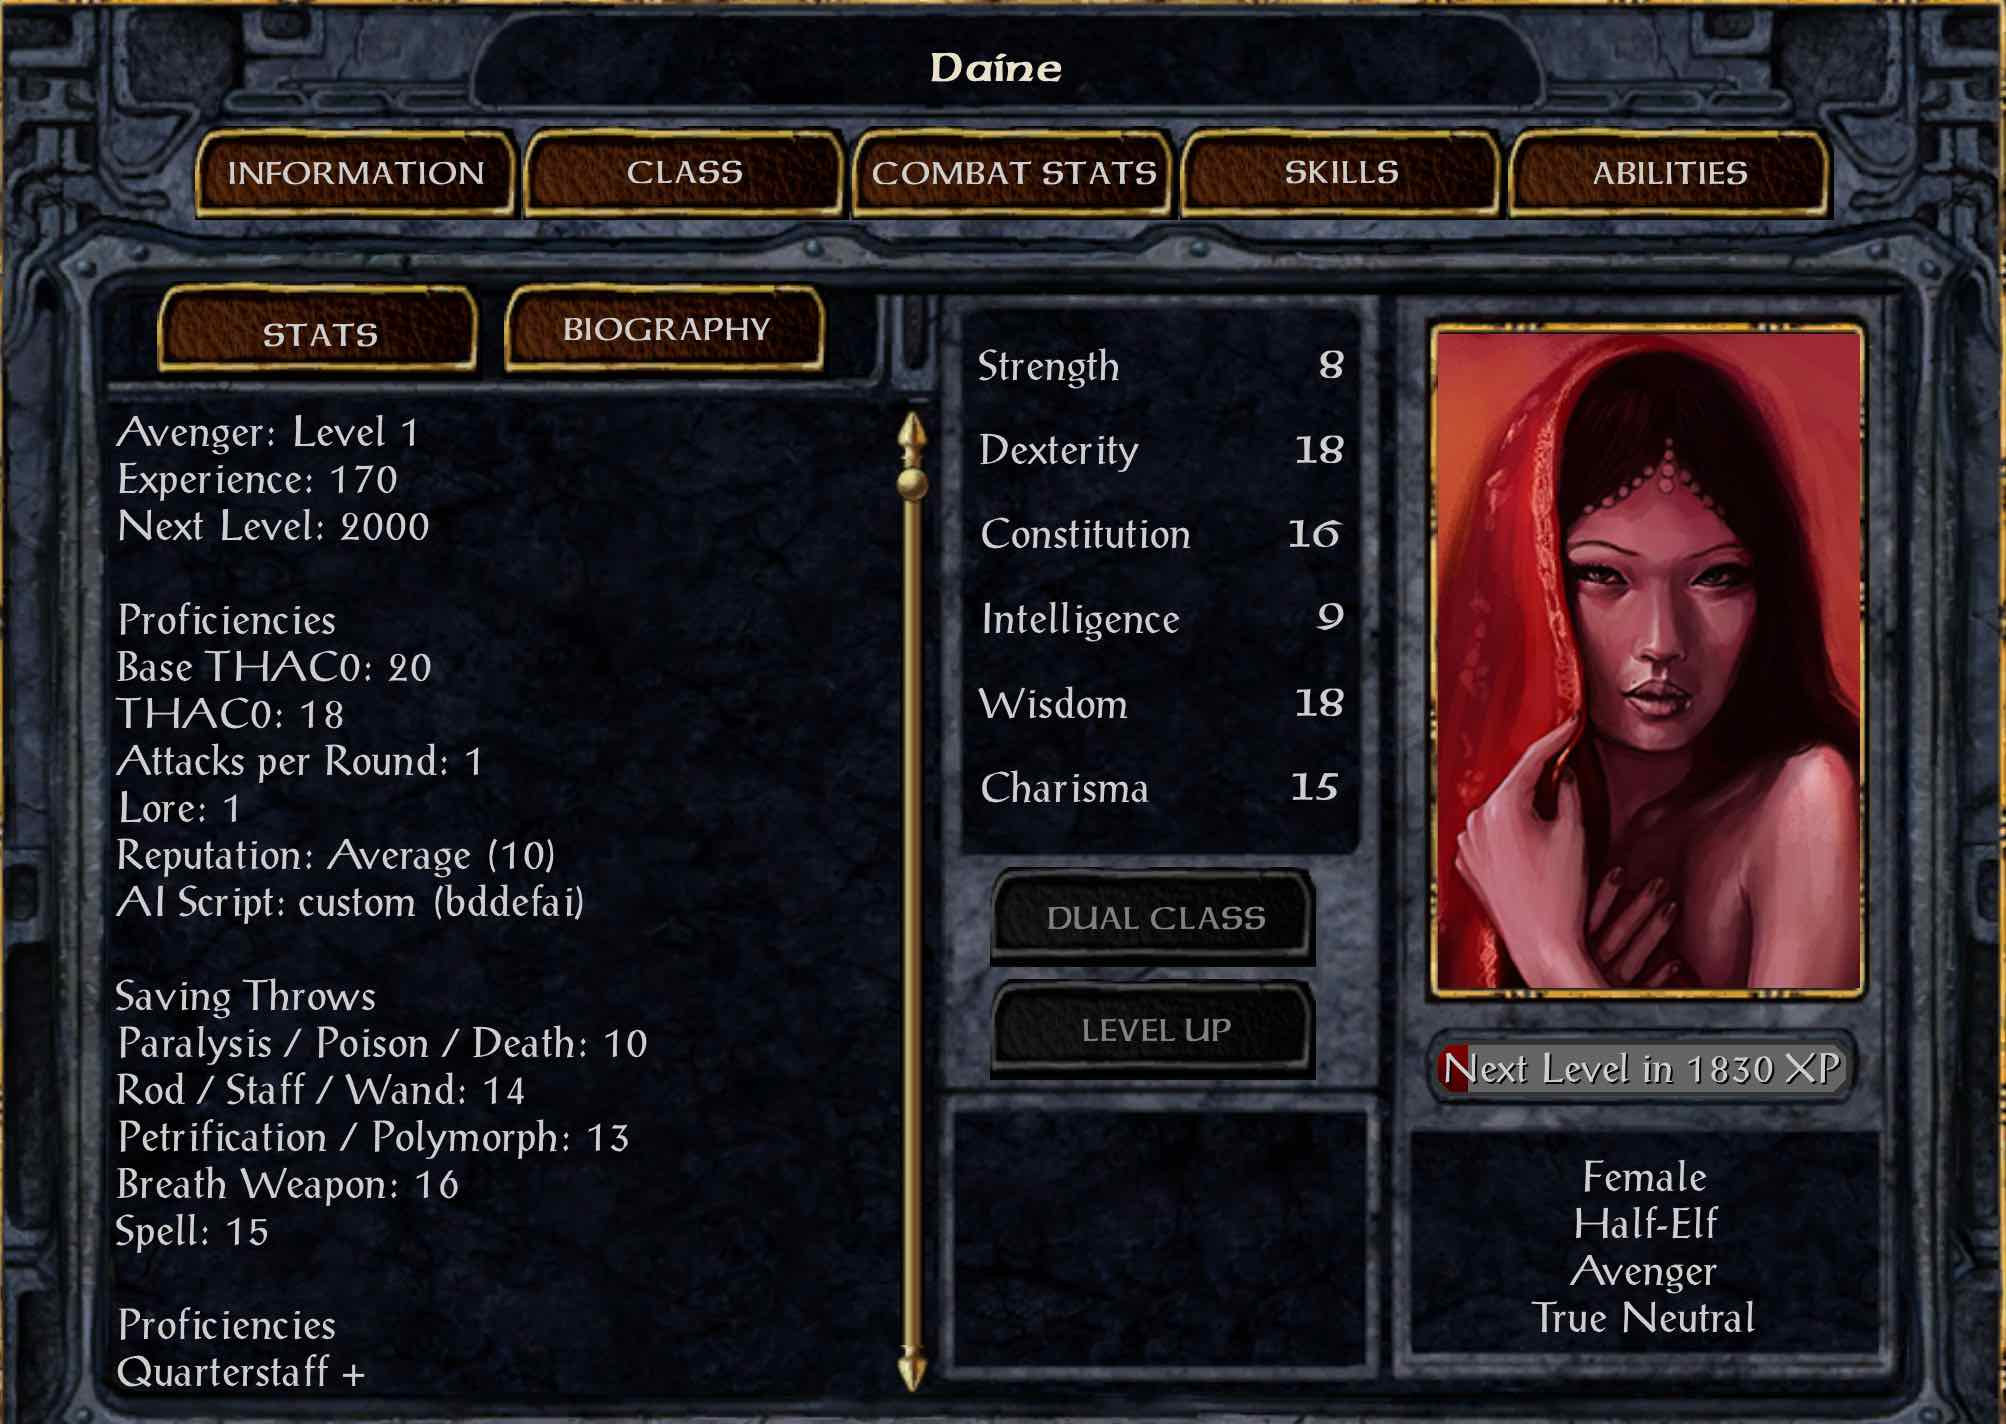
Second, his companion for the BGEE portion of the run is a half-elf avenger Daine. She gets a much more mundane roll of 84: 8 Str, 18 Dex, 16 Con, 9 Int, 18 Wis, 15 Cha. Plenty there for all of the important stats, and no combat penalties for her low strength. Early on, she'll stay back casting spells and using slings. Later on, she'll fight shapeshifted, as one of the party's tanks.
She starts with three instances of Cure Light Wounds memorized; I would take some Chromatic Orbs instead, but the Avenger bonus spells can't be memorized during character creation. They're also un-memorized if the character ever leaves the party and returns.
It is important to note that SCS (the "improved shapeshifting" component, one of the few rule changes I use) significantly changes the Avenger shapeshift forms. In addition to replacing the 1/day transformations with the ability to make tokens that transform the user when equipped, they have significantly different stats than the forms in the unmodded game. Details below:
Fire salamander: Unmodded, it's 18/75 Str, 19 Dex, base AC 2, 50% fire resistance, +60% movement speed, 1 APR, and three instances of "Breathe Fireball". The weapon is two-handed and hits for 1d8+3 piercing damage with a +1 attack bonus, enchanted at +3. The fireballs deal 2d6 fire damage (no save), ignoring magic resistance and spell defenses.
Modded: 18/76 Str, 19 Dex, base AC 2, 100% fire resistance, fire shield, 1 APR + haste. The weapon is two-handed and hits for 1d8 piercing damage, enchanted at +2.
So, compared to the original, we lose one point of attack and two points of damage, but attack twice as often due to the free haste. We lose the fire breath, but get immunity to fire rather than a mere partial resistance. And that immunity is very important for our strategies. This form is Daine's staple.
Spider: Unmodded, it's 16 Str, 16 Dex, base AC 0, immunity to web, and 4 APR + haste. The weapon is one-handed and deals 2d6 piercing damage, enchanted at +1.
Modded: 16 Str, 16 Dex, base AC 0, immunity to web, and 3 APR + haste. The weapon is two-handed, enchanted at +2, and deals 1d4 damage plus 1 poison damage per 3 seconds for 36 seconds on a failed save versus poison.
Definitely a nerf for the modded form, as the poison damage can be saved against and takes time to act. The vanilla sword spider tears up helpless (webbed) enemies much faster than the modded spider. I use this form on occasion, almost always in concert with webs.
Baby wyvern: Unmodded, it's 16 Str, 17 Dex, base AC 3, immunity to entangle/grease/hold/web/level drain, and 2 APR. The weapon is one-handed, enchanted at +1, and deals 1d6+2 piercing damage plus 5 poison damage per second for 20 seconds on a failed save versus poison at -4.
Modded: 18/76 Str, 17 Str, base AC 3, 2 APR. The weapon is two-handed, enchanted at +2, and deals 2d4 piercing damage plus a 25% chance of 1 poison damage per 3 seconds for 6 seconds on a failed save versus poison.
I don't use this form at all in this run; it's massively nerfed from the unmodded version, to the point of being basically useless. No immunities, weak poison, and all you get in return is a slightly stronger physical attack. It just doesn't have a significant role. About all that can be said for it is that it's still better than the vanilla druid's wolf and bear forms.
All of the modded forms allow for at-will transformations and block effects that modify strength and dexterity. SCS v32 allowed you to play tricks like equipping the gauntlet of ogre strength for 18/00 strength in spider form, but that doesn't work in v33. Spells or potions used in normal form will take priority over the equipped values, so there are still a few ways to increase strength, but they're of very limited use. On the flip side, the enemy can't enfeeble you if you're transformed.
There are a few issues here; the spider form's AC doesn't match the token's description, the spider and wyvern forms don't have immunity effects so their poison can interrupt even creatures with poison immunity, and all druid shapeshift tokens grant a proficiency point in daggers that only serves to enable an exploit for fighter/druids. Nothing critical.
TL/DR: Daine will fight mainly in fire salamander form, which is immune to fire and has a permanent fire shield. Spider form is useful on occasion, to web enemies and then tear them up with rapid attacks. Wyvern form is terrible, and I don't use it at all.Modded: 18/76 Str, 19 Dex, base AC 2, 100% fire resistance, fire shield, 1 APR + haste. The weapon is two-handed and hits for 1d8 piercing damage, enchanted at +2.
So, compared to the original, we lose one point of attack and two points of damage, but attack twice as often due to the free haste. We lose the fire breath, but get immunity to fire rather than a mere partial resistance. And that immunity is very important for our strategies. This form is Daine's staple.
Spider: Unmodded, it's 16 Str, 16 Dex, base AC 0, immunity to web, and 4 APR + haste. The weapon is one-handed and deals 2d6 piercing damage, enchanted at +1.
Modded: 16 Str, 16 Dex, base AC 0, immunity to web, and 3 APR + haste. The weapon is two-handed, enchanted at +2, and deals 1d4 damage plus 1 poison damage per 3 seconds for 36 seconds on a failed save versus poison.
Definitely a nerf for the modded form, as the poison damage can be saved against and takes time to act. The vanilla sword spider tears up helpless (webbed) enemies much faster than the modded spider. I use this form on occasion, almost always in concert with webs.
Baby wyvern: Unmodded, it's 16 Str, 17 Dex, base AC 3, immunity to entangle/grease/hold/web/level drain, and 2 APR. The weapon is one-handed, enchanted at +1, and deals 1d6+2 piercing damage plus 5 poison damage per second for 20 seconds on a failed save versus poison at -4.
Modded: 18/76 Str, 17 Str, base AC 3, 2 APR. The weapon is two-handed, enchanted at +2, and deals 2d4 piercing damage plus a 25% chance of 1 poison damage per 3 seconds for 6 seconds on a failed save versus poison.
I don't use this form at all in this run; it's massively nerfed from the unmodded version, to the point of being basically useless. No immunities, weak poison, and all you get in return is a slightly stronger physical attack. It just doesn't have a significant role. About all that can be said for it is that it's still better than the vanilla druid's wolf and bear forms.
All of the modded forms allow for at-will transformations and block effects that modify strength and dexterity. SCS v32 allowed you to play tricks like equipping the gauntlet of ogre strength for 18/00 strength in spider form, but that doesn't work in v33. Spells or potions used in normal form will take priority over the equipped values, so there are still a few ways to increase strength, but they're of very limited use. On the flip side, the enemy can't enfeeble you if you're transformed.
There are a few issues here; the spider form's AC doesn't match the token's description, the spider and wyvern forms don't have immunity effects so their poison can interrupt even creatures with poison immunity, and all druid shapeshift tokens grant a proficiency point in daggers that only serves to enable an exploit for fighter/druids. Nothing critical.
Color-wise, it takes me a few tries to settle on the right colors. Aerys has red clothes with gold trim, while Daine leans more toward magenta with red trim. Also, Daine has an unusual skin color; her experiments into fire elemental transformation are already influencing her.
On the way through Candlekeep, Aerys starts using fire right away:

I rest at the inn before leaving Candlekeep, refreshing Aerys' daily spells and having Daine memorize a Chromatic Orb. Here are some snapshots of the two as they prepare to leave the fortress for the wider world:
Aerys:

Daine:
(I hit post at 12:00. I couldn't even load the error message when it failed. So, ten minutes later, I'm outside for this.)
Regular posts will begin next week.
Post edited by jmerry on
5
Comments
The first order of business after leaving Candlekeep is to dodge Imoen. I'd like to recruit her later, after Aerys and Daine have the chance to level up some. It's not easy to get away, but we eventually reach a map edge and escape. We travel west to Candlekeep, and arrange Gorion's burial.
Back on that map, we pick up some things from the battle site and a diamond hidden in a tree. There's one hostile encounter along the way - a wolf. We give it the runaround and attack from range, but Daine missteps:
Over to the east, we pick up a ring of protection and continue north. A gibberling falls to our ranged attacks along the way.
Aerys adds another ring at the Friendly Arm; doubled level 1 spells are very useful at this early stage. And still, we continue north.
At the farm, we talk to some evil fishermen, then murder them for a bowl. The alternative is a fight with Tenya, and she's a cleric that can cast Command. Bad idea at level 1. Handing that bowl to her, on the other hand, is worth 2500 XP. We're getting pretty close to level 2 now.
There's still one place farther north to go - the zombie farm. We slip by an ankheg before it can attack, and start shooting down zombies from long range. One at a time, they're pretty easy to handle. Even Aerys' slight fatigue isn't a serious problem.
Now, multiple zombies at once? That can get hairy.
There are no further close calls on the rest of the map. Daine gains a level just as she starts to feel exhaustion, gaining 7 HP (roll 5/8). Reporting to Wenric earns another 800 XP, bringing level 2 for Aerys and 7 HP (roll 6/6). We rest right there on the farm, memorizing a second Chromatic Orb and bringing Aerys up to 6 level 1 spell slots available.
Beregost comes next; we buy a +1 sling, a stack of +1 bullets, and a bunch of throwing daggers. We have to sell the diamond to pay for it, but that's what gems are for.
After a couple noncombat quests (calming down Marl, buying a book for Firebead), we head west to High Hedge.
A group of gnolls cause trouble right off the bat:
Still, one melee attacker is in a bad position against two ranged attackers determined to avoid contact. We eventually take down that veteran, and mop up the other two as well. Perdue's sword is ours.
Next, we hunt golems. That's what the +1 bullets are for. Draw one out, get distracted by a skeleton:
Before I finish the chase, a flind joins in. I hit it with a Sleep, continue killing the golem, and take down the flind with normal ammo.
That flesh golem brings level 3 for Daine, and another 7 HP (roll 5/8). Level 2 spells like Web and Slow Poison are now available to her.
The second golem doesn't draw any monster attention, but we do get a good shot of Permidion Stark running away from it:
With the guardians disposed of, we enter the building and talk to Thalantyr. He sells us two scrolls of Protection from Petrification and a potion case. More will come later, of course.
For our next move, we head south through the first road map, avoiding all conflict. Then west to the map's border - this path has some hobgoblins along the way.
A second pair comes soon after, and this time only one sleeps. The other gets a Chromatic Orb instead.
The next map has a Chill hobgoblin which I hit with another Chromatic Orb. He takes 1 damage from it. Well, that was a dud.
We inch closer along a forest, activating a single gnoll ...
92 ... 86 ... 79 ... 77 ... 72 ... 67 ... 66 ... 59 ... 54 ... 51 ... 47 ... 45 ... 38 ... 31 ... 29 ... 24 ... 17 ... 14 ... 7
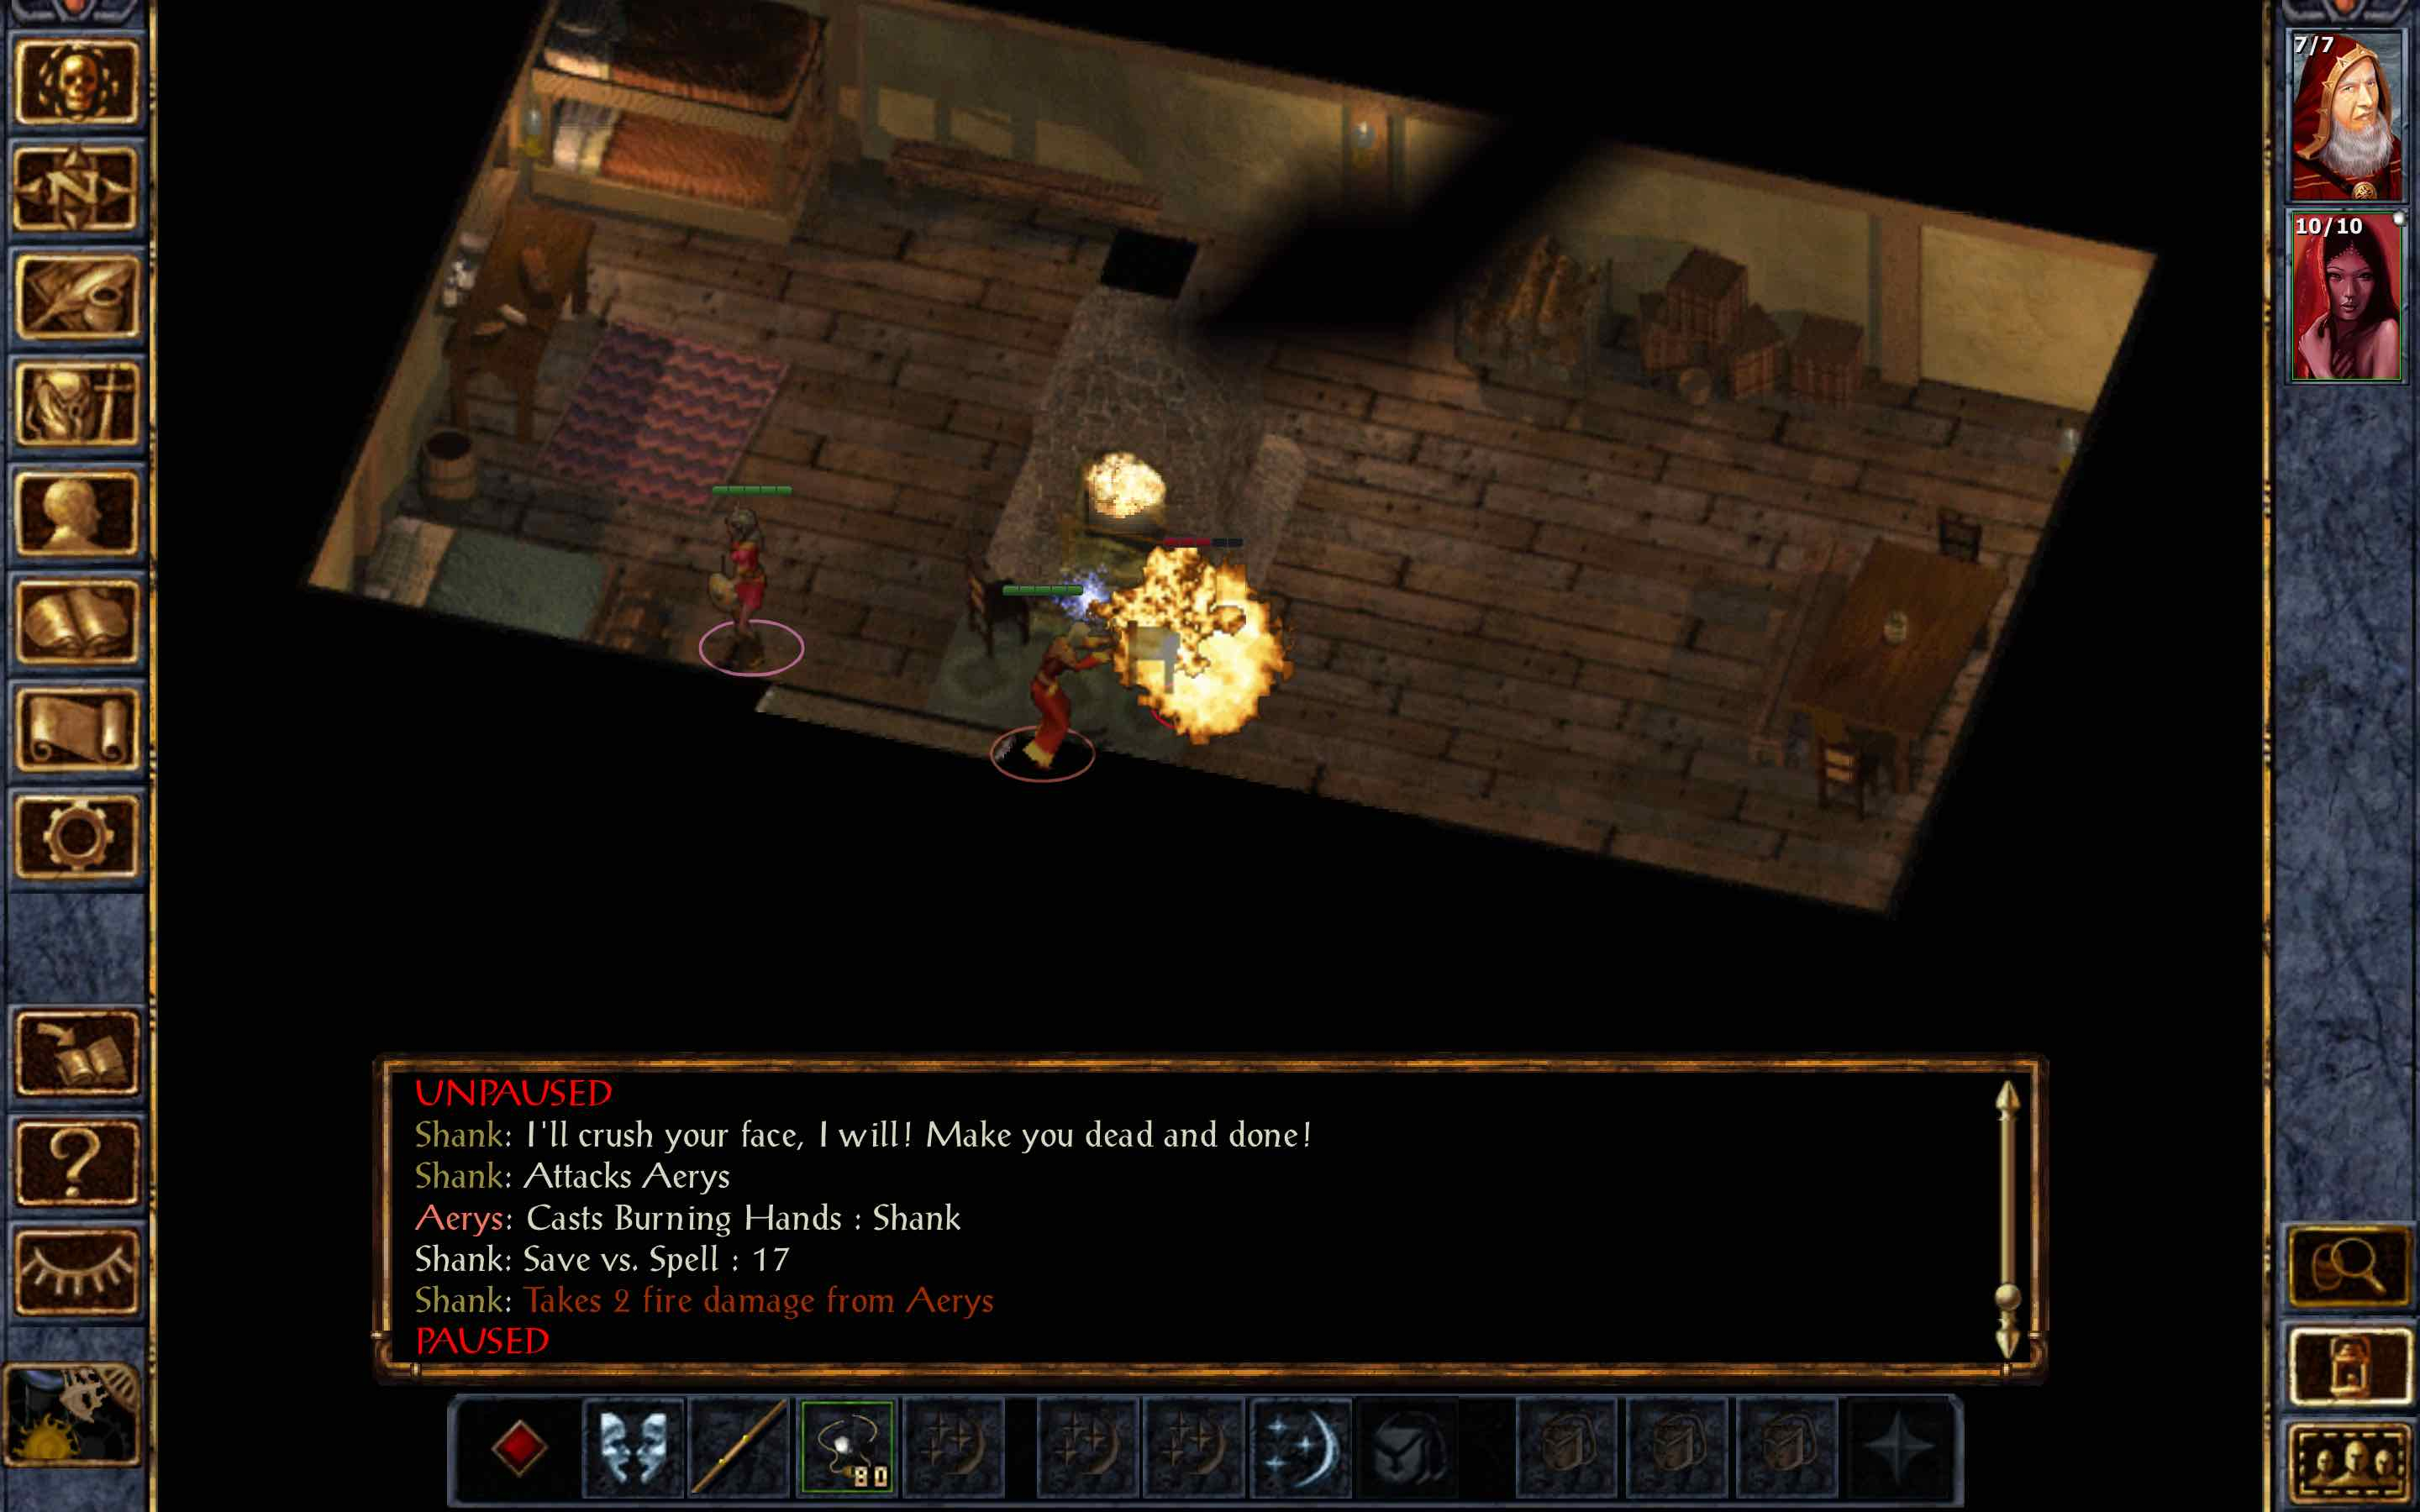
With Drizzt in range of a single hit, Aerys unleashes his fire breath.
Drizzt mops up the surviving gnolls, then starts chasing Aerys, who leads him in circles around Daine. Daine uses her sling ...
That's level 4 for each of them. 6 more HP for Aerys (roll 5/6) and 4 more HP for Daine (roll 2/8). Daine also takes two-handed style; she'll use the scimitar Icingdeath for now, but in the long run she'll go with two-handed weapons.
At this point, our inventories are full (mostly of gnoll junk), our spellbooks are empty, and Aerys is feeling exhaustion. We head back to Beregost to rest. There's a ghoul ambush along the way, but nothing too serious.
After that rest, it's Karlat's turn. He gets a hit in on Aerys, but gets blinded in return.
After a healing spell, the spiders come next. Disturb them, then cast Sleep...
The fourth spider inside gets our usual tactics; one character runs while the other attacks. With that last spider, Daine reaches level 5. She gains 5 HP (roll 3/8) and can now cast 3rd level spells.
Aerys and Daine return to the road next, taking on the quest targets. First, a pair of ogrillons:
Off the road, our attack on a random ghoul is interrupted by a hobgoblin:
More hobgoblins follow, eventually including one of a different color.
Back in Beregost, we visit Mirianne, Colquetle, and Zhurlong. Then we kill Zhurlong to get the boots back. Reputation 8, and we're less than 5000 party XP from Aerys reaching 16K. For this step, I try something riskier. Ankhegs await us.
Handing over the body is good for 500 XP. Another 100 gold adds 1000 XP and a point of reputation. Aerys has over 16K experience, and we're ready to start building a party.
Total fire kills so far: 6.
If you light a man on fire, he'll be warm for the rest of his life."
- A modification of a well-known saying. The wording here is my own, but I'm sure I heard it somewhere. And I'm also sure that it has multiple origins.
Our path south is interrupted by a trio of bandits:
Back near Candlekeep, we finally let Imoen meet us. She gets 16K experience, and immediately levels up from 2 to 5. That gets her 16 more HP (rolls 10/18) and scimitar proficiency. Twinkle will be her melee weapon of choice. For skills, Imoen puts 25 points into Pick Pockets (a score of 50) and 50 into Find Traps (a score of 98).
We also take this opportunity to clear the rest of the map. A few diseased gibberlings have to be put down, and Montaron and Xzar join long enough to hand over their potions and scrolls. Xzar also identifies a few things before he goes.
Over at the Friendly Arm, Tarnesh awaits.
Also, in retrospect, I probably should have used Sleep. While Tarnesh in the vanilla game is level 5 (with no 3rd level spells memorized), SCS reduces him to level 4.
With that, Imoen starts working on the spellbook. I also have Gellana identify the wand we picked up - we have some real firepower now.
After a rest, it's time to clear out the area, and try out the wand while we're at it. A scorcher:
Joia brings our reputation up to 10, Landrin hands over some antidotes and gold, and we move on. After a stop in Beregost to sell ankheg shells and restock on throwing daggers, we head east.
Some hobgoblin archers interrupt us as we make our way across the north side of the temple map:
Xvarts waylay us on the way east - a Sleep handles that. Then the basilisk map ... straight south to the edge. We're not fighting anything on this map today.
At that edge, travel to Durlag's tower is available - that's our real target.
The first challenge we face is a pair of battle horrors. I'd rather not fight them right now, so I blind them:
We rest on the ground floor of the tower, then start heading up to hunt ghasts. In these tight quarters, fancy footwork is key; any party member that enters melee with ghasts is likely to be paralyzed and killed.
Imoen disarms the traps on this level, but the locked chests are beyond her. We'll have to come back later for them.
The third floor has more traps to disarm, and Aerys claims the wisdom tome. The charm trap gets by his elven resistance, but he still saves with an 18. The ghost's wing ... leave that alone.
The cellar comes next. We lure three ghasts up to the ground floor, and scorch them:
Two more ghasts emerge from the side corridor, and fall to our normal ranged attacks. Imoen disarms the traps, and we head up to the top floor.
On the top floor, we avoid Kirinhale, but still disarm the chest trap and draw out the ghasts. Retreating to lower floors to split them up and make room to move, we again defeat the five ghasts here without letting them hit us. And that brings everyone up to 20K experience for their next levels.
Aerys reaches level 5, gaining 6 HP (roll 5/6) and then another 5 from the Con increase at that level. His new spells are Magic Missile and Mirror Image. Daine reaches level 6 and gains 6 HP (roll 4/8). Imoen reaches thief level 6, gaining 6 HP (roll 4/6) and putting another 25 points into Pick Pockets (total 75). And then, she immediately dual-classes to mage. Her starting spells are Identify and Protection from Petrification, staples she will plan on always having available. She takes dagger proficiency, for both melee and ranged options.
Of course, there are still targets we can hunt here. With the traps disarmed, the way to the roof is clear. Two scrolls of PfP allow both Aerys and Daine to go out and hunt basilisks.
There are some gnolls on the landing - Sleep. The greater basilisks get blinded too:
Incidentally, some AI quirks I observed here:
- A vanilla basilisk will never use its gaze attack while blinded. It will either attack in melee or retreat if it sees an opponent nearby. A basilisk with SCS (or, at least, the relevant component for their AI) will sometimes use the gaze on enemies in melee range, even while blinded.
- Unlike other enemies, blinded basilisks that are under ranged attack won't go wandering in hopes they run into something they can attack. Instead, they'll just stay there and take it, even with SCS. You need some gaze protection to deliver the initial spells, but Blindness and ranged attacks are a very good way to deal with them.
It does take a while to kill the basilisks this way; our PfP spells expire just after we finish. With the two-hour duration of Blindness, that was still plenty of time to spare.
The party is still about 4K experience each away from the final NPC joining threshold of 32K, so I decide to make that up with Battle Horrors.
A doppelganger has spawned in, so we kill that on the way north. Daine aims her lightning bolt at the two horrors ...
More spells follow. A 2-damage Chromatic Orb. A Web that holds one back, but the other gets a melee hit in. A 1-damage Orb. Then, Aerys gets off a scorcher.
The second Battle Horror gets more webbing and another scorcher:
There's one more battle horror to face. This one comes with a bunch of skeletons, so we need another tactic. Daine casts Barkskin and Resist Fire and Cold on him, and he heads up the stairs ...
Aerys follows up a round later with a scorcher.
With that, Aerys has reached 32K experience. We're ready to recruit the rest of our party.
Total fire kills: 25.
-Seventy Maxims of Maximally Effective Mercenaries, Schlock Mercenary.
An in-universe collection of sayings, frequently (mis)quoted by characters in the strip.
Erdane sells a wand of fire (20 fireball charges, one scorcher charge). We could buy it now, especially if we sold the Laeral's Tear necklaces the basilisks dropped, but I choose not to at this time. I'll buy the necklace of missiles in Nashkel first, and come back here later when I have more of a discount buying items.
There's a waylay by three gnolls on the way back to Beregost, but the trip to the Friendly Arm is otherwise uneventful. Khalid and Jaheira join, immediately leveling up. Khalid goes from level 1 to level 6, gaining 52 HP (rolls 37/50) and taking longbow mastery. Jaheira goes from level 1/1 to level 5/5, gaining 26 HP (rolls 14/36) and taking scimitar proficiency. I suppose terrible HP rolls for her are just something I'll have to endure, whether in this game or the next.
Khalid equips a longbow as his primary weapon, while Jaheira takes Icingdeath. She'll take some occasional shots with slings, but otherwise the scimitar will be her primary weapon for the rest of the game. 50% fire resistance is crucial, and we're willing to live with having only one attack per round for a while.
High Hedge comes next, to pick up Kivan. He goes up to level 5, gaining 24 HP (rolls 24/30) and taking two-handed style. He'll primarily use a longbow as well.
We visit Thalantyr for Kivan's spear - his new melee option - and also buy a few level 2 and level 3 scrolls so Imoen will have something to memorize in those slots. With my tweaks, Imoen no longer takes a penalty to spell learning, and a 76% chance of success is worth the gamble.
Clearing the area comes next. A pack of gnolls goes down easily to a Sleep, but skeletons cause some pain. Daine tries a lightning bolt, but they're immune. Aerys uses his fire breath on a second skeleton pack, but trees get in the way; only one of the skeletons dies to that.
The most dangerous encounter is a quartet of Huge Spiders - but they all sleep.
There's a second group of ghouls further south on the map, and Jaheira isn't so lucky this time.
I also update Jaheira's stats at this point; I intend to pick her up in BG2 exactly where she left up, and that means she gets to have 17 Dex.
While we're in town, it's time for a bit more questing. Silke comes first:
Talking to the "thugs" simultaneously gets us two potions of defense. Then Garrick joins temporarily; he goes up to level 6, where the only stat we really care about is the 60 lore. Many items are identified, and then he's out again.
After that, it's Neera's turn.
Neera joins after that, going up to level 5 and gaining 10 HP (rolls 10/16). She then hands over her gem bag and heads back to the Friendly Arm. We'll take on her quest later, but we don't want her in the permanent party.
Imoen finishes up her little project, and now has an artifact that adds dexterity for 8 hours ... most of the time. We end up never using it. Kivan buys a composite longbow to take advantage of his strength, and we leave town to the west.
At the shore, a pack of wolves are quickly followed by the sirine Shoal.
Droth follows up by casting Sleep twice. Apparently, the presence of level 4 mage Imoen (who has 5 HD) makes him think there's a vulnerable target. His third spell is a Charm Person targeting Kivan; elf resistance blocks that.
The helm is a key item for this party. Jaheira takes it, the second of three pieces she'll need for fire immunity.
Continuing west, we run into ogre berserkers for the first time.
We kill two of them, and then the rage timer runs out on the third:
We talk to Mad Arcand next, and head to the ship. Two carrion crawlers later, Daine levels up. Druid level 7 reached, her most important power boost of the game. She gains 9 HP (roll 7/8, a good number for once), has access to level 4 spells (Call Woodland Beings), and can shapeshift.
Daine has been wearing leather armor; she now takes that off, as it only serves to make her AC worse when transformed. If she ever needs AC untransformed, that's what Barkskin is for.
The next challenge on this map is a large group of ogre-kin. Daine plays bait here, with her fast movement.
We encounter five ogrillons and an ogre first - easy enough to handle even without any fancy tricks. The second half of the pack has an ogre berserker:
Down in the southwest, a trio of sirines await us. Only one is visible in this shot, but they always come in threes.
That was the only arrow the three loosed, and they didn't get any charm spells off. The wolves going hostile mid-battle was only a minor distraction.
With this battle, we pick up another level - Kivan reaches level 6.
Kivan also has a quest on this map ... check the script ... ah, we have to wait for night. The party rests, then stands around a bit more waiting for the quest-giver to show up. We talk to her, and are brought to the shore for more of this drama of elves and sharks.
The prize for this is a Boomerang Dagger +2, an incredibly powerful weapon for BG1. That will be Aerys' primary weapon going forward, both melee and ranged. The Surgeon patches us up, and we leave the map for good.
Now, it's time to progress the plot. The party heads for Nashkel, hugging the easter edge of the southern road map to avoid conflict. We arrive fatigued, so we head for the inn right away.
We pick up a set of ankheg armor for Jaheira, force a door with salamander strength to talk to Joseph's wife, endure Noober, and visit the carnival. At our current discount, the ten-charge necklace of missiles costs 2540 gold. Worth it.
Vitiare goes to pickpocket us ...
Zordral comes next. He gets in the first word.
There's more to do here at the carnival, but that can wait. Next time, we head for the mines.
Total fire kills: 29. Not much fire this time.
- Susan Ivanova, Babylon 5
The first encounter, of course, is Dorn's ambush.
On the mine surface map, we find and immediately identify a wand of frost - but we're not going to use it much. It's just not our element. We face assorted minor threats - war dogs, ghouls, wolves. Then the winter wolves show up:
Before long, the area is clear, and we meet Prism. With a new addition to the encounter:
I try some spells. Blindness fails. Magic Missile doesn't.
Isra offers to join us ...
We claim the emeralds, and head down into the mines.
The first level is uneventful; just a few kobolds, easily handled. The second starts getting a bit more action. Kivan's presence allows Beldin to jump to safety:
The larger groups here prompt us to use a few spells:
The third level brings even larger floors, and the fireballs come out.
The east side offers another fireball opportunity.
The bridge is a little troublesome; with our lack of a thief, we can't do anything about the traps. Aerys triggers the two arrow traps on the bridge, taking the damage.
The kobolds around here - that's another story. We have some nice tactics available, like stealthy arrows.
Some kobolds still get attacks in - like this one.
As we approach the boss encounter for the level, we trigger a fight with spiders on one side and kobolds on the other. Aerys pulls out the wand for this one.
And then, the bosses. We open by shooting down one guard and having Imoen cast Horror.
There are more unavoidable traps at the exit, so we spread the damage around. Then, summon a nymph for the mass healing. With the whole party in the green, we descend to the bottom level of the mine.
More kobolds await at the bridge, and that means another fireball.
We bluff Mulahey and set up behind him, then open the chest to start the fight. Minions? Fireball.
I invite Xan in briefly so he can pick up his moonblade. He's tempting with his free fire resistance from the blade, but the inability to cast fireballs is a deal-breaker. That, and Imoen's thief skills will be worth a lot.
We take the lower exit, then immediately head west to leave the map for gibberling country. After picking up a free protection spell and meeting a Flaming Fist member, we run into some dread wolves.
And then, the big prize.
The gibberling horde is next, and they get a wave of fiery death:
We clean out the remainder, then pick up Samuel and head back to civilization. There's a waylay on the way to Nashkel:
Back in Nashkel, we close out a couple quests. Speaking to the mayor brings another point of reputation ... and more importantly, a new level for Aerys.
But before we can cast any fireballs, we need to rest. And on the way to the inn, there's Nimbul.
Nimbul is also an excellent target for a preemptive backstab, but this party didn't have anyone backstab-capable at the time.
That rest brings our first Bhaalspawn ability, since it's the first time we've rested since chapter 1 ended, and chapter 2 is over as well. Aerys can heal now.
We're off to Beregost next, to confront Tranzig. We open with a Magic Missile ...
Garrick identifies our stuff, and stays on for one more thing:
We continue north, to the road area we still haven't fully cleared. Doing that now brings a crowd when we face some bandits guarding a caravan:
More bandits die - to weapon attacks - and Deke surrenders.
The belt ogre comes next; Daine handles it nearly on her own.
A random group of bandits shows up in the western part of the map - a full ten of them.
With that, the map is done. We head to the Friendly Arm and drop off Samuel; this brings Jaheira to druid level 6. She gains 3 HP from her new level, a minimum roll of 1/4.
We sell off the junk we've accumulated and rest. Next time, we enter the woods to hunt bandits.
Total fire kills: 75. With kobold mobs to push up the numbers, and the ability to properly cast fireballs, we're really cooking now.
No end quote this time, as the title for this part has the quote instead; a famous song title/lyric by Jerry Lee Lewis.
On the way to Larswood, we are waylaid. And it's a serious threat this time - Molkar's crew.
Halacan wastes a round with a Sleep targeted at Imoen; she casts a Horror back. The latter is considerably more effective.
Molkar is next to fall, though he inflicts serious damage on Khalid in melee before that.
With this fight, Imoen reaches mage level 5, and access to 3rd level spells. Although we don't have a fireball scroll yet for her to learn. Maybe the enemies will stop trying to use Sleep on her now.
After completing our travel, we heal up with two cure spells and a nymph. Bandits await - first, a trio, then Teven.
We deal with some minor encounters, sending Baeloth away. I'm not that bloodthirsty. Then we run into Nim Furlwing - a Sleep is just the thing to protect his hounds.
Farther north, a truly dangerous encounter awaits us - Blacktalon elites. My stealthy scout spots them, allowing me to hit them from out of sight.
More minor encounters follow. A gibberling rolls a nat-20 on its attack ...
Finally, we come to the druids in the northeast. Mad Osmadi attacks:
Then it's Corsone's turn.
Peldvale comes next, and more Blacktalons.
I try to get cute and throw in fireballs - one from Aerys and one from Daine. Aerys just gets webbed instead.
Kivan scouts ahead under stealth. Most encounters have us just walk up and fight, but I give some bandits a fireball from out of sight:
Aerys breaks out his other fire spell for a group of flinds:
There's another Blacktalon group, and we stick to the sneaky tactics that have served us well.
We eliminate one flaming idiot ...
Against Raiken's gang, I fight.
And with that, Peldvale is clear. It's time to go burn the bandit camp.
I set up southeast of the camp, at a spot where only a narrow gap through the forest is passable. Kivan shoots a bandit to start things.
As more bandits arrive, I start on the fireballs.
That's also our only fireball potion. The wand, the necklace, and Aerys' two spell slots are all we have from here on out.
Unfortunately, for this second round, Aerys goes a little too far forward and gets caught in the web. Daine hands the necklace to Jaheira, who gets considerably more value.
Hand the necklace back to Daine for one last shot before a recharge:
My defenses are starting to break down at this point; Daine has to go forward to attack a Blacktalon elite who isn't quite in the webs, and the mage Venkt is close to Aerys.
Then, Britik breaks free and comes at Aerys, while a Blacktalon takes another shot at him ...
Aerys finally gets free, and fails to cast that fireball he's been holding all this time. Retreat a bit, and use the wand instead.
Just three enemies remain out here, all hobgoblins. Daine handles them in melee, and the bandits are broken. We collect the various items of interest, and explore the camp at our leisure.
A few bandits still hide in tents, with a larger group of gnolls in a cave.
Finally, we go for the main tent. Talk to Ender Sai, then open the trapped chest ... actually, wait. There's something Aerys should do first.
Anyway, the lightning bolt misses completely. One party member at the chest, one at the door, no problem. Daine gets the gauntlets.
We clear out a few random monsters from the rest of the map, then head back to the Friendly Arm with full packs. But I'll be back - there are a lot of locked chests here we can't get into yet.
Back at the inn, Imoen buys a potion of genius for a scribing session - 98% success chance, unlimited numbers. She fails to learn Larloch's Minor Drain, but otherwise fills out her spellbook pretty well. A rest earns Aerys his second Cure Light Wounds, and the party is ready to enter the Cloakwood.
119 fire kills. We don't have the resources to truly carpet-bomb the bandit camp, but we came pretty close on the chokepoint.
- Colonel Kilgore, Apocalypse Now
Our first objective in the Cloakwood isn't a fight, but a new party member. We kill a few tasloi along the way, and pick up Coran as a replacement for Kivan. He'll be about 13-14K behind the rest of the party in experience, but his thieving skills are vital.
Coran levels to 5/5 upon joining, gaining 9 HP (rolls 9/16). He takes 25 points in Open Locks (to 95) and 25 points in Set Traps (to 40).
It's a little awkward having Coran and Khalid competing for the same weapons, but we can live with one of them having a plain +1 sword. And Strength of One can boost Coran's strength for a composite longbow.
Our first encounter with Coran in the party is a pack of wolves, and we are treated to an unusual sight:
The rest of the forest is populated with random forest creatures, and the encounters are of little note. They are at least worth decent experience, since dread wolves are common here.
There is one encounter of note here: Aldeth and Seniyad. With Jaheira's aid, we talk them out of an immediate fight.
Also, Coran helps himself to the contents of the traps in the lodge.
The next area will be more troublesome, and we get a preview of it along the way:
We can avoid the web trap in the ambush area, but we can't avoid the first trap in the spider area. Either you have 50 skill in Find Traps, or you will trip it.
As for the rest of the area, we can actually avoid all of the other traps by following a specific path. We head south first, then come around through the middle of the map. There are some huge spiders and ettercaps along the way, and then we come to the key passage.
There's a web trap on the dirt path straight north of the party, but the grass next to the cliff is also passable and not trapped. We hug the cliff and then head north, escaping the area's traps. We'll be back, but not until Imoen has her thief skills back and can disarm the remaining web traps. A few more huge spiders, and we reach the northern edge of the map.
On the way to the next area, we are waylaid again.
The cleric Zeela goes for an Unholy Blight:
Maneira is still running around invisibly, so I start casting AoE spells blindly ...
We rest in the druid area after completing our travel.
Laskal hands us a potion and leaves, but the other shadow druids here are not so accommodating. The sight of Jaheira drives them to attack automatically.
I go for a fireball, but the minions die before it can arrive and Takiyah survives it. Then he dies as well.
Izefia and his two minions get another fireball:
After some amusing bullshit, we fight Peter of the North and his wyverns:
Random encounters in this area can get pretty serious:
Finally, the treehouse. I capitalize on a key weakness of druids here - no fear protection. Imoen opens with a Horror ...
Incidentally, Aerys went for a Magic Missile on Amarande, to guarantee disrupting his first spell. That's why he's slightly damaged in that shot.
Moving forward, the party faces another ambush. This time it's a pair of wyverns.
After completing our travel, the eternally annoying hamadryad is next. We have lots of elves and half-elves, but Khalid still gets charmed.
We follow up with an NPC project encounter - the pack of druids tormenting Beador. I open with a wave of disablers - two Webs and a Horror. Then Daine switches to spider form to attack.
That means that some of them get spells off. Aerys takes a nasty Chain Lightning hit, and retreats so he won't get hit again.
With the battle over, Beador directs us back to the shadow druid base. But first, we have wyverns to hunt.
The eastern half of the map is populated by various forest creatures. We get through them easily enough, and reach the wyvern cave.
Back outside the cave, we run into some Iron Throne guards; we're close enough to their base that they have patrols here.
Another minor encounter, and Coran reaches thief level 6. He gains 2 HP (roll 2/3) and adds 25 points to his Set Traps skill.
I reach the bridge to the northwest section, and ... oh, that's too perfect a setup not to use.
We finish off the hostile forest dwellers, running out of nonmagical arrows as we do. Now, back to the druids.
There's one more fight here - Andarthe, at the base of the tree. We rest, and Aerys gains Slow Poison. Also, three ambushes (spiders, tasloi, spiders again) before we actually get that rest.
We open with fireballs and fire arrows ... the lead druid has iron skins up and gets off a Chaos before we can disrupt him.
For round two, I'll play differently. I pre-summon a nymph, then add a Horror and a wand Magic Missile to the initial fireball.
Coran backs off so he won't be tempted to kill himself shooting Andarthe. He gets animals summoned on him for his trouble.
Our second fireball takes out a nymph ... wait, that was our own nymph. Oops.
Finally, Andarthe surrenders.
Now, we head back. Seniyad adds 5K experience and a nice club - not that we'll ever use it.
Rather than returning to the deep forest to take on the mine, I leave it entirely. I'll come back later once Imoen can disarm traps again.
On the last leg back to civilization, we run into more ettercaps.
The fight continues ...
129 fire kills. Fairly light on this update, but that's mostly because the Cloakwood is full of tougher creatures that we can't just burn in droves. Friendly fire kills are included in the general kill count, so I'm including in this count too for consistency.
- Joss Whedon, talking about a scene in his show Buffy the Vampire Slayer
Now that we're back in civilized territory, Coran can make use of his lockpicking skills. There isn't anything really notable in the Friendly Arm, but Beregost gets us a wand of lightning and some valuable things to sell.
We'll be spending some time clearing the wilderness, and we start with the temple area just east of town. The wolf pack is the only real challenge here.
The fireballs themselves don't get many kills, but they do a good job of weakening the pack.
Aside from that fight, the area features Cattack's band of hobgoblins (trivial) and some random encounters. One of those was a trio of dread wolves, for decent experience at least.
We hit the road south of Beregost next, properly clearing the area this time. It's mostly populated by hobgoblins, which aren't any real threat. Some Flaming Fist idiots accuse the party of banditry, but Jaheira speaks up and we de-escalate the situation. It's been a long day since resting at the Friendly Arm, so we head back to Beregost and rest again.
After that, we're off to a new area west of the road. Low-level undead such as zombies and ghouls are added to the mix here ... hey, get out of our way so we can fireball these enemies!
Zargal and crew follow. We don't have any use for a +2 short sword, but Aerys does reach level 7. He gains 8 HP with a perfect 6/6 roll, and takes Shield, Melf's Acid Arrow, and Spell Thrust as his new spells.
Elsewhere on the map, a hobgoblin elite gets a lucky poison hit on Daine ...
I have Coran using auto-stealth out here. When I have him switch to melee against some skeletons, the inevitable follows:
Finally, the most dangerous foe. We face Bassilus and his horde.
Daine responds with a Chromatic Orb:
I level up Daine after the battle. She gains 8 HP for level 8 (roll 6/8) and takes spear proficiency.
With the area clear, we return to High Hedge ...
While we're here, we mug some skeletons for their throwing daggers.
After a rest, we head further south. We dipped into this area once for Drizzt, and we'll clear it properly now.
Some gnolls get a fireball:
There were other encounters that we didn't use fire for, but the likes of a few skeletons are no big deal. Imoen picks up her sixth mage level here, after some gnoll elites. She takes dart proficiency; since she doesn't have a strength bonus, darts are better weapons for her than throwing daggers. We've picked up a few regular darts for her, and will buy some fire darts at High Hedge when we swing by there again.
Now, a group of ogre berserkers?
Finally, a squad of flinds gets Aerys' last fire spell of the day.
Back in Beregost, we rest and pick up Bjornin's reward. That's 18 reputation now.
We continue south to the next stretch of road. This is another low-level area, so we don't really have anything better to do with our fireballs than to use them on hobgoblins...
In Nashkel, Rasaad joins to start his timers; he levels to 6 and takes single-weapon style and stealth. He also gains 21 HP from his five levels (rolls 21/40). Then we let him go again.
Over at the Carnival, it's time to properly clear the map. There are monsters in the north, like kobolds.
The fire effect on Imoen there is from a kobold commando's arrow. She wasn't in the actual fireball's range.
We now proceed west. After a non-hostile waylay (a bear), we reach the xvart village. Meet a cave bear, burn it.
After that rest, we head up the path. Naturally, all of the xvarts attack immediately.
This encounter is a little tricky for the kill tracking; some of the xvarts are worth more XP but still have the same name.
The cave brings another bear and some AC 8 bracers - since we haven't bought any archmage robes yet, that's nice for the mages.
Then there's Borda. He's inexplicably magic immune, so I go for some fire breath ...
Borda drinks a potion of invisibility once he starts taking damage, so I respond with a Glitterdust. Glitterdust ignores MR - or, at least, the actual effect does. The cosmetic effects, such as the log entry saying the target was blinded and the glow, are subject to MR. It's a moot point in this case as he saves anyway - no effect. Then he misses a backstab, and we take him down.
Now that the area is clear, we head south. Unlike the river to the west, this area has reputation bonuses, and maxing out our reputation for shopping bonuses is on the agenda.
Ludrug and his gnolls are first:
Some animals follow, and then it's time for a couple of idiots.
And once they're dead, we talk to the dryad. 20 reputation.
We return a dead cat as well, but there's no reputation left to gain. Many animals fall before us, another cache in a cave is claimed, and Ingot dies:
Some winter wolves get a fireball:
There's still one more rewarding encounter after that - a trio of dread wolves, bringing levels for Jaheira and Khalid. Jaheira reaches fighter level 6, taking scimitar specialization and gaining 6 HP (roll 4/5). Khalid reaches fighter level 7, gaining 10 HO (roll 7/10). Jaheira finally has more than one attack per round in melee.
And finally, we're ready to go to the gnoll stronghold. Gnarl and Hairtooth ... we really don't need anything fancy.
We go for the cliffs first, after some healing and a rest. The xvarts are no threat, and we easily retrieve the tome. We don't use it yet, though - Imoen's daily Identify spell goes to the Protection from Undead scroll that Drienne gave us.
There's a carrion crawler in one of the caves; those creatures are incredibly weak against fireshields. It hits Daine for 2 damage, and gets hit back for an automatic 7.
Up top, the gnolls come. Usually in groups of four, and we don't bother using any spells unless more than that show up. In practice, that's just the main group around the chieftain.
We head back to Nashkel by the most direct route. There's a cave bear waylay on the way, easily handled despite Dynaheir having nothing to contribute. We rest with her in the party, getting some free Identify spells including the tome. And then, we reunite her with Minsc and let her leave the party for good. Branwen gets freed from her stone prison and provided with some basic gear, and then we invite Imoen back into the party. Next time, we'll start working on the eastern areas.
218 fire kills. We're picking up the pace now.
- Seventy Maxims of Maximally Effective Mercenaries, Schlock Mercenary.
Or first destination is the tomb-lined valley we briefly visited before. This time, we'll clear it out properly.
We're fighting some ankhegs when Hentold shows up:
Heading out, we face encounters that fireballs are much better for. Ogrillons:
And then, after that, it's weapon attacks that do the job. A lucky ice arrow gets through the mirror images to disrupt the enemy's first spell, giving us time to burn through his defenses and finish the job.
A couple more minor encounters - some ogrillons and some ghasts - and the map is done. Actually, the ghasts were before Narcillicus and his oozes.
We head north to Firewine Bridge next; we're not ready to take on the ruins and their traps, but the surface is something we can handle. Coran hears something, alerting us to a quest he has here.
Bentan wanders off after a talk; none of the party has the pickpocket skill to take his scroll, so he gets to keep it. A group of skeletons comes next:
Across the bridge, kobolds come in large numbers:
We also meet Amelia near there, the object of Coran's quest. She hands over some withered roses for us to restore at the Beregost temple.
To the north, we pick a fight with Meilum.
And now, Kahrk. He's a brutal fight, so I pre-summon three nymphs.
Kahrk goes for a Slow against our ranged line, and ...
We took three painful melee hits before the Hold landed. After that, beating up the helpless enemy is trivial. The nymph heal us, and we move on.
There are only some minor encounters left, though Aerys is willing to use a fireball on some angry dogs:
Back in town, we sell some junk and ankheg shells, then rest. Over at High Hedge, it's time for some serious shopping. Thalantyr recharges the wand of fire, then sells Imoen some archmage robes and Coran the Claw of Kazgaroth. Imoen gets a whole bunch of fire darts too, and I switch a pair of LotM gauntlets over to take advantage of her new 3 APR. There isn't quite enough gold left to buy a second set of archmage robes for Aerys, but we'll be back again. Until then, fire resistance robes will have to do.
On the way out, we hit some skeletons:
We sell off a bunch of magic gear we're not using in Beregost, and we could afford those archmage robes now - we're back up to over 40K gold. But no, I'm fine with more waiting.
On the way back to the bridge, a gibberling ambush ...
A small group of respawned kobolds go down, and then Amelia directs us into the dungeon.
Some kobolds start trickling in - first from the entrance, then deeper in the dungeon. They're easy to ambush and slaughter in the tight quarters here. The increased range on calls for help does the enemies a disservice in a space like this.
After the battle, we head back up to the surface. Coran is charmed and removed from the party.
So, then ... I could fight Amelia, but I go for a more peaceful bargain. She gets the powders, her captives get freedom.
Fighting the succubus is worth less XP, and you don't get the amulet either. This bargain is the more rewarding path.
Talking to Natan afterward is worth either a material reward (several good potions) or a chunk of experience. I take the potions, after first dealing with a kobold interrupt.
Now that we have Coran's lockpicking skills and more general fighting ability, it's time for a return to the upper floors of Durlag's Tower. We buy that fireball-only wand, then head for the eastern battlements.
So, then, I go for a fireball on the skeletons coming up from the other direction. Imoen's fire darts work well, too.
It takes a while to get the final blow - slashing weapons aren't very good against the doom guard's plate mail. The doom guard is whiffing too, so it doesn't actually hurt us.
And now, into the tower. We start unlocking chests and looting, then rest as exhaustion catches up.
Up on the third floor, it's time to fight the ghost.
Once it does, a hasted Daine pokes him and then heads downstairs to cancel his spell. He follows.
The chests in the ghost's room ... I unlock them, but I'm pretty sure at least one has a trap that I didn't get a chance to disarm. They can wait.
I pick a fight with Riggilo, backstabbing him ...
Incidentally, Riggilo's stats are a weird mishmash. He's a pure level 8 thief, with the base hit points of a level 8/8 fighter/thief and the memorized spells of a level 7 mage. Not that he can cast, since he's wearing armor.
Once Riggilo reveals himself with that stab, the kill comes quickly and we can heal Coran.
Next up, the succubus. And we're not in the mood for any sort of deal this time.
283 fire kills so far. We're carrying a good deal more item charges than we were, so we can be freer with using them.
- Homer Simpson, The Simpsons
Unusually for a run in which I raced through fixed encounters for early levels, I haven't gone after the basilisk area. I've passed through it, but not fought any of the basilisks there. It's time to change that now.
As usual, I go with a single designated basilisk killer. Khalid gets a strength 19 potion, an oil of speed, and a casting of Protection from Petrification. He has one hour to shred the basilisks in melee before his buffs expire.
I send another party member up closer to pass out some antidotes and a regeneration potion. Since that regeneration gets doubled by the haste, it's a lot of healing.
Then Khalid heads north, and runs into Mutamin. He's capable of 3rd level spells, and this iteration of him has a Remove Magic memorized. Khalid is in melee with a greater basilisk when the spell lands.
As you can see in that shot, Khalid ran away as soon as he noticed the problem. Fortunately, the first post-dispel basilisk attack was a melee attack, and he got away.
But that basilisk might still be coming, and I don't have a second PfP memorized. Khalid runs back toward the rest of the party, intent on escaping the area with them. Unfortunately, he runs too close to the Waterdhavians and provokes them. Also, Mutamin's other 3rd level spell was a Haste, and he's chasing Khalid as well. We'll have to fight our way out.
We engage near where the southern basilisks were, and Daine throws in a fireball for the approaching party.
After some rest and a retooling of Imoen's spells - she memorizes four instances of PfP memorized today - we head back out to face the remaining basilisks. Imoen immediately starts casting her spells ... and finishes just in time.
We reunite the party and return to our usual tactics. But then, there's not much left except gnolls. They provide very little threat.
With the area clear, we wait ... and the inevitable end comes.
Still, we'll come back to this area at some point - I forgot to bring any scrolls of stone to flesh.
I head up to the Friendly Arm for a bit, and invite Neera into the party. Travel to Beregost, buy the +1 composite longbow, return to the Friendly Arm. That runs out her one-day timer, and her expository dialogue triggers.
Now, back to the normal party. Imoen rejoins, and we head north to the ankheg farm. There's a reward here that's pretty obscure:
Resting in the field brings an interruption:
The second try at rest succeeds, and we're ready to clear out the remaining ankhegs.
Three more ankegs follow in the farm's furrows, then a few hobgoblins as I ferry the shells to the edge of the map. Those hobgoblins put Coran over the line to fighter level 6 - 4 HP gained (roll 4/5) and a mostly irrelevant bastard sword proficiency. Also, I use Strength of One so he can re-equip his bow.
Inside the cave, there are six ankhegs left that we didn't kill the first time. Facing them one at a time, they're no threat.
Back outside, we run into the first bit of trouble here - a pair of ankhegs hits Imoen hard.
We kill three more of the random ankhegs, then two of the pre-placed ankhegs Gerde cares about, and that's it for the area.
Imoen reaches mage level 7 with this, and her thieving abilities are back. She gains 5 HP for this level (roll 3/4), but doesn't know any 4th level spells to fill that slot. Equipment-wise, she can use a bow again, but I have her stick mainly to her fire darts for a while. Her melee option is now Twinkle, a major improvement over her old dagger.
Now, it's time for a shopping trip to help out Imoen's spellbook before we return to the Cloakwood. We buy lots of scrolls, starting with Feldepost's Inn, then heading to High Hedge ... oops, skeleton interrupt.
Finally, Ulgoth's Beard. This offers a few 4th and 5th level spells, plus more equipment such as the +3 staff, the cloak of displacement, and the wand of the heavens. Imoen drinks two potions for 100% scribing success, and learns all of the scrolls I have available.
Coran starts in on trapping the area. After a rest, he continues, and I decide to speed things up with the Reform Party trick. Every time he leaves the party, daily class abilities such as Set Traps are refreshed, so I can set the equivalent of weeks worth of traps all at once. As I see it, it's an exploit to use this under pressure, but for speeding things up when you could just rest safely it's fair game.
Then something weird happens. Coran damages himself with a failed trap, then I remove him from the party ...
As best as I can tell, that's his new neutral script telling him "Oh no, a party member hurt me! Better fight back." because the damage was too recent. Lesson learned - wait a round or two after any damaging trap failures before reforming the party.
I reload, and repeat. Seven traps laid outside, seven inside Shandalar's house, and seven more in the basement. We have prepared the field for the demon cult.
Shandalar calls on us, but we put him off. The ice island will come later.
Over at the bandit camp, we loot the chests we couldn't open earlier, and grab a bunch of junk to sell. We have a fireball scroll now, but Imoen can't learn the spell until she drinks a potion - too many level 3 spells already known. Everyone who can use shields has a +1 medium shield now, and we have two wands of fear instead of just one.
After selling that junk at the Friendly Arm, we pick up Neera again. She's almost ready for her quest, and traveling to Firewine Bridge takes long enough that she opens up when we get there.
Naturally, there are kobolds there. Aerys goes for a fireball...
More kobolds trickle in to help the mob; they get weapon attacks and in one case a Sleep. After a rest, we're off to Adoy's enclave.
It's pretty quiet there; aside from the oddly cooperative goblins and the paranoid ranger, there are just some wolves.
Inside the cave, the goblins get meaner. They attack, and we have to kill them. We bury Rilsa and retrieve her ring, then face the goblin leader Rogdok.
Inside the last room, we talk to Adoy and trigger the quest's final encounter. For the Thayans ... more fire, of course.
Adoy hands over his reward, we pick up the loot, and it's off to Magreb. I really don't like picking a fight with the goblins outside, with Neera so vulnerable.
Incidentally, Magreb's dialogue is bugged; there's an option that should appear in this case, but it has the wrong conditions and is thus practically never available. The conversation, starting at the key point:
M: "What have you discovered? Have you avenged my Rilsa?"
PC: "I took care of the troublemakers among them. You should find the survivors much more open to negotiations."
M: Maybe that's the best solution. Rilsa would be glad to know you spared those who were open to peaceful coexistence. For both myself and Rilsa, I thank you."
The conversation returns to the standard track after that, and the experience reward is the same as for the "killed them all" option you'll normally see. The problem is that this option only shows up if you've killed less than nine goblins. With exactly nine goblins inside the cave that are automatically hostile - the troublemakers - you won't see it unless you sneak past and don't kill all of the troublemakers.
Anyway, we head back to civilization to sell some junk, then dump Neera and bring Imoen back. There's one more northern area to hit - the eastern area in the Wood of Sharp Teeth. This area has two tough encounters, and both of them got me in my last run ...
We start off the area with some giant spiders, which immediately web up Daine:
We neutralize these spiders with a Sleep and finish them off without taking any damage, but that tactic doesn't work nearly as well when they have support from the more damaging sword or phase spiders.
Show a useless scroll to Fahrington, identify it, drop it.
And now, the Red Wizards.
Jaheira adds a second necklace fireball...
A round later, Denak goes invisible. Glitterdust him ...
The only effective enemy action was a double Acid Arrow sequencer on Daine. We just heal our way through that. The ring of energy, the scroll of Remove Magic, and some junk are ours.
Now, on to the spiders. We have some small groups as warmup ...
After we disarm some web traps and kill a couple ettercaps, we're done with the area. That went well, unlike my last run in this area.
324 fire kills. We used quite a few fireballs, and guest star Neera really got into it.
— David St. Hubbins, This is Spın̈al Tap
We now travel to Gullykin, where not much is going on up top.
Down in the gully, we run into a trio of ankhegs:
But the real challenge here is the dungeon. After a rest (we traveled 24 hours to get here), we head down into the Firewine ruins. A roaming kobold commando - probably riled up from our last brief visit - finds us immediately, and we head back up to the cellar to kill the commandos as they trickle in. 13 kobolds later, I've finally killed enough to start advancing.
Pressing forward, I have Imoen lead and disarm the traps ... until one case where, immediately after I save, she steps on one.
But she was moving slowly and detecting at every step. She should have seen this one. On the reload, she does, and gets our first fire kill down here:
Finally, after more than fifty kobold commandos, we approach the other exit to Gullykin. Our first foray draws out more kobolds, while the second brings Lendarn.
The ogre mage is next, and I go for a triple fireball:
The second fireball exacerbates the ogre's injury, while the third comes late. When Daine finally moves around the obstacle and fires it, Aerys takes more damage than the enemy.
Up top, we meet Jenkal...
Now that we're done with the ruins themselves, I travel to the other side looking for the fallen paladin Svlast.
We run into some zombies on the way:
On the way out, it's another kobold mob.
We head back through the ruins, visit Erdane to sell some junk, and head back to Beregost through the basilisk area. We have some stone to flesh scrolls now, so we free Tamah and Corianna as we pass by. There's a worg ambush during our travel here:
After getting rid of our ankheg shells, we're off to Ulcaster next. The area is plagued by skeletons and zombies:
Furret tries to sell us a "magic" gem, not noticing that Imoen has already picked his pockets for the decidedly nonmagical turquoise. Nice try.
There are living threats too - like kobolds on a hill...
Up on the plateau, it's Icharyd's turn. With SCS, he's 90% magic resistant, so our fireballs aren't going to help. Only Aerys' breath is likely to penetrate that. Jaheira also switches to her club because of Icharyd's (mod-added) resistance to non-crushing weapons and drinks a potion for 19 strength.
Returning to Ulcaster, there are just a couple of groups on the way to the plateau. The plateau itself brings more skeletons and a kobold mob:
Down in the dungeon, one weakness of the party shows itself. We haven't memorized any instances of Remove Fear, and Mal-Kalen takes advantage.
Later, when I get around to reconciling my kill counts, I find a 2000 XP/1 kill discrepancy. As best as I can tell, nobody got credit for killing Mal-Kalen, though the party did get the experience.
After Daine recovers, we head for the jellies. Daine stays back for this fight, as her piercing attacks can't hurt the mustard jelly.
The mustard jelly brings Aerys to level 8, and he finally has a bad HP roll. Only 4 HP (roll 2/6) this time. His new spell is Stoneskin, and his innate fire resistance improves to 50%.
We move on to the wolves' domain. Dire and dread wolves abound here, and Daine reaches level 9. She rolls 3/8 for 5 more HP, and can memorize 5th level spells now.
As we approach the big bad wolf, a bunch of dread wolves come at us:
And now, the boss. SCS seriously upgrades this fight, including both multiple Horror effects and a dispel.
I follow up with wands of frost and the heavens. Twice.
There are still some ghouls and dread wolves to clear out, and the paralyzed Coran takes some damage, but we get through it without too much trouble. Ulcaster gets his book, and we can leave the area for good.
399 fire kills. Another very fiery update.
- Adam Savage, MythBusters
There are just a few wilderness areas left, mostly in the western part of the map. We'll clear them out before returning to the Cloakwood.
We start in Nashkel, and it's the right time of day for a bit in the carnival we never had the opportunity for before.
Rasaad joins for a moment to give some expository dialogue, and then we restore the normal party and head northeast. The first fight here is a group of ogres:
Then we talk to Sarhedra, who wanted us to kill those ogres. "That was quick."
More fights follow. Ogres:
The xvarts attacking the cow ... they don't get fireballs.
Then a quartet of ogre berserkers ... that calls for multiple fireballs.
More ogres follow, and then a second bandit group:
There are still a few more monsters around, which we handle without the fireballs. The only tricky bit is the cave; Imoen goes in first to disarm the trap.
Incidentally, we pass a milestone here - Daine is the first party member to exceed 100K experience from kills.
That was the last of the eastern areas. Now, to the west. We'll start in the south, with the forest at the foot of the Cloud Peak mountains.
We start in the north, and that means Sendai comes first. We pick a fight, of course.
Since I'm not using level 1 spells offensively much at this point and Aerys has so many (11 or 12, depending on whether the amulet or ring is equipped first), I start having him use Shield even when not preparing for specific threats.
Lots of minor threats like xvarts or skeletons get wiped out with weapons, and then we run into a skeleton pack that I decide to burn:
Of course, just because I'm using Shield doesn't mean that I'm up on all of my long-duration buffs. I'm most of the way through the map when I remember that both of my mages know Stoneskin now.
Vax and Zal ... back to the fireballs.
A trio of winter wolves elevates the usual level of random monsters here:
Rufie gets the last daily fireball ...
We head back to Nashkel to rest and sell some junk, then continue farther west. For this trip, I won't pick up every little thing; I'll only carry the more valuable junk back to civilization to sell.
First, Seawatcher. But before we get there, some xvarts:
Arriving at the coast, we encounter some hobgoblins first:
The northern reaches don't have much; just a few wolves.
I provoke Arkushule by demanding an answer ...
And now, the main event here. The start of the path to the cave is guarded by hobgoblins and sirines:
With Sil's group, I go for a backstab:
Inside the cave, Imoen easily disarms the traps, and we shoot down the flesh golems with no trouble. The tome gets immediate identification, and Jaheira uses it. 18 Con at least offsets her poor HP rolls a little. And I plan on updating her BG2 stats for continuity when I get there.
On the way out of the cave, there are some carrion crawlers:
Now, we head toward the southwest, where worgs show up:
The river comes next. We get ambushed on the way ...
Once there, we run into Neville's band:
We use more fire on the northern bridge, but the hobgoblin elites and ogre berserkers are tougher:
The area also brings random ogre berserkers ...
The lone polar bear is no problem, and Jared hands over some boots. Random monsters in the western half of the map, though ...
Another quartet of berserkers nearby gets the same four-fireball treatment.
Finally, up north, we meet Laurel and face a gibberling horde.
One hungry ogre killed, and we're done with the area. Also, the gem bag is full again; we'll have to sell our gems and jewelry when we get back to civilization.
There's one last unexplored wilderness area, and we head there now. It's not very threatening, with a number of packs of dogs that don't even consistently go hostile. Ba'ruk's band does rile up some dogs, though:
The northern section brings a notably varied tribe of gnolls, all the way up to a chieftain.
We help out Charleston Nib, then take the idol so we can face the Doomsayer.
Coran scouts the last few bits of the map stealthily, and we talk to Brage. Answer his riddle, get teleported back to Nashkel. I end the session in Beregost, after emptying the gem bag and resting. It's day 87, Aerys has over 100K experience, and we have nowhere to go but back to the Cloakwood.
462 fire kills. Fireballs just solve so many problems in this game.
— Teal'c, Stargate SG-1, "200"
After a bit more restocking from Thalantyr (fire darts, potions of freedom, and even some fire bullets), we return to the Cloakwood. We passed through the spiders' area the first time, but this time we're actually going to clear it out.
We talk to Tiber, and meet some respawned huge spiders nearby.
We turn to the north next, and take on the ettercaps.
We disarm a few of their traps, then rest.
After waking, it's back to killing spiders. The way to the Spiderdome is clear, so the party heads there next. Dip in, then come out to ambush them on our own terms.
Tiber gets his brother's body back, and we have a nice sword that we're not going to use - but the free action effect is useful enough to carry it.
Now, we go around the north side of the dome to the falls.
There are more phase spiders in the southwest, but we have more room to maneuver here.
We do trip one web trap instead of disarming it, but the only remaining thing that gets us is a lightning strike.
We're not quite done with spiders; traveling to the mine brings an ambush.
And now, the mine. Since I'll have to rest soon, I go after Drasus' party with the remainder of my daily resources. The two bridge guards are easy, and then it's time to prepare. Sequencers, Stoneskin, Shield, a Protection from Fire, and a pair of nymphs.
Aerys drinks a potion of freedom so he can hit Kysus with a Spell Thrust. While he's working on that, Kysus casts Remove Magic at Daine ...
Imoen actually got stuck in the webs before she could cast her own sequencer. She does so now - Web and Horror. Kysus saves against the Horror, so he can still cast spells.
Aerys adds another web, keeping Kysus immobile. Daine takes advantage.
Instead, Coran decides to shoot a horse.
The boots go to Jaheira; since we have no melee skirmishers in this party, the best use for them is to make sure both of our tanks can close quickly.
Attempting to rest summons guards.
We step into the guard barracks, and engage the pair there.
There are Blacktalon elites around, so we use Coran to scout ...
Most of the remaining encounters are trivial - forest creatures like tasloi and wolves. Lakadaar and his guards, though - that calls for fire.
Then more guards get involved:
A few more guards follow as we head to the mine - one in an outbuilding, two at the top of the mine. And down we go, with the previous day's stoneskins still active.
The mine level is pretty trivial - one guard at a time, and they can't do anything of note to us. The stoneskins do expire, though, their time running out.
The prison level brings actual fights, as the guards come in groups here.
Next, Hareishan's room. I disarm some traps, and send in several party members to deliver a lot of fire.
There are a couple ghasts in the back passage, but that's it. One lands a sickening hit on Daine. Rill gets some money, Yeslick waits. Also, Aerys casts a new Stoneskin.
Down on the barracks level, Aerys casts a fireball for the first room.
We clear a few lightly populated rooms, then hit the hobgoblins' barracks:
Then the second room gets a wand fireball.
Now, it's Natasha's turn. I start with a backstab ...
The result is inevitable.
There's one last threat on this level - an ogre mage.
That brings us to the final level, and Davaeorn. His guard up front challenges us, and gets in a hit before going down.
Next, Imoen disarms the traps and Coran sneaks forward far enough to trigger Dave's dialogue ... while still invisible. The battle horrors come after us, but the mage just stands there still doing nothing.
Now, Davaeorn's reinforcements start to arrive - Blacktalon elites, in both ranged and melee varieties. I web up the entrance and start shooting at the trapped enemies, but it's time to do something about the boss as well.
It deals 8 damage, and he drinks a potion to heal. Then 5, then 6. Jaheira escapes the webs long enough to drink a potion of freedom, and continues her watch. 6 more damage, and the second wave arrives. I decide to level up Imoen mid-battle; 6 HP gained (roll 4/4), and she casts her Stoneskin for four skins.
2 more damage, then 9, 10, and 9. Dead; Davaeorn has 45 HP, and we've done 47 damage since he healed.
We faced two waves of reinforcements; there can be up to five, but they stop when the boss dies. With multiple webs to trap them and a whole party to attack them, they never stood a chance.
We kill the recap guy and the mustard jelly, then claim the loot. With everything from down here, our scroll case is full now.
Yeslick gets a brief recruitment and some basic gear - helmet, splint mail, mace, shield. Then we flood the mines and send him off. The big city awaits us.
510 fire kills. Not that many by the standards of recent updates, but we did get some high-profile kills that way.
- Jaya Ballard, Magic: The Gathering. Flavor text for the card Sizzle.
The first order of business, of course, is to leave the Cloakwood. And since the travel here has a high chance of interruption, we get two waylays on the way out. First, wyverns.
Second, ettercaps.
Before heading to the city, we visit Beregost for some trading. Officer Vai now has 111 bandit scalps in her collection, and our archers are armed with +2 arrows. I have enough gold to keep that up for the rest of the game.
Now, we head north to the city. Kill an ankheg, collect a dagger, then cross the bridge. We enter through the gates in the morning, and head straight north.
Coran is fatigued, but the rest of the party isn't yet. As such, I press on. First, the counting house.
Upstairs at Sorcerous Sundries, some mages are hanging out ...
But then, they launch a fireball of their own. We retaliate with a third blast:
Then Wheber casts his next spell.
But then, Wheber's defenses collapse.
This was a blunder. Fighting mages with the fatigue debuff is simply a bad idea, and I paid for it with a death. Fortunately, it's a recoverable blunder; we can raise Coran for 800 gold and heal up with some nymphs.
Coran applies his lockpicking skills to acquire a +1 longbow - a good stopgap until we can boost his strength for the +1 composite longbow. And again, to open the way and return Nester's dagger. We talk to Lothander and find out how to remove his geas, then head north and east to meet Brielbara.
We wake in the late afternoon, and immediately head upstairs to chop up a mustard jelly.
Now, it's time to get started on the night quests. We talk with the thieves and pick up a tome - Jaheira now has 18 Dex. Khalid wears the gauntlets of dexterity, because he's actually the only party member that benefits from them at all.
Darkness falls when we leave the building, so we head north for Narlen's heist immediately. Coran is the thief for this part, because of his excellent stealth.
After a detour to the Elfsong Tavern - Imoen gives us a nice amulet, Brevlik offers another quest, and the merchant upstairs sells us a second necklace of missiles - we head south to loot Gantolandan's place.
This heist calls for Coran and Imoen working together - Imoen takes care of the trap, while Coran handles the locks. Gantolandan doesn't even start to wake.
The museum heist comes next. In and out with no one the wiser.
Finally, the main guild heist. Coran handles this one with his stealth, getting through the whole thing without being seen at all. One key hide check does fail, so he drinks an invisibility potion after retrieving the parts upstairs.
And no, you don't have to talk to Glanmarie. She doesn't set any flags with her dialogue, and she doesn't even initiate dialogue on her own.
The result of all this stealthy thievery ...
Next, Imoen learns some new spells. I buy all the new scrolls from Sorcerous Sundries and feed her a pair of potions of genius to learn them. While I'm there, I also pick up a full stack each of arrows of dispelling and detonation.
We now have three hours of high lore for Imoen. I decide to take advantage by going after Ragefast and Ramazith.
Sadly, Jaheira failed her saves against that sequencer. I spend another dispelling arrow on her, so she doesn't have to fight blind for two hours. 9 damage ... wait, I should have unequipped Coran's gauntlets for less damage.
Jaheira gets the nymph cloak, and we head off to confront Ramazith.
The mustard jellies get a hit on Daine; she makes both saves.
The ghasts get a double necklace fireball.
With that, the treasure on the top floor is ours. Imoen lore-IDs the intelligence tome, and Aerys uses it.
Next, it's time to get back to the poisoning quest. We talk to Jalantha Mistmyr, buy a wisdom tome, and hear about a dead child - we're not dealing fairly with the Umberlee priestesses after that.
Daine reaches level 10 here, for a fixed gain of 2 HP. Jaheira uses the wisdom tome, and is now up to 16.
Restoring the bow brings Khalid reaches level 8, gaining another 12 HP (roll 9/10). At 87 out of a possible 104 HP, he's quite sturdy.
Lothander is next, and I'd love to throw some fireballs to clear out those goons. Unfortunately, there are also innocents in the area, so we have to settle for normal attacks.
We return to the docks now, to save Coran's unknown child. There's trouble in the Low Lantern ...
That just leaves Desreta. Imoen casts Hold Person ... magic shielding potion. So much for the easy way. Also, she hits hard - that 17 damage is one hit on Daine.
In round two, Desreta drinks an invisibility potion. I respond with Detect Invisibility ... no backstab. She still gets in another hit before going down, though.
Downstairs, Yago lets us get into position ...
Noralee gets her gauntlets back, and then I send Jaheira after the basilisk.
We return to Brielbara, and the baby is cured ...
And now, the Blushing Mermaid. Larze on the ground floor gets a Wand of Paralyzation shot:
Upstairs, it's Marek's turn.
And with that, we have the antidote. Aerys is cured, and we don't have any strict time limits hanging over our heads any more. The remainder of the city's troubles can be dealt with at a more leisurely pace.
527 total fire kills. We didn't add many in this part, but then we didn't have that many kills overall.
— Ignus's teacher, Planescape: Torment
Now that we don't have any pressing timers, we're free to choose our targets based on what we get from them. We head to the southwest sector first. An inn overrun with green slimes? Slice them up.
Then an unmarked building holds a group of thieves:
And finally, the reason we came this way.
Then again, when he follows us and becomes visible ...
We try to hit him some more, but he uses a mirror image/invisibility sequencer. OK, just kill Maka instead.
There's also a "General Store" in this sector that buys practically anything (including wands) and is very easy to steal from, but we don't need any recharges right now.
On the other hand, the Merchants' League? That's worth looking into. Edie gets a potion of insight, we check out Zorl's office, and the doppelgangers reveal themselves. The one on the second floor and the five on the bottom floor are no problem, but the crowd upstairs?
But ... the pillars are trouble. Imoen steps too far forward and is burned by Aerys' fireball.
The remaining doppelgangers are handled easily, and without any fire. Aerys reaches level 9, gaining another 5 HP (roll 3/6) and taking Glitterdust, Slow, and Improved Invisibility as his new spells.
We visit Brielbara again. Coran isn't ready to take responsibility quite yet, but stepping back out does the trick.
For our troubles, we get a second potion case.
Since I don't want to risk the baby's safety too much, I head out for some side quests - lots of travel, not much danger. First, Dorn's quest.
We're at 20 reputation, so Dorn won't join ... unless we lower it first. And there's an easy method we have of doing that.
Khalid has been stashed upstairs in the Friendly Arm to make room.
She gets some levels, but she's not going to fight so it doesn't matter. Back at the inn, we trade her for Dorn.
We head south with him - one waylay on the way to Beregost.
I look to buy a helmet ... no, it's night. The smithy is closed. On to Nashkel, then.
We rest, then talk to Taris. Since we sold some helmets here in Nashkel, we can buy one back now. And with that, we're off.
We arrive, and face a few skeletons.
When we do meet her, there's a cutscene - and she casts Horror while still in cutscene mode. It's literally in the air before we can do anything.
Well, all right, let's respond appropriately.
Kryll also goes down in the fireball, and the remaining skeletons (Lori and Hagar) die by script.
After waiting for Jaheira to stop running around, we head back north to face Simmeon. We get plenty of rest along the way, of course.
Aerys follows up with another fireball, targeting the priest:
Aerys continues with a pair of Magic Missile spells ...
One Thrall of Azothet goes down to an arrow from Dorn, and the battle continues ... until the Horror runs out.
With that, we're done with Dorn. We head back to the Friendly Arm, and rest. Our reputation is back up to 20.
And now, it's Rasaad's turn. We head south again to recruit him, giving him the Cloak of the Wolf as a primary "weapon".
Returning north, we reach the Baldur's Gate docks at mid-day. Time warps:
The note gives us a lead - but before we follow up, we rest again at the Blade and Stars. Sorrem agrees to show us his friends, warping time again ...
Upstairs, we have more room to work with, and Aerys throws a fireball.
On the way south, we're waylaid immediately.
And then, we reach the monastery. Upon arrival, we find a dispute:
The outer snows have some monsters, including snow trolls. But then, Coran brought some fire arrows.
After that, we come to the stairs, guarded by actual people.
The initiates at the top of the stairs are more numerous ...
Inside, the enemies spread out more.
Moving slightly forward, Imoen trips an acid arrow trap for nine damage. I wasn't cautious enough there. Also, that reminds me to use Stoneskin. We do get the other traps disarmed properly, and then face Gamaz again.
That fireball we're casting in that shot kills the two initiates; the monks survive only to fall to our weapons.
And in a side room here ... the Big-Fisted Belt. Coran gets it, for general convenience. We can stop memorizing Strength of One now.
The cave brings some nuisance critters and a riddle. Bassano is free, though he doesn't attack immediately.
Outside, it's the final confrontation with Gamaz. Aerys makes use of one of his new spells:
On the way out, Bassano attacks.
Oh, and the double "Blinded" messages? That's a bug with vanilla Glitterdust. When I standardized the MR issues with the spell (active starting in BG2), I fixed that too.
And now, we're done with companions outside our standard party. We let Rasaad go in town, reclaim Khalid, and restock on +2 arrows. Just as we return to the big city ...
548 total fire-kills, after this update of lots of travel and not so much fighting.
— Kefka Palazzo, Final Fantasy VI
Now that Coran's burden is taken care of, we can move on to riskier places. First, we head back to Ulgoth's Beard to take up Shandalar's quest.
The first enemy we meet on the ice island ... winter wolves.
The first mages are the trio in the next room - open with fireballs, of course.
The corridor there is an awkward bottleneck for us, so we retreat to the surface. Marcellus follows us.
Jaheira gets the final blow, and we wait out the Chaos before continuing forward.
Beyn hits us with a Slow, affecting half the party.
We start clearing side paths, and I'm not perfect at catching the traps. Imoen blunders into one Flame Strike trap. Still, I get the rest, and approach Cuchol ...
I go for fireballs on Garan ...
Then we head toward the exit - Tellan is on the way.
I follow up with a blind cast fireball ... miss. He's wandering too much. So I wait ... and he comes for the party before that defense wears off. The fight is on. Stoneskin goes up, I wear it down ...
While I have the dueling fireshields set up, Daine gets the kill with her weapon. All that trickery didn't save him.
There are a few more winter wolves before the second level, and Coran reaches fighter level 7. He gains 3 HP (roll 3/5), and that wonderfal APR boost.
The second level is mostly full of lots of winter wolves. They're worth plenty of XP, but they're boring. And then, there's Dezkiel.
Dezkiel held the item Shandalar wanted, so we can leave now. And as he teleports away, we pick his pockets repeatedly.
While I'm at it, Imoen picks Dushai's ring of free action as well. That'll give us a little more flexibility with Web.
While we're here, we speak to Mendas as well. The quest for Balduran's isle is open, though we won't go there until chapter 7. Buy out a merchant, hire Ike's tour, and we're done with Ulgoth's Beard for now.
And then, there's one more thing to do outside the city - face Shilo Chen's ogre magi in Larswood. On the way south, some half-ogres jump the gun:
On arrival at Larswood, we move quickly - fatigue still isn't a problem when we reach the ogre magi and their minions.
Before we can fully get free, some gibberlings join in:
Back in the city, we pick up our reward (gloves of pickpocketing, useful for Imoen on occasion) and start working through buildings. Most are uneventful, but there are a few encounters of interest.
On to the north, where we help out a kid and a bard. Then another hostile encounter comes up.
Now, his boss upstairs gets some fire.
I pick up a skull and a stash of gems in the Three Old Kegs, then talk to the noblewoman Areana. Over to the Elfsong ...
There's that one inexplicable shop ... instant roast chicken, anyone?
We make a delivery for Nadine, and pick up a third necklace of missiles. Excellent. After a rest, we enter the northwest sector.
The peeper Gervisse doesn't get anything fancy - just weapon attacks.
We visit Pheirkas and hand over a cloak ...
The Silvershields get Eddard's pin back, and now it's time for something more involved. We enter Degrodel's house, and engage the horrors within:
On to the petrified adventurers. I try to be sneaky and pick a pocket ...
On the second try, it's a success. I talk him into giving up the cloak, then go for the helm as well. While we're picking up the cloak from Quenash, I lay some traps in the Undercellar, again using the Reform Party trick.
Then we go to the Helm and Cloak, and set some more traps. Talk to Gorpel Hind, start teh bar fight.
Still, the enemies have a cleric. Unholy Blight hits us, dealing minor damage and interrupting the nymphs' spells. Daine goes for the archer Caturak while the rest of the party handles Pargus:
But fireballs still work...
Coran has the lowest HP in our party, so he gets the helm. Jaheira could use the THAC0, but she needs the fire resistance from her current helm.
Then we return the helm to Degrodel ...
There's not much left in the city for us; just the main plot, the sewers, and acquiring the sea charts. We hit the Seven Suns first, and there's an odd glitch - the doppelgangers on the first floor don't transform. We kill them anyway, for less XP but better loot. The quest still completes properly, and Scar tasks us to investigate some disappearances next. The first thing we meet on entry are the sewerfolk:
Arkion gets the body, we pick pockets for his and Nemphre's trinkets, and we turn them in to Ordulinian. That brings the final level-up:
With that, the final levels and HP for the party:
Aerys: Dragon Disciple 9, 69 HP. That's 45/54 from levels, 6 from his familiar, and 18 from Con. He's +3.2 points above what average rolls would give him, or +9.2 if you don't include the familiar in the average.
Daine: Avenger 10, 63 HP. That's 45/74 from levels and 18 from Con. She's -11.5 points below average rolls.
Jaheira: Fighter 7/Druid 8, 68 HP. That's 38/67 from levels and 30 from Con. She's -10.1 points below average rolls.
Khalid: Fighter 8, 87 HP. That's 64/80 from levels and 24 from Con. He's +4.0 points above average rolls.
Coran: Fighter 7/Thief 8, 51 HP. That's 46/59 from levels and 5 from the Helm of Balduran. He's -2.7 points below average rolls, or -1.7 below average counting from his level 3/3 starting point.
Imoen: Thief 6-Mage 9, 53 HP. That's 35/48 from levels and 18 from Con. She's -2.7 below average rolls if counting from the beginning, or -2.3 below average counting from her level 2 start.
So - terrible rolls for Daine and Jaheira, good rolls for Aerys and Khalid, mildly had rolls for Coran and Imoen. At least we have enough Con to avoid most problems.
Aerys is just below the XP cap, and I end the session here. Next time, I begin the ironman run to the end.
583 total fire kills. The chickens account for nearly half our count this time, because the enemies aren't very dense in the big city.
Some say in ice.
From what I've tasted of desire,
I hold with those who favor fire..."
- Robert Frost, Fire and Ice
Starting the new session, my first task is one I overlooked earlier - picking up the sea charts. I choose to just pay the captain's tab. We've got tons of gold, so spending 900 to get the charts with no risk is fine with us.
Then, it's back down into the sewers. We land near some carrion crawlers, and Imoen flames them.
And then, it's the ogre mage and his crawlers.
The next path we follow leads to more crawlers, and Daine gets a fireshield kill:
The main group of them gets a fireball:
That's the last fight of this eastern part of the sewers. The middle section is less exciting, with only some random oozes and Ratchild.
And then, the west. With the sewerfolk already eliminated, this area is all about the spiders.
While I use a flame strike once, that doesn't get a kill. No fire kills in this section.
With the sewers complete, we report to Scar. Three party members are now at the experience cap. Duke Eltan tasks us with going after the Iron Throne, and we're off. A bit of preparation before the battle - Khalid drinks a potion for strength 19, and Imoen drinks potions to boost her lore so she can identify our newest necklace of missiles.
And now, the Iron Throne party.
Many fireballs land. Khalid gets the doppelganger. Coran gets the mage Naaman and the thief Shennara. Aerys gets the cleric Diyab. Imoen gets the thief Kaalos.
Then the fighter/cleric Aasim falls to an arrow, leaving just three foes. Alai (fighter/mage) and Gardush (berserker) were out of range, while Zhalimar (berserker) drank a potion of magic shielding.
As Alai is the only spellcaster left, we hit him with a dispelling arrow and focus him down.
Oh well. We can just visit a temple before we do any more fighting. Three spells later, everyone's back in the green - nymph healing is very nice.
We rest in the city one last time, recharge some wands, and restock on +2 arrows. Then we're off to meet the duke and go to Candlekeep.
The ogre mages are there, of course.
I add a pair of wand horrors to ease the pressure, and then take out the leader:
Once fully rested, we head to the keep, and loot it thoroughly. Along the way, we find our first greater doppelganger:
Once we've finished exploring, we talk to "Koveras" and then confront the Iron Throne leaders.
After that, it's an arrest and some cutscenes. We enter the catacombs with all but Coran at the XP cap, and Aerys at 169381 XP.
The first paths we follow down here are full of traps, but very few enemies. The second fire resistance ring is welcome, but I wait on identifying the wisdom tome. Jaheira will use it, but it's a minor enough boost that it can wait.
The last path in this part has some more dangerous enemies - phase spiders.
The ghast path comes next, and they come in enough numbers for fireballs to be useful.
The next floor brings a series of lone doppelgangers, handled with weapons. The skeleton packs, on the other hand ...
For the false Elminster, we go with flame strikes instead, plus one fireball.
And then, we enter the caves. Prat's group gets another fiery barrage:
Then Prat comes after us, with his stoneskin still active since we didn't hit him with a dispelling arrows. He goes for melee attacks, and has a run of fantastic luck:
As for the other swings ... Prat has effective THAC0 8 in melee with his axe. Coran and Jaheira each have AC -10 against slashing. He needed 18 to hit, on everything except the one stealth attack.
After that display, we spend a dispelling arrow and finish him off. Then a healing spell for Coran.
The spiders come next. Set up in Prat's area, draw them out.
Finally, a pair of basilisks. I have a bit of fun with this, protecting Aerys so he can blind them.
644 total fire kills. Both mooks and real threats are falling to our fire, as we get freer with the item charges in this late stage.
- Seventy Maxims of Maximally Effective Mercenaries, Schlock Mercenary
Now that we're in chapter 7, it's time to delve into Durlag's Tower. We've cleared out the upper floors, but we haven't gone into the dungeon areas at all.
We stop in Beregost and Nashkel for a few things (free identification, the violet potion, selling some stuff) and then travel to the tower. On the way, we are ambushed:
At the tower, the tour comes first. Ike's spiel is interrupted by the demon knight, which Daine and Jaheira attack fruitlessly.
There are a few containers upstairs left to loot, as this is the first time we've been here with both lockpick and trapfinding skills available. Once that's done, we head down into the dungeon proper.
The first danger we face is a group of spiders.
I actually went for a double flame strike in that shot, but the spider died to the first one.
Khalid starts drinking strength potions; we have so many that we can easily afford to have him at 19 or more essentially all the time.
And now, the room of three doppemgangers:
With the mallet head ours, we're on to other paths. I set some traps in the central area for the upcoming warder battle, and head to the north. Ghasts attack ...
With the ghasts eliminated, we're clear to use the forge and remake the mallet.
Heading west, we reach a corridor crowded with zombies ... the regular 2 HD kind that haven't been a threat ever.
With that corridor clear, we ring the silent gong and read the deeds of pride. Two warders are satisfied.
A skeleton warrior comes next, and that hits Daine and Coran before we take it down. We don't even try fire, since those monsters are magic resistant.
Some incautious moves have Imoen tripping a fireball trap; three party members fall into the yellow. That calls for a nymph, at least after we deal with the mustard jelly.
Before long, we reach the bedroom. Imoen lures out some spiders, and a golem follows:
There's not much after that - just some looting, a switch, another flesh golem, and the wine press. Now, the warders.
Meanwhile, I'm aiming dispelling arrows at Pride, and repeatedly missing. I eventually manage it, but ...
Looking back at the strategy, I tried to stun Pride multiple times. I shouldn't have bothered - he's immune. Instead, I should have summoned some fodder to take his hits while I took down the others.
Completing the first level sees Aerys at 189467 XP. If not for the cap, Jaheira would be a level 9 druid.
And now, the doppelganger level. The first two greater doppelgangers here are alone, and thus easy. The third goes down cleanly as well, but that room isn't clear yet.
One approaches the party, while the other ...
The torture room brings a Kiel and a Fuernebol - this room is actually random, with ten equally likely pairings evenly distributed among the five possible doppelganger states. My picture for this went missing, but Daine gets the kill on the Fuernebol with a Flame Strike.
We open some doors, and Coran starts feeling fatigue. Back up to the ground floor to rest, then.
The lava room starts with two Fuernebols and an Islanne.
A Durlag joins in - very tough against physical attacks, but we like using spells. And the bonus for killing him in that form is fantastic. Two Flame Strikes, then another fireball...
That leaves one more doppelganger, that hasn't quite entered the room yet. It's an Islanne, and it has had some time to put up some buffs. Daine takes a double Acid Arrow sequencer, we aim a dispelling arrow ... changed to Durlag. The arrow lands, and doesn't dispel anything.
There's a definite bug here - when a monster changes forms, any protections it had up remain, and become immune to all dispel/breach/protection removal effects. Fortunately, there are very few enemies that change like this and are capable of casting spells.
The dwarven doom guards come next. They're resistant to fire, so they get lightning instead.
The others don't come right away, so Imoen heads over to trigger that. She uses a wand:
There's one more corridor full of enemies ... mere ghasts.
We're up to 667 fire kills now. Not too many this update, but Durlag's tower runs on small numbers of strong enemies rather than hordes of weak ones.
burn! Let it burn! Let it burn! Let it burn!"
— Buffy the Vampire Slayer, "Once More With Feeling"
Upon entry, we hurry across the exploding room. Well, most of the party do. The immune ones stay there passing the boots of speed around. Our destination is the northern path, where wyverns await among the dragon's bones. Free tanks are available, but no. We'll do this on our own.
Now, the statues? Kill them. One at a time against the full party, they don't stand a chance. Coran gets the second set of full plate, and relegates his thieving skills to outside combat.
With that, we reach the western corridor. There are a few greater ghouls here:
Next, we take on the central platforms. I go with a standard pattern of two wand fireballs per platform.
It goes smoothly until the last platform, where Aerys gets hung up and doesn't fire.
And that's it. I use the fireballs in my standard runs - of course I'd use them here as well.
Finally, the southern garden area. It has backstabbers, so I switch everyone without stoneskin protection to melee by default. Detect Invisibility ...
The garden also has greater ghouls. Now those can die in a fire.
The second ashirukuru makes its save against Glitterdust ...
More greater ghouls follow, and then the last backstabber.
While I didn't take much damage in this level, any incidental damage to our tanks could easily have been cleared up by adding fire resistance beyond 100% and going to stand in the explosion room. I'm pretty sure I did a bit of that.
With the main portion of this level clear, it's time for the elemental rooms. I tried a different order last time through with my warriors, but I'm going with the conventional path of fire last with this group.
First, air.
Second, slime.
For ice, it's back to the fireballs.
Before entering the fire room, we prepare. AI off, one spell cast - Daine makes Aerys invisible. All but Aerys attack the first Phoenix Guard, and we're teleported to the chessboard as soon as he dies. Having fire-immune melee makes this room so much simpler.
On the board, I pause right away ...
The second rook comes next - two flame strikes and a scorcher.
Down in the next level, our first target is a Helmed Horror:
A second horror follows:
Those scorchers are also some minor free healing for Jaheira; at 110% resistance, she heals a point or two each time she gets hit.
This path brings some new gear for Jaheira - a better shield and sling. Not that she uses the sling much. We answer a riddle about the tower's history, then head back out on the next path.
The spider path comes second.
So ... can't let it get at Imoen. She dodges, the rest of the party attacks...
After another riddle, we're back to the hub. This time, we head south to the acid caves. And with all the greater ghouls here, I'm going to use some items. Aerys gets an oil of speed and a scroll of protection from undead. 3 APR with his dagger, and a lot of damage.
Now, the crypt crawlers can still see him and attack. They get scorchers.
Grael has some crawlers:
Doing things this way, Grael doesn't get to talk. Instead, he just gets to burn.
We keep moving and actually kill a crawler with weapons; I hit it with a scorcher, then finished it with dagger throws before the second hit.
Then the east side:
Imoen gets a pair of acid protection scrolls and grabs the loot. Then we creep toward the treasure room, disarming traps as we go. One last riddle, and the demon knight awaits.
For this battle, I have a cunning plan. Prepare minor sequencers, buff up, set up around the arena. Haste, protection from fire, free action for some of the party, and a few summoned distractions.
I talk to Dalton, and he heads out, walking straight through the webs. For some reason, he has ridiculously good saves. We head back up to the surface, and Jaheira has something to say:
With the tower complete, Aerys is at 224K XP. Daine would be a level 11 druid now if not for the cap, and would thus have a level 6 spell slot. We sell off a whole bunch of stuff, and also recharge our necklaces of missiles - we have four now, so we don't even need potions for any future full-party barrages. Imoen drinks two potions of genius and a potion of insight for 77 lore and certain scribing success. Only the demon knight's helm and a protection scroll evade her identification abilities; we'll have to spend spell slots on those.
728 total fire kills. A very fiery update, with us burning most of the threats in these two levels of the tower.
A forge fire tempers steel.
Why then are you surprised to find
A fire that can heal?"
— The Arbolit, verse 3, from Magi-Nation
Now that the tower is clear, we head back to Ulgoth's Beard, with some shopping stops. There are a couple enconters along the way. First, gnolls:
A group of hobgoblins waylay us as well; they don't get any fire.
And then, we arrive.
Since it's been more than a day since our last rest in Beregost, we rest at the inn. On to the next battle - this time without any traps.
In Shandalar's house, it's a different story. This is a much more dangerous group, but we have traps in place.
The fireballs land ...
The latest version of SCS is supposed to reduce the cult wizard's level, but it didn't for me. He was still that level 15 monster with Death Spell and Finger of Death memorized. Not that he uses those to destroy the party; his AI doesn't know how to use Finger of Death at all, and doesn't use Death Spell unless summons or insects are detected.
For Aec'Letec - more buffs. Free action, potions of mirrored eyes, fire immunity. We set some traps ...
Before long, the front guards are down and we're moving on to the back. On to a second volley:
The guards go down, leaving the demon alone:
We claim the reward, and immediately sell it. This party has no use for a hammer.
Now, on to the werewolves. I hand in the sea charts, then set some traps for Mendas - only four, since that's equivalent to before and after a rest. And then we travel.
Khalid is encumbered when we arrive, but at this point we can afford to just feed him a steady diet of giant strength potions. Loot the village ... potion expires before we even reach the northern half of the island.
Once we do ... 22 Str for Jaheira, heroism and speed for all the warriors. Jaheira now has 3 melee APR at THAC0 4 for 16-23 damage. While I'm shuffling belts - the front line should have the best slashing AC possible - the inventory goes gray ...
Anyway, I restore the XP when I reload, at the map transition. No actual progress lost. Apply the same buffs ...
For the sirine queen, Jaheira goes ahead while the rest of the party stays behind to ambush the minions:
Now, Daine is taking some hits here - one from Meym, more from a dire wolf pack. I give her a potion of defense, improving her AC by 2.
I try a fireball against Palin's group ...
On the other hand, when we get to the ship ... the bottom floor is full of wolves.
That's not quite the whole floor worth of enemies; there are still a few more when we go inside again, including two vampiric wolves. But there aren't enough to surround the party and make things messy.
I repeat my strategy against the second deck, drawing them down to a prepared position.
Now, draw down the third deck - at least, the ones that didn't come earlier.
For the top deck, Coran switches to melee mode with the Burning Earth sword, and hides. I want a backstab on the boss.
Daese comes first:
Coran re-hides, and we draw the next round of enemies down ... all but one. Focus on Karoug:
We then head up as a group, taking care of the last wolfwere and looting the top floor.
Now, back to the village. Report success ...
More than 30 werewolves later - we cleared out the whole village - we enter the tunnels. They show up in pairs here ...
Our oils of speed expire, but I'll continue without them. We're just a little slower now. We could negotiate with Kaishas, but no.
The first few wand shots run into MR. Then Coran can't get into position for a backstab ...
That clears the way to travel back to Ulgoth's Beard, and one more fight.
740 total fire kills. We only used fire in a few big battles this update, and that cuts into the numbers. Still, we got some high-profile fire kills.
- Klingon proverb, Star Trek/
All that remains now is the plot of chapter 7. We sell off Balduran's stuff, restock on +2 arrows at Sorcerous Sundries, and make our way to the Flaming Fist castle through the sewers. There are mercenaries inside:
One of those mercenaries is out of range behind the door, and survives the initial barrage. We gang up on him and prevent any spells. The false healer goes down easily, and we pick up the duke.
Now, it's easy to get caught by the Flaming Fist as you leave the castle; there's a patrol just out of sight. We take the exit one by one, and avoid their sight. After selling a pile of plate mail, it's back down to the sewers. Come out right in front of the Iron Throne, pop back down to aim for the harbormaster instead. That spot is at the same intersection in the sewers, so it's quick.
Now, back to the Iron Throne. There are a few conversations on the way up, and then it's time to take on Cythandria and her golems.
We also laid a pair of traps - they hit the golems, and that lets us take one down before they reach us.
The basement of the Iron Throne offers a nice shortcut to the Undercellar through the sewers, which we take. Head to the center ...
We head to the palace now, passing by some repopulated spiders in the sewers:
Inside the palace, I take the trouble to sneak up and loot before the big battle. There's really quite a lot of stuff in unwatched chests you can take.
Now, the battle. I precast an Insect Plague and add a Chaos as soon as the battle starts.
In the maze, we start using oils of speed again. Also, switch to melee attacks - there are a lot of enemies in here that are resistant or immune to missile damage. I also don't bother with fire, since so many enemies are resistant.
Aerys' Shield spell fades, and I replace it with a potion of defense. AC -9.
Well, OK, I use a bit of fire.
And ... whoa, I hit a trap.
Now, down to the Undercity. Aerys is at 266472 XP, and would be level 10 if not for the cap. Only Imoen wouldn't have at least one new level.
Rahvin's party comes first, and they get fire. Lots of fire.
Tamoko comes next. We could talk her down, but that's no fun.
Now, before we go in for the final battle, we head out on an undead hunt. I have four scrolls of protection from undead, so I send four melee attackers out under that protection to clear the area. With necklaces to blast groups, of course.
The regular packs of skeletons and zombies let us rack up some big numbers:
The buffs expire just as we finish, but that's OK. We'll make new buffs for the final battle. After I do that ... unexpected quit. Reload, restore XP, do it again.
We open with some exploding arrows ... three bats, a gnoll elite, a dire wolf, and and ogre die. No enemies do, although that is at least some damage to Tazok and Semaj. Oh well, time to summon more fodder to distract Sarevok.
Diarmid is the first non-Sarevok foe to become visible, so we focus on him. He's near death when Semaj appears:
Diarmid is next to fall, then Tazok. Angelo survives by dint of his PfMW.
I didn't even need any healing potions in the final battle. The summoned distractions worked, even if I had to keep resummoning them after killing them with friendly fire. If I were doing it again, the one thing I'd change is that I'd cast a True Sight to reveal the enemies faster.
Aerys will enter BG2 with 279536 XP, and Jaheira will join him with 276734. Daine will not be imported, since I'm planning to fill her slot with Cernd instead.
808 total fire kills for the whole of BGEE. The random skeletons and zombies in the Undercity really pushed up the count, but strong enemies fell to our fires as well.
The only thing worse than a horde of zombies is a horde of flaming zombies."
— The Zombie Survival Guide
No epilogues this time; only Coran properly left the party afterwards, and he gets a cameo in BG2.
Instead, have some very thorough kill counts. I tracked kills by both character and enemy type, along with which ones were killed with fire.
First, all kills by character:
Aerys: 720 kills for 259653 XP, strongest Greater Basilisk (7000).
Coran: 452 kills for 256444 XP, strongest Karoug aka Greater Wolfwere (8000).
Kivan: 90 kills for 21078 XP, strongest Shoal the Nereid (5000)
Daine: 601 kills for 253337 XP, strongest Aec'Letec (16000).
Imoen: 264 kills for 140168 XP, strongest Greater Basilisk (7000).
Neera: 19 kills for 1393 XP, strongest Ekandor (500).
Jaheira: 288 kills for 220902 XP, strongest Demon Knight (15000).
Khalid: 531 kills for 238719 XP, strongest Greater Basilisk (7000).
Dorn: 2 kills for 535 XP, strongest Thrall of Azothet (500).
Rasaad: 6 kills for 2590 XP, strongest Winter Wolf (975).
Korax the Ghoul: 1 kill for 1400 XP, a Lesser Basilisk.
Unknown: 1 kill for 2000 XP, Mal-Kalen.
I have them sorted by "party slot". Coran replaced Kivan, Neera substituted for Imoen, Dorn and Rasaad substituted for Khalid.
Aec'Letec is technically worth 0 XP with the 16000 being awarded by script, but I'm including that 16K in Daine's count. Without that, her top kill would be Drizzt at 12K.
In the case of Mal-Kalen, his death script appears to prevent any party member from getting credit. Since I didn't record who actually killed him, that goes in the "unknown" category.
While the numbers of kills vary widely, the experience counts are quite balanced. No character or party slot reaches even 20% of the total, and Imoen is the lowest of the final party at just over 10%.
Next, all kills by enemy type. The full list below, in spoiler because it's very long.
Some names are abbreviated to reduce white space.
Some of the 0 XP numbers are estimates; I killed a lot of my own summons in the final battle, so I'm not sure exactly how many go to each type. The total is correct, though.
Creatures with the same name and same XP value are counted as the same. If either differs, it gets another line.
The top ten enemy types for total experience:
1. Skeleton Warrior 64000 (16 at 4000 each)
2 (tie). Greater Doppelganger 56000 (14 at 4000 each)
2 (tie). Greater Basilisk 56000 (8 at 7000 each)
4. Phase Spider 46200 (33 at 1400 each)
5. Ghast 38350 (59 at 650 each)
6. Ankheg 37050 (38 at 975 each)
7. Invisible Stalker 33000 (11 at 3000 each)
8. Winter Wolf 32175 (33 at 975 each)
9. Dread Wolf 31200 (48 at 650 each)
10. Greater Ghoul 28000 (28 at 1000 each)
And the top ten for number of kills:
1. Kobold 227 (7 XP each)
2. Skeleton 185 (65 XP each)
3. Hobgoblin 139 (35 XP each)
4. Kobold Commando 135 (35 XP each)
5. Gibberling 129 (35 XP each)
6. Xvart 105 (15 XP each)
7. Kobold Guard 101 (26 XP each)
8. Gnoll 78 (35 XP each)
9. Wolf 61 (65 XP each)
10. Ghast 59 (650 XP each)
Now, the fire kills. First, by character:
Aerys: 414 kills for 114419 XP, strongest Greater Wyvern (5000). 57.5% of his kills and 44.1% of the XP were with fire.
Coran: 24 kills for 11606 XP, strongest Shennara (2001). 5.3% of his kills and 4.5% of the XP were with fire.
Daine: 132 kills for 58988 XP, strongest Aec'Letec (16000). 22.0% of her kills and 24.9% of the XP were with fire.
Imoen: 138 kills for 73696 XP, strongest Greater Basilisk (7000). 52.3% of her kills and 52.6% of the XP were with fire.
Neera: 18 kills for 1367 XP, strongest Ekandor (500). 94.7% of her kills and 98.1% of the XP were with fire.
Jaheira: 63 kills for 45030 XP, strongest Angelo (9800). 21.9% of her kills and 20.4% of the XP were with fire.
Khalid: 19 kills for 6030 XP, strongest Bishop (2000). 3.6% of his kills and 2.5% of the XP were with fire.
Total: 808 kills for 311136 XP. 27.2% of all kills and 22.3% of the XP were with fire.
So ... the mages got around half of their kills with fire (mostly fireball spells and wands of fire), the priests got around 20-25% (necklaces of missiles and wands of the heavens), and the archers hardly got any - they only used fire in a few big barrages late in the game.
Now, the big list of fire kills by creature:
Top ten enemy types by fire kill XP:
1. Ghast 16250 (25 at 650 each)
2. Aec'Letec 16000 (1 at 16000)
3. Greater Wyvern 15000 (3 at 5000 each)
4 (tie). Battle Horror 12000 (3 at 4000 each)
4 (tie). Fuernebol 12000 (3 at 4000 each)
6. Angelo 9800 (1 at 9800)
7. Invisible Stalker 9000 (3 at 3000 each)
8. Greater Doppelganger 8000 (2 at 4000 each)
9. Skeleton 7020 (108 at 65 each)
10 (tie). Greater Basilisk 7000 (1 at 7000)
10 (tie). Greater Ghoul 7000 (7 at 1000 each)
Top ten by number of fire kills:
1. Skeleton 108 (65 each)
2. Kobold 88 (7 each)
3. Kobold Guard 55 (26 each)
4. Kobold Commando 43 (35 each)
5. Hobgoblin 33 (35 each)
6. Bandit 29 (65 each)
7. Ghast 25 (650 each)
8. Gibberling 23 (35 each)
9. Xvart 21 (15 each)
10 (tie). Guard 16 (270 each)
10 (tie). Gnoll 16 (35 each)
10 (tie). Rabid Chicken 16 (1 each)
Fire kills are thin enough that single notable foes can make the XP short list. But the prolific lesser monsters are there too. And a special recognition to the ghasts, which made all four top ten lists. They're prolific, they're worth a good deal of XP, and they make great targets for fireballs and scorchers.
All in all, I'm very satisfied with this run. It plays well, and it's great fun just blasting everything that gets in the way. The fire-immune melee front line is crucial, because you can't afford to use fireballs only at long range. And that means ... killing Drizzt early is crucial. The 2.6 patch will allegedly close the AI exploit used here, which makes that a lot harder. Xan could also reach early fire immunity with his Moonblade, but he's a terrible choice on the front line unless you change his class.
Now, on to BG2. Our repertoire of fire spells will grow even more, and not even 100% magic resistance will stop us. Seriously - I just wiped out a pack of golems with fire storms in the session I played today (as of writing this). Of course, that also means I need more than just a front line of fire-immune characters. And it'll take a while to get there, aside from once or twice a day with temporary buffs.
Upon import to BG2EE, Aerys immediately goes up a level. Level 10 brings 8 HP (a perfect 6/6 roll) and Chaos as his first level 5 spell. Imoen joins up, and she has retrained her thief skills and lost most of her spellbook. I leave all of that alone, as she won't be a long-term companion here. She does immediately level up to mage level 10, gaining 8 HP (4/8 rolls). Jaheira is a bit trickier, and I have to apply her continuity edits in two stages. One round of XP to level up to 7/8, another for her final total, and save-editing to apply the stat and proficiency changes. By the time she's done, she's up to level 8/10, gaining another 12 HP (rolls 5/9). She has slightly more HP than Aerys now, but that definitely won't last. Minsc joins as well, and goes up to level 8 for another 10 HP (roll 8/10).
Now that we have a party, there's a corpse in a nearby cell.
After picking up some basic equipment and a set of pantaloons, we head out. The party kills a smoke mephit and a lightning mephit, then casts stoneskins before speaking to Aataqah. Jaheira switches between wolf and bear form; wolf form is better for defense, bear form is better for damage, and both are far better than her ability while using a non-specialized weapon.
Aerys says he would press the button, and Aataqah summons an ogre mage. It's quite dangerous at this stage, but we're ready for it.
The next corridor brings some goblins, and they drop a bow for Imoen. She'll do much better now with two ranged attacks each round. The sewage golem's room has a mephit in it, but it also has a magical weapon we can use - a +2 staff mace for Aerys. Jaheira also has a scimitar now, for when she's not in animal form. It's only 2 APR instead of 2.5 APR as a bear or wolf, but it allows her to use a shield for the best possible AC.
A nearby room has two "lesser clay golems"; we take advantage of their inactivity to bash them.
The room of jars follows, as we kill more mephits. We also pick up another magic weapon - a +1 staff. With two magical blunt weapons, we backtrack for another golem:
Now, on to the library and the duergar beyond. I usually use Imoen's lightning bolt for them, but with this party I'll use fire instead.
The cambion comes next:
That marks the end of what we can do without activating the sewage golem, so we head back and do that. This opens the way to the central room, and the otyugh within.
After that, it's a few goblins and a lot of traps. We pick up the Claw of Kazgaroth, but nobody puts it on. A statue opens the way to a platform over a windy void, and the next serious challenge of this dungeon. It's a large group of mephits, and they can hit very hard - especially since one of them has a spell that stuns on a failed breath save.
So then, I have Imoen use her Minor Globe and go forward as a tank. She draws out the spells, Aerys uses a fireball ...
That clears the way to free another genie and pick up a magical two-handed sword for Minsc. On to the next level, then. Yoshimo joins, and we take on the mephit portals.
Indeed, the three party members still standing easily take down the portals, and we get a chance to look around.
We clear out a few more minor threats, then go after the vampire Ulvaryl:
Then I make a silly mistake giving away trap XP for no reason, and reload. How about a different strategy against Ulvaryl?
Frennedan deals serious damage, but Aerys finishes things with a rare Burning Hands spell:
There's one last side path, and that gets Aerys' last two area fire spells. A fireball for the goblins...
There are just a few more shadow thieves on the way out. They like to backstab, so I have Imoen summon some meatshields and Aerys casts a Glitterdust. The Glitterdust is unsuccessful at revealing its target, but that assassin misses his attack anyway.
With all that taken care of, the party rests. Imoen spends her spell slots on identification, and we head up to the surface. Minsc reaches level 9 (8 new HP, two-handed style), but Imoen is taken away. New troubles await us in this new city - next time.
My import planning at the end of BG1 had Aerys carrying the staff mace +2, the Claw of Kazgaroth, two Fallorain's Plates, and the golden pantaloons. None of those were equipped.
The fire kill count restarts here with BG2; this dungeon has a total of 14. And all of those belong to Aerys.
— Fahrenheit 451
I edited the quote for this part; the one I had fits better a little later. And there's another bit I wanted to add;
for lack of a better place to put it, my mod list for BG2:
- Unfinished Business (most components, but not all)
- Ascension
- Isra
- Wilson Chronicles
- Yeslick BG2
- Sword Coast Strategems (same rule changes as BG1, all tactical components except the starting dungeon and removing items in Spellhold)
- Portraits Portraits Everywhere
- Additional personal tweaks, not part of a formal mod:
- Sequencer innate abilities don't stack up when characters leave and re-enter the party (SCS component fix)
- Enhanced Bard Song blocks insect spells (SCS component fix)
- Planetar weapons don't chunk on vorpal hits
- Stein in the graveyard and a guard in the government district aren't stuck in walls
- Larloch's Minor Drain from upgraded Foebane adds HP
- Kalah's illusionary werewolves don't use real claws unless you attack them (SCS component fix)
- Polymorph Self ogre form strikes as magical, like it does in BG1
- Isra and Yeslick get standard joining XP triggers
- The Shadow Armor +3 is available, worn by Mae'var's subordinate Zyntris; SCS removes it from Mae'var so he can cast spells, but doesn't make it otherwise available
- Resurrection effects don't break polymorph spells and sequencers. At least, they don't break in the really bad way; you can still be left with empty sequencers when you raise someone due to timing issues, but that's harmless.
- Mass Raise Dead only heals by its stated amount, instead of up to six times that much
- Drow have less ambiguous names, and some that were not elves or lacked magic resistance had that corrected. The name changes are mostly to make the kill tracking easier; no more fighting six different kinds of creature all named "Drow" at the same time.
- Glitterdust cosmetic effects match the actual effects; both ignore MR. And the extra "Blinded" text was removed
- Pierce Magic from the wand of spell striking reduces MR by a fixed 20%, rather than varying based on the user's arcane caster level (SCS component fix)
- Liches and rakshasas can be affected by True Seeing, but not by level 5 attack spells such as Feeblemind (SCS component fix)
- Party member combat scripts tweaked so that Bard Song activates even without combat, and Turn Undead activates more often than once in a blue moon
If I see something that needs a fix ... I might well fix it right then. Some of these, like the lich/rakshasa immunity tweak, were applied mid-run.
After leaving the map to go to the slums, Aerys dismisses the party. Minsc and Yoshimo go to the Copper Coronet, while Jaheira stays in the rooftop temple without a talk. Experience will go farther with Aerys alone, after all.
First, Aerys rises to the provocations of Amalas:
Nalia wants to talk, but I don't want that yet. So instead, I lead her toward an exit before going outside and using the other door to go inside and reach the back rooms. The first guard goes down very easily:
Still, they're more trouble in multiples. Against the next group that spawn in, I fall back and use the stairs to ambush them.
Some others didn't chase me - they get a fireball.
The next room brings a winter wolf. It prefers ranged attacks, so if we sneak up on it with the aid of corners ...
I thin out the beastmaster's animals before facing him directly. Two throwing dagger hits each for the mutated gibberlings. Two throws and two melee hits for the panther, which was too fast for Aerys to maintain distance. A bear and minotaur activate next, and give Aerys quite a chase:
The minotaur has better AC; Aerys only hits it around half the time, in theory. It takes a while to bring it down, though it doesn't land any more hits without the bear's support.
The other bear follows, and it's not hard to beat alone. Then, finally, it's the beastmaster's turn.
Now it's time to free the gladiators and follow them out. Aerys gets some of the kills here, and even gets the final blow on Lehtinan.
After a restock on throwing daggers, Aerys heads down into the sewers. The hobgoblin pack here gets his second fireball of the day:
Against the otyugh, Aerys gets two good melee hits in before it blocks a door and gets him instead. The final blow comes with an acid arrow instead.
There's also a mustard jelly there. For that, Aerys casts Shield and wades into melee with his staff.
On to the second jelly - but Shield expires.
A pack of kobolds just standing there? Burn them.
Another pack of hobgoblins follow. Aerys takes two consecutive arrow hits, lowering his stoneskin and then inflicting damage. But it's not enough to stop the fireball:
There's supposed to be another hostile down here, but the carrion crawler didn't spawn. Oh well. I could head up into the slaver ship, but they're not something I want to take on from this angle, with the risk of being unable to retreat.
So instead, Aerys heads outside, and takes on Bregg and Cohrvale.
The merchant out here has poisoned throwing daggers, so Aerys buys a bunch of those (sell half back to renew them, since they come in packs of two). That should kill considerably faster than the plain kind.
Check out the slaver ship ... oh, it's locked. And at difficulty 80, even 22 strength from DUHM won't bash it.
As such, it's time to recruit a companion. Fake "Hexxat" joins, and her thieving skills will allow us to hit a wider range of targets. She levels from 8 to 11, gaining 7 HP (rolls 5/12). Her skill investment goes to Pick Pockets and Find Traps.
And now, the two head off to the docks. A mad cleric is the first encounter:
We talk to Renal Bloodscalp and accept the quest. That opens up Mae'var's practice area, which "Hexxat" clears out. Well, most of it. Then she drinks potions of perception and master thievery so she can finish the job and have enough skill to shoplift from Gorch safely. Loot his good stuff and recharge some wands, talk to Mae'var for the first quest, and head out.
It's now late enough that vampires start showing up on the streets. We spot Hareishan picking on some thieves, and intervene ...
This ... doesn't go well. Hareishan refuses to stop chasing, and I can't avoid level drain. Instead, I reload and skip that encounter for now.
There's only one way out of the docks without triggering it, though, so - time to face some thugs.
The second scorcher starts getting kills:
On the way to the Temple District, we are ambushed. It's Suna Seni and her crew of slavers.
On the second round, it's a fireball instead.
Suna herself gets a scorcher:
I go for one more scorcher on the panicked Eldarin, but the cloud gets him first, and the ambush is over. Aerys waits for the cloud to disperse and the enfeeblement to wear off before picking up the loot and continuing to the temple district.
Once there, we loot the temple of Talos. The reward for picking up the necklace brings Aerys to 500K XP. And with that milestone, it's time to turn to a faster source of experience gain. We head back to the slums, where Nalia awaits.
37 total fire kills. More this time, because now Aerys can use a wand.
— George Carlin
Upon joining the party, Nalia goes up to mage level 11 immediately. She only gets 4 HP from her two levels, rolling a 1/4 on the tenth hit die. And then, we head out so we can make use of the false Hexxat's current thieving boosts. We need to steal some scrolls, after all.
Over in the promenade, we come in by the west interest and run into that vampire encounter we deferred.
With that dealt with, it's time to get to the stealing and scribing. Clara loots the inventories of Galoomp, Lady Yuth, and Jayes. Also, she pickpockets Ribald's ring on the main screen. We buy two potions of genius so Nalia can scribe with certain success. And then we dismiss Clara and start scribing. The first pass filling Nalia's spellbook brings Aerys to 650K. Level 1 scrolls, and it's just short of 700K. Level 2, and that's 815K. That brings level 12 for Aerys and Nalia; Aerys takes sling proficiency and Death Fog, while Nalia takes crossbow proficiency.
Level 3 scrolls bring Aerys to 953K, level 4 scrolls 10 1055K, and level 5 scrolls to 1125K. That's level 13, for new spells Greater Malison, Breach, and Pierce Magic. Scrolls beyond that level are sparse, but there are still enough for Nalia to join Aerys at level 13.
And now, Clara rejoins. I want to reach 1250K experience with Aerys before I let anyone else join. Our first target is the slaver ship, back in the slums. Incidentally, all of this scribing has emptied Nalia's memorization. She's stuck with nothing but wands and weapons for the rest of the day.
Now that we have thieves, we can open that outer door to the ship. The slaver guards do not take our intrusion well.
Continuing further in, we run into a guard and another mage:
Clara disarms a floor trap, and the corridor beyond brings more guards to scorch.
Still, there are more targets to fight in here. The priest of Cyric comes out, and survives two scorcher hits before falling to a 2-damage arrow. That's the first kill we've picked up in here that wasn't from the wands.
Similarly, the yuan-ti go down to weapons. They're resistant to fire, so that just isn't as efficient.
Finally, we strike at the captain.
That key lets us open the last doors - but first, we have some trolls to kill.
Hendak could offer more of a reward, but we're not going there yet. I'd like to claim that with a full party. Instead, I head off to Hexxat's quest as we inch ever closer to the key 1.25 million mark.
This quest features a very nasty challenge - devil shades. They're permanently hasted, they drain levels at 4 APR and THAC0 5, and they have 110 HP and -3 AC with substantial resistances. It even takes +2 weapons to hit them. Thankfully, they have a weakness.
Then the bolt rebounds.
This was actually the second try. The first time, I didn't summon fodder and the point-blank lightning bolts missed completely. After Aerys got drained. I reloaded.
On to the next threat, as Nalia drinks a healing potion ... oops.
We repeat the same strategy for the second shade. The wand misses, but we have a second mage.
As usual, Burich is already hostile when he talks.
For Dragomir? Lots of scorchers.
Aerys is at 1227K XP when we reach Hexxat. Very close to the threshold, but not quite there. I have Hexxat join while still in the tomb, and she goes up to thief level 14 immediately. Most of her skill points go into pickpocketing, so she can shoplift from nearly everywhere with just the pickpocket gloves. We give up a level compared to waiting, but it's not like she'll spend much time in the party.
Then I let Hexxat go anyway, and get started on the other bits of the graveyard. Leave the tombs with skeleton warriors alone, but mummies and shadow fiends?
Then we step back in ... and the same undead are there, perfectly alive. And again. I've stumbled onto an experience loop here.
Still, it's not an infinite loop. After six shadow fiends and two mummies, I stick around in the tomb, and the enemies don't reappear.
Tirdir is freed, and the Crypt King comes next. He gets scorchers.
On the way back to the slums for that - ambushed.
All right then, how about a Wand of Fear shot? It gets some of them, but the cleric has a Remove Fear. After an initial Silence which stops Aerys from casting anything from his spellbook.
Then the thugs get to us. One backstabs Nalia, and another hits Aerys enough to finish off his Stoneskin. Time to summon some help, then.
With that interruption out of the way, we continue to the slums and recruit Anomen. I edit the save to give him proficiency in clubs instead of staves, and then continue. He levels up to cleric 13, gaining 13 HP - that's a 3/8 roll on the level 9 hit die. For his level 12 proficiency, he takes club specialization.
Jaheira returns as well, leveling up from 8/10 to 10/12. She gains 7 HP, a roll of 4/5 on the one fighter hit die. Her level 9 proficiency goes to sling specialization.
Now that we have Hexxat's bag, we can backtrack over already cleared areas and pick up junk to sell. There's a lot of it.
But of course, four isn't a full party. One of our planned party members isn't in Athkatla, but the other is - and now is the time to get her. Isra starts in the Den of the Seven Vales, so we head off that way.
And, of course, we get waylaid. This is a pretty nasty one, added by SCS. The visible foes aren't the only ones here, after all. It has a minimum XP requirement, but we've zoomed well past that.
On second thought - make some distance. If the mage can't see us, we don't have to worry about her while we fight the others. That still leaves the mage's initial Slow which catches Jaheira, but now she's out of sight.
Meanwhile, it's four of us against three of them. And we're not doing terribly well.
We get to work on cleaning up the confused foes, and ...
We keep casting fireballs, including Aerys' last 3rd level spell slot of the day ... and Jaheira decides to talk.
A few more wand fireballs, and it's over.
And now, we can leave for the Promenade. Next time, we finish gathering the party.
62 total fire kills. That wand of fire is really getting a workout.
- Mike Nelson, RiffTrax for The Last Airbender
In the Promenade, we sell some junk and visit an inn:
On the way there ...
We fight the thugs; they have decent HP, but nothing else going for them. The rescued Rana leads the rest of the way to the estate, and we speak to Isra.
Now, of course, there's a quest to resolve. After a bit of a runaround, we find the Cowled Wizard that has been causing the trouble:
True Seeing reveals Gelion, who put up PfMW and PfNM. Nonmagical melee weapons it is, then. He casts PW:Silence. We cast Chaos. With him confused, the result is inevitable.
Back out in the government district, I talk to Jan. He joins briefly, leveling to 11/12 and investing massively in pickpocketing. Another option for looting merchants, with his 180 skill including gauntlets.
We return to the Jysstevs to complete the quest; this brings a substantial gold reward, and the option to start chapter 3 opens up. I'd rather collect that reward with a full party, though. So instead, after a visit to the docks to drop off Renfeld, we rest and head to Trademeet.
Well, OK, first we visit a temple to buy a few potions of genius. It's getting late, and ...
As a consequence, Aerys takes a backstab. But it's for a good cause - Nalia drinks a potion and learns Breach. There are other scrolls, but they can wait.
We rest at the Copper Coronet, and that means we'll face the next day with a lot more spells available. This arsenal is immediately tested, as slavers waylay us on the way to the city gates.
At the gates, it's another vampire/thief encounter.
With bystanders nearby, we're in no position to use a fireball here. We have to rely on weapon attacks instead. One thief dies quickly, while the other uses a potion to go invisible - but Jaheira's True Seeing is still going.
But there's a silver lining. One of the thieves drops a scroll of Find Familiar, and that means Anomen can summon Balerion again. 12 free HP brings him to 92 total.
We talk to Flydian, and then head out to Trademeet. On the way ...
But Jaheira is in there, mostly alone, with poor AC due to her bear form and no chance to command a retreat. Orog attacks get to her, and she goes down.
Now ... I can't raise Jaheira in the field. Anomen didn't memorize a Raise Dead. There's a temple in Trademeet, but I won't make that mistake again.
Upon reaching Trademeet, there are a few animals. Sleep.
And with that cleared up, we can head to the temple and spend 1200 gold to raise Jaheira. It's not cheap, but I'll take it. The second stop is the mayor's office, to pick up Cernd. He levels to 13 on joining, taking two-handed style and gaining greater werewolf form. With him in the party, I hit the other gates:
While we're there, we visit Gaelan Bayle and pay his 15K fee. Chapter 3 is started, and we haven't finished any of the major quests in chapter 2.
I run into a couple of encounters on the way to the map edge. First a "shady character" that tries to mug us and dies for his foolishness, then another menacing a tourist.
Habib throws some scimitars, and we're off to the docks.
We visit the shadow thief basement, and pick up three very useful items. The Amulet of Power will go to Aerys, except when I want someone in melee to have drain protection. The Guard's Ring also goes to Aerys as our first +2 protection item. And finally, the ring of lockpicks means that only a very few locks will resist Nalia's skill.
Unfortunately, exhaustion catches up to us - and trouble arrives practically as soon as we step outside.
Since it's dark out, I might as well do the first quest of the chapter 3 plot. We head down to the waterfront to meet with Mook:
We report the matter to Aran Linvail for another nice chunk of XP, and also start on another quest. The XP reward brings Anomen's 14th level, and he is the first in the party with access to level 7 spells. Correcting his earlier oversight, he memorizes a Raise Dead and a Resurrection.
With a visit to the Sea's Bounty, Jaheira is cursed. Off to the slums then, to track down Ployer and get the cure.
Shortly after, we reach Ployer's lair. And we're buffing for this fight. Fire immunity all around, plus an array of other divine buffs.
Terrece follows up with a second Sunfire, and Jaheira is near death. Then a third ...
And here, I stop. That's such a shameful way for a member of this party to die that I just have to reload and play it better. I did make obvious mistakes there, losing two spells that Aerys tried to cast.
The second time, Aerys waits until after the talk to cast a spell, and makes it a Sunfire.
This fight marks a milestone - we have enough protection items for the full party, though the warriors don't have full plate yet. We rest, and end the session.
75 total fire kills. Not much this update, because we're a little short on permanent fire protection.
- Farnsworth, Futurama
Now that I have the full party together - and Cernd in particular - I'd like to go through the shapeshift forms I'll be using in BG2.
Unkitted druids such as Jaheira have access to two forms at level 7; bear and wolf.
Bear form grants strength 18/00, dexterity 12, and armor class 7. The latter will, of course, be superseded by any armor Jaheira wears. The form grants double movement speed, but that's against the bear's very slow walking animation; it's still slow. On the attack, it deals 1d6+Str slashing damage with 2 APR and a +2 enchantment level.
Wolf form grants strength 17, dexterity 18, and armor class 6. The form grants double movement speed, and that actually means something in the wolf animation. On the attack, it deals 1d8+Str piercing damage with 2 APR and a +2 enchantment level.
Jaheira has spent much of her low-level time in bear form, as it hits harder than the manufactured weapons she has so far. Wolf form is also used for mobility. These animal forms do gain extra attacks from warrior levels, but a fighter/druid can't gain specialization bonuses for them.
Cernd, as a Shapeshifter, has access to three forms - lesser werewolf at level 1, werewolf at level 7, and greater werewolf at level 13. The tokens for these forms are given automatically when he joins the party or levels up ... and the tokens for lower-level forms are removed at the same time. Since he's already level 13 immediately after joining, only the greater werewolf form matters here.
Greater werewolf form grants strength 21, dexterity 20, and AC -4. It also grants 40% magic resistance, 50% resistance to all elements, regeneration of 6 HP per round, and haste. The haste doubles that regeneration to an effective 12 HP per round. On the offense, it deals 2d6+Str slashing damage, at 2 base APR plus 1 from the haste and a +3 enchantment level.
This form is very good for tanking, especially against elemental damage. Unfortunately, its offensive potential is held back by the Shapeshifter's poor THAC0. A pure druid has 12 base THAC0 at 2.95 million XP, worse than even a thief. And while you get +4 to hit from strength, the weapon doesn't grant any enchantment bonus to hit.
Finally, all druid gain access to two forms as high-level abilities. In vanilla, these can be taken multiple times. Here, the HLA can be taken only once, and grants the token directly.
Fire elemental form grants strength 22, dexterity 24, and AC -5. It also grants 100% fire immunity, immunity to non-magical weapons, a fireshield effect for 1d8+2 fire damage retaliation, and haste. The description claims that's just increased movement speed, but it also grants bonus APR. On the offense, the form deals 1d10+Str crushing damage and 1d10 fire damage, at 2 base APR plus 1 from the haste and a +4 enchantment level. The form sets base THAC0 to 2, even if the character's original THAC0 is better.
Earth elemental form grants strength 25, dexterity 10, and AC -5. It also grants 50% physical damage resistance and immunity to nonmagical weapons, but reduces movement speed to 75%. The form has a large selection circle, and is unable to pass through some paths that humanoids can use. The physical resistance also blocks further modification, but you can apply damage resistance effects such as Armor of Faith and Hardiness before transforming to stack with it. On the offense, the form deals 2d10+Str crushing damage, at 2 base APR and a +4 enchantment level. Like the fire elemental form, base THAC0 is set to 2.
Fire elemental form will be our staple once we reach epic levels, even for Cernd. On top of the essential fire immunity, it's fantastic for both melee damage and physical tanking. We also have earth elemental form for when fantastic AC and normal weapon immunity aren't enough, but that will be rare.
Before we go anywhere, let's do something about our party's lack of full plate. I have Isra wait in the Copper Coronet, while Hexxat joins and we visit some merchants for a five-finger discout. And while I'm at it, I spend a potion and loot Bernard's store as well. It takes a few trips to find enough merchants with appropriate stock, and the game hits us for it:
I choose not to use spells in this fight, and Aerys takes serious damage from the enemy backstabbers. Still, we win through and reach the Bridge District. Hexxat picks up the third full plate and the boomerang dagger, and we have what we wanted.
Back at the Copper Coronet, we restore the party. And then, we hit the sewers for Lilarcor. With a flaming sword for Isra and acid arrows for Nalia, we're ready for the trolls. Cast Stoneskin before leaving Athkatla, and go.
There's no ambush on the way to the keep for once. I could have waited. Oh well, four hours of protection after we arrive is still good.
As fits the improvements made by SCS, the first group of trolls includes a Spirit Troll.
A Greater Command follows. We go after the spirit troll, but the damage is done.
The north brings a second group of trolls:
With that, we're ready to head inside. Daleson says there are around thirty trolls? We'll be keeping count.
After a few quiet rooms, we find some ice trolls:
Incidentally, this is why that +1 damage effect is there in SCS. The tweaked troll regeneration doesn't make them vulnerable to death until after the first packet of fire damage, so that +1 damage allows big fire spells to kill in one hit. Ice trolls only have 15 HP, after all.
The main hall brings a large cluster of trolls, and they get a wand fireball to disrupt them.
The next group of trolls gets a double fireball.
There's one more troll menacing a servant, and the first floor is done. Now, out to the courtyard. I go to fight the otyugh ... and get a trollish interruption.
The dogs get a gratuitous fireball:
There's one more spirit troll on the wall before we can open the gate, and then it's time for a fight. We renew our stoneskins, summon a nymph for healing, and head over to fight the invaders.
Upstairs, we find still more ice trolls:
That path leads to the yuan-ti mage, and we draw out its support first.
The mage itself puts up multiple illusions, Stoneskin, and PfMW. Aerys clears all of that away with a Remove Magic.
We continue around the outside, clearing out some more trolls:
The corridor beyond brings yet another pack:
And at this point ... crash. I have to redo the whole second floor. I goes pretty similarly, although Isra gets a fire kill on one of the split trolls this time:
Up on the roof, I have a very well-aimed fireball:
After going up the tower and handling the yuan-ti we find, it's time to meet Glaicus. I start with Cernd tanking as Jaheira casts a Charm Person or Mammal ... saved. Actually, he's a level 15 fighter with saves to match, so that had very little chance to work. Anomen comes out for a Dispel Magic, and that does work.
Now, we're back to fight the golems. It's theoretically possible to get fire kills here, since the flaming sword and flail don't care about magic resistance, but it's unlikely. We pick them off one by one, switching weapons as appropriate. We even have enough blunt weapons for everyone to get in on fighting the clay golem:
Jaheira's curse has finally expired, so bear form is good for her again. She uses that when we attack the stone golems.
Then, for the iron golem - Isra handles that on her own, with Azuredge.
With the golems down, we can loot the treasure they were guarding. And none of those weapons are of any use to us.
In the cellar, Nalia fails to detect a trap:
After a small group of trolls, we come to the room full of umber hulks. Nalia casts Invisibility on Aerys so he can sneak by and feed them.
Once the cloud and confusion expire, we launch another.
And now, only the boss fight remains. And this one's a doozy. It's time to buff.
I open with a pair of fireballs.
TorGal focuses on Isra, and takes her down extremely quickly.
So, for the second round, I add some contingencies.
Against the mages, I use Spell Thrusts and send in the fire elementals. They have +4 attacks, so they can hit over the Mantle.
Insect Plague can't panic trolls, but it does still do decent damage. That gets us our first kill, a giant troll. We continue to take heavy damage in melee as well; Isra has to retreat, and then Jaheira.
Finally, we do enough damage to TorGal. He falls unconscious, and Nalia finishes him with a fire arrow.
And with that, we've won. Nalia's loyalty is secured. The experience reward brings new levels for nearly the entire party - Aerys to 14 (new spell Project Image), Isra to 13, Jaheira to 11/13, Cernd to 14, and Nalia to 14. It would have been nice to have those levels before we fought that boss fight - some fireball sequencers would have made a huge difference - but that's life.
Daleson estimated about thirty foes. I count nearly a hundred in this run; 79 trolls of various kinds, ten yuan-ti, and six umber hulks.
On the way out, the Roenalls close the doors on us - but they don't bother to lock them. And since we exited through the courtyard, we can just lower the drawbridge again. If we ever wanted to, we could visit the keep's interior again.
100 total fire kills. While trolls are quite vulnerable, the SCS tweaks to their regeneration mean you can kill them with anything. It's mostly the lesser ice trolls that actually died to fire directly.
— Magic: The Gathering. Flavor text for Razia, Boros Archangel.
After one stronghold quest, we head straight into another. It's time to secure Cernd's loyalty by taking back the druid grove.
When we go there - well, it's time for Aerys to use his new spell.
Now, we head down to another group of trolls.
I send the image in to cast a Sunfire ... nope. Expired. Instead, Nalia wakes and uses a fireball of her own.
Now we cast some healing spells and wait. Spirit troll melee attacks drain strength, which is a problem for everyone but Cernd (immune while in werewolf form). The stuff on the ground was because of that; strength-drained characters dropping things so they can move.
Even before the drain expires, we press forward a bit. Cernd attracts the attention of some spiders:
Aerys adds a second fireball - some damage, but no more kills - and the spiders are on us.
Anomen raises Cernd, who wastes a healing spell on himself. Oops. I should have adjusted his AI before now to my standard of not automatically casting spells.
We leave the troll mound alone for now, and continue forward. That doesn't mean that we don't run into some trolls, though:
After another lone troll, we face a Greater Earth Elemental. We may not be terribly well-equipped, but we do at least have +2 weapons for everybody.
The next encounter after this one brings both trolls and a party that starts friendly. Since they won't stay friendly, we don't care about collateral damage. Cast some fire protection, and break out the fireballs.
And now, I use Aerys' second level 7 spell slot for another projected image. Another Resist Fire and Cold gets Anomen to 95% resistance, Isra and Jaheira are immune, and Cernd has MR and regeneration. Time to start burning some druids.
Anomen adds a Greater Command, and Aerys casts another fireball:
The image still isn't done, though. We still have the bridge of spores to take on.
One last Sunfire gets the last spore colony, and the party moves up. There are also some trolls down below the bridge, so the image throws one last fireball at them. With that, it's completely out of 3rd and 5th level slots. It goes to cast a Burning Hands - unsummoned. Still, we can mop up those trolls easily enough. And one more that didn't come up to join the fight.
That one projected image cast nine fire spells for a total of 13 kills.
With this, the way is clear to the ogre's tower. Jaheira picks up Belm, and now her animal forms are obsolete. Wielding Belm with a shield is better than fighting as a bear, both offensively (0.5 more APR) and defensively (7 points better AC).
Before facing the rakshasas, we backtrack to the troll mound.
Inside, it's one troll down quickly, and then a spirit troll casts Unholy Blight. We dodge out the door ...
It takes some time, but we make progress. First a giant troll dies, then a spectral troll is beaten unconscious.
The spear isn't something we're interested in using. The bracers of archery are nice for Nalia - or would be, if she wasn't using AC bracers. That's a situational option, then.
And now, the rakshasas. We buff fully for this fight:
Another round of dispels both ways follows:
More spells pile up - a Web is troublesome. But at least, we get Ihtafeer.
On the second try, Aerys gets in a 36-point crit right away. Ihtafeer goes down in one round.
With most of our buffs still active, we head out to take on the Shambling Mounds.
Now, what was going on with that True Seeing not dispelling the rakshasas' illusionary defenses? That has to do with the "More Consistent Breach" component of SCS. It replaces the blanket level 5 immunity of liches and rakshasas with a list of specific spell immunities. And that list has some mistakes. On one hand, it misses certain spells like Feeblemind and Greater Command. On the other hand, it adds a spell which does work on those monsters in vanilla - the secondary spell of True Seeing, which activates on rounds 2-10. All other anti-illusion divinations, including the first round of True Seeing, work just fine against them.
I have interpreted this as a bug. After this session, I applied edits to change the immunity list, making liches and rakshasas vulnerable to True Seeing as they should be.
134 fire kills so far. Project Image really boosts our firepower.
- Belkar Bitterleaf, Order of the Stick
Our rest is uninterrupted, and we wake ready for the trials to come. First, a few more spore colonies.
Some angry bears follow - they get fireballs.
For the druids outside the entrance, Aerys makes an image.
The second Sunfire finally gets some kills:
Finally, this brings us to the duel. Cernd prebuffs - Protection from Lighting, Chaotic Commands, Death Ward, Resist Fire and Cold, Armor of Faith, Barkskin. I have another party member hold on to the shapeshift token, then pass it over once the duel starts. That token and the staff are his only equipment here.
Then Faldorn adds an Insect Plague.
Back in Trademeet, night has fallen. We speak to Logan, but then rest before speaking to the genies. After all, the merchants only come out during the day. Anomen reaches level 15 from the experience reward, and Terl also shows up - we'll be heading back to Athkatla soon.
Day comes, and we head out. We interrupt a philosophical argument:
Then it's off to the genies, and Nalia starts drinking master thievery potions. With three and the gloves, she's prepared to loot all of this town's merchants. We go to talk to the khan, but first:
After that talk and a visit to the mayor's home, the merchants are back in business. Nalia gets Tansheron's bow, Anomen gets Blackblood, Jaheira gets the cloak of displacement, and Aerys gets the belt of inertial barrier. All that from just the first merchant.
We loot the rest of them too, but there's one item we buy legitimately - the necklace of missiles the caravan merchant has. It comes with two charges, so we sell it and buy it back for the full 25. Now Isra can contribute fireballs for the team, and hers ignore most spell defenses because they hit as level 9.
Now, back to Athkatla. We hit the government district first, and finally do something about Viconia being tied up.
Then it's night, so we get a vampire encounter:
With that done with, we can visit Anomen's family. He considers revenge, but we talk him out of it.
And now, Cernd's quest. He has been approached by an acquaintance, so we're tracking down his infant son. After some talking in the promenade, we head back to the government district, and the Deril estate in particular. Before actually traveling, we prepare sequencers and contingencies, and Nalia drinks an insight potion to wish for glasses of identification.
At the Deril estate, we add a few more priestly buffs and enter. Deril is protected by illusions, Improved Mantle, Spell Shield, and Minor Globe. True Sight deals with the illusions, but we still aren't hitting him unless we can break those defenses down.
This hurts Deril, but ...
Then it gets worse. Time Stop into Improved Alacrity, Dark Planetar, and another Horrid Wilting.
All right, plan B. Can we win this without offending the lich? I try without the necklace shot ... I missed the Spell Trap in the buff list. Since I don't have a Ruby Ray memorized, I'm not getting a Breach through that. Deril's melee defenses are effectively unbreakable, and fire is really our only option. The lich still gets mad because of the firestorm, and I abort this try for another reload.
Now, plan C. The "C" stands for "Cheap shot".
Another couple of tries - that opening move does take some luck - and I get a good run.
The baby shows no ill effects from the fire, and Cernd picks him up. He's off to the grove, and we follow after a rest.
That fight showed us a weakness; a mage that puts up Spell Trap is basically immune to anything we can do except for a few high-level AoEs, as we are now. And if they put up the right defenses, even those won't work. Nalia will memorize a Ruby Ray to cover this weakness before we take on any further high-level mages.
Now, that trip to the grove? It's not entirely uneventful.
The rest of the way to the grove is uneventful, and Cernd rejoins us. His personal matters are done, and he's with us for good.
139 fire kills. Only a few enemies died to our fires this time, but one was the highest-value fire kill so far.
Know that I would be a liar
If I was to say to you
I didn't set your house on fire
But it's just the way I am
Have to take it for a fact
Life can really burn you up
When you're a pyromaniac"
— The Dead Milkmen, If You Love Somebody, Set Them On Fire
With our party's loyalty quests taken care of, there's nothing we absolutely have to do now. So, then, we'll do a bunch of little things. First, we travel to Watcher's Keep. We buy a potion case and a gem bag, adjust some spell choices, then rest outside.
This leads to trouble; Aerys is far enough along in Jaheira's romance for the next event.
The backstabber emerges... and misses. His target had full plate and a shield. He drinks a invisibility potion and tries again ...
Inside the keep ... Trap Not Disarmed. One of the chests in the first room has a high-difficulty trap, so we can't get the paladin bracers unless we spend a potion. Which we're not carrying. OK, we'll come back later. With a ring to do the same thing.
The first enemy we have to deal with is a stone golem. That gets a hit in on Isra before we take it down. Then come the trolls:
That path has some good loot for us, but soon we must take on the main hall. I activate True Seeing, cast NPP on the party ...
All right. We need to rest after casting Restoration, and next time I'm going in with more buffs.
It goes much better.
The rest of the floor has a couple of random monster groups. First, a pack of spiders:
The spellhaunt is no problem, and neither are the mustard jellies.
Back in Athkatla, a messenger arrives. It's time for the funeral of Lord de'Arnise. Naturally, we head over to the graveyard immediately.
Once the funeral is over, there are some other things to do in the area. First, we take care of a spontaneously risen zombie; unfortunately, his target panics. Even Isra's Remove Fear is unable to help him regain his senses:
There are also some minor tombs we haven't hit yet; one holds some skeleton warriors:
Outside, it's late enough in the day that Stein has showed up. With True Seeing active, we head over for a chat.
One tomb brings a pair of mummies and a skeleton warrior. I cast a fireball...
And now, with the lesser tombs exhausted, we head down to the main complex. Our first encounter is a group of spiders:
Still, there are more spiders down here, and more chances to get things right.
We head into the structure there, and talk to Pai'Na. Sure, we'll retrieve Spider's Bane. And while we're here, we'll pick up that ioun stone too. Aerys equips it.
The next group of spiders is more successful with a Web Tangle:
For the last spider group, I have Isra use her necklace:
The lower tombs come next, and here I have Aerys project an image.
That lost level does very little damage to Anomen's fighting ability, so I continue. For the next passage, I open up with the Wand of Lightning:
Once the mummies are disposed of, it's back to the lightning:
A skeleton warrior with a unique weapon comes next:
On the other hand, the mummies down the hall? We picked up a wand with 50 scorcher charges (but only one fireball) back in Trademeet. It's a perfect time to use that.
I leave the two rooms at the ends alone; we'll come back with appropriate party members for their quest content.
Now, we have a quest to complete, and we can't do it staying here. We head over to the temple district for that. Isra speaks up ...
We detour into the temple of Helm to start up the illithium quest, then enter the sewers. The central pit is our first target:
This gets us access to the workers with Spider's Bane. It's broken, so we buy it cheap for 75 gold.
Down in the south, we hit another group of kobolds:
I take Roger's quest now, and set out. The sea troll and otyugh come out after us, and go down easily enough:
And here's that battle.
There's one more big battle down here, and this one calls for some more conventional preparation.
The mage gets some spell-breaking attacks next; Pierce Magic and RRR, to be followed with a Breach.
The mage's next move is a sequencer with Emotion:Hopelessness in it, and nearly our whole front line is out of the fight.
The mage Gaius goes down to his confused ally Rengaard, but not before using a Death Spell to kill our nymphs. And after that, it's a slow fight - with so many on both sides unable to attack, it takes a while to get anything done. Rengaard is first to break out of confusion, and he casts Sanctuary ...
Nalia takes out Gallchobhair with an acid arrow spell next, then turns to Tarnor. Cernd gets Zorl, and only two enemies remain.
This battle was a comedy of errors; I can think of a lot of ways to do it better. Still, we got through without too much suffering.
Now, one more side bit before we return to the graveyard:
170 total fire kills. We did a lot with spell damage this time, but we mixed up the elements so it wasn't all fire. Today's late update comes from ... well, I let the buffer run out. I need to build that back up some.
- YERD
With our business in the graveyard finished, it's on to a new session. And since we have a good chunk of gold, it's time to spend some of that. Aerys spends 33300 gold on the Robe of Vecna and the Girdle of Hill Giant Strength, leaving the party with almost nothing left. Jaheira gets the belt and Aerys gets the robe.
We also restore Anomen and rest, before moving on to the Bridge District. We've visited briefly before, so this visit triggers Neera's scene.
Then, it's on to investigating the murders. Our investigation leads us to the tanner, and he flees into the basement ...
Once we've cleared out the lesser foes, the bone golem shows up:
The man in red comes next. We inadvertently block his path, so he goes hostile ...
Reti tries to run ...
Upstairs, Aerys chooses not to free Lady Elgea, and looks into the ransom instead. Since it's midday, we won't be collecting that right away.
Then it's a visit to the playhouse to pick up another quest. We also check out a couple of empty buildings, and find traps beyond our current means; we'll have to come back later to deal with them.
Now, back to the docks, for some lucrative quests I've been neglecting. After a visit to Valygar's home, we turn to the thieves' guild quest, and Edwin's task. It's time to confront a Cowled Wizard.
First, his ground floor is full of mephits.
The next floor brings a pair of stone golems. Their Slow spell is brutal.
That brings us to Rayic Gethras himself.
Once those four rounds are up, we come back and Rayic activates his sequencer. Added to his prebuffs, that's two simultaneous fireshields:
Coming back ...
Marcus' documents come next, and Isra sweet-talks him out of them. We head out for the final test of loyalty ...
Well, time to track down some evidence. Barg talks, Dirth fights:
We head to the government district next, to investigate Isaea's place and get Nalia back. While we're there, I hand in the body of the murdered inspector; that brings the party's reputation up to 14.
Head out on a side trip to talk to Jerlia - bandits waylay us.
And then, I screw up the dialogue. Reload, arrange for both real and fake illithium - but no bandit ambush this time.
And now, back to the quest.
We hand over the dagger, get the key from Edwin, and pick up the documents. Renal Bloodscalp charges us to eliminate the traitors - on to the fighting. We prepare with party-wide fire immunity and a few other spell buffs, then enter from the top.
Project an image, then get to the fireballs.
On the first floor, Aerys makes another image.
The strongest thief here is Zyntris, who goes down to weapons:
Another pack of thieves waits in the bar area, and they get more Sunfire:
In the basement, it's Aerys himself. And he has a sequencer ready.
Returning to Renal Bloodscalp, the quest reward brings new levels for Anomen (cleric 16) and Isra (paladin 14). Anomen takes his third dot in clubs.
We still have more to do in the docks, though. It's time to get into the Harpers' building. First, we do a task for them, and take care of a couple of mages:
And then, running on autopilot ...
The mages aren't quite out of it, though, and one casts a lightning bolt for a whole lot of damage.
We summon a couple of nymphs for healing, and loot the room. This triggers undetected traps on all three containers; they have difficulty 99 for some reason. Aerys takes a bit of damage from the Magic Missile, and his Stoneskin absorbs the other two traps.
With that done, we enter the building and do our business there. Then, before I hand over the bird, I check my experience ... pretty close to levels for the two mages. The quest reward would cover about half of it. I'd like those levels before I rest, so I can memorize more spells for the next day. So then, we do a few other things first.
As we're in the docks, the pirates in the Sea's Bounty are our first target.
Night has fallen, so we head over to the slums and pickpocket Welther for the silver pantaloons. Then it's over to the bridge district. We get an encounter in the street first:
Over at the Five Flagons, we meet some traitorous thieves upstairs.
And now, it's late enough at night that the vampires come out.
But ... in the end, we only kill one of them. The other two flee. And so, I reload, with the intention to use flame strikes to ensure that none of the vampires survive.
We open with the same drain protections, and things go much better.
Now we've done enough for those mage levels. We report to Aran Linvail, and then to Xzar. Meronia comes for Jaheira, and she's temporarily out of the party. Aerys reaches level 15, taking new spells Spell Immunity, Protection from Magical Weapons, and Spell Turning. Nalia also reaches level 15, for a much more modest boost to her spellcasting arsenal. But more importantly, we can put level 5 spells in contingencies now. That will be very important in the near future ...
186 total fire kills. Some of our encounters were very fiery, but this wasn't a very combat-heavy update.
When I reconciled the kill counts during this session, I ran into some discrepancies. First, nobody got credit in their kill counts for whacking the images of Aerys. That's actually a standard thing - good, because we'll be doing that to a lot of images in the future. Second, nobody got credit for killing Tanova. That has to do with the vampire death script, and it's a recurring (but not consistent) problem. We'll have to watch out for it in the future.
I went down, down, down
And the flames went higher
And it burns, burns, burns
The ring of fire
The ring of fire."
— Johnny Cash, Ring Of Fire