How to manually create animmeshes - a tutorial
 LaputianBird
Member Posts: 107
I made a tutorial for a friend some time ago, regarding how to create an advanced animmesh with manual vert deformation/transformation, unlike the parametric approach used in nwmax. Once EE will provide a complete range of shaders, animmeshes are going to become obsolete for the most part, but there might be some cases where they are still the better option, or however an alternative way to achieve the same result, using a 3d modeling program innstead of having to write some code in the shader scripting language.
The technique uses a mix of 3dsmax modeling and of ASCII manipulation, and I'm going to split it up in a few separate posts.
First of all, what is an animmesh? It can be considered as a primitive analogue of the skinmesh. The main difference is that skinmeshes verts are animated in real time by the engine, through their bones. Animmeshes use verts deformation/transformation as well, but everything is pre-calculated and "baked in" from the start, with no help from the game engine.
As a result, animmeshes have a few relevant disadvantages over skinmeshes:
- the file size can grow significantly depending on the length of your animation and the number of verts of your geometry
- while it is possible to easily add as many animations as desired to a skinmesh once the initial setup is complete, animmeshes would require repeating the whole setup process for every new animation, as all verts deforms/transforms always need to be pre-calculated
- animmeshes don't use animation keys for their pre-baked verts transforms, they use a sampleperiod instead. This means that it isn't possible to speed up or down the animation arbitrarily. It is still possible to add a separate set of animations keys that apply to the whole mesh and can be combined with the per-vert animations (I'll include an example)
But they also have advantages:
- animmeshes don't suffer from "max number of bones" limitations (as they don't use any!)
- while skinmeshes are limited to verts animations, the texture verts (tverts) of an animmesh can also be animated (it can be used to create a waterfall or a moving ocean foam, for instance)
- it is possible to animate specific verts or groups of verts directly, in ways that would require the use of a high number of bones with a skinmesh (which the engine wouldn't allow)
In short: animmeshes allow for a high degree of freedom, at the cost of having to pre-calculate all animation data.
A closer look at the ASCII format of animmeshes (to clarify, it's aniM-Mesh, with 2 m's, or the engine won't recognize the mesh type).
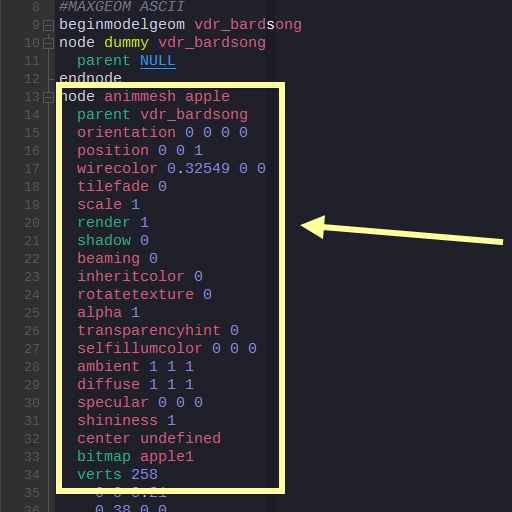
An animmesh is defined in the geometry section of a nwn model just like a trimesh.

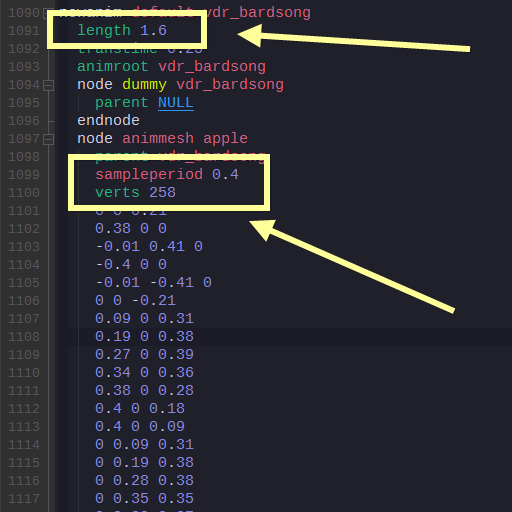
In the specific animation section (to note, the animation length), the animmesh is given a sample period,

and a set of animverts

There is no explicit declaration of the number of the animation frames. It can be calculated with this formula: (animation length)/(sample period). Since the result has to be an integer (a whole number), it means that the animation length must be a multiple of the sample period. Example, if we set the sample period to 0.4, the animation length must be one of the series 0.8, 1.2, 1.6, 2.0, 2.4 etc etc. In other words, it is better practice to define the sample period and the number of animation frames first, and calculate the resulting animation length as the last step, with the formula (number of frames)*(sample period) .
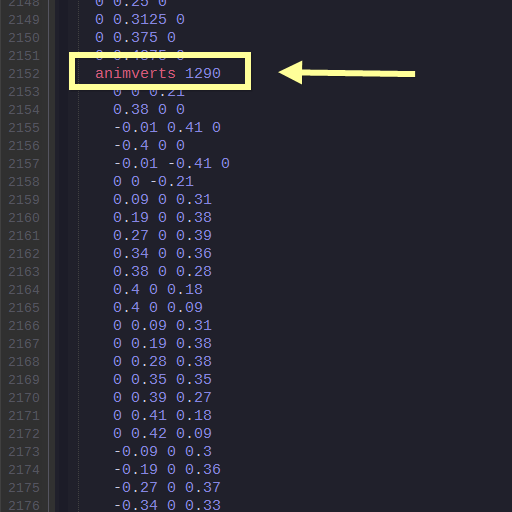
There is the explicit declaration of the number of animated verts (animverts). The formula is (number of mesh verts)x(number of frames + 1). In our example, (258)x(4+1)=1290.
At each and every frame, the engine needs the position data of each and every vertex of the animmesh, and needs one additional set of vertex positions to close the loop of the animation.
There is no visible difference between the animverts that belong to a frame and those that belong to the previous or next frame. The engine assigns an animvert to one frame or the other based on its position in the list. In our example, of those 1290 animverts, the first 258 belong to the first frame, the second 258 to the second frame etc. That means, animmeshes are extremely fragile under this regard, one single mistake in the text/ASCII manipulation (a missing vertex after a copy and paste for example) can completely break the animation.
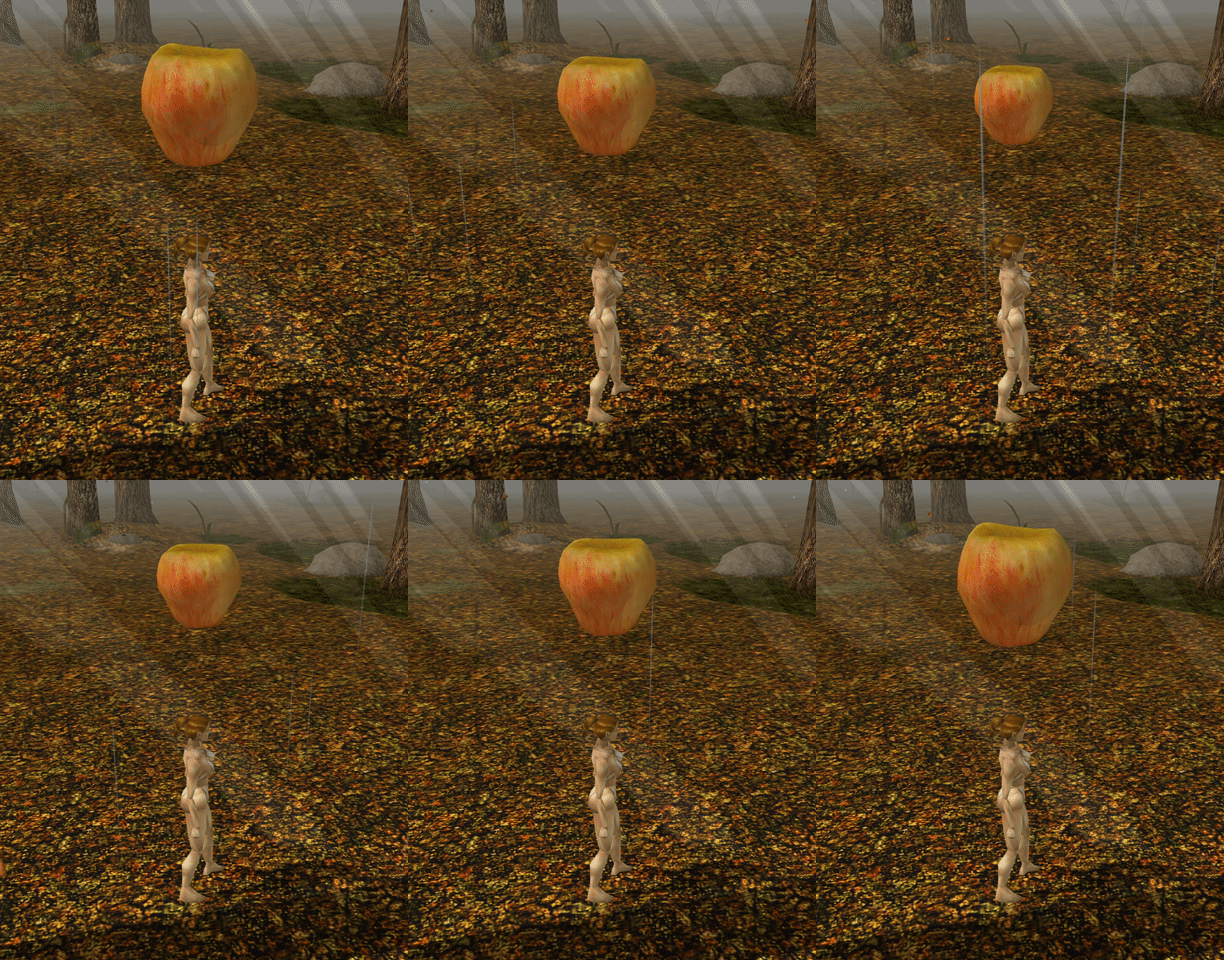
If you are curious as to what an apple mesh is doing in a bard song vfx...

[ actual tutorial coming in next post ]
The technique uses a mix of 3dsmax modeling and of ASCII manipulation, and I'm going to split it up in a few separate posts.
First of all, what is an animmesh? It can be considered as a primitive analogue of the skinmesh. The main difference is that skinmeshes verts are animated in real time by the engine, through their bones. Animmeshes use verts deformation/transformation as well, but everything is pre-calculated and "baked in" from the start, with no help from the game engine.
As a result, animmeshes have a few relevant disadvantages over skinmeshes:
- the file size can grow significantly depending on the length of your animation and the number of verts of your geometry
- while it is possible to easily add as many animations as desired to a skinmesh once the initial setup is complete, animmeshes would require repeating the whole setup process for every new animation, as all verts deforms/transforms always need to be pre-calculated
- animmeshes don't use animation keys for their pre-baked verts transforms, they use a sampleperiod instead. This means that it isn't possible to speed up or down the animation arbitrarily. It is still possible to add a separate set of animations keys that apply to the whole mesh and can be combined with the per-vert animations (I'll include an example)
But they also have advantages:
- animmeshes don't suffer from "max number of bones" limitations (as they don't use any!)
- while skinmeshes are limited to verts animations, the texture verts (tverts) of an animmesh can also be animated (it can be used to create a waterfall or a moving ocean foam, for instance)
- it is possible to animate specific verts or groups of verts directly, in ways that would require the use of a high number of bones with a skinmesh (which the engine wouldn't allow)
In short: animmeshes allow for a high degree of freedom, at the cost of having to pre-calculate all animation data.
A closer look at the ASCII format of animmeshes (to clarify, it's aniM-Mesh, with 2 m's, or the engine won't recognize the mesh type).
An animmesh is defined in the geometry section of a nwn model just like a trimesh.

In the specific animation section (to note, the animation length), the animmesh is given a sample period,

and a set of animverts

There is no explicit declaration of the number of the animation frames. It can be calculated with this formula: (animation length)/(sample period). Since the result has to be an integer (a whole number), it means that the animation length must be a multiple of the sample period. Example, if we set the sample period to 0.4, the animation length must be one of the series 0.8, 1.2, 1.6, 2.0, 2.4 etc etc. In other words, it is better practice to define the sample period and the number of animation frames first, and calculate the resulting animation length as the last step, with the formula (number of frames)*(sample period) .
There is the explicit declaration of the number of animated verts (animverts). The formula is (number of mesh verts)x(number of frames + 1). In our example, (258)x(4+1)=1290.
At each and every frame, the engine needs the position data of each and every vertex of the animmesh, and needs one additional set of vertex positions to close the loop of the animation.
There is no visible difference between the animverts that belong to a frame and those that belong to the previous or next frame. The engine assigns an animvert to one frame or the other based on its position in the list. In our example, of those 1290 animverts, the first 258 belong to the first frame, the second 258 to the second frame etc. That means, animmeshes are extremely fragile under this regard, one single mistake in the text/ASCII manipulation (a missing vertex after a copy and paste for example) can completely break the animation.
If you are curious as to what an apple mesh is doing in a bard song vfx...

[ actual tutorial coming in next post ]
6

Comments
Oh an btw. I always set the "sample period" to very low. So you save some mdl size
Part 1:
1. Create a basemodel, whether a placeables, an effect, or any model type that supports animations. Add a "default" animation to it.
2. Create a trimesh (which we'll convert into an animmesh only much later), and edit its shape as you see fit, keeping in mind this is going to be the starting and ending shape in the animation loop
3. Create a second model base, that we'll use temporarily to store some data (this will be discarded and wont end up in game). Name it something memorable like "frames".
4. Clone the trimesh and make sure you rename it by adding a semantic suffix to it (it'll make things easier later on). I use _frame001 etc.
5. Move in place and link the cloned "frame" to your second modelbase. Apply any transforms, whether parametric of manual, face/vert/edge based, anything really. Do the same to the UV mapping if you want to animate the texture (any kind of transforms). This is going to be the first frame inbetween start and end.
6. Please note: the only forbidden transforms are those that create new verts or tverts, or delete existing ones. So no slicing, cutting, tessellation, extrusion etc. No optimization, vert removal in poly mode, welding etc.
7. Repeat step 5 as many times as necessary to have the desired number of frames (I usually clone the previous frame, so that it inherits the transforms from it and I can built on top of them). The pivot position of each cloned frame is irrelevant (it'll be discarded), feel free to move them around to make your viewport easy to work with.
8. When all meshes/frames are done, add an aurora trimesh modifier on top (if you haven't yet), and reset/collapse them, in order to bake the transforms in.
9. Export both models to ASCII format.
Now, if you use CleanModels3 by OldMansBeard, you don't need the last step, as the utility will perform it for you, beside checking the consistency and the formatting of the data.
Otherwise, this is the last step you need to perform manually before testing your model in game:
Silly, but just wanted a quick and dirty example to showcase mesh deformation and texture shifting
(Hint of course I think it's a great tutorial, I wouldn't be asking for a pdf version otherwise)
TR