How to Create Your Own Custom Portrate's in NWN: EE in 2018 (Reflections, Opinions, Requests)
 HunterRayder93
Member Posts: 266
HunterRayder93
Member Posts: 266
First of all I want to thank BG again for bringing back to life one of the RPGs that really made me discover and love even more RPG games, D & D and Frogotten Realm's in general.
After various tweaks and research on how to create a custom image in NWN, I managed in my intent, it was not easy the process eventually turned out longer than expected but ... I managed to import my image into NWN.
If you want to know more about the custom image in question here is a link on how I created the image:
https://forums.beamdog.com/discussion/68294/creating-a-legendary-hero-my-custom-portrait-for-bg1-2-ee-and-iwd-ee-ing-version#latest
Let's start now with the guide...
1. PORTRAIT FILES
1.1 Image file format
NWN unlike BG1-2 and IWD makes use of as many as 5 images of different sizes, but unlike the Nifinity titles (which play the 24bit BMP format) in NWN the file format and ".tga" a format type used in Photoshop and similar programs
1.2 Image file dimensions
The 5 formats as already mentioned before must be of 5 different formats and all in .tga (width x height, in pixels and Visible Area)Final .tga images must be in 24-bit format (no alpha level).
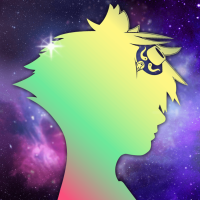
Original image

Custom Portrate in Game

After various tweaks and research on how to create a custom image in NWN, I managed in my intent, it was not easy the process eventually turned out longer than expected but ... I managed to import my image into NWN.
If you want to know more about the custom image in question here is a link on how I created the image:
https://forums.beamdog.com/discussion/68294/creating-a-legendary-hero-my-custom-portrait-for-bg1-2-ee-and-iwd-ee-ing-version#latest
Let's start now with the guide...
1. PORTRAIT FILES
1.1 Image file format
NWN unlike BG1-2 and IWD makes use of as many as 5 images of different sizes, but unlike the Nifinity titles (which play the 24bit BMP format) in NWN the file format and ".tga" a format type used in Photoshop and similar programs
1.2 Image file dimensions
The 5 formats as already mentioned before must be of 5 different formats and all in .tga (width x height, in pixels and Visible Area)Final .tga images must be in 24-bit format (no alpha level).
- Huge-256x512/256x400
- Large-128x256/128x200
- Medium-64x128/64x100
- Small-32x64/32x50
- Tiny-16x32/16x25
Only the top portion of the image is displayed in the game, so that the actual size of your portrait is 256 x 400 pixels. The bottom portion of the image MUST be blank and unused. If it is not blank, your computer will light on fire and explode when you try to save your game -- er, well, or it might just crash.
Areas of the image:
Areas of the image:
- canvas is the entire image
- portrait is the area used by the game
- blank is the unused area (but required)
1.3 Image file naming conventions
Each image must have a specific name so that the game can recognize the various formats, here are the rules:
Each image must have a specific name so that the game can recognize the various formats, here are the rules:
- there must be "_" between the name and the initial of the format
- file names must be limited to 16 characters or less all 5 files must have the same name so that the game can identify each individual image as a single format...
- End with the letter H,L,M,S or T according to size.
example: portraitname_H (Huge) , portraitname_L (Large) , portraitname_M (Medium)
2. THE "PORTRAITS" FOLDER
The folder is in Documents / Neverwinter Nights / portraits , if the folder is not present, create it,all 5 files must be placed in this folder so that they can be used in play.
Here is how the created portrait appears in game:
The folder is in Documents / Neverwinter Nights / portraits , if the folder is not present, create it,all 5 files must be placed in this folder so that they can be used in play.
Here is how the created portrait appears in game:
Original image
Custom Portrate in Game
Quick guide to convert a file to tga without having Photoshop or similar programs installed on your computer:
If you do not use Photoshop, I recommend using PowerPoint to create the 5 images,first of all to simplify your work I suggest you keep open 2 Powerpaint windows open so that in one you create the canvas format of the image and in the other the visible area or what you see at stake.
to create the precise cut of the image you want to use I recommend you to use https://imgur.com/ And a great site completely free to share and import images in forums and other ways easily and without too much effort.
After you have definitely done all 5 formats every single size you will be wondering how you can do to convert the files in .tga format...the solution appeared to me in a totally random way, through the site https://image.online-convert.com/convert-to-tga select the files you want to convert individually and the site will automatically convert them to .tga format (accept any other format), after which you only have to move all 5 files in the folder Documents / Neverwinter Nights / portraits , access the game and Voila! your image can be used in game!
guide to convert a file to tga through console command in game:
you could use the "ConvertPortrait" command from the console on a 256x400 or larger .jpg file in your portraits folder
The 256x400 size is because it will crop and scale down the original to that ratio\size, add the extra bottom padding, and make all 5 .tga files automatically. If you use a smaller image, it will have to scale it up for the larger sizes, and the results will be lower quality. See the link http://www.neverwinternights.info/portraits.htm from more details about that.
Note: Currently there is a bug with the location it checks/creates the files, but that should be fixed in the next updates. Until then, you need to make a portraits folder (lowercase p is fine) in your \bin\win32 folder (where nwmain.exe is located). Mac/Linux may or may not have the same glitch, but the fix should be on the way soon, so you can use your regular portraits folder in any case.
Assuming your .jpg file is named MyPortrait.jpg, load any module you want to get IG, hit the ~ key (or ## if you do not have "~" your keyboard), and type:
The command is case sensitive, or just hit uppercase C, then tab for it to auto-complete "ConvertPortrait ".Spaces in the file name will probably break the command (I didn't test quoting it, but NWN never liked spaces). *edits* Amazingly spaces in file names work when converting them. Don't add the .jpg extension.
Hit enter and it should say "Portrait file converted. Proceed to character gen." If you get an error, then check the location of the portraits folder, your spelling/case, and that it is a .jpg file.
If the location bug is fixed, you are done (besides removing the original .jpg if you want) and it should just work when creating a character, but until then you will have to move the 5 new MyPortraitH.tga, MyPortraitL.tga etc. files to your regular portraits folder in the "UserName\Documents\Neverwinter Nights\portraits" folder (or proper locations for Mac\Linux).
Considerations and requests:
In conclusion (for me but maybe also for others) the .tga format is very inconvenient, also because this same format is also used for screenshots that are made in game, and was also the beginning a little trouble understanding how to convert back to a simpler format, the solution has always appeared to me randomly through Google, through the site http://www.zamzar.com/it/convert/tga-to-jpg/# ,The process is a bit long but I managed to convert some screens of the game to be able to post them on the site.
I think that BD from my point of view should make sure to simplify the process of exporting custom portrates, not only with less files of various formats to use but also, to be able to use other files that are not .tga would simplify the life to many people and above all would invoke the average user to use personalized images.
If you do not use Photoshop, I recommend using PowerPoint to create the 5 images,first of all to simplify your work I suggest you keep open 2 Powerpaint windows open so that in one you create the canvas format of the image and in the other the visible area or what you see at stake.
to create the precise cut of the image you want to use I recommend you to use https://imgur.com/ And a great site completely free to share and import images in forums and other ways easily and without too much effort.
After you have definitely done all 5 formats every single size you will be wondering how you can do to convert the files in .tga format...the solution appeared to me in a totally random way, through the site https://image.online-convert.com/convert-to-tga select the files you want to convert individually and the site will automatically convert them to .tga format (accept any other format), after which you only have to move all 5 files in the folder Documents / Neverwinter Nights / portraits , access the game and Voila! your image can be used in game!
guide to convert a file to tga through console command in game:
you could use the "ConvertPortrait" command from the console on a 256x400 or larger .jpg file in your portraits folder
The 256x400 size is because it will crop and scale down the original to that ratio\size, add the extra bottom padding, and make all 5 .tga files automatically. If you use a smaller image, it will have to scale it up for the larger sizes, and the results will be lower quality. See the link http://www.neverwinternights.info/portraits.htm from more details about that.
Note: Currently there is a bug with the location it checks/creates the files, but that should be fixed in the next updates. Until then, you need to make a portraits folder (lowercase p is fine) in your \bin\win32 folder (where nwmain.exe is located). Mac/Linux may or may not have the same glitch, but the fix should be on the way soon, so you can use your regular portraits folder in any case.
Assuming your .jpg file is named MyPortrait.jpg, load any module you want to get IG, hit the ~ key (or ## if you do not have "~" your keyboard), and type:
ConvertPortrait MyPortrait The command is case sensitive, or just hit uppercase C, then tab for it to auto-complete "ConvertPortrait ".
Hit enter and it should say "Portrait file converted. Proceed to character gen." If you get an error, then check the location of the portraits folder, your spelling/case, and that it is a .jpg file.
If the location bug is fixed, you are done (besides removing the original .jpg if you want) and it should just work when creating a character, but until then you will have to move the 5 new MyPortraitH.tga, MyPortraitL.tga etc. files to your regular portraits folder in the "UserName\Documents\Neverwinter Nights\portraits" folder (or proper locations for Mac\Linux).
Considerations and requests:
In conclusion (for me but maybe also for others) the .tga format is very inconvenient, also because this same format is also used for screenshots that are made in game, and was also the beginning a little trouble understanding how to convert back to a simpler format, the solution has always appeared to me randomly through Google, through the site http://www.zamzar.com/it/convert/tga-to-jpg/# ,The process is a bit long but I managed to convert some screens of the game to be able to post them on the site.
I think that BD from my point of view should make sure to simplify the process of exporting custom portrates, not only with less files of various formats to use but also, to be able to use other files that are not .tga would simplify the life to many people and above all would invoke the average user to use personalized images.
Post edited by HunterRayder93 on
7
Comments
Don't actually need an underscore before the size letter at the end of the file names.
At least with all the other existing custom content, file names need to be limited to 16 characters or less.
Almost any good image editor can be used. GIMP is free and does the job.
I don't know if it's changed for NWN:EE, but you should be able to convert any .jpg into a set of portrait files with a console command from in-game. You drop your desired image into your portraits folder, hop into the game, and use the "ConvertPortrait" command followed by the image file name.
Additional reading for those interested:
http://www.neverwinternights.info/portraits.htm
The 256x400 size is because it will crop and scale down the original to that ratio\size, add the extra bottom padding, and make all 5 .tga files automatically. If you use a smaller image, it will have to scale it up for the larger sizes, and the results will be lower quality. See the link in the previous post from more details about that.
Note: Currently there is a bug with the location it checks/creates the files, but that should be fixed in the next updates. Until then, you need to make a portraits folder (lowercase p is fine) in your \bin\win32 folder (where nwmain.exe is located). Mac/Linux may or may not have the same glitch, but the fix should be on the way soon, so you can use your regular portraits folder in any case.
Assuming your .jpg file is named MyPortrait.jpg, load any module you want to get IG, hit the ~ key, and type:
ConvertPortrait MyPortraitThe command is case sensitive, or just hit uppercase C, then tab for it to auto-complete "ConvertPortrait ".
Spaces in the file name will probably break the command (I didn't test quoting it, but NWN never liked spaces).*edits* Amazingly spaces in file names work when converting them. Don't add the .jpg extension.Hit enter and it should say "Portrait file converted. Proceed to character gen." If you get an error, then check the location of the portraits folder, your spelling/case, and that it is a .jpg file.
If the location bug is fixed, you are done (besides removing the original .jpg if you want) and it should just work when creating a character, but until then you will have to move the 5 new MyPortraitH.tga, MyPortraitL.tga etc. files to your regular portraits folder in the "UserName\Documents\Neverwinter Nights\portraits" folder (or proper locations for Mac\Linux).
Anyway @TheAmethystDragon I have also followed the guide of http://wiki.avlis.org/Making_a_Custom_Portrait , and in the file names he put the "_" before the letter "L, H or S" for example, I know that there is a command to convert an image directly into the 5 formats, I tried it even before doing this guide following the steps and always revising if the command written well but I was the error that could not convert the file, I think because the folder has been moved or simply the command has not been fully updated, is not wanted to add in the guide not to give false information to users who wanted to follow my steps, and then the guide is based on my experience of importing images so ... that's all.