The Pack: A werewolf-themed playthrough [Complete]
 jmerry
Member Posts: 4,222
jmerry
Member Posts: 4,222
Part 1: Introduction and Candlekeep
This playthrough began with me noticing something, in my first SCS run - unlike what it says in the description, the tokens from the Improved Shapeshifting component can be transferred and used by other characters. Not only that, but their class restrictions aren't very tight. They can be used by any druid, monk, or shaman - even the Avenger and Shapeshifter forms, which really should be kit-specific. Naturally, I reported this; as an exploit introduced by a recent version of this actively maintained mod, I expected it to be acknowledged as something to fix, and probably scheduled for the next version.
That was not the response I got. Instead, the message was "I have a 'don't block exploits' policy".
Well, if this is here to stay... time to build a playthrough around it. The most powerful options come from the shapeshifter kit, particularly the greater werewolf's defenses. For those of you not familiar with the mod, here are the shapeshifter's tokens:
Lesser Werewolf Token: Str 18/76, Dex 16, base AC 4, magic resistance +10%, 1d6 base slashing damage, 1 base APR, hits as +1. Can be created 1/day starting at level 1.
Werewolf Token: Str 19, Dex 17, base AC 0, magic resistance +20%, 1d8 base slashing damage, 2 base APR, haste, hits as +1. Can be created 1/day starting at level 7 (35K experience). The token's description claims base AC 1, but that doesn't match the character screen.
Greater Werewolf Token: Str 21, Dex 20, base AC -4, magic resistance +40%, fire/cold/electric/acid resistance +50%, 2d6 base slashing damage, 2 base APR, haste, hits as +3. Can be created 1/day starting at level 13 (750K experience).
All of these tokens are two-handed dagger-type weapons. They gain bonuses from two-handed style, they gain from specialization and beyond in daggers, and they gain APR from warrior levels (including monks). For those characters that aren't already proficient in daggers, they grant basic proficiency as well. If the character is also wearing armor or bracers of AC, the armor's mods against various damage types apply and the base AC is whatever's best.
Shapeshifting tokens can be equipped and swapped out at will, like any weapons. They don't expire, so you can use a token permanently after creating it once. This means you can fight transformed, shift back to human to cast a spell or two, then transform again without worrying about a daily usage limit on shapeshifting. As such, they're much easier to use than the shapeshifting abilities in the unmodded game. Even the vanilla druid's bear and wolf tokens can be quite useful to an under-equipped party; Jaheira is considerably more effective transformed than she would be using the weapons you can find in Irenicus' dungeon.
So then, the plan is to play this to the hilt, and maximize the party's fur factor. We start with a shapeshifter druid, Jaheira, and Rasaad. The shapeshifter will have to be a PC in Baldur's Gate 1, but we can replace them with Cernd in Baldur's Gate 2. For the other three party members, we rely on the Use Any Item high-level ability to eventually grant the ability to wield the tokens.
All gameplay will be done on Tactical difficulty. I've enabled the "maximum HP on level-up" option for this run, to go with my generally relaxed attitude here.
While this seems to be a very mechanical party theme, it also comes with a neat roleplaying interpretation. Lycanthropy is an infectious disease, and we can flavor its spread through the party as members choosing to be bitten. So, then, let's introduce the cast. First, Gorion's ward Lupa:
Character sheet: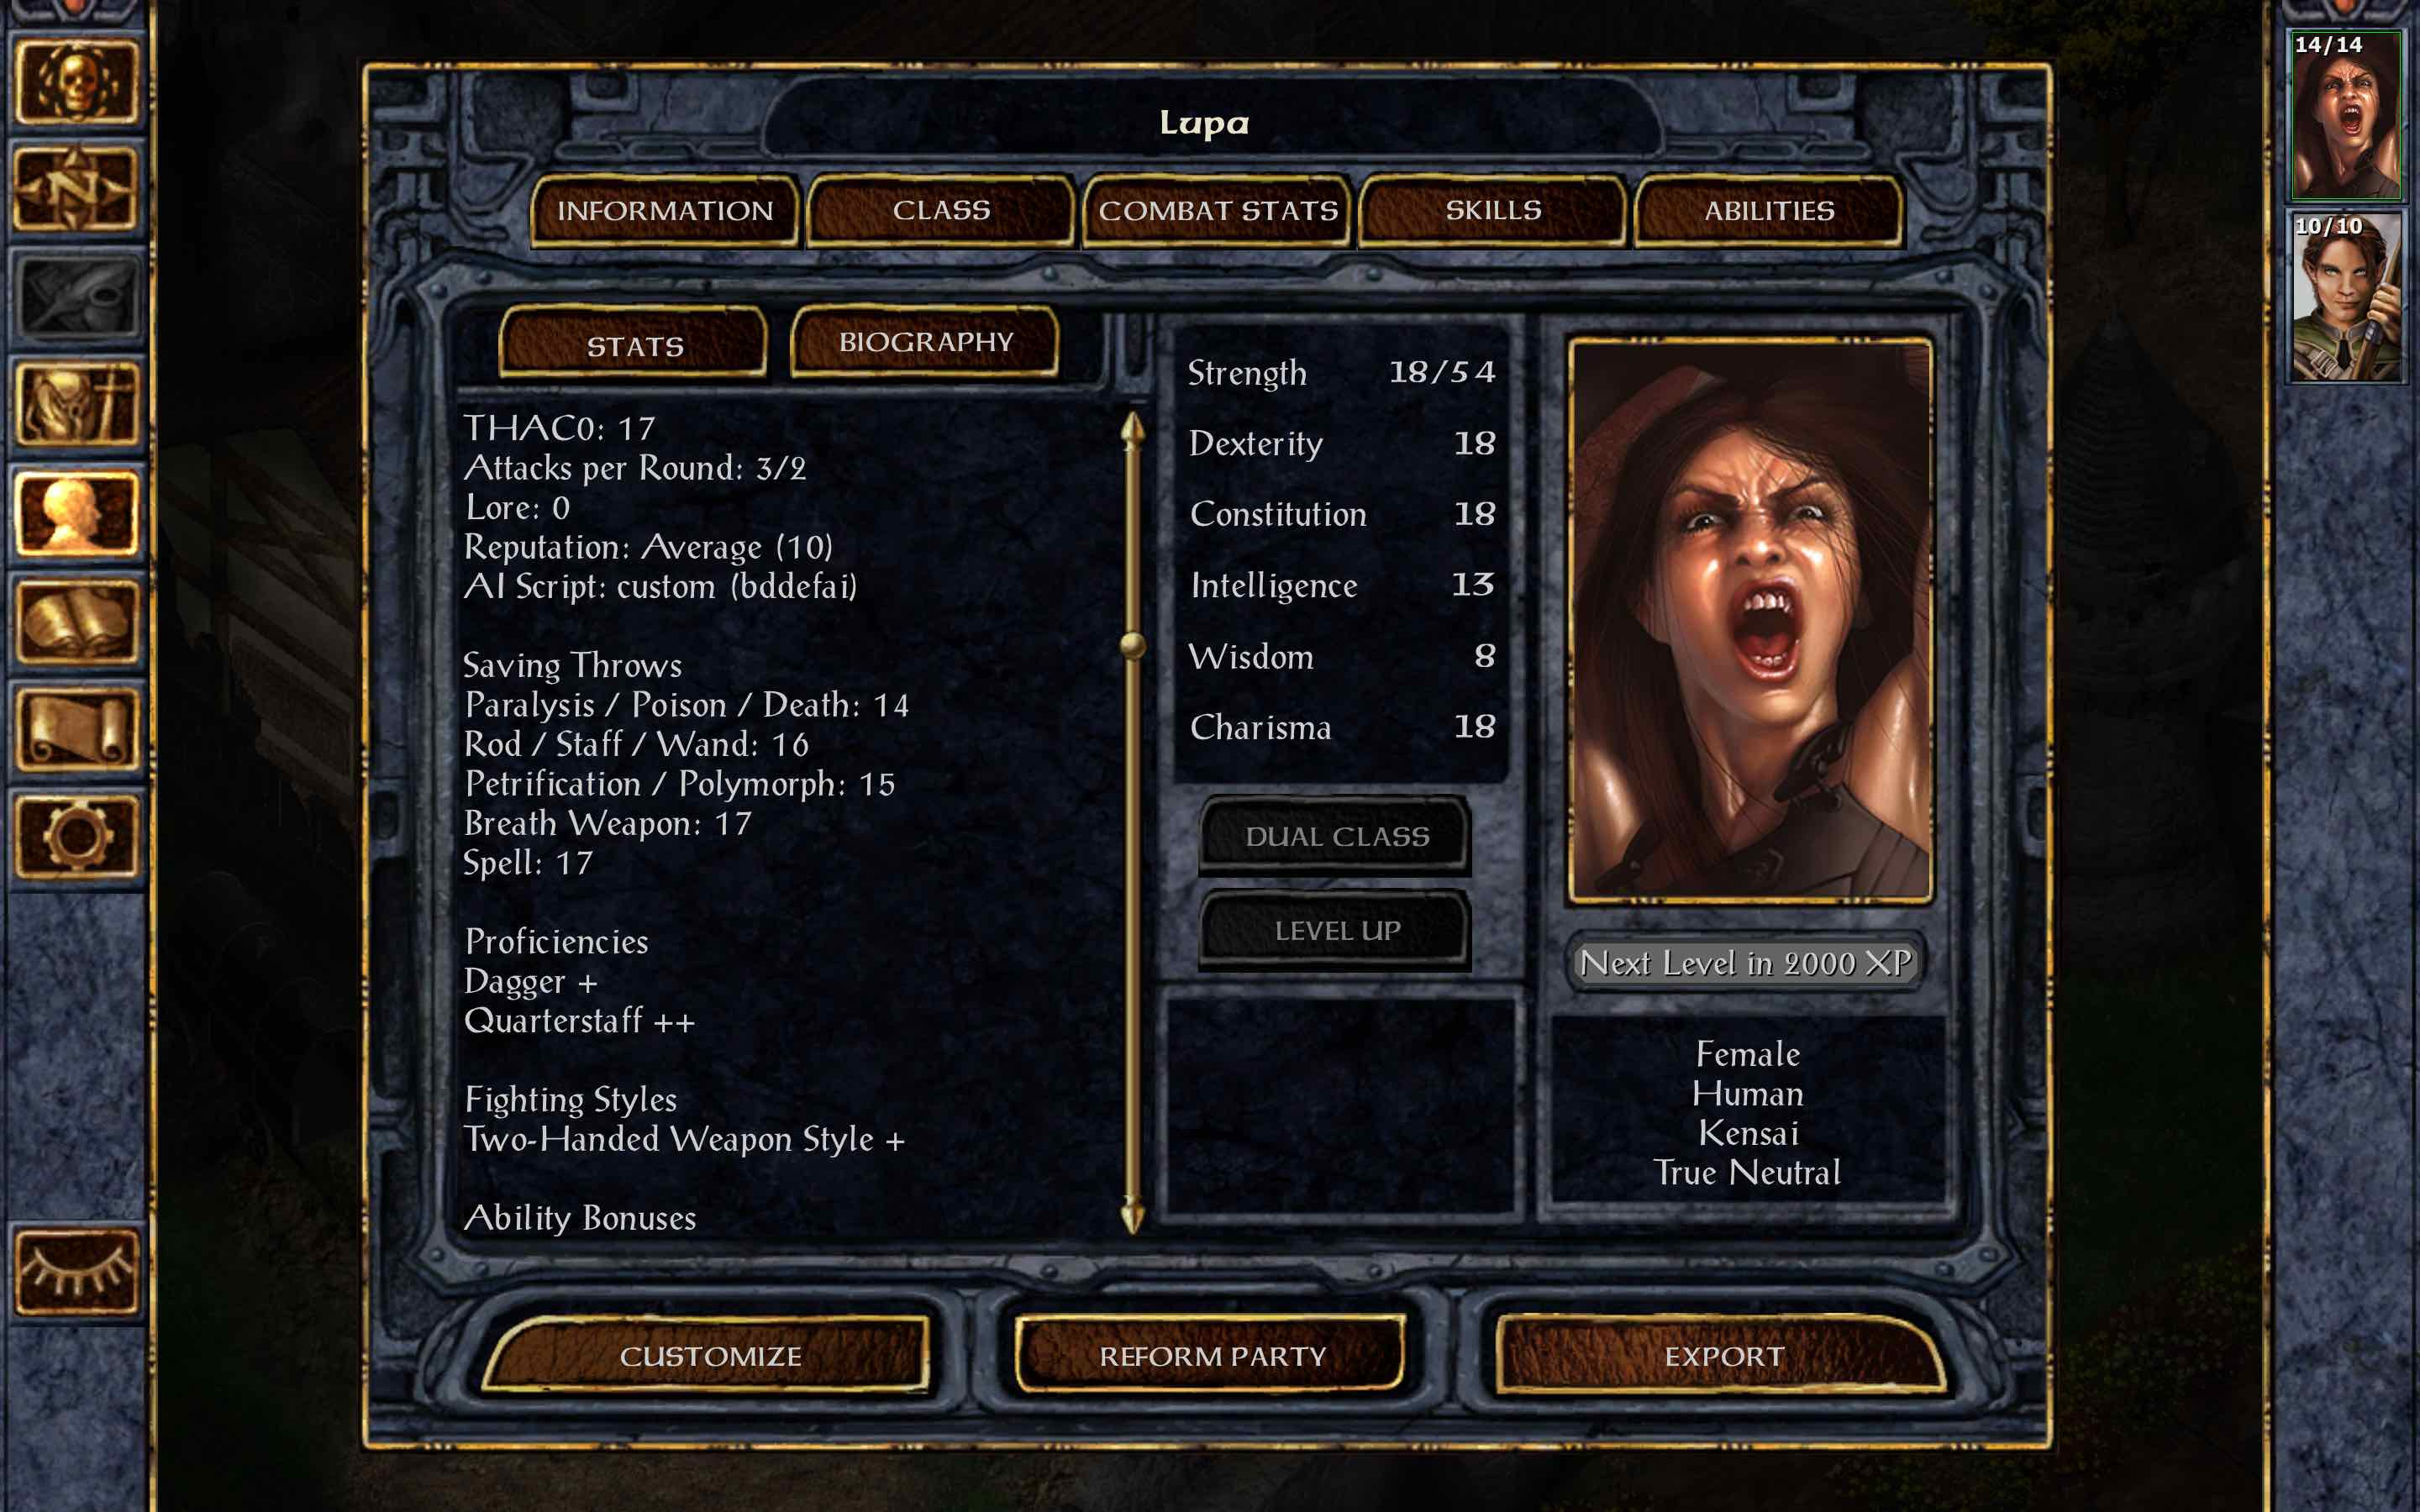
The plan is to dual-class to thief at level 13. She'll be the last in the party to achieve werewolf form, but the most powerful attacking with it.
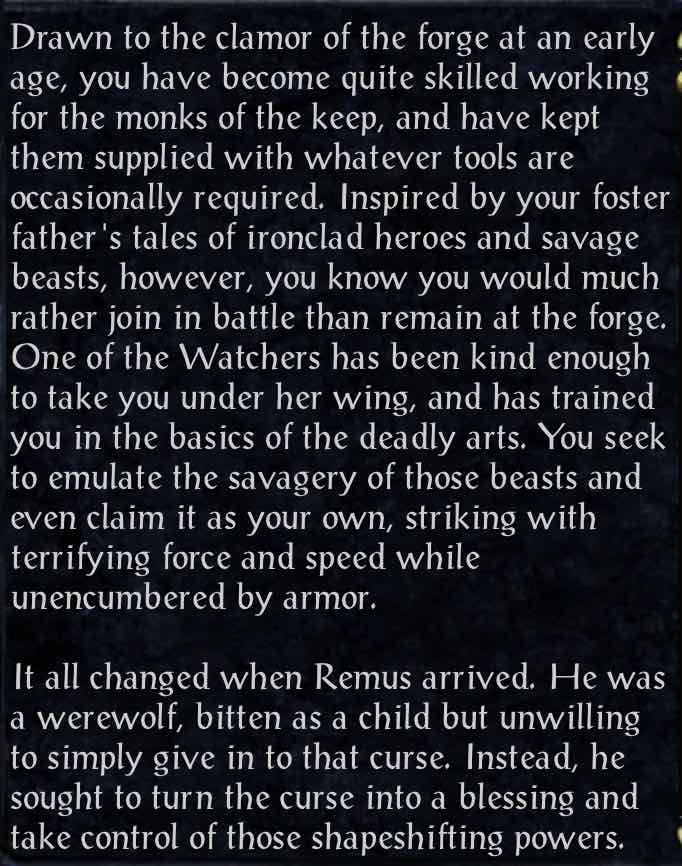
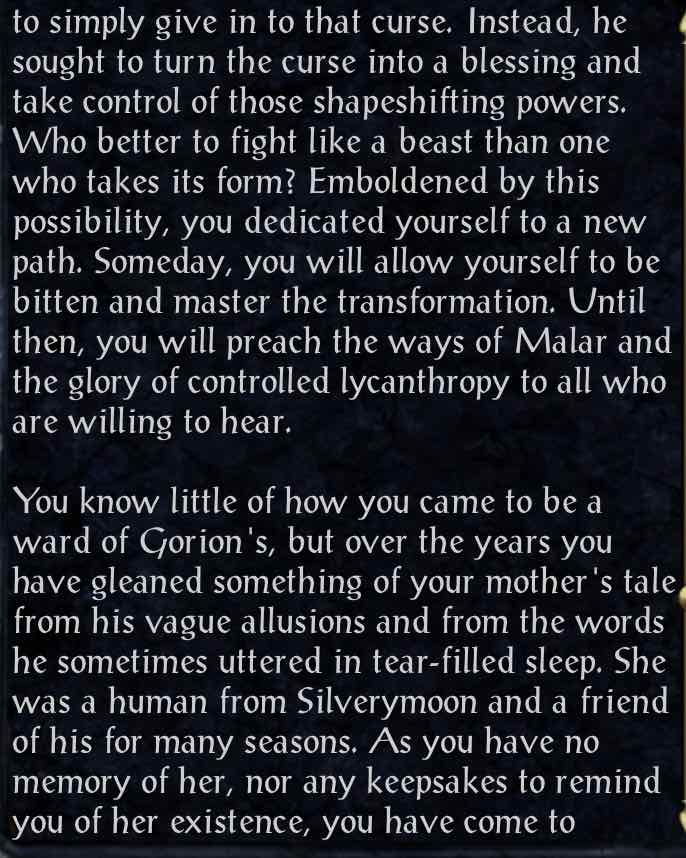
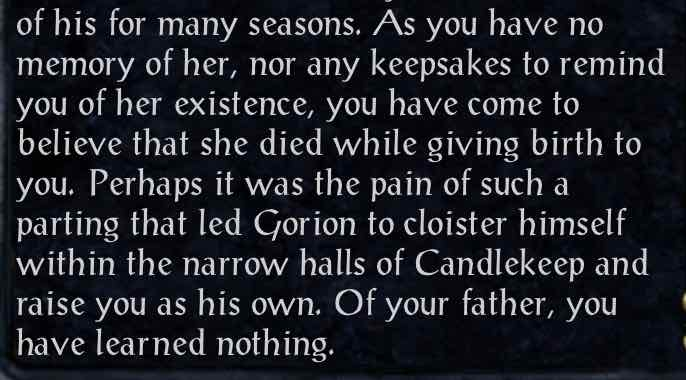
Biography:
Second, her werewolf friend Remus:
Character sheet: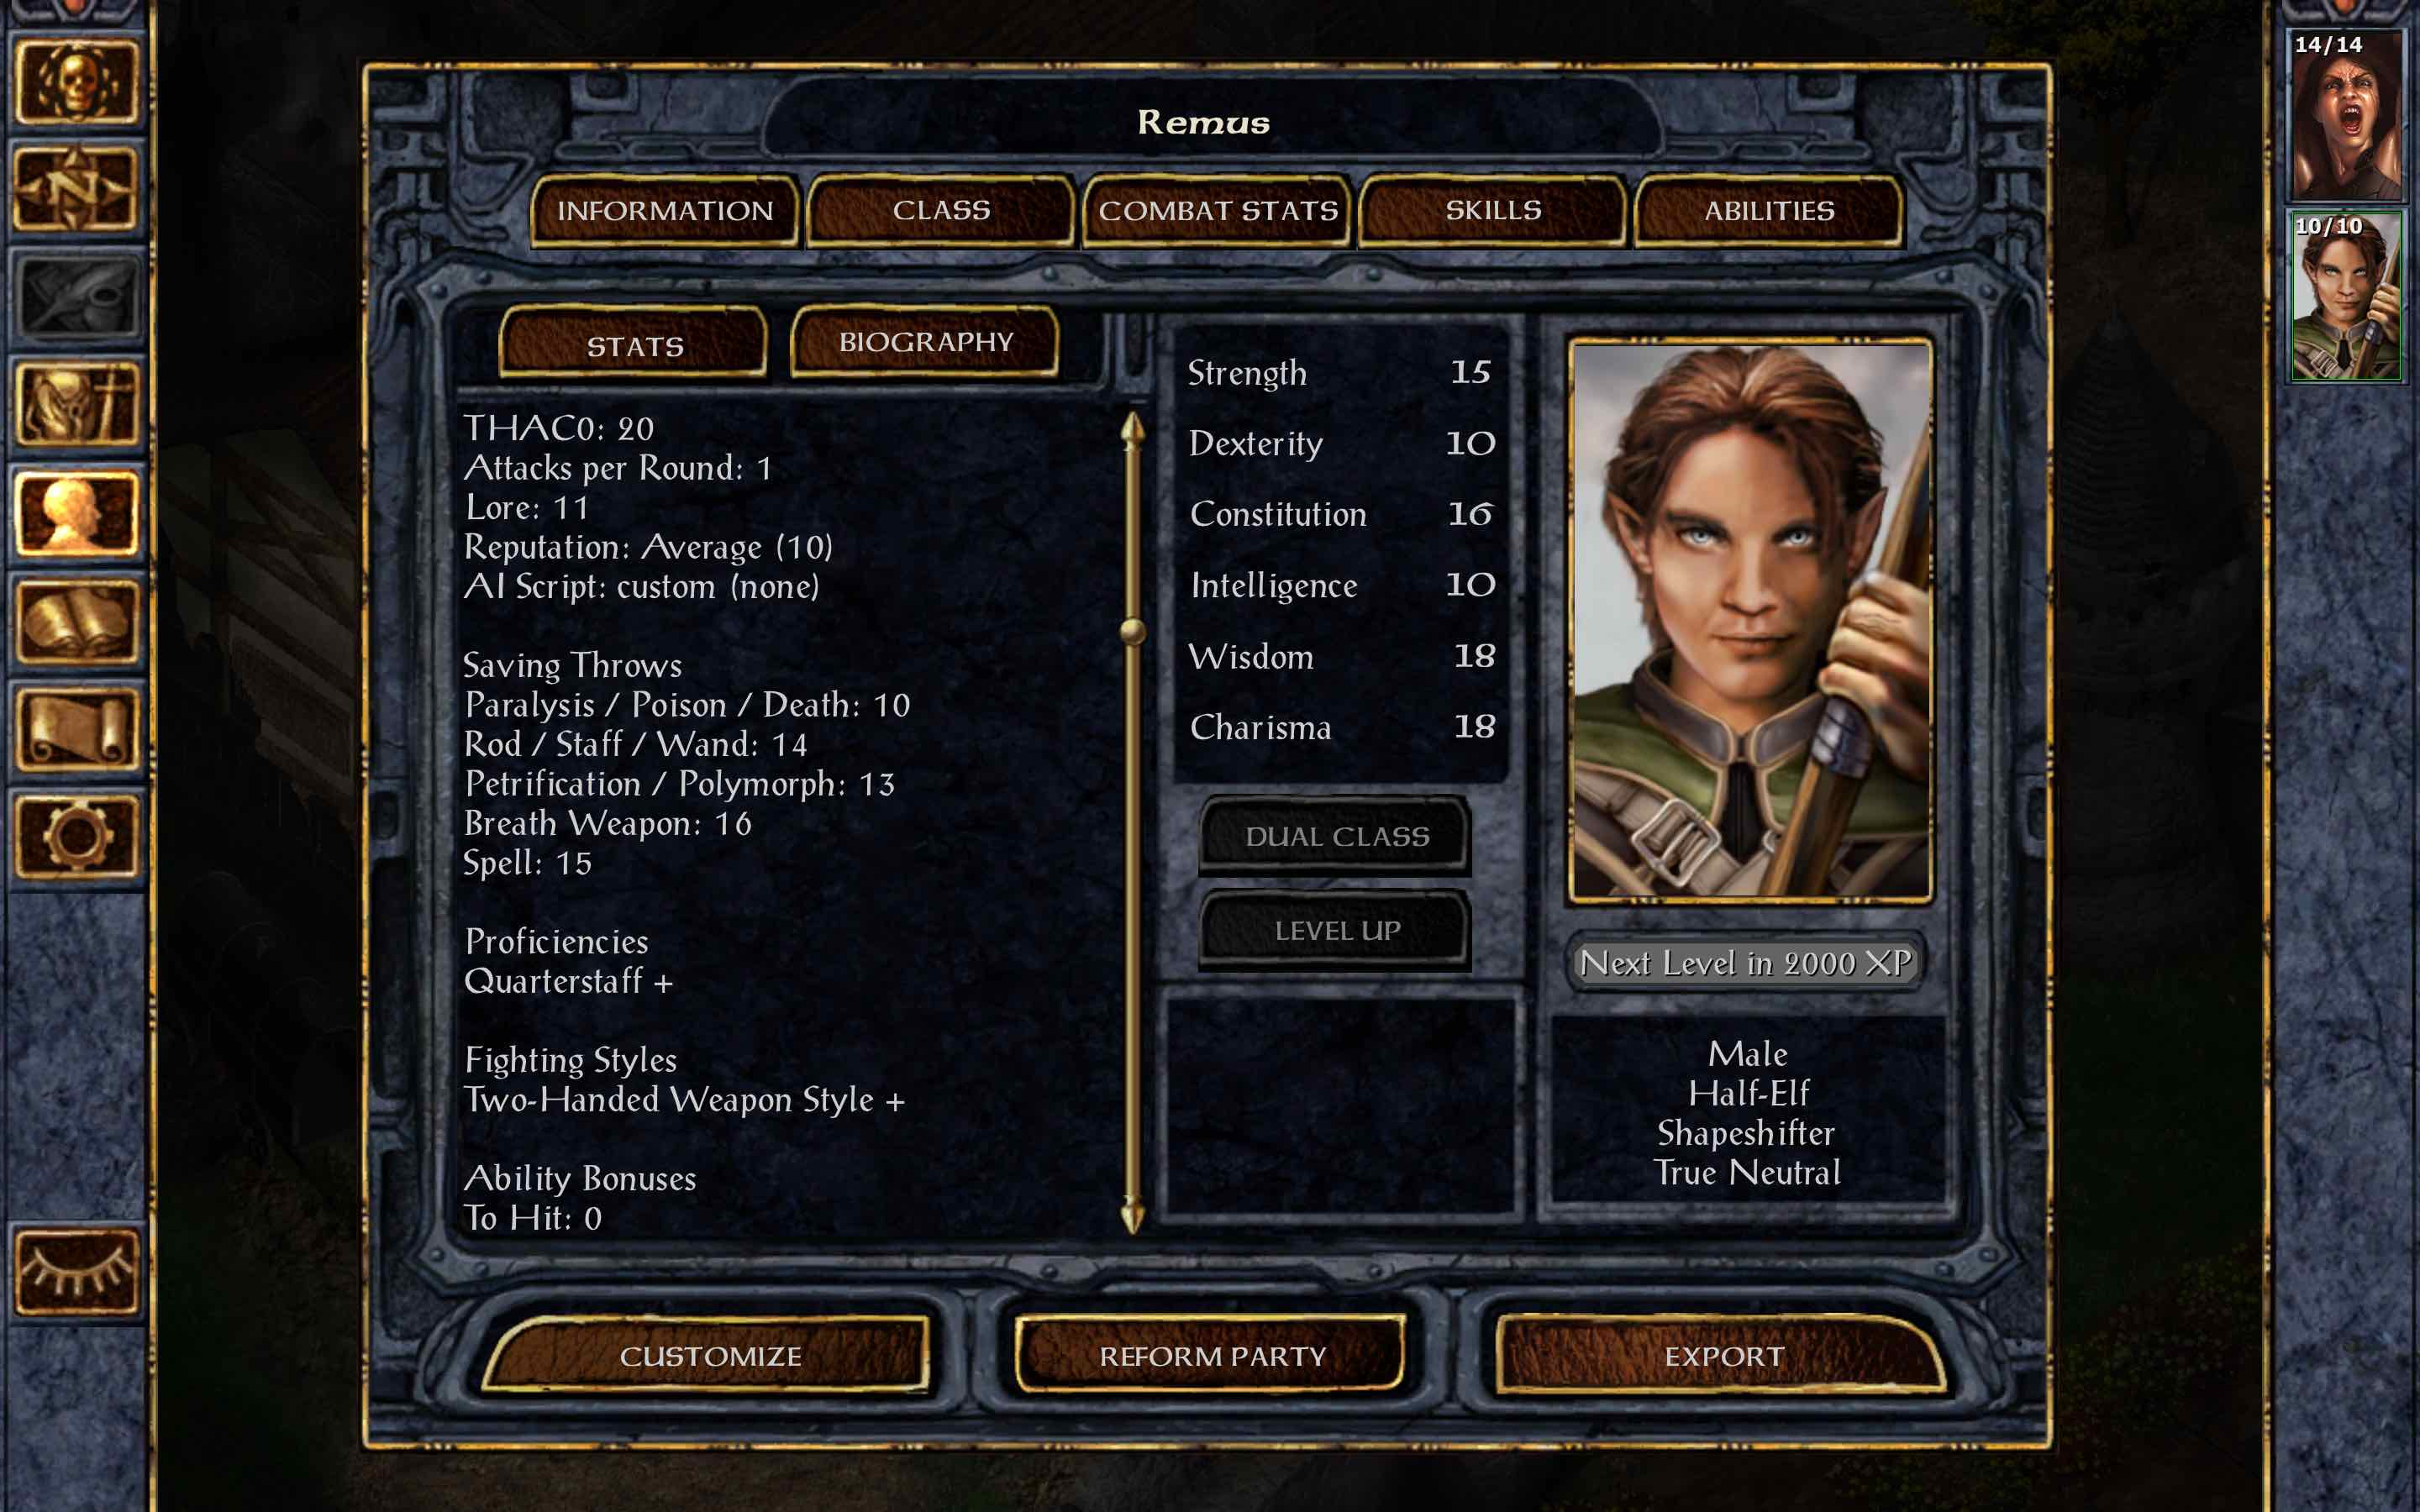
Unlike Lupa, he won't be imported to BG2.
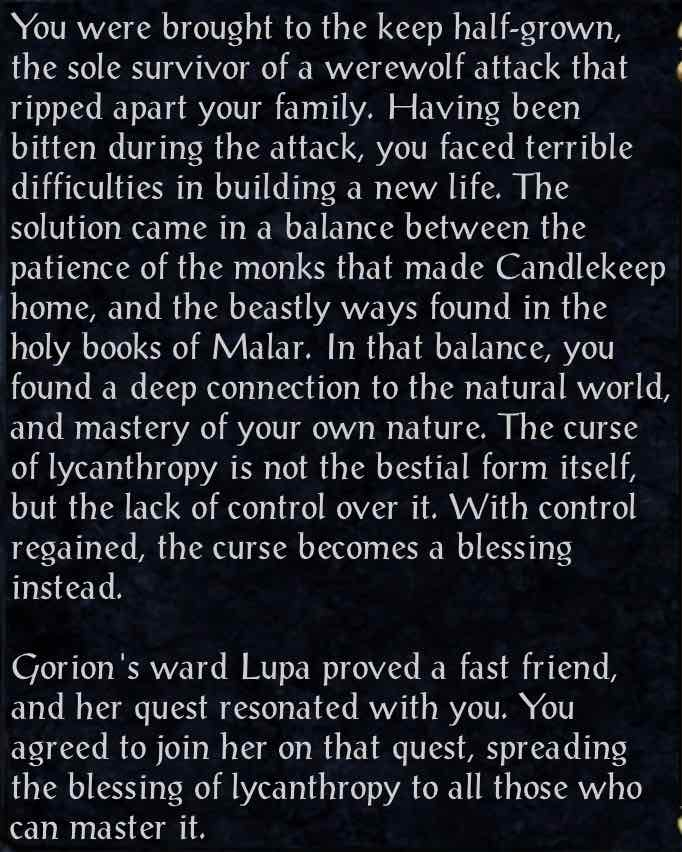
Biography:
The two are worshippers of Malar, seeking to spread the blessing of lycanthropy - but, at the same time, to bring it under control and live in harmony with the civilization around them. There are three paths they have discovered to reach this control. First, those who are connected with nature can soothe the wolf's spirit. A dog is said to be man's best friend, and what is a dog but a tamed wolf? Second, those who train rigorously to master their bodies and minds can master them even when that body changes shape and the mind faces the pressure of a beast's instincts. Third, a master trickster can learn to deceive even a mindless curse, and shed a coat of fur as if it were merely an ordinary cloak.
And, for a gameplay update, the prologue in Candlekeep. There isn't much to report, really. We looted some chests, killed some assassins and rats, and did a bunch of odd jobs. Between a staff-using kensai and a shapeshifter, there wasn't much to buy - neither needed any new weapons or armor, after all. I did forget to adjust the characters' AI, so Lupa wasted her Kai on the rats. They've got 1 HP and don't attack - Kai really doesn't make a difference against that.
This playthrough began with me noticing something, in my first SCS run - unlike what it says in the description, the tokens from the Improved Shapeshifting component can be transferred and used by other characters. Not only that, but their class restrictions aren't very tight. They can be used by any druid, monk, or shaman - even the Avenger and Shapeshifter forms, which really should be kit-specific. Naturally, I reported this; as an exploit introduced by a recent version of this actively maintained mod, I expected it to be acknowledged as something to fix, and probably scheduled for the next version.
That was not the response I got. Instead, the message was "I have a 'don't block exploits' policy".
Well, if this is here to stay... time to build a playthrough around it. The most powerful options come from the shapeshifter kit, particularly the greater werewolf's defenses. For those of you not familiar with the mod, here are the shapeshifter's tokens:
Lesser Werewolf Token: Str 18/76, Dex 16, base AC 4, magic resistance +10%, 1d6 base slashing damage, 1 base APR, hits as +1. Can be created 1/day starting at level 1.
Werewolf Token: Str 19, Dex 17, base AC 0, magic resistance +20%, 1d8 base slashing damage, 2 base APR, haste, hits as +1. Can be created 1/day starting at level 7 (35K experience). The token's description claims base AC 1, but that doesn't match the character screen.
Greater Werewolf Token: Str 21, Dex 20, base AC -4, magic resistance +40%, fire/cold/electric/acid resistance +50%, 2d6 base slashing damage, 2 base APR, haste, hits as +3. Can be created 1/day starting at level 13 (750K experience).
All of these tokens are two-handed dagger-type weapons. They gain bonuses from two-handed style, they gain from specialization and beyond in daggers, and they gain APR from warrior levels (including monks). For those characters that aren't already proficient in daggers, they grant basic proficiency as well. If the character is also wearing armor or bracers of AC, the armor's mods against various damage types apply and the base AC is whatever's best.
Shapeshifting tokens can be equipped and swapped out at will, like any weapons. They don't expire, so you can use a token permanently after creating it once. This means you can fight transformed, shift back to human to cast a spell or two, then transform again without worrying about a daily usage limit on shapeshifting. As such, they're much easier to use than the shapeshifting abilities in the unmodded game. Even the vanilla druid's bear and wolf tokens can be quite useful to an under-equipped party; Jaheira is considerably more effective transformed than she would be using the weapons you can find in Irenicus' dungeon.
So then, the plan is to play this to the hilt, and maximize the party's fur factor. We start with a shapeshifter druid, Jaheira, and Rasaad. The shapeshifter will have to be a PC in Baldur's Gate 1, but we can replace them with Cernd in Baldur's Gate 2. For the other three party members, we rely on the Use Any Item high-level ability to eventually grant the ability to wield the tokens.
All gameplay will be done on Tactical difficulty. I've enabled the "maximum HP on level-up" option for this run, to go with my generally relaxed attitude here.
While this seems to be a very mechanical party theme, it also comes with a neat roleplaying interpretation. Lycanthropy is an infectious disease, and we can flavor its spread through the party as members choosing to be bitten. So, then, let's introduce the cast. First, Gorion's ward Lupa:
Character sheet:
The plan is to dual-class to thief at level 13. She'll be the last in the party to achieve werewolf form, but the most powerful attacking with it.
Second, her werewolf friend Remus:
Character sheet:
Unlike Lupa, he won't be imported to BG2.
The two are worshippers of Malar, seeking to spread the blessing of lycanthropy - but, at the same time, to bring it under control and live in harmony with the civilization around them. There are three paths they have discovered to reach this control. First, those who are connected with nature can soothe the wolf's spirit. A dog is said to be man's best friend, and what is a dog but a tamed wolf? Second, those who train rigorously to master their bodies and minds can master them even when that body changes shape and the mind faces the pressure of a beast's instincts. Third, a master trickster can learn to deceive even a mindless curse, and shed a coat of fur as if it were merely an ordinary cloak.
And, for a gameplay update, the prologue in Candlekeep. There isn't much to report, really. We looted some chests, killed some assassins and rats, and did a bunch of odd jobs. Between a staff-using kensai and a shapeshifter, there wasn't much to buy - neither needed any new weapons or armor, after all. I did forget to adjust the characters' AI, so Lupa wasted her Kai on the rats. They've got 1 HP and don't attack - Kai really doesn't make a difference against that.
Post edited by jmerry on
6
Comments
In the Coast Way, we run away from Imoen, then recruit Montaron and Xzar. We head south to High Hedge, mug some skeletons for throwing daggers, and buy two scrolls of Protection from Petrification. It's east from there through Beregost and the temple to the basilisk area. We don't make it unscathed, though; Montaron goes down (from full health) to a 16-point crit from a Flind before we escape High Hedge. If he had only switched to his melee weapon, he would have survived with 1 HP.
We don't bother to raise him, however. Instead, we have Xzar use the two scrolls on Lupa and Remus once we reach the basilisk area, then remove Xzar and the corpse from our party. Xzar likes playing with corpses, right?
The actual fights... well, we can handle basilisks. Mutamin is a different matter. We reach level 4 against the basilisks in the south, taking the third dot in staves for Lupa and proficiency in slings for Remus. Then it's time to face Mutamin himself, and his pets. The problem is, he has a Sleep memorized and neither of my party members has reached level 5, is an elf, or can disrupt his spells at range. If that spell lands, whoever it hits is helpless long enough for a basilisk to munch on them in melee. All we can do is try to position things so Korax is targeted and the rest of us are unaffected. We eventually pull it off, but only after several reloads. In future runs, when I go for super-early basilisk killing, I'll either avoid Mutamin completely or find some way to counter that Sleep.
That leaves the party with about 12800 XP. We hit some fixed encounters and easy quests to reach 16K - Marl, Firebead's book, Silke (she saved against Summon Insects, then died to a 26-point crit by Lupa), Karlat, spiders, helping Tenya, Tarnesh (he hit us with a Sleep, but a guard killed him for us), and Landrin's reward.
With that threshold met, it's time to gather the party. Khalid and Jaheira are recruited, and Jaheira accepts the blessing of lycanthropy. We exploit an engine bug here; by leveling up with the lesser werewolf token equipped, Jaheira can immediately take the second dot in daggers. The resulting dagger specialization is permanent even when the token is unequipped, and we've essentially just stolen a free proficiency point.
Khalid chooses to focus on archery, taking the second dot in longbow. Then we head back to the Coast Way and recruit Imoen. She comes as the level 2 version, and we boost her to 90 FT and 55 OL with her 16K experience. She takes scimitar proficiency - a waste, because she doesn't have the strength to wield them. Then, we head south along the road, hugging the east edge of the map to avoid all encounters until reaching Nashkel. We recruit Rasaad and convince the Selune-worshipping monk to accept lycanthropy. The party is complete.
The party, in battle formation:
The bounty agent Oublek asks if one of us is Greywolf - ooh, yes, that sounds like a great name. We'll take the reward, too. Noober is endured:
One encounter in the mine area does get us - a pair of ghasts, which paralyzes both front-line werewolves and tears one apart. Reloading, we use better tactics the second time; one is killed before it can close, and the other mobbed.
Just before meeting Prism, Imoen and Jaheira have a conversation:
It turns out Greywolf is hunting Prism, and he's not happy about us taking his bounty. He rolls very well on his attacks - 20, 5, 18, 17 - but we've got the HP to take that. Still, that encounter and the various kobolds have worn down our HP and exhausted our healing spells; we rest before entering the mine.
Inside, things go quickly; the kobolds, even boosted, just can't stand up to a level 5 party. That brings us to the final room, and the kobold boss party...
Lupa uses a shield charge, and the two druids untransform for a moment. Remus hits the shaman with a Summon Insects, Jaheira hits the chieftain with a Charm, and Rasaad hits the shaman with a Sun Soulray when it tries to cast. The results? Save, Save, too late to interrupt Mirror Image. Then we get hit with a Horror and three out of four melee attackers panic. Note that, with no clerics or mages, we can't counter that. Remus goes down to attacks, and we reload that bit of awful luck.
The second time around... they still save against both spells, but at least this time only Lupa is hit by the Horror. None of ours die, but we do run out of healing potions as well as spells.
Mulahey himself is nothing compared to that. He doesn't even show up in my notes. We take our leave from the mines, exiting by the tunnel in the depths.
At this stage of the game, it hasn't really come together yet. Werewolf attacks are good enough to use, but 1 APR at 1d6+4 damage and +2 attack is basically just equivalent to a good magic weapon in the hands of someone without much strength. On defense, 4 base AC with 16 Dex is only enough to tank the weakest of enemies. The next phase of the plan is to wander the wilderness for a while, killing monsters for experience and loot. When we reach the key threshold of 35K experience for Remus, everything will change.
- The descriptions for all of the "create _ token" abilities are copies of the Barkskin spell description, rather than anything relevant.
- As noted in the initial post, Werewolf form provides base AC 0, rather than the AC 1 listed in the token's description.
I probably should have mentioned this earlier, but here are the relevant mods I'm running: BG1 NPC project, Unfinished Business, Portraits Portraits Everywhere, Sword Coast Stratagems. I haven't installed the component of the latter for IWD spells, so my druids are stuck with the lackluster selection of low-level spells the BG series normally has. I have at least included the component with increased power to cure spells, so Cure Medium Wounds becomes a truly good option at level 3.
The BG2 portion of the run will add Ascension, and it will also be largely uncharted territory: this was my second modded run through BG1, but I halted the first early in BG2 in favor of continuing this.
Part 3: Wilderness exploration and growth
The area outside the mines offers good experience, but is also a drain on our resources. We have no real combat spellcasting power at this point, and are forced to rest twice in the area to keep up with healing. The mad mage Narcillicus leads to several reloads - he keeps casting Skull Trap despite our attempts to interrupt him with a Sun Soulray. This was more about the unfair feeling than whether we could fight on through it, and eventually we got a version of the fight we could live with. The experience is enough for Remus to reach level 6, and Imoen soon follows him (80 OL, 90 FT). She then immediately dual-classes to mage and tries to learn spells. Level 3 and 4 scrolls? Failed. Sleep? Failed twice. Web? Failed twice, then failed twice again when two copies drop in a later area. We have to settle for Color Spray as a level 1 crowd control spell - a larger area, but far easier to save against, a short duration, and bystander-unfriendly.
And now, an intermission regarding a bug in the base game - one which actually led me to these forums in the first place. Specialist mages have a 15% penalty to their chance of learning spells from scrolls, if that scroll isn't their specialty. This is intentional, and included in the kit description in the current game version. Where it goes wrong is that the 15% penalty also applies to anyone that has a kit. Wild mages, bard kits, and kitted characters dual-classed to mages also suffer this penalty, and they don't have a favored school to reverse it.
And then, there's Imoen. She doesn't have a kit, but she suffers anyway. Why? I didn't realize until later in the run, but it's because her "kit" value is the empty 0x00000000 rather than the "base class" value 0x40000000. This applies to all recruitable versions of her, in both games. Change that, and the spell learning penalty goes away for her. There are no other gameplay effects I'm aware of, in the current version. I did that for her eventually, in chapter 4.
Also, an issue with the SCS component for a broader selection of random scroll drops: it's excessively streaky. While it does what's advertised and drops scrolls from the full wizard list (of appropriate levels), it also tends to drop the same scroll multiple times from enemies of the same type in the same area. When you kill a pack of tasloi and get five copies of the same level 1 scroll, it doesn't feel very random. A chance of duplication is normal, but not to this extent.
Continuing the area, Jaheira is nearly killed against the tunnel ghasts, and we are forced to rest a third time. This party can hit fairly hard, but their mediocre AC and lack of disabling spells means they take a lot of damage. Back in Nashkel, Nimbul gets mobbed by soldiers and goes down easily. We pick up Minsc for his quest, leaving behind Rasaad for the moment. We choose a path to the stronghold that avoids most encounters, but we still have to kite a pair of ogre berserkers in the map north of the stronghold. The charisma tome is claimed for Lupa, Minsc is reunited with Dynaheir, and we send them off to the Friendly Arm.
On the way back to Nashkel, we are waylaid. This may be tricky:
Confronting Tranzig, he saves against Miscast Magic, gets off both Skull Traps despite a Sun Soulray, and is generally a nuisance. Thankfully, this party has plenty of hit points to get through it. High Hedge gets us lots of throwing daggers for Imoen. The temple is next - or, it is until Jaheira goes down to a Vampiric Wolf. We switch over to the road area south of Beregost first, earning a ring of protection before tackling the temple area again. Cattack's gang brings Jaheira to druid level 5, and the big wolk pack brings Imoen to mage level 3.
The next targets are north - the road, the outer areas of the Friendly Arm, the farm overrun by zombies. Also, a quick trip to Ulgoth's Beard to buy the +3 staff. We hold on to Joia's ring for now, as a bit of reputation management so we don't get to 20 too early. The ankhegs come next, and Rasaad reaches level 6 in their den. Lesser werewolf form actually hampers his offense somewhat now, with half as many attacks as he would have unarmed. I still keep him transformed for the better AC, THAC0, and carrying capacity.
Then we head west, to the coastal area south of Candlekeep. Imoen reaches level 4 on some Dread Wolves, and Lupa reaches level 6 by killing Shoal. Droth fails his save against Imoen's Horror, but ith Protection from Normal Missiles up it takes a long time to catch up and actually get hits in. Jaheira reaches fighter level 5 from Mad Arcand's quest, and Khalid reaches level 6 and longbow mastery in the big ogrekin fight. Sadly, Jaheira takes one too many hits and goes down. We try the sirines... and they charm our whole front line. Nope. Reload and head back to Beregost instead.
At over 32K XP on the protagonist, we finally recruit Garrick to identify items for us with his 60 lore. Then it's Neera to finally have a gem bag - which is immediately full from the jewelry we stashed. We don't sell it all just yet, though. Instead, we press on to the area south of High Hedge, and pick up a chicken... no, not to eat. We don't eat anything that talks; that wouldn't be civilized.
A tactical error gets Rasaad isolated and surrounded by ghouls, and he dies to them. On the bright side, multiple copies of Web drop and Imoen finally learns it. With exhaustion catching up to us, we face Bassilus; we talk him into dismissing his undead minions, he gets interrupted first by a fireball and then by attacks, and he dies without ever getting a spell off.
We are waylaid on the way back to Beregost by... no, I'm not doing this encounter right now. Not with our inventories nearly full and most of the party fatigued. Reloaded.
We enter the Wood of Sharp Teeth, and the first foes we face are swarms of gibberlings. It's a bit of a mismatch:
Up in the northeast, a mad druid named Osmadi tries to call down the wrath of Malar on us. No, that's not going to work. In a disagreement between worshippers, Malar's tenets say to fight it out on your own. Imoen then asks who Malar is - seriously, did she ever paying attention to Remus and Lupa when we were growing up?
Then it's on to Peldvale. We run into a bit of trouble attacking some hobgoblins, when a bear suddenly goes hostile and bites Khalid in the rear. Still, even a fight with two groups of Blacktalon elites at once can't do much to this party, and we clear the area. Having neglected to fill Remus' fourth level slots (all nymphs, of course), we rest before talking to the last group of bandits. That rest spawns bandits, and then more bandits, and Raiken's group go hostile because we kill one of those bandits too close to them - well, I guess we're doing this the hard way.
On the way to the bandit camp, the amazon ambush we avoided earlier comes again. We're much better prepared now, with full-strength werewolves. Imoen's Horror panics all of them, then a follow-up Detect Invisibility scroll reveals the hidden one. Too easy? Nah, no such thing. We reach the camp just before dawn, a perfect time for an attack.
On the first try, the nymphs act like complete idiots and don't use their attack spells. Reloaded. On the second try, the mob of low-level bandits gets too many hits on Lupa, and a fireball from Imoen's wand finishes him off. The third time's the charm; a chaotic mess with all sorts of powerful spells from the nymphs neutralizing the leaders, fireballs from wand and potions cleaning up the minions, and werewolves running amuck. Imoen reaches mage level 5, and Jaheira reaches druid level 6. Jaheira also gets the full plate armor, transferring the ankheg plate to Khalid.
Cleaning up, we lack a thief, so all we've got is Str 19 lock-bashing. That doesn't get everything, so we make plans to return sometime later... and never do. The lightning bolt trap on the chest in Tazok's tent misses at point-blank range, and we head back to town to identify and sell things. That includes 117 bandit scalps - there were a lot of them in the forest there.
Next comes the Cloakwood. The werewolves absolutely savage anything that stands in their way; this is probably the most powerful melee party I've ever built in BG1, and it's still only chapter 4. Aldeth Sashenstar and friends are killed, and Seniyad gives us a quest to find two victims kidnapped by the shadow druids. This is Jaheira's content with the BG1 NPC project, incidentally.
Handling the spider zone without a trapfinder is tricky, but doable. We just have to make sure to trigger the webs while spiders aren't in sight. One encounter with a giant spider turns hairy when multiple phase spiders teleport in - that led to us using two antidotes. In Centeol's lair, we just attack straight up, without any real tactics. We prebuffed with Armor of Faith/Barkskin/Bless, but the only spells cast during the fight were a Color Spray and a Slow Poison. This party has the melee power to pull that off.
On the way to the druid area, we are waylaid by a pair of wyverns. Jaheira requires a lot of healing after that, but at least nobody died. The various shadow druid fights are easy; only Amarande manages to get any damage on us. A rest before moving on brings a new Slow Poison spell for Lupa.
The hamadryad in the next area is less annoying than usual, since we have hasty attackers to chase it down. Then it's the first objective to Seniyad's quest: Beador being menaced by a group of shadow druids. Horror scatters them and we gang up on the only one that didn't panic before picking off the rest. Beador wakes to Jaheira's muzzle healing him:
At this stage, there are two tiers of combat effectiveness in the party. Each of Lupa, Remus, and Jaheira have about a quarter of the party's kills in this chapter, while the rest are split approximately evenly among the other three. Rasaad's haste immunity is really hurting him - he's only at 2 APR instead of 3, and he moves slower than the other werewolves. Lupa may wear the shield amulet, but she doesn't actually use it; since she's using a long weapon and moving slower than the other melee combatants, she just doesn't get targeted by the enemy very often. Her effectiveness mostly comes from having better THAC0 and per-hit damage than the werewolves - a +3/+3 enchantment bonus, +3/+4 proficiency bonus, and +2/+2 kit bonus go a long way, even with lower strength.
After leaving the Cloakwood, we take on a few more wilderness areas. First, it's the sirines on the coast just south of Candlekeep. We kill them easily, but not before they get off a couple Dire Charm spells. Fortunately, it's the slower party members Lupa and Rasaad who are charmed, and we are able to run away from them until the charm wears off.
Next, it's back to the basilisk area. We send Jaheira ahead under PfP in case there were any we missed, and we do find one basilisk for her to kill. Kirian's party goes down easily; they cast Silence, we cast Horror and send in the werewolves.
The eastern forest area poses some challenges. Our first attempt at the Red Wizards ends in failure; they use Slow to weaken us (negating the werewolf haste) and Spook to take party members out of the fight. Then they start summoning, Khalid goes down to a pair of Phase Spiders, and we reload. On the second try, we summon a nymph beforehand. Opening with a Horror and a Confusion, two of the four enemies are neutralized. Add a Detect Illusion spell to get rid of their mirror images and reveal the invisible one - well, it misses the invisible one. Rasaad levels up to 7 mid-battle - a particularly impactful level, which makes it worth taking right away. For all the confusion and mess of the battle, we don't take much damage; the nymph's Mass Heal and a single Cure Light Wounds are enough to top off the party.
The big group of spiders also causes trouble; Jaheira gets webbed and dies before we can take them out. Remus reaches level 8 against a pair of ettercaps (Dart proficiency, not that he ever uses it), and we head back to town to raise Jaheira.
The southwestern areas come next; meeting Drizzt, slaughtering xvarts, hunting gibberlings with Laurel, and clearing out the rest of those areas. Imoen reaches mage level 6 in the process, for only another 20K experience to get her thief skills back.
Back in civilization, we pick up Neera to trigger her conversation - and she doesn't feel chatty. Well then, let's have her in the party for a bit while we ferry ankheg shells. That works, and we get her story when we arrive in Beregost. We dump her after that, of course - the conversation introducing her quest is also on a timer. Incidentally, with the 19 strength from the werewolves, this party can move 13 or 14 shells without overburdening anyone. I love it.
The next targets are to the east: the surface areas of Ulcaster, Gullykin, and Firewine Bridge. An attempt to rest gets hairy when a mob of kobolds becomes an even bigger mob of kobolds, nearly killing Imoen. Icharyd goes down quickly, although he does deal a lot of damage. Lupa reaches level 7 against a pack of ghouls in Gullykin. Over at the bridge, Meilum is killed even before he can get a spell off, and then there's Kahrk. We foolishly don't prepare the first time, and a huge fireball kills Imoen. Reload. The second time, we summon a pair of nymphs. Hold Monster x2? Saved against twice. Confusion x2? Saved against twice. Imoen casts Detect Illusion to get rid of his mirror images? Nope; she walks right up to him, gets hit, and fails to cast. There's something wrong with that spell. Then she goes down to a Cone of Cold, and I reload again. Escalating to three nymphs, he fails his save against one of the Hold Monster spells, and we beat him down quickly from there. With our inventories nearly full, we head to the Nashkel Carnival to sell all those kobold daggers - and meet a mob of kobolds as soon as we enter the map. Well, I guess it'll be a few more to sell.
Then it's the last mountainous spot in the southeast.
The hidden cache is claimed, Hafiz gives us a scroll of protection from magic, and Samuel is picked up. That gets our reputation to 18, and now Neera's ready for her quest. Just before the final boss fight, she goes down to two backstabs from the archer goblins - they're level 1 thieves (note: they use composite longbows, with neither the strength nor a valid class to do so), so SCS gives them a hide/backstab thief script rather than the base game's ranged attack script. I reload for that, and switch Neera to hold her melee weapon, since I really want her alive for the battle.
Ekandor one-hits Neera with a Cone of Cold. I let that one stand and raise her when we get back to civilization. Neera keeps the belt, and Khalid rejoins the party.
Now, something I've noticed: the mages in the EE character quests don't get prebuffs. The general AI improvements are there, but mages like Ekandor need to spend precious time on spells like Stoneskin that should already be up.
Also, those thief hide/backstab scripts can feel a bit unfair. It's broad daylight, and you're telling me that every single one of those level 1 thief goblins can successfully hide in the shadows? Is there any way to have hide scripts for enemies that don't automatically succeed?
We're down to under 15K experience needed for Imoen to be a thief again, but also out of wilderness areas I'd like to tackle at this time. I choose to recruit another thief for the Cloakwood mine - Coran. Also, I want to do Dorn's quest, so I pick him up now before our reputation can get too high. The two replace Khalid and Jaheira - and, due to this group's weirdness, going from Jaheira to Dorn is a massive drop in ofensive power.
This also introduces me to the wonderful character that is NPC project Coran. We have a female protagonist, so naturally the first thing he does is hit on her. Rejected. Then, of course, he tries again... and again... and again. He simply will not take no for an answer.
Dorn levels up against the mage Natasha... and Coran compliments her beauty, even dead. Sigh.
Dorn, attacking guard: "This will not be a quick death!"
Remus, practically instantly after: *Claws guard for 28 damage, a critical hit*
Guard: *Explodes into little chunks of meat*
That brings us to Davaeorn, and I decide to use that Protection from Magic scroll for this battle. The party will stay at the entrance and deal with the reinforcements, while Rasaad goes in to deal with the mage under complete immunity. And... reload. The tactics there didn't work out. The second time around, I use Rasaad's stealth to sneak behind him first, and that works better. Then Davaeorn teleports into our waiting party, and goes down immediately. The sniveling apprentice and the ooze die, Coran drinks a master thievery potion, and we loot the place.
Flooding the mines brings our reputation back up to 18, and it's under 7K experience left for Imoen. We take Dorn around to do his quest, killing first Kryll and then Simmeon's band. For this party, the only real reward is Albruin - 1/day detect invisibilty.
With that, Dorn's role in this party is done. We drop him and Coran for Jaheira and Khalid, and we're ready to enter the city of Baldur's Gate.
After our recent adventures, Khalid and Jaheira are about 10K experience behind the rest of the party. They'll reach their maximum levels before the rest of the party hits the experience cap, at least.
Inside the city, our first stop is Sorcerous Sundries, and the battle upstairs. Result? All three werewolves panicked by a double Horror sequencer, and the one with a fireball wand starts using it on the rest of our party. Reload. This time, we take out the fireball guy before he can use the wand, dodge the worst of the Horror, and win fairly easily. It's worth noting that fear effects are a major weakness for this party; druids don't get Remove Fear.
We talk to Brevlik and Shilo Chen (added in UB), get the trinket Imoen makes for us (a protection amulet that stacks with other protection items), then rest. After the rest, it's time for quests. We head north to set the assassins' plot in motion, head west to deal with Dabron Sashenstar and consult the diviner, then head south for the Umberlee high priestess. Visiting the area at night triggers Rasaad's quest, with a small group of Dark Moon monks attacking and dying. She demands a tome which we buy, and we also pick up another quest - to retrieve a child's body. We get the body and the geas removal scroll through force, slaughtering the Umberlee priestesses. It's an easy fight; all they get on us is a single Unholy Blight from one of the lesser priestesses.
The basilisk is killed, and then it's time for the Blade and Stars. Lothander has backup now, but it's not enough; he is blocked in and killed. That fight triggers Sorrem to squeal, but we follow up by interrogating him anyway. Only Khalid lacks fast movement now.
Going with Sorrem to the Dark Moon hideout advances time by nearly 24 hours, causing an icon to show up on Lupa for the poisoning. The hideout itself is easily handled, and we clear out the Seven Suns doppelgangers while we're in the area. Returning the boy's body to his father to be raised, the experience reward finally brings Imoen to mage level 7, and lots of new opportunities appear. We steal the telescope, offer a bard some tales of vicious beasts, then head over to the confrontation with Marek. Unlike Lothander, he's still alone. Larze and Marek are mauled, the antidote is drunk, and we rest.
After that, we kill Ragefast and free the nymph (21 Cha for our protagonist now), then go after Ramazith. His tower is taken care of quickly, once we make sure not to expose squishy Imoen to enemy archers, and he is mauled. He gets off a Chaos, but three of our four melee save or resist.
With our new maximum discount, it's off to Sorcerous Sundries for spell-shopping. Rinnie gets her book, the Merchants' League Counting House gets plundered, and we head south for the remaining wilderness areas and Rasaad's quest.
The gauntlets of dexterity are reclaimed from Minsc and given to Khalid (everyone else is at 17 or better), Chelak's body is returned to his friend (just forgot that one), Garrick identifies everything (+1 Int and Wis for Lupa), Imoen plunders Beregost, and we buy a Robe of the Archmagi for Imoen and the Claw of Kazgaroth for Rasaad from Thalantyr. Rasaad has the weakest attack of our werewolves, since he lacks hast or two-handed style, but he has the best AC with his boots and now the claw.
The Seawatcher lighthouse area is next. Six sirines, only one dire charm spell successfully cast (and saved against), no arrows of biting fired. Inside the cave, the Flesh golems? They got one attack roll each, and all missed. A flawless victory looting the pirate cave, with no spells used. The Con tome, of course, goes to Lupa. Safana is sent back to civilization, and the lighthouse worgs are dealt with.
Moving on, the dig site glitches oddly, with Charleston Nib only leading two of the party to where the idol rests.
Brage is killed, we sell our excess scrolls at the Nashkel store, and Imoen prepares a Glitterdust/Horror sequencer. We head off to the Dark Moon monastery, where the foes are numerous but not threatening. The only thing that got me was a fireball trap that I forgot to look for. Rasaad picks up new gauntlets, Lupa gets the cursed 19 Str belt for now, and it's on to the next wilderness area.
An encounter with a group of ogres deals serious damage to both Lupa and Remus, but this party has enormous healing resources now with all the nymphs, and they're soon back in the green. Then, we rest. A pack of wolves interrupts, sniffs around, and doesn't attack. Then another pack of wolves interrupts and doesn't attack. The third attempt gets the actual rest we needed. We kill some bandits, save a cow, and head back to Nashkel to sell some junk.
The southwest comes next. After killing a poorly trained "dog" and some overly aggressive Amnians, we face a mob of kobolds - and their death enrages Larry, Darryl, and Darryl. So much for the old reference joke.
As a brief intermission, I hunted down an error in my mod installation here. For some reason, the modified CLAB files for a bunch of arcane spellcaster kits weren't installed on BG2, meaning that mage specialists (like illusionists) weren't getting their sequencer abilities. I copied some files over to fix that, and also deleted a duplicate field in the kitlist that looked like an error introduced by another mod.
Innate sequencers and contingencies still aren't bug-free; they're currently set up in a way that gives the abilities anew every time a character rejoins the party. Since Imoen is the character I temporarily drop each time I call on Garrick in this run, she accumulates a lot of instances of the "Create Minor Sequencer" ability. Oh well, it's mostly harmless. I wasn't going to use those abilities multiple times per day anyway.
The "fastest dart-thrower" throws exactly two darts before dying, and Imoen gets the bracers of archery. The final area over here is very routine; we only refrained from doing it earlier for reputation-management reasons. We're nice to a dryad and a little girl, and mean to the gnolls.
Next, the Ulcaster dungeon. We've had the combat power to handle this ever since we unlocked full werewolf forms, but I didn't want to do it without a thief. Mal-Kalen hits us with a Horror, making two werewolves run around for a while. The rest of the enemies are trivial, until the big bad wolf. It howls, Lupa panics, and the three werewolves tear it apart. All in all, not too bad with this ridiculously powerful party. For a more normal party, the Wolf of Ulcaster is a brutal DPS check; you need to kill it before it summons too many wolves and ghouls to help it, and you need two castings of Remove Fear to beat its howls.
The Firewine ruins are next. We take some damage, but otherwise get through with little trouble, collecting a whole lot of fire arrows. Jenkal doesn't even manage to get away.
Back at Beregost, we buy some stone to flesh scrolls and the dagger of venom (for Imoen). Tamah is freed, ogre-mages are killed (Shilo Chen's quest), and we finally get around to returning Joia's ring. With around 150K gold, we blow a bunch of it recharging a full set of wands for Imoen. We could recharge that Shield Amulet - but why bother? We aren't using it anyway. By the end of the game, it still has charges left from the initial ten.
Then it's off to Ulgoth's Beard with a couple looting stops along the way. The whole party has protection items now. Shandalar sends us to the ice island, where we encounter something new: Andris polymorphs Remus. That spell is permanent until dispelled, and none of my other characters have dispels prepared. The Cloak of the Wolf gets him back to human form, but his strength is still set to 3 and his hit points 5/9 - even after equipping the werewolf paw. He can cast now... no, he can't. Attempt to cast Dispel on himself, cast failed. Imoen casts from a scroll, and the effect isn't removed. With no real options left, I reload. After a couple of tries aborted with my people running into traps, I get a good run of the battle. This time, Andris summons a lesser air elemental - which the werewolves can't hurt. Noted - this is how I know the claws hit as +1.
Actually, there's a design question there: should that spell and its other-element counterparts be available to enemy mages in BG1? It's not available to players, and it introduces monsters that don't fit the game's pattern of being hittable with any magic weapon.
There's another reload later, as I was insufficiently cautious looking for traps. The area's second level brings Imoen's eighth mage level against the wolves, and Rasaad's eighth monk level against Dezkiel and his golems.
Oh, and both levels of Ice Island got infected with the endless battle music bug. I take that as my cue to end the session and quit.
We finish up a few errands first - hire the tour, talk to Mendas, sell ankheg shells and wolf pelts in Beregost, buy stacks of +2 arrows for Khalid and Imoen - but soon it's back to Baldur's Gate for the remainder of chapter 5. Note here that SCS substantially changes ammunition; fire arrows are no longer the absurdly overpowered +2 arrows with 1d6 fire damage, but instead match their BG2 values of no enchantment bonus and 1d2 fire damage. Ice arrows are even slightly better for most purposes, since they don't allow a save against their elemental damage.
Our first quest in the city is also the last time we'll bring in anybody outside our core party. Coran, it's time to save your daughter.
Down in the Low Lantern, Vay-ya goes down without casting any offensive spells, while Desreta goes invisible immediately and lands a backstab on Coran. At least he switched to melee weapons, so it's only 21 damage. Then she drinks another potion, and lands a 54-point critical backstab on Lupa - from the front, too. Enemies don't have to worry about positioning.
Our reward for the encounter is some experience and a collection of magic items I have no use for. What's the point of 18/00 strength when all four of my melee characters already have 19?
Yago goes hostile when we talk to him, and dies instantly to our melee attacks. Looting his chest gets us noticed, but these guards are willing to take bribes. We accept some pay from Brielbara, but Coran does not accept responsibility.
We start exploring the city, poking into every building and looting anything unattended. Along the way, I have a thought - what if that polymorph problem happens again? We could use a guaranteed dispel, and thankfully there is one available: arrows of dispelling. We buy some and a nonmagical shortbow to deliver them if necessary.
A shop has been overrun by angry chickens? We'll handle that. Yum.
Eventually, it comes time to delve into the sewers. Our party's ludicrous attack speed serves us well here; Ratchild's force of kobold commandoes can't hurt us before dying. The ogre mage and his carrion crawlers earn a spell - a single casting of Horror, taking most of them out of the fight. That fight brings Lupa to fighter level 8, and returning a body to Arkion brings Remus to druid level 10. His two level 5 slots go to Insect Plague and True Seeing, a combination that can break many of the most challenging encounters in the game. Of course, all five of his level 4 slots go to Call Woodland Beings.
Next, Imoen buffs with potions and gloves to pickpocket Arkion and Nemphre. Their trinkets are returned to Ordulinian.
Continuing, the helm and cloak of Balduran are claimed, and Degrodel is dealt with. Battling Degrodel and his minions brings Jaheira's eighth druid level, so the party can now summon seven nymphs per day. It also exhausts our healing spells, and we bring this very long day to an end. Potions of genius provide certain spell learning and increased lore, we sell a bunch of stuff, and we rest.
Now, it's time to investigate the Iron Throne. Every conversation we have on the way up reinforces the feeling of trouble, and we warn Emissary Tar. She doesn't listen. Suspecting battle coming, we buff the party - Stoneskin for Imoen, Armor of Faith for the druids, Barkskin for Lupa and Remus, Bless, and True Sight. Remus opens the battle in human form with an Insect Plague, and Imoen adds a Slow. Then Rasaad gets dire charmed (he's one level short of being immune), Lupa gets caught in a Hold (we missed their mage with that Insect Plague), and Rasaad kills Lupa. Reload.
The Insect Plague is better targeted this time (on Lupa) and we hit everyone that matters with it.
Then we swindle some sea charts out of the Merchant's League captain, buy two more wands of the heavens, and head to Duke Eltan to finish the chapter.
The ogre-mages ambush us outside Candlekeep. Well, four of them do. The fifth stays invisible and non-hostile, meaning our invisibility-breaking spells don't even reveal him.
After selling the contents of our full gem bag and resting, we head into the central keep and ransack it. Theodon tries to embarrass Lupa with tales of running around naked, but what's wrong with that? It's only natural. A creepy fellow calling himself "Koveras" tries to pass himself off as a friend - yeah, that's not happening. We confront the Iron Throne leaders, but don't start a fight - this is not a place for bloodshed.
They are killed anyway, and we are framed and arrested. With no chance to prove our innocence, we must escape instead, through the catacombs.
A note here: there's a way to get to the top floor and explore it, talking to Tethtoril and Ulraunt. All you have to do is immediately run past the second floor before "Koveras" can speak to you, and also avoid confronting the Iron Throne group until later.
In the catacombs, Khalid reaches level 8 against some phase spiders and Lupa gets a pair of tomes. We're carrying some Remove Curse scrolls, so this lets us transfer the Big-Fisted Belt to Khalid. We have five 19-strength party members now. Any potions of Hill Giant Strength we find are utterly useless from now on.
And... crash. Full computer freeze, power off and restart needed. At least it's just back to the autosave at the beginning of the catacombs. We do it again, then clear the ghasts down the next corridor and move to the next level. Two doppelgangers in, Jaheira reaches fighter level 7. Combined with the specialization bonus, that's a full +1 fighter bonus attacks, and she now has 4 APR as a werewolf. 4 APR, in melee, with 19 strength - it's just incredibly powerful in BG1.
The "Elminster" greater doppelganger gets overkilled; after being interrupted in its first spellcasting attempt and taking a 46-point crit from Lupa, it dies before Jaheira's crit can land.
For Prat's band, we use a Slow and send in the werewolves. It isn't enough; with Remus and Jaheira both deep in the red and one helpless, we reload. The second time around, we add two nymphs, and open with Greater Malison/Hold Monster. Also, Barkskin on Lupa. And ... oops, forgot to have Imoen's Stoneskin up. Fixing that, the third time is the charm. The two mages are taken out of the fight immediately, and mopping up from there is easy.
The spiders and basilisks are easy, although we run into some web traps and get slowed down. And with that, we escape Candlekeep.
On the way over to the tower, we stop in Beregost to rest. This stop brings a dream of power, and Lupa has Draw Upon Holy Might. It was absolutely certain; as the chapter 5 dream while we're in chapter 7, its chance of happening was bumped to 100%.
Once at the tower, we find the Battle Horrors to be fairly effective against us; their plate armor and exceptional AC means even Jaheira misses on a 15. Still, Lupa can reliably hit them, and soon we've cleaned up everything outside the tower.
Inside, we watch as a bunch of tourists and the guide are killed by a Demon Knight. Regrettable, but not something we were in a position to stop. The foes inside are mostly ghasts, and we have more trouble keeping our melee from running into the traps than we do fighting them. Jaheira takes care of the basilisks on the roof; with the first two greater basilisks killed in one round each before they could switch to melee, they pose no difficulty.
The third floor brings a ghost that doesn't get any spells off - killed before even its precast triggers activated - and the rogue Riggilo who doesn't take kindly to us dismissing him. Riggilo does at least get off a 3x frontstab on Lupa before going down. Lupa takes the wisdom tome, and we head up.
On the top floor, Kirinhale manages to charm Remus before dying; the rest of the party ducks down a floor to wait that out.
The basement level is the toughest so far - not because of the foes, but because Imoen blunders into a trap and gets confused. In her confusion, she attacks Bayard and triggers a fight with that level 9/8 Conjurer/Thief. He dominates Lupa, and she deals a lot of damage to the rest of the party.
The warder level brings many routine fights and less routine traps. Even using her artifact for 19 Dex and 95 FT, Imoen doesn't disarm everything on the first try. Imoen reaches mage level 9 against a pair of skeleton warriors and their lesser skeleton minions; that's the party's last level in BG1. The three greater doppelgangers aren't a problem; we just charge in and start clawing. They don't even get to finish buffing before going down.
The boss fight against the warders, though, demands more respect. We'll be using Remus' fifth level spells on this one. Even then, they hit us hard, dropping three party members into the red.
On the doppleganger level, fights against single greater dopplegangers are easy as usual. For the throne room, I used the trick of getting my whole party up by the throne - in the stinking cloud, out of the cloudkill. One doppleganger died there, while the others didn't join the fight until after the clouds dispersed. In the lava room, the first Islanne is curiously slow to act; we charge it, and kill it easily. The second is more trouble, but the only offensive spells it gets off are acid arrows. The Fuernebols are easily handled, and the Durlag transforms into a mere greater doppleganger. This fight also brings our last two party members to the experience cap; from here on out, we're questing for its own sake.
Against the dwarven doom guards, I soften them up with a couple hits from a wand of lightning, and then fight in melee. That still hurts, and it's time for nymph healing. One of the containers in the room those doom guards were guarding resists Imoen's 85-point lockpicking, so she drinks a potion of perception. From there, it's routine, and we head down to the elemental level.
We tackle the greater wyverns first. With this party's sheer power, one hero (Hack) is enough to tank all three of them in sequence. We then kill off the heroes one by one, claiming their loot - including a set of full plate for Khalid.
The garden area comes next. As we're out of spells, we start using our enormous stash of healing potions instead. The ashikuruku are annoying as always, but not any more so than their vanilla versions; they're now smart enough not to target mages with Stoneskin up, which means that they go after heavily armored party members instead and often miss.
That leaves the central platforms, which Imoen clears with a Wand of Fire. I prefer having two wand users here, but this is the party I've got. She takes a hit from a dispelling arrow (removing her Stoneskin and perception potion), but is otherwise fine.
The ice room is handled with simple brute force. The slime room has us equipping fire arrows on Khalid and Imoen; the first slime splits anyway, but its children don't. The air room gets a Slow spell; the Air Aspect goes down quickly, and the stalkers follow. Since we saved the fire room for last, there's no explosion there; the party is instantly transported onward when the first phoenix guard dies.
In the "chess" game, we open with fireballs from everybody, killing the pawns. The knights rush through straight at Lupa, and she takes massive damage before drinking an invisibility potion to survive. The enemy king is killed with offscreen fireballs, and picking up the plate mail leaves us with basically full inventories. We'll stash some things down here, but no rest - we want to finish this. The first two paths are routine - the astral phase spider poisons Lupa, but she drinks a quick antidote - and soon it's time for the largest wing. Lupa uses a pair of Protection from Acid scrolls for immunity, and we head out. The many paralyzing foes here are less of a problem than they would be for many parties - our front line has both excellent AC and excellent death saves - but we still take our lumps.
We face it without buffs, instead summoning some monsters and attacking. Victory comes, but painfully so:
Jaheira speaks to us in pride when we exit the tower, but tries to deflect the credit. Don't sell yourself short there - you landed the killing blow, after all.
After selling piles of stuff and going well over 300K gold, we head north to Ulgoth's Beard. The initial cult ambush goes smoothly; a Stoneskin protects Imoen and an Insect Plague disrupts the crowd. Then, since it's been over two in-game days, we rest at the inn before continuing to their hideout. We buff with potions all around; strength 21 and heroism for the warriors, speed for the non-werewolves, invulnerability for Lupa. 20-25 damage at THAC0 -1, attacking three times per round, and AC -8? Not bad. Khalid also switches to melee mode for this. Remus casts True Sight, and we head in. That doesn't go so well; they dispel our many buffs, and the cult wizard casts Mantle for immunity to all of our weapons. I should have retreated then, but I didn't. Khalid gets petrified, and I reload.
The second time, I target the cult wizard before he even goes hostile, and he doesn't have the time to cast anything before dying. It's cheap, but he deserved it; there's really no way for a BG1 party to counter Mantle (improved by SCS) except retreating and waiting it out. The enforcer's dispel wipes out the potions on Lupa, but misses the rest of the party, and we clean up.
For the summoning chamber, we restore Lupa's buffs and add potions of mirrored eyes all around.
And then, once the guards are hunted down, we win. Jaheira gets the killing blow again.
(Apologies for the slight delay on this part; my computer froze while I was composing this post, and I had to rewrite it. Add on some failed uploads due to a poor internet connection, and this took far too long to post.)
Mendas is good to his word, and provides a ship to follow the charts we have obtained. Sadly, that ship sinks just as we reach our destination, and we wash ashore. We are greeted by a young girl, who shows no fear at the strange werewolves; all she can say is that we smell funny. Clearly, something is odd here.
Exploring the village, we pick up a few odd job quests, and the hints crystallize into an unspoken certainty; the people of this village are shapeshifters at well, though they have chosen to live in peace.
Then, it's off to the northern half of the island, where the wolfweres roam. Since we have the resources, Lupa drinks a potion of defense. The sirine queen and her minions are killed, netting us 56 arrows of biting; she calls us fools for not realizing that the man she killed was a monster, but it is merely a difference of opinion; we don't see werewolves as monsters.
We find the ship's mage Dradeel, aged and somewhat mad but not lycanthropic. He tells us the story of Balduran's final voyage; how new crew that were brought aboard infected the others with lycanthropy and the ship was scuttled here. He provides a charm to aid us in battle against the wolfweres, and a quest - to recover his spellbook.
With that, we enter the ship itself. There are mobs of wolves and wolfweres on each floor, a gauntlet of battle. For all that, it's a trap on the second floor that hits hardest, dropping Imoen to a third of her HP with a lightning bolt. She should have detected it, too - she drank a potion of perception and stood there for a round.
Karoug is the only truly dangerous enemy; our werewolves' claws can't hurt him, so we equip special weapons (Burning Earth for Khalid, Kondar for Lupa, Werebane dagger for Jaheira) and supplement with Flame Strike wands. That lets us recover the baby, and investigating the top floor brings us both Dradeel's spellbook and the logbook of Balduran we were hired to find.
Durlyle gets kind words, the cloak, and flowers. Maralee gets her child. Farthing gets her dolly. Evalt gets his brother's body. All that remains is to talk with Kaishas.
Jaheira ... reacts oddly.
We say that it sounds OK, but then the bigoted underling Tailas pipes up. He, and those like him, won't accept us. We weren't born werewolves, and that makes us impure and unworthy. Sigh. It looks like we'll have to fight our way out of this anyway.
Our suspicions were true - Mendas was the liar his false name suggested, and is in fact Selaad.
We make one last attempt at diplomacy:
The island of werewolves remains; we did not slaughter all of the villagers, only those who chose to stand in our way. Perhaps we might visit again someday - but for now, we must face the threat of Sarevok.
With that episode behind us, we return to Baldur's gate. The time that has passed has not cooled the hunt for us, and our faces appear on wanted posters all over the city. With Flaming Fist patrols everywhere, we have Rasaad scout ahead under stealth to avoid them. That is, at least, unitl we approach the Flaming Fist castle itself to rescue Duke Eltan. While Rasaad scouts ahead to find the way around one patrol, another comes up from behind the rest of the party and catches them.
Avoiding a fight, we are thrown in prison with no chance to defend ourselves. We are forced to accept the aid of the despicable child-murderer Neb to escape. Still, we continue to the same objective. A woman Tamoko approaches us outside the gates. We listen with compassion, and she explains more of Sarevok's past. We promise to attempt a peaceful resolution, but with the understanding that it is likely not possible.
Inside the castle, it is a party of mercenaries we face, capable of casting cleric spells and wielding swords. They snare Remus with a Hold Person spell - werewolf form does not make him immune to that effect - but only deal any damage with an Unholy Blight that hits Rasaad. Our party is protected from that spell by simply being mostly neutral. Upstairs, our slightly depleted party deals with the false healer Rashad, and we have the weakened Eltan.
Eltan is delivered to his friend the harbormaster, and we investigate the Iron Throne headquarters as Tamoko requested. Cythandria and her golem minions go down, and now all signs point to the Undercellar. We have a bit more trouble with guards than before; where once some guards were content to simply speak of their misgivings, now they are all hostile on sight. We avoid any fights, though, since the guards are just innocent dupes in Sarevok's scheme.
The Undercellar brings the fight with Krystin and Slythe, and we will unleash the power of level 5 druid spells here. True Sight eliminates Slythe's invisibility, while Insect Plague ignores Krystin's Protection from Magical Weapons and spell defenses to disrupt her. Still, it takes some time to wear down her Stoneskin, and she gets off a Chaos just after Slythe dies. Only Imoen and Remus, who stayed out of the fray, are not confused. A Dispel from Remus at least frees up Khalid, who starts hacking Krystin with a nonmagical sword. That does the job.
In the Ducal Palace, the battle is very quick. We prepare with two nymphs, hit the enemy with a Chaos, and send into the party. All of the doppelgangers are confused, so they don't cast their spells. That makes them easy prey, and neither duke is even harmed in the battle.
For our rush through the Thieves' Maze, our choice of potions is Str 22 and Heroism for the warriors, plus Invincibility for Lupa, Speed for Khalid, and Perception for Imoen. ALl but Imoen switch to melee weapons. The one-hour potions expire before we're entirely through, but the two-hour potions last all the way. Winski is saved, and we enter the undercity.
It's possible to take a path that skips all the battles here, but we won't with this party. Instead, we clear the area. First, we go invisible to sneak up on Rahvin's crew and take their exploding arrows out of play. It works well; all but the mage Shaldrissa (who used PfMW) go down easily with our warriors in their midst. I retreat for a few rounds, heal, and then return for her. Well, actually, she follows us and hits the party with a dispel taking out some of the potion effects, but then falls to simple attacks with her protection expired.
Then, I use a Protection from Undead scroll on Lupa, and she heads out to bash the many undead that inhabit the area. Fully buffed, she's at 3 APR, THAC0 -1, and 21-26 crushing damage while being ignored by the enemy. It's not remotely fair.
She runs into Tamoko along the way, and convinces her to leave without a fight.
On the brink of the final battle, we should think about what items we're importing to BG2. Armor... irrelevant. The only character who's going to want armor in the medium term is Jaheira, and she'll prefer a protection item over anything enchanted. Miscellaneous item... the Helm of Balduran is always nice, but only two of our planned BG2 party can even wear helmets before Use Any Item. The Claw of Kazgaroth will be competing for slot space with all the protection rings we'll want, but there are plenty of ring slots in a full party. A Remove Curse scroll is cast, and Lupa holds the claw.
All sorts of potions come out to buff the team for the final battle, and it's on to the fighting. Sarevok is invulnerable in SCS until his minions go down, so we distract him with summoned monsters while we attack the others. The enemies manage to dispel two of our team, but the rest are still at full strength as we defeat the last of the minions and turn to Sarevok.
And now, to look at that final save for the postmortem. Wow, 188K experience per character? XP past the cap resets down to the cap periodically, but it looks like that was a long time in this run - likely before even the Thieves' Maze, based on a scan of the saves we have available. I think this is the highest XP total I've ever had entering BG2.
Total XP from kills, plus the "strongest" killed by each character:
Lupa: 361929, Angelo (9800)
Jaheira: 332542, Demon Knight (15000)
Remus: 234323, Greater Basilisk (7000)
Rasaad: 143441, Ungh (8000)
Khalid: 126829, Queen (5000)
Imoen: 57397, Wolf of Ulcaster (4000)
Jaheira was the most powerful combatant most of the time, but Lupa caught up when fully buffed and also had some excursions killing things without her.
Final XP: Lupa 188849, Remus 188848, Jaheira 188823, Imoen 188729, Khalid 188789, Rasaad 188817. Rasaad invested his skill points entirely in stealth; I'll make a light continuity edit to reflect that when I pick him up. Jaheira will also get continuity edits; she'll be given that XP total when I recruit her and half the difference between her starting HP and the maximum possible. Also, her proficiencies will be swapped to dagger and two-handed style instead of scimitar and shield style. I took advantage of a bug to give her dagger specialization in BG1, but I won't do that for BG2. She'll start with one dot, and pick up her second at fighter level 9. Imoen will get her starting XP, but no other edits. Well, that number will be her total XP including the thief part.
In BG1, the power of the party mostly comes from that level 7 werewolf form being so strong on the attack. Permanent haste with a strong melee attack is just something normal foes at that level can't handle, and only spellcasters with disabling effects pose much of a threat. Naturally, the SCS AI uses a lot of those disabling effects against you, and so there are plenty of tough battles that you have to prepare for rather than simply rushing in.
In BG2, it's the defensive power that stands out. The level 13 greater werewolf form only hits a little harder than the level 7 werewolf form, but it has much better resistances and rapid regeneration. Could I hit harder with conventional melee builds? Yes. Rasaad would hit harder and more often with fists and the belt of hill giant strength. Jaheira would hit harder and more often dual-wielding Blackblood and Belm with the belt of hill giant strength. But to do that, they would be sacrificing AC, resistances, and regeneration - and, on top of that, I only have one strength belt so far.
Anyway, on to the game.
Lupa wakes in a cage. A strange mage taunts her with talk of "experiments" before being called away to do battle against intruders. Then Imoen shows up - she was imprisoned here as well, and has somehow escaped. There are other cages nearby - one holds our good friend Jaheira, and another holds the ranger Minsc we briefly traveled with. The key to Jaheira's cage is on a nearby cage, and Lupa frees her immediately.
Edits are made, as discussed in the last update. Imoen gets the "Base Class" kit as well, although it's not going to matter because this version of her won't scribe anything. Minsc doesn't get any of that; with him, we allow the catch-up trigger to fire and give him 125K XP. After leveling, Jaheira is at 55+24 HP, out of 71+24 possible.
Another cage nearby contains a mutilated corpse. It is all that remains of Remus, clearly far beyond any hope of resurrection. Without his guidance, Jaheira no longer feels secure in her werewolf form; she will have to fall back on her old wolf and bear forms until we can find someone new to aid us.
The last wing of this level leads through a library to a workshop populated by duergar. As I usually do, I open this fight with a lightning bolt from Imoen; this time, it bounces oddly and only hits two duergar, not killing either. A poor showing. The enchanted chain mail their leader drops looks nice, but it's not actually an improvement over the splint mail Jaheira and Minsc are wearing right now.
The pack of mephits in the air room are distracted by Imoen's Summon Monster spell, and do relatively little damage to the party. Then we aid a djinn by finding his flask, and are rewarded with Sarevok's sword. At least Minsc can use it. The cambion is killed, at the cost of considerable damage to Jaheira. That uses up the last of our non-superior healing potions, and it's on to the next level.
Yoshimo joins, and we head straight for the portals in the mephit room ahead. Imoen uses her minor globe here, not that she's targeted much. On a sadder note, we find Khalid's corpse, mutilated beyond hope of resurrection.
We next find a vampire fighting a group of the invaders, and kill her with the aid of Imoen's haste spell. The invaders turn on us, and fall as well. Wait, what was that? The mage charmed herself?
The haste lasts long enough to slaughter another group of goblins and duergar. Then it's on to the next room, where we meet an imprisoned doppelganger. We free it, but tell it we don't trust it, and it attacks us. After that, the last passage leads to a group of assassins who are actually willing to talk - but not to resolve anything peacefully. Our party all equip melee weapons to weaken their backstabs, and they actually miss when they try.
Before leaving the area, we rearrange spell memorization and rest. Imoen identifies most of the wands, and then we head up.
The reward for leaving the dungeon brings Lupa to level 9 and Jaheira to level 8/10... wait, oops, forgot to enable max HP on level-up. The second time, we do that and Lupa becomes a grandmaster in the quarterstaff. We buy a scroll case from Galoomp and sell our surplus magic items, then leave the promenade. Minsc stops to give some directions to a Calishite on the way out.
That brings us to the slums. After talking to Gaelan Bayle and buying a gem bag from Arledrian, we head to the Copper Coronet. Lupa takes down Amalas with the aid of a DUHM and a Barkskin. Then it's off to the back rooms, carefully avoiding Nalia. She chases us a bit, but we can duck outside to get away. We view the pit fight, and then go to deal with the slavers.
I try the sewers... and the first pack of hobgoblins takes out all three front-liners with a Hold Person. OK, upstairs first. The slaver mages charm both Lupa and Minsc, but this is merely Charm Person rather than Dire Charm. They just stand around doing nothing until the spell wears off, while Jaheira and Yoshimo take down the enemy. The Beastmaster's animals are lured away one by one, and then we face the man himself. He can't be lured out, so we charge in to attack him. Jaheira gets the plate mail, Yoshimo gets the Tuigan Bow, and Lupa holds the Wolfskin Bag (not that I noticed it was a bag for a while).
Rather than take the quest rewards right away, we'll try to clear out the sewers as well and grab just about everything but the quest experience. Thinking about it... OK, the hobgoblin pack gets a nymph. After a Mass Cure and a Barkskin on Lupa, we engage. Jaheira runs ahead and gets held, but only after killing an archer and making the rest scatter. With a Hold Monster taking out the biggest threat, the follow-up forces kill the hobgoblins and Jaheira only drops to about half health. She gets a healing potion and a scroll of Cure Serious Wounds. The kobolds are murdered, and then it's the second pack of hobgoblins. They're behind a corner, which is actually better for this melee-focused party. We get very close before seeing each other, and they die with no nymph needed. Jaheira uses the cure scroll to heal again. Finally, the jellies and otyugh are taken down, and we head back up into the Copper Coronet.
Up next, we visit the government district and recruit Jan. It's time for a shoplifting spree. He gets a free levelup right away, and invests it all in Pick Pockets. We also pick up the quests from Delon and Tolgerias while we're here, and buy two potions of genius. Jan casts his Stoneskin for the day in the temple, and we travel to the docks to talk to the Shadow Thieves and pick up a second free potion of master thievery. Then, it's a trip to the promenade, to get serious about thieving. We are waylaid by a group of slavers on the way:
Oh, and we finally let Nalia catch up with us. Rather than recruit her right away, we send her on to her keep and promise to meet her there soon. In retrospect, it would have made sense to do that earlier.
The first member we pick up is a temporary one - "Hexxat". She gets the Blade of Roses and the Tuigan Bow for now, while Jan gets the Army Scythe. Jaheira is in the docks, and gets bumped to 1 million XP immediately when we bring her back in. She reaches level 10/12 and takes dagger specialization. We travel to Trademeet, and encounter trouble on the way:
Upon arriving in Trademeet, we are greeted by hostile animals, and kill them. Then it's a philosophical argument. When one philosopher sets a thug on the other, we intervene - but neither party appreciated that.
Resting outside brings a dream of a strangely distorted Candlekeep - and, eventually, Irenicus. That man haunts even our dreams. Also, that refreshes the token abilities, and we have two greater werewolf tokens. The third of or werewolf party members has to settle for being an ordinary werewolf for now.
And now, we head to the Athkatla graveyard. "Hexxat" wants to leave to go to Dragomir's tomb, but we convince her to stay with us and go to Dragomir's tomb instead. She's ... kind of dim.
Inside - well, going up to a million XP has upgraded some of the random spectral undead to Devil Shades. For those who aren't familiar with them, Devil Shades are a ToB enemy, usually first encountered in Watcher's Keep or Saradush. They're permanently hasted, with excellent AC and THAC0, and drain levels on hit. They require +2 weapons to hit. Unlike the usual SoA level drainers, I don't think their level drain has a save to avoid it. On top of that, when they die, they spawn a pair of Shadow Fiends. Needless to say, these are serious overkill for an early-game party. And, of course, we have no source of negative plane protection and our druids can't cast Lesser Restoration. At least we've already shoplifted a bunch of restoration scrolls.
Jaheira loses two levels to the first Devil Shade, Cernd loses one to Burich, and then Jaheira loses another two to the second devil shade that spawned after using the rod. Well, time to use a scroll of restoration on Jaheira; level drain on a multiclass character hits both of their classes. Fortunately, she's fighting as a greater werewolf and regenerates the lost HP rapidly.
Dragomir is completely unable to do anything that works as our four melee attackers shred him; a Domination that fails against elven resistance and some attacks that miss. "Hexxat" uses a second restoration scroll on Cernd, and the party is at full effectiveness except for one exhausted thief.
Then the real Hexxat shows up, and kills Clara. We object, but she brushes that off.
On the way back to the Copper Coronet, we are waylaid by bandits. They get a Chaos on us, confusing Lupa and Jaheira - but the two mostly attack the enemy, and injuries are minimal by the time we're done.
On arrival, Hexxat hands us the bag of holding "Dragomir's Respite" and we dismiss her from the party.
We're in uncharted territory now. Throughout BG1, this was my second SCS run. In BG2, this has overtaken the other to become my first. I can also say that gaining access to the greater werewolf tokens is another leap in power for this party. With that regeneration, I don't need healing spells nearly as much as I did before - which leaves the question of what I'm going to do with all those spell slots. The answer ... mostly not use them. There's just not a lot of good stuff in the low-level druid slots, and I tend to leave a lot of spell slots unused anyway in a typical adventuring day.
Our next stop is the docks, to hand over Renfeld. The rest of the quest at the Harper Hold can wait; instead, we'll deal with Baron Ployer and then head over to de'Arnise Keep. On the way, a banter between Rasaad and Jaheira - wait, is that SoD content being referenced? I don't even have SoD.
While we're at it, Jan shoplifts the Glasses of Identification. Facing the Baron and his hired mages, we go with the trusty combo of True Sight and Insect Plague:
I trigger the Rumar/Tiana/Priss scene, just for the fun of it. Tiana wins the fight this time. We rest again, and another dream comes - Irenicus taunting us with promises of power. After the rest, Cernd creates the third greater werewolf token and our current werewolves are at full power.
And... I'm not paying attention on a random bandit ambush, and a reload is needed. One mage gets a PfMW up, and then a Chaos hits the party confusing Lupa, and Jan goes down to a pair of backstabs (because I didn't want to cast Stoneskin until arriving at the keep). That needed spells, particularly from our druids.
The second time, Jan only takes one backstab (frontstab) before switching weapons to reduce his vulnerability. We also get off a True Sight/Insect Plague combo, neutralizing all of the enemy except one mage. The Chaos confuses our party except for Cernd and Rasaad, who hunt down the enemy.
Then, it's another ambush, by slavers and orogs.
Upon arriving at the keep, we have Nalia join our party. A second archer to execute trolls will be a welcome addition, and her spells are nice too. Our first encounter is against a pack of trolls led by a spellcasting spirit troll - ah, that's what "improved" trolls are. Our werewolves, at least, can handle that in melee easily. Also, as clerics, the spirit trolls have their spells disrupted easily by just hitting them.
A second spirit troll drops Jaheira with a Greater Command, and we have to scramble to protect her:
The next pack of trolls doesn't have spirit troll support, so they die even faster. Rasaad takes the opportunity to talk to Lupa, with a rather odd line:
The troll group in the main hall causes some issues; due to where the spawn trigger is, they get off a spell and put Jan to sleep with a Greater Command. Nalia is much worse at executing trolls with her normal bow and fire arrows than Jan with the Tuigan bow and acid arrows, so some of them wake up fully restored and have to be put down again.
The second floor is straightforward, until we meet the yuan-ti mage. Shield, Stoneskin, protection from normal missiles - and then it casts Protection from Magical Weapons, just a bit faster than the Sun Soulray disruption I tried. Lupa and Jaheira switch to nonmagical weapons, then duck onto the roof when that isn't fast enough to disrupt its next spell (Chain Lightning). A nymph heals some of the damage, and we deal with the rooftop monsters. Then it's back down, and the mage doesn't survive even a round without its protection spell up.
The key is ours. We head up the tower, then through the secret doors into the inner dining room. Glaicus gets a Remove Magic, and the second flail head is ours.
Then it's through to the treasure room. We claim the final flail head, assemble the flail and make dog stew, then head back to fight the golems. The Iron Golem comes first, and we fight it in melee; Cernd and Jaheira get poisoned by the cloud, but it can't outpace their regeneration.
The Clay Golem is next. All four of our melee can switch to magical blunt weapons (flail, staff +1, Staff of the High Forest, fists), so it goes down quickly. The Stone and Flesh golems get our normal weapons, and it's done. No damage taken, except for one hit and some poison from the Iron Golem.
The Shield Amulet is claimed and equipped by Lupa. That lasts until we have amulets with static benefits for everyone, at which point we realize that we never used the Shield Amulet at all.
Rasaad is our best stealthy character (83/78), so he delivers the dog stew to the feeding area. Jaheira equips the Orc Leather; it's generally better than her old +1 plate mail, when the AC is overriden by being a werewolf.
For the battle against Tor'Gal and his bunch, we prepare. Two fire elementals, two nymphs, mirror images for both mages, Barkskin on Lupa, Greater Sun for Rasaad, and True Sight. Rasaad will add Flaming Fists once the battle is joined.
The party goes after the umber hulks with no subtlety. Jaheira is confused, but she targets summons rather than party members.
The experience reward for completing the quest brings Rasaad to level 13. He now has a full 3 APR as a werewolf, the same as the pure druid Cernd. The quest as a whole came with quite a bit more XP than in the base game, because of those spirit trolls. Lupa accepts responsibility for the keep and earns her stronghold, on the morning of day 5.
Our next stop is the temple district of Athkatla, to lay the groundwork for our final party member. The gold in our pockets attracts attention - first a mysterious figure named Valen, then a return of Brus. Apparently, the deal we had earlier is subject to change. We pick up some potions of healing and mind focusing at the temple of Talos, along with a second girdle of bluntness. The High Watcher at the temple of Helm calls on us to deal with a cult, and we head into the sewers.
The party there loses to Insect Plague and Chaos, except for the mage Gaius who puts up a Mantle. SCS modifies that to be immunity to weapons up to +3, so he's nearly untouchable for four rounds. Fortunately, the only offensive action he takes in that time is an attempt at Flesh to Stone on Jaheira. She saves, part of her 70% chance at beating that effect. Then the Mantle expires, and he is torn apart by werewolves.
Among the spoils of that battle, the immediately usable one is the set of full plate, for Jaheira. She now has her armor for the rest of the game; full plate mods versus the various damage types are the best, and enchanted armor won't boost her AC because the werewolf form's -4 is better. As such, wearing nonmagical full plate with a protection item is the clear best option, just as it was in BG1.
Then it's on to the central area, where the kobold shaman lands a Hold Person on Jaheira. Can the rest of the party catch up fast enough to save her? They can; the rakshasa isn't interested in attacking her physically. It casts a Cloudkill eventually, which Jaheira has no choice but to stand in - but 1d10 poison damage per round can't beat that greater werewolf regeneration.
Once that battle ends, the bag of holding is overflowing and Cernd is fatigued. Time to sell some junk and rest. Potions are drunk, spells are scribed, and we rest. This includes the Breach scroll we found in the keep, so now we have options against Mantle and similar defensive spells.
A third dream comes, with Irenicus promising great power for some unknown cost. It is dark when we wake, and we take the opportunity to meet with the mysterious contact in the graveyard. She offers an alternative to our deal with the Shadow Thieves, but we turn her down; she's extremely creepy and obviously untrustworthy. While we're there, we help a man who was buried alive, and he points us to his kidnappers in the bridge district.
Then, it's back to the sewers. We go into the hidden lair, deal with some mephits, and then enter a room of umber hulks and a minotaur. Jaheira gets confused, runs off, and starts attacking Haer'Dalis... nope, reloaded. We want him to join the party, not to be hostile or dead.
On the second try, two werewolves get confused, but they don't run off to attack anyone. That's it for now. We head back down, clear out some minor encounters and Roger's sea troll, and then head to the bridge district.
Troubles abound; there's a murderer active in the area, and we face an attack by muggers. Then a vampire attacks a group of Shadow Thieves; we try to kill it, but it turns into a bat and flees first. A hostile party is lurking inside a building; we kill two, wait out their mage's Mantle, and return. On returning, he goes invisible with Shadow Door, launches an offensive sequencer (triple Flame Arrow) that doesn't break invisibility, casts another defensive spell that doesn't break invisibility, and then finally becomes visible by summoning a nishruu. A casting of Chaos catches four of the party, but he finally goes down. And, really, I thought rogue Detect Illusion worked better than that. I guess it was the other guy keeping him in combat mode so he didn't dispel the illusion.
The loot is sparse, but it includes a second scroll of Breach, which we save for now.
Our investigation into the murder leads us to the tannery. After informing the guard Aegisfield, we go ourselves - and find the guard dead. The Human Flesh is claimed, and we chase after Rejiek. At this level, it's ghasts and a Rune Assassin we face; the assassin is neutralized with a Detect Invisibility, and the ghasts are trivial. And then... a second invisible assassin and a Bone Golem appear. Why couldn't they have just been there the whole time, so we could deal with both assassins' invisibility at the same time? The second assassin gets a 23-point backstab on Lupa to drop her below half health, so she gets a Heal spell post-battle.
We pay a visit to the playhouse and hear of Haer'Dalis' plight, then search out the kidnappers. Say, what was that about a ransom...
Our walk to the slums is interrupted by Neera, who points us to the Hidden Refuge before leaving on her own. Then we continue to the slums and have Jan pickpocket Welther. Silver Pantaloons acquired, and then we release Elgea. It's less experience than just letting her go right away, but also no reputation loss from accepting the ransom deal.
One perk of note from recent encounters: greater werewolves have such fantastic AC that backstabbers miss a lot. The Rune Assassins are 12/12 Fighter/Assassins, and one of them missed on a 14 attacking from invisibility.
We view the very short fight between Carbos and Shank; a 16-point crit kills Shank in one hit. Junk sold, empty buildings looted, inspector's body turned in, Viconia rescued. We're counting down those last little bits of experience before 1.25 million.
The slaver stockade follows, entering from the sewers. Captain Haegan and crew take down Nalia's stoneskin and nearly kill her, but she has a second prepared. The second slaver group has mage support, so we summon a nymph. A Confusion, a Horror, and a Slow coupled with melee attacks - they're toast. The trolls are killed, the children are freed, and we still need a little more. Off to the graveyard again; Uncle Lester is put down, Risa gets a caretaker, Wellyn's parents are spoken to, and the undead occupants of a tomb are put down. Oddly enough, one of the skeleton warriors managed to drop its gear into a locked casket.
Now it's time to go rescue Haer'Dalis. We choose a negotiated solution, helping Mekrath out by recovering his mirror. Returning to Mekrath grants the last bit of experience needed, and Lupa reaches level 13. Her final character sheet as a pure kensai:
Dual-classing to thief, she takes long sword and single-weapon style to start, and equips the Blade of Roses. The initial skill points go to stealth. Then, we pick up Haer'Dalis, the gem, and the contents of Mekrath's formerly locked container. We have a Rod of Resurrection; since the only way our druids can raise anyone before HLAs is Jaheira's nerfed version of Raise Dead, that's a crucial safety net.
Haer'Dalis gets long sword proficiency, so he'll get a second point from his special trigger (simulating Doom Guard perks). Having our newest party member scribe scrolls brings four levels to Lupa right away - more stealth, and katana proficiency.
It's been a long day of running around. Jan's Stoneskin times out, and he doesn't have a second memorized. We'll have to be careful with any further battles today. On the other hand, there's a lot of easy experience to take. First, back to the Copper Coronet. Hendak's reward brings Lupa to thief level 7, for 100/100 stealth and a start on Set Traps. Solving Lilarcor's riddle is good for level 8 on Lupa and 16 for Haer'Dalis; proficiencies in scimitar and two-handed sword respectively. Then we head up and pay Gaelan Bayle. It's another 45K experience to the whole party, so Lupa reaches thief level 9, Jan reaches thief level 13, and Rasaad reaches monk level 14. The skill points went to trap-setting for Lupa, pickpocketing for Jan, and stealth for Rasaad. The latter also gets his magic resistance; coupled with the werewolf form, that's 82 MR and more to come.
Then it's the docks. Meeting with Aran Linvail, we get the Amulet of Power and the +2 ring of protection. Jaheira equips the amulet and Lupa equips the ring; we have protection items for five party members now. Prebek, Sanasha, and their creations go down easily with no need for spells on our side; the only damage is 9 points to Jan from an acid arrow. Exploring the Harper Hold and returning the bird to Xzar brings Lupa to thief level 10; Set Traps is maxed, and Find/Disarm Traps is next.
Jaheira is called away immediately by Meronia, one of the Harpers we met. The party brings this day to an end by resting at the Sea's Bounty.
Jaheira returns, appearing literally on top of Lupa. That was awkward.
We are wanted at the Harper hold, and it degenerates into a fight. Fortunately, Jaheira is more loyal to the party than to her old organization. We open with Greater Malison, Confusion, True Sight, and Insect Plague:
Next, it's time to meet Mook. We lay a pair of traps before speaking to he. Then, we make the mistake of getting Lupa into melee range of Lassal after Haer'Dalis is dominated - two levels drained. Let's try that again. Of note, the two druids are wearing helmets of charm protection and Rasaad is immune from his class. There's no chance of any werewolf getting dominated here.
Of course, the game just has to rearrange the party into a terrible formation with the melee far away from the enemy and Lupa visible... This time, it's Lupa that gets dominated. Jan runs away, leaving her to uselessly swing at werewolves. The werewolves deal a ton of damage to Lassal, driving him into bat form and then gaseous form - and they surround that cloud so it can't run away:
After reporting to Aran, the theft from the temple of Talos is next. Some muggers attack us on the way out of the docks, but we let them waste their attacks on werewolves to little effect.
The necklace is turned in, and it's on to Edwin's missions. First, Rayic Gethras. The mephits and golems go down quickly, and we arrange to start the fight with him surrounded. He opens with a Mantle, we respond with a Breach. It's over in moments after that. The wand of fire and +2 staff are now ours. Then, the documents - Marcus just can't say no to a pretty face. Finally, Mae'var demands the death of a "traitor". We convince him to hand over his dagger and flee instead. Lupa is now just barely short of level 11.
We choose this moment for some more shoplifting. First, we clean out Gorch of pretty much everything valuable. Then Jayes, including his scroll case. Wands are sold and stolen back, although we don't bother taking back the magic missile wands.
Dealing with the Shadow Thief defectors gets Lupa to level 11, and it's back to report to Aran again. On the way, we are ambushed by random bandits, and we open with Detect Illusion/Bard Song from our two arcanists... so, naturally, the enemy mage's Horror panics Haer'Dalis before the song can kick in.
Next up, it's a return to the bridge district for Haer'Dalis' loyalty quest. On the way, the random bandits strike again - and instead of fighting, they run.
At the playhouse, returning the gem is enough for Cernd to reach level 14. The monsters the conduit spawns are no trouble - but then the bounty hunters appear, and kidnap the troupe before our eyes. What choice do we have? We follow.
Expecting a fight, we buff before entering the portal, with True Sight active and an Insect Plague ready to cast. It works, although we do have to use a Breach on the mage that put up a Mantle. Lupa gets her first killing backstab:
Now, against the Warden... well, just look at that list of defenses. Even if we still had a Breach memorized, we couldn't crack that because of the Abjuration immunity. Our only recourse is to wait for the PfMW to wear off.
I don't have anything since the autosave entering the prison, and it takes a while to get back to that point. Now, the plan is to block the Warden with summons while we exhaust its combat protections. Wand of Cloudkill shots deal with the minotaur and umber hulk riff-raff. Then Rasaad heads forward under stealth and triggers the second PfMW. Repeat for the third. Then it's a Minor Globe of Invulnerability - it must be out. Send in the werewolves... wait, no, it had a Mantle too. We wait that out to some extent by retreating, but in the end pretty much have to engage. Victory comes eventually, at Rasaad's claws:
The reward for completing the quest brings levels: Rasaad to level 15, and Haer'Dalis to level 17. Haer'Dalis equips the Melodic Chain, for now anyway. Eventually, he'll wear mage robes and a protection item.
Our next target is the druid grove; Cernd's loyalty quest. Since it's night in Athkatla, we head out and trigger a vampire encounter. Sansuki is saved:
Cernd has a Negative Plane Protection memorized, and he used it on himself. Jaheira wears the Amulet of Power. Rasaad is less likely to be targeted by attacks, since he starts the fight stealthed. For all of that, we mostly just tanked them with AC; ten vampire attacks, with rolls as high as 18, all missed.
Then, we meet Habib. Somehow, he can hit Jaheira twice in a row with thrown scimitars, dispite her -13 AC vs. missile.
Upon arriving in the druid grove, Cernd insists that we go to the druid grove. Uh, about that...
I try a Wand of Cloudkill shot at the trolls by the entrance to the mound, but it doesn't kill anything. The 6-HD basic trolls should be vulnerable to dying on a failed save, but the mod's changes have apparently removed that. Instead, it just deals poison damage that can't keep up with their regeneration. Deprived of that option, we just fight them, and win easily.
For the trolls inside the mound, we duck inside, then come back out. They follow, and there's a big battle at the entrance. After that's cleaned up, we go in and loot the place. Only a spectral troll and a spirit troll remained inside.
After getting clear of the trolls, the next fight is against a Greater Earth Elemental - that's new. Now, despite the name, it's not too scary; just 10 HD and 19 Str.
The fight after that has some scripting issues. The first part, against the trolls, runs fine. Then our allies turn hostile, and it gets weird. You see, they summoned some creatures during the first stage - and now, those creatures are on our party's side, against them. They're even controllable, as if we summoned them.
With two enemy spellcasters, I have Jan launch a fireball to disrupt them. It works beautifully, killing the mages and one fighter outright and severely wounding the others, while only causing trivial damage to my party.
While we're on the topic of fights with bad scripting, some issues with another fight around Trademeet that I avoided in this run. In my other (on hiatus) run, I ran around Trademeet triggering all the animal fights. For the one at the northeast gate, there's a militia wizard (level 8 mage, invoker in my install) and two militia soldiers (level 2/2 fighter/?, innocent). When you approach, several hostile animals approach and attck the militia. So far, so good.
The problem comes when the wizard goes on the offensive, with a lightning bolt - a natural choice for an invoker of that level. The bolt kills both the animal it was aimed at and the soldier it was fighting.
Then, apparently because an innocent just died, the wizard and the remaining soldier both become hostile to the party. Hey, don't blame me for your mistakes!
Killing them, of course, results in a large reputation drop because of that innocent.
The two ways around this I found - either activate the fight, then retreat until the wizard can kill both fighters, or don't activate the fight at all. I went with the latter in this werewolf run.
The next fight is against Kyland Lind and a bunch of other druids. They get a pre-summoned nymph and fire elemental, with a Malison/Confusion/Insect Plague combination to break them. Kyland attempts to surrender, but too much damage has already been done - and even post surrender, one of the other druids hits Jan with an Insect Plague.
Running around everywhere, our forces reach the bridge, which is now full of spore colonies. That's a long slog, as we can't stop them from summoning lots of myconids and none of our party are fully immune to confusion. Our werewolves fight through on sheer endurance, and we pick up Belm. A decent primary weapon for our protagonist, at least until she gets her fighter abilities back.
At Adratha's cottage - huh, I've never been this way without talking to the djinni first. "Adratha" actually sells things this way. We buy the four-charge wand of frost for later use, and don't bother with any of the potions.
Next, it's shambling mounds, and - yowch, that was a 50-point crit on Rasaad. A monk in front is always at risk. Just before the end of the area, fatigue catches up to Cernd and Rasaad. We press on - Cernd should be able to beat Faldorn even if he's a little tired.
In the duel, Cernd is stripped of equipment, including his greater werewolf token. No problem - he just makes a new one, equips it, and attacks. Faldorn summons a nymph - dead to a crit before it can do anything. It takes a while to wear down her Iron Skins; she summons another nymph to die, and then casts a Creeping Doom. That panics Cernd a round later, giving her an opening to cast another spell: Dolorous Decay. He saves, then shuffles weapons to clear the slow effect. But then, that's the end. No more spells for Faldorn, and Cernd wins. He hands over control of the grove, and stays with the party.
We rest in the wild, then head back to Trademeet. Arriving at night, we take the opportunity to pick up another gem bag from Kich. We report success to Lord Logan, pickpocket the efreeti bottle, talk to the djinni, and return to the druid grove.
Fighting the rakshasa - uh, why are they bothering with Protection from Normal Missiles in their buff routines? They're already immune naturally. Anyway, first attempt failed; three werewolves just attacking didn't work so well, inside an Ice Storm + Cloudkill with a magical sword attacking. I'll add fire elementals, traps, and a True Sight for the second try. Ihtafeer casts PFMW and Spell Shield, so we break that with a Haer'Dalis dispel - wait, what? That dispelled the True Seeing as well? Take note - True Sight is dispellable with SCS.
It's a battle of endurance, but we pull it off, targeting the lesser rakshasa first and outlasting the cloudkill and magical sword. Ihtafeer does have some serious AC - as I calculate it, -14 versus slashing. At the party's current level, that's enough so that Rasaad hits on a 14, Jaheira hits on an 18, and Cernd hits on a 19+ crit.
Returning to Trademeet, reputation goes up to 14 and the reward boosts Lupa's thief level to 12. Short sword proficiency taken, and more points in Find Traps. The grateful populace make statues of us:
We want to do some shopping - well, shoplifting - but it's late evening and the merchants aren't available right now. We save Jenia first, with the aid of one of our restoration scrolls, then rest. The reputation reward is skipped for now.
In the morning, before the shopping can begin, we are accosted by Harpers. 14 rep is not enough to convince them to stand down, and a battle ensues:
Rasaad gets the Cloak of Displacement, Cernd gets the Belt of Inertial Barrier, and Jan gets Tansheron's bow. Jaheira also gets Blackblood as a backup weapon, for when slashing damage isn't enough.
After a trip to Watcher's Keep (exterior) to buy the potion case, we have new trouble. Haer'Dalis stands accused of murder. We must clear his name if we are to continue. Cernd also faces trouble - he left a woman pregnant the last time he was here, and the child must be seen to.
Investigating the Balthis estate brings a lead - the art dealer Quataris also coveted a bust of Sune that was stolen. The confrontation with him becomes violent when he summons bodyguards, but he is soon willing to sign a confession and hand over the bust.
That is enough to secure Haer'Dalis' release. We encounter the vampire Parisa and a dominated Shadow Thief Forgetting to stop and cast NPP.... Cernd is hit three times and drained nine levels, all the way down to level 5. Ouch.
In the morning, we head over to the Bridge District to deal with the real culprit in the murder. The mage confronts us as soon as we enter the Balthis estate... and he's capable of 9th level spells, with all the scariness that implies. The first time, we're not prepared for a fight at all, and we get wrecked. The second time, let's go with a True Sight/Insect Plague combo to start. He goes with Absolute Immunity rather than PfMW; OK, we've got plenty of Breach spells memorized, and our arcanists were out of range of the initial Fear/Stun trigger. The Breach lands right before the insects do, he gets struck at the same time disrupting his spell, and he's toast.
Up next, Cernd's child. We visit his old home, then his former servant's home, then the home of the man that claimed the child. Deril is another high-level mage. The first time around, he just has too many anti-Breach measures, and we fail. The second? Secret Word, Breach, Insect Plague, True Sight. His summoned swords stick around, but we just let them have a slap fight with the two remaining werewolves after Cernd leaves.
Being temporarily down a party member, we take the opportunity to investigate the circus tent. Monsters real and illusionary are dispatched, Aerie is rescued, and Kalah is killed. Aerie gets to scribe some things, and then we're done with her.
Returning to Athkatla, Jaheira is confronted by her old tutor Dermin, and chooses to renounce the Harpers in favor of staying with us. That can't have been an easy decision, but she has been with Lupa almost from the beginning of her journey, and forged a truly close bond. The party heads out to run some errands - first, the Helm temple wants the services of a famous sculptor. We talk to him and then the ore merchant, getting a lead on where to find illithium as well as a promise of an alloy to substitute. While we're at it, we upgrade our bronze horn to silver for a stronger summoned warrior.
Unger Hilldark tells us of his brother, trapped underground far to the east. We must find him first if we are to recover the true illithium. We have rested, so we check on the ore merchant - not back yet. Then we pay a visit to the Den of the Seven Vales, and the mercenary party upstairs. We summon a nymph in advance and talk to them; they're looking for a fight.
Lupa misses her backstab attempt, and, wow, Smaeluv hits hard. With the aid of a crit, Rasaad goes down. The combination of a berserking sword and barbarian rage is brutal.
(I thought I had a picture for this, but it's not there. Oops.)
There's a temple right there, so we raise Rasaad for 1400 gold. With his regeneration, no further healing is needed.
While we're waiting for Jerlia to return, we head over the Radiant Heart and agree to deal with some fallen paladins for them. This leads to a vampire encounter; three paladins, Cernd uses NPP, and we don't take any lasting damage or level drain. Rasaad levels up to 16, taking club proficiency and raising his stealth skills to 100 each.
We are forced to battle the fallen paladins, and that conflict brings Haer'Dalis to level 18. The quest reward brings our reputation to 15, and the gloves of healing go in the bag.
Now seems like a good time to face the guarded compound in the temple district. Facing the summons on the ground floor, it appears our mods have removed the summoned fiend. As such, we have to fight them all ourselves, with no inter-summon conflict to aid us.
For the battle upstairs, we prepare with a full array of buffs, including True Sight and Find Traps active. Then it's an Insect Plague to start. And... nope. Jaheira gets stunned and killed, Lupa gets stunned and killed. Koshi is just incredibly dangerous in this fight. The second time, we don't run Jaheira out right at Koshi. Instead, we let him come to us, gang up, and kill him. The enemy mage Sion has Si: Abjuration up, so we hit him with a Greater Malison and a Chaos, and wait for his Improved Mantle to run out. The cleric Stalman gets repeatedly interrupted with damage, and never gets any spells off. Rasaad gets seriously hurt and has to drink a healing potion, but our team all live.
The loot... Lupa picks up Celestial Fury, until she gets her fighter abilities back. Jaheira gets the Helm of Defense, for 70% elemental resistances and better saves. Everything else, including the suits of +1 full plate, go into storage to be sold eventually.
The night goes on, and we do more things to pass the time. Following up on the search for Valygar, we are directed to his old friend Suna Seni, and then to the Umar Hills. We wait more until sunrise, but that's not enough for Jerlia. Our next step is clear: the Umar Hills.
We meet "Darcin Cole" there. and speak to him about the Human Flesh armor. It needs one more ingredient - the blood of a silver dragon. We buy a cheap beljuril, conduct some diplomacy between Madulf's group and the townsfolk, and deal with a mimic and a rogue golem before resting. Ilbratha is not useful in combat, but a little more defense never hurt.
Then we shoplift some swords and booze for the juvenile delinquents, and investigate Merella's cabin. That points us to the ruined temple nearby, and we go there. Upon entering the area, Jan is accosted by a relative. We promise to go back to Athkatla soon to help out with his family problems. A fellow werewolf Anath tells us of the threat here - a Shade Lord that has corrupted all, including the rest of her pack. We agree to join her against the creature.
Outside, it's all shadows and shade wolves. I usually rely on Turn Undead for this area, but brute force works too. Ooh, that was nice - a backstab crit for 118. Maximum rolls for both attack and damage:
At the fountain, the large mob of shadows taxes us. Lupa gets paralyzed, and takes 42 damage and 6 strength drain. Jaheira takes 2 strength drain, and Cernd takes 6. Anath falls to the shadowsm but her sacrifice is not in vain; we repair a mirror to shine light on the area and protect it from the shadows.
Down in the temple, we find many shadow creatures and a wall of solidified shadow blocking our path. The creatures are fought, and we recover a sun gem to dispel the wall. That leads to the foul-mouthed Gorje Hilldark; we should have that illithium soon.
Another group of undead awaits near the name puzzle. Lupa gets hit by a mummy's disease and needs a spell to cure that, but the fight is otherwise unremarkable. Soon, we come to the end, and send Jaheira back to answer the statue's riddles for the last piece of the key forward. She also picks up Mazzy for the final fight, and leaves Haer'Dalis behind for now.
Planning to buff, I glance at Lupa's abilities... something has gone seriously wrong.
Also, Mazzy has two instances of each of her abilities, for some reason.
Our buff routine ends when True Sight wakes the dragon. Wait, what? That spell has no effect on anything that's not already hostile. It really shouldn't break the wardstone effect here. We don't want to fight it no, so we go up to fight the Shade Lord.
It's a hectic fight, but we prevail. A Breach spell tears down some defenses, a Sun Soulray disrupts another spell, and the level drain all washes away when the light returns.
Back in Athkatla, we face another vampire encounter - this time, a large group of vampires against Arkanis Gath and some friends. We come to the Shadow Thieves' aid. Then, another minor encounter, presumably also added by UB. A tourist is being menaced by a shady character and an ogre. We deal with the attackers, but the tourist can't stop calling for help once per second, and it is with some difficulty that we slip out of sight.
Then, it's time for Jan's quest. Lots of running around and gnomish nonsense, only a little combat. It does include a more serious turn for Jan, and we promise to aid him with Lissa and Vaelag if the need arises.
After a rest, we talk to the Hilldarks. Their illithium was stolen, but at least we have a lead on the thief. Jerlia provides the alloy, which Sarles rejects - but the temple of Helm accepts the alloy instead, and rewards us with a Helm of the Noble for Cernd.
And now, it's time to stop procrastinating and face the vampires. We use a Protection from Undead scroll on Jaheira, so she can run around and kill the vampires without retaliation. They still run around a lot, and we take a few nasty hits; a cursed wound from a Clay Golem on Cernd, two levels drained on Rasaad. Our regeneration blunts that cursed wound's impact, but we'll still need to memorize a Remove Curse at the next rest to deal with it. Jaheira levels up to fighter 12 in the lower level, and takes spear proficiency.
Bodhi herself, improved by SCS... well, she's tough. The first time, I reload after taking several level-draining hits and losing a high-level spell I was trying. The second time, I reload after Rasaad's Sun Soulbeam interrupts the same spell. Note to self - that's a party-unfriendly AoE. Third time... Jaheira's PfU runs out, and she dies quickly. Fourth time... I'll just let this shot speak for itself:
We'll also take this opportunity to clear out the graveyard in general. Meeting Pai'Na, she claims to be a druid working to preserve spiders. All we see is a mad Lolth-worshipper sending spiders to attack innocents. She attacks us, and she dies.
There's someone named Stein constantly appearing and disappearing just outside one of the crypt doors; he seems to be misplaced and stuck in a wall. In order to talk to him and find out what was going on, I spawn another copy. All right, it turns out he was a graverobber. Emphasis on "was".
The bridge district is next, and the confrontation with Neb. That brings Rasaad's 17th level, and we also steal the cutpurse's scrolls while we're at it. We report our success to Aran Linvail, and forge the improved mace of disruption. That includes a rest, so we're ready to finish dealing with Mae'var. We prepare for the battle ahead by pickpocketing several thieves for their potions, and then send Jan home so Edwin can help.
The battle against Mae'var gets Haer'Dalis to level 19, and I note that the shadow armor no longer drops here. It makes sense that Mae'var isn't using it, since he's a mage as well as a thief, but that armor should still be somewhere, and as far as I can tell it isn't. Mae'var himself is a fairly simple fight; his chosen protection is PfMW, and thus Insect Plague wrecks him.
Rather than claim the quest reward immediately, we head over to the graveyard to retrieve Edwin's scroll. He does that, and then it's Hexxat's turn. Before we switch over, Edwin goes on a scribing spree, and that experience brings Lupa over the top to thief level 14. She is a fully realized dual class now, with absurdly powerful backstabs.
Walking outside brings Cabrina, and we're off to the Crypts of Durkon.
This leads to our first encounter with SCS mind flayers, and that leads to a couple reloads immediately. We don't have any Chaotic Commands prepared - druids don't have the fifth level slots to spare - so it's up to our store of invulnerability potions. Or maybe not; since these are just a few normal mind flayers, Rasaad can swap his +1 ring of protection for a +2, and reach a save vs. spell of 1 that way. He'll be the designated mind flayer hunter, with the option of drinking potions so he can take more than two hits. Of note: SCS mind flayers see through invisibility and can go invisible themselves. My old favorite backstabbing tactics won't work on them.
And then... two flayers teleport in while we're fighting the umber hulks, don't use their other abilities, and die easily. Only the alhoon remains, and he's already fighting the ghostly monks. We send in Rasaad, Keno is brainsucked to death in the battle, and the remaining monks are unwilling to hold up their end of the bargain. We are forced to kill them, and open the way ourselves.
The tomb guardians are the next major fight - so we summon some help, set some traps, and start out with a True Sight. The traps take out the mage Ming-hua Dai, and then Haer'Dalis casts a Slow on the two nearest foes.
Korgan gets some full plate, Frostreaver, and the Shield of Harmony, with hammer mastery from his levels. Cernd is temporarily dropped to make room. With a quick stop to buy the Staff of Rhynn, it's down to the tombs - which have already been looted. Pimlico's place is equally ransacked, and we find Korgan's erstwhile companions on the roof of the Copper Coronet. Korgan rages, Crazyface is backstabbed, and the rest of the enemy forces are simply killed. Crazyface did panic Lupa with an Aura of Fear, but Haer'Dalis cleared that up with his song.
We send Korgan off with his recovered book, and it's Dorn's turn next.
On recruiting Dorn, we lose 1 reputation, and Jaheira objects - but Rasaad doesn't. At least it's not a deal-breaker. The highest-level version of him comes with specialization in bastard swords; I would have picked halberds, but it's not like I'm going to use anything but swords and crossbows with him anyway. He gets Lilarcor, full plate, and a cloak of protection from our bag.
Crashing the wedding, we lie our way past the doorman and the bride's brother. Dorn may have a target, but we're not looking to kill indiscriminately here.
Jan says he's been to worse - like his cousin who married a horse. Lupa decides to sow some chaos:
Now it's a matter of waiting for the next quest to become available - and we have to keep Dorn in the party for it, or lose him permanently. Travel time helps with this, since it's an in-game timer of about a week.
We travel over to the keep and forgive the thieving guard, paying for his medicines from the keep's income this week. Then it's time for some pointless travel to many different places.
We do a few things of note. At a stop in the Umar Hills, we visit the mimic cave, and watch those fool kids flee from a diseased gibberling. A rest, and "Terminsel" shows up to tell us Jaheira has left. Jan takes the opportunity to pick his pockets, and scores some serious bling:
Rasaad's romance finally progresses; he's on some seriously slow timers. At the moment I write this, some quests into chapter 6, he's still not committed.
Another travel cycle or two, and Bolumir shows up at the keep. We let him set up shop.
16 hours of travel later, we finally have a target - the paladin Terpfen. We must talk to Guardian Telwyn to find where he has gone.
On entering the temple, Dorn shows his usual lack of tact and diplomacy:
Traveling back to Athkatla brings trouble - a Tyrite hit squad.
After the battle, we are visited by Azothet - a rival to Dorn's demonic patron, who has a tempting offer. Back in Athkatla, we sell our junk - 12 platemails alone bring 1440 gold - and rest. The Resurrection Gorge is next.
Summerheigh offers items for sale, but nothing we're interested in. Then we see the great tree, and our companions have plenty to say:
At the summoning circle, we summon some help for the fight ahead and then send in a nymph to trigger the summoning circle. Summoning Azothet... failed. I reload (back at the top), and try again... failed. And a third time... OK, I'll just spawn Azothet in. Will that work? [Edit note - see below for what went wrong, and a better fix]
The experience is enough for Rasaad to reach level 18, and Cernd wears the Visage. He'll make good use of the THAC0 boost and immunities.
With that done, we head back to Athkatla and pick up Hexxat in Dorn's place. Cabrina has a job for us right away, and this tomb is full of spiders. We collect the four complicating items and press on, killing the bloated spiders easily. The statue gauntlet are no trouble; they unstone at 1 HP and die immediately. It's lucrative, too, with many suits of full plate. The furious djinni deals some damage with its fireball, but a nymph erases most of that.
Then, the three magicians... they don't get SCS prebuffs. They have their own "tattoo" mechanics to partially compensate, but it's just not the same. One of them goes down to a backstab. We try a silence from Namarra, but the two remaining mages Vocalize. Then we get hit with a Greater Malison/Chaos combination and lose control of most of the party. We take the mages out, but can't stop Lupa from killing Haer'Dalis. Reloaded.
The second time around, we open with a Greater Malison/Confusion combination in addition to the backstab. That leaves only one functional, and we disrupt him with acid arrows.
The riddle statue up ahead - well, it's not too bright. We make a mistake the first time, but avoid any punishment. The second time, we answer the questions correctly, and the door onward is opened to the room of webs.
Raffiyah opens with a Silence, and silences herself. She caught Cernd too, but he wasn't planning on casting anything in this fight. A simple beatdown suffices from there. The quest's final reward leaves Haer'Dalis and Jan just short of their next levels, and we let Hexxat go. We're done with evil party members for SoA.
[Added in edit]
OK, that issue with Dorn's quest? It turns out it's because the OHD_PLOT global variable wasn't updating properly; it missed at least one step. That variable should be equal to 7 when you enter the summoning circle with the stones. Also, OHDAZOT1 is the intended version of Azothet, looking like a marilith instead of a cloaked humanoid.
It's time to retrieve Jaheira and crank our reputation up. As such, we head to the Harper Hold, where we find mercenaries looking for a fight. They are anough for Haer'Dalis to reach level 20; he takes halberd proficiency. That also gets him over 100 lore, and he identifies the +2 cloak of protection.
Another group of mercenaries accost us on the way out:
Then, the Rasaad romance finally ticks forward, with some kissing.
We return the Dawn Ring, and Jan is now a level 15 thief. Turning in Neb's head brings our reputation to 16, then we donate 2500 gold to the Waukeen temple as penance for what we did with Dorn. Reputation 17. On the way to the Umar Hills... orc ambush. We have a little trouble extricating our squishies, and then... Flesh to Stone, targeted on Jaheira. She fails both the save and magic resistance rolls, and we don't have any scrolls to unpetrify her right now. Reloaded, since I'm not going to allow a character to be permanently lost.
The second time, no ambush. We talk to the mayor and Madulf for reputation 18, a piece of leather armor we won't use, and a shield we won't use.
Then to Trademeet. Talking to Tiris' family brings reputation to 19, and then we visit the crypt so we can return the mantle to Logan. Rep 20 achieved. And... my computer crashes. Fortunately, there's an autosave at Logan's door, so no real progress is lost. It is a good marker to end the session.
Now, we can shop with maximum discount, and we finally take a look at the stock of some merchants we can't steal from. We head to the promenade, where Maheer upgrades our horn again. Then it's the Adventurer Mart. Rasaad gets the Sensate Amulet, Haer'Dalis gets the Girdle of Hill Giant Strength, and Jan gets the Robe of Vecna and the Mercykiller Ring. Then we pick up the Ring of Air Control and a second Rod of Resurrection. That basically exhuasts our current gold reserves, dropping them to just over 1000.
What about the Shield of Balduran? It's a shield. We don't use shields here. Besides, SCS beholders can counter it (after a bit), and we have a different plan for them.
We earn back a bit of gold by selling wands to Hes - and only stealing back two of them. There's plenty more we could get if we sold magic items or even suits of full plate, but I'm holding out for merchants who pay more. We sell some potions we don't have a use for, and buy more potions of genius and mind focusing in their place.
A note on our current equipment loadout: In his quest for the best saves, Rasaad has incidentally been stacking anti-missile equipment. He has the Claw of Kazgaroth, the Cloak of Displacement, and the Girdle of Piercing. Combined with his innate missile defense, that's a -17 modifier versus missiles. With his base AC of -13, that's -30 versus missiles; an enemy would have to have a THAC0 of -11 or better to hit him with any non-critical missile.
Some character quests come next. We attend Nalia's father's funeral, then pick up Minsc for a bit of unfinished business - Boo is missing! After some silliness, we track him down and are rewarded with a license to cast magic in Athkatla. Oh well, no Cowled Wizard hunting with this party. Also, Minsc gets his strength improved to 19.
And now, on the evening of day 34, the party is ready to head to Spellhold.
Vampires ambush us immediately after leaving the boat. They throw Domination spells at Jan and Haer'Dalis; Jan has a save of 2 and Haer'Dalis throws on Lilarcor for protection, so we should be good... nope. Jan fails his save, and immediately follows up with an arrow in Cernd's back disrupting his NPP spell. Then a backstab attempt misses because the vampire kept running, we fail more saves, a dominated Lupa kills Jaheira... let's just reload that.
The second time, Jan takes some level drain and I reload out of frustration at losing the backstab again. I just want one good hit her; is that too much to ask?
The third time's the charm. I get off the backstab, and even re-hide for a second. Also, everyone that doesn't have charm immunity starts the battle invisible, and nobody gets dominated.
Continuing in Brynnlaw, we dispose of some random hostile pirates, then meet a pickpocket boy and his beggar mother. We offer to find them a way out, by disposing of their cruel "boss" Chremy and paying for their passage.
In the tavern... you know, giving Sanik potions kind of breaks his script. He's supposed to die in one hit when the assassin shows up, but with SCS he instead drinks a potion when the party enters the room - and then the cutscene has him take multiple arrows from the assassin while everyone stands around and watches.
The bartender points us to Lady Galvena's Festhall; we need a medallion to enter, which we can get from Chremy. OK, he's dead now. We allow the courtesans to bring us in, and plot a revolution. The guards get sleeping potions, and then death. Galvena and her mage go down without any damage taken or spells used on our side - only a Remove Magic disrupting Jan's Stoneskin. The mage casted Mantle, but with the Staff of Rhynn we actually have a weapon that beats that. Claire is rescued, and takes us to captain Golin - hey, you look familiar:
We trade stories, and Golin learns of Remus - his survival of the attack as a child, his infection and mastery of the curse, and his recent untimely death at the hands of Irenicus. Golin agrees us to help us as best he can in our quest for revenge - which, right now, is only to help us gain entry into the asylum.
The Cowled Wizard Perth is the first target; he holds a key to the asylum wards. A strange reddish fog covers the island - is it an omen of some terrible thing to come?
A mad priest Greyhand confronts us, believeing us to be in league with Irenicus. Nothing we can say will dissuade him, and so he attacks. He does leave behind some intriguing boots - ones with a powerful defensive ability, but at a high cost.
Then we go to Desharik. We deceive him with the truth - that Lupa is the child of a god. Such delusions are a clear madness that must be cured.
The inmates in the asylum include some old acquaintances. Even Jan can't stand Tiax's megalomania:
(OOC note on the thing with Golin: I'm using a portrait pack that draws from a lot of the same sources as PPE - which means that sometimes my characters will share portraits with someone out in the world. In this case, I decided to run with it as an in-character relation.)
Imoen is here, but we have no place for her in the party. She sneaks out on our own, to meet us back in Athkatla.
There are four exits from the room we are in; we try the southwest first. This leads to a group of yuan-ti; one of their mages doesn't put up defenses fast enough and gets backstabbed, while the other mages put up PfMW. We wait that out and use an Insect Plague on the group. Their melee forces panic, and we can soon send in our own melee to clean them up.
Next, the northeast. The Clay Golem goes down to Lupa striking from stealth and retreating three times; it can't react fast enough to hit her back. We are rewarded with a bag of holding and some magic ammunition.
Then, the northwest. This is a larger area, where we are repeatedly tested by riddles. The rewards include an ioun stone for Rasaad (+1 AC) and a ring of regeneration so that our non-werewolves can heal faster. Low-level healing spells are basically obsolete now. A group of yuan-ti lie beyond the statues; their mage doesn't get a stoneskin up, and dies to a 204-point critical backstab.
A rakshasa rukh wastes its time trying to cast a divination spell, and dies to a backstab before it can finish. The mephits go down to werewolf claws, and we investigate the portal. Our three stones open it three times, for a greater werewolf, a pit fiend, and a genie. The first two die before they can attack, and the third gives us a useless suit of +3 plate mail.
That leaves the southeast path. We scout ahead and find umber hulks suddenly appearing. Rasaad fights them alone; with 94 MR and saves on a 1, he won't be confused. Well, it doesn't work out so well; three lucky crits drop him into the red, and our other two werewolves have to come up to support him. At least they don't try any more confusing gazes at that point.
The corridor beyond has mummies and ghasts, which fall to a combination of backstabs and brute force. The mummies' damage resistance is enough to survive a backstab, but only barely.
A tome summons monsters, and we position Lupa to backstab them as they appear. The last two, however, are outright immune - a mind flayer and a beholder. We lay some traps for the beholder, but it still gets off two rays - an antimagic ray on Jan (nothing to dispel) and a death ray on Lupa. Save vs. death: 1. It's a good thing she's wearing both the Periapt of Life Protection and a ring of protection; remove either, and she dies.
The kobolds are killed, claiming the crystal shard and stake. They may be buffed, but they're still not dangerous. Then it's random undead. Taking a peek... bone golems, greater mummies, and skeleton warriors. No random liches on this difficulty. Lupa solos the group striking from stealth, and only takes one retaliatory hit.
After we kill the vampire Dace, Rasaad teaches Lupa meditation - a tool to master the mind as well as the body. This will surely aid us in our ultimate goal of becoming a perfect werewolf.
The ordinary monsters here fall easily, with plenty of backstabs. Jan does have to get out his acid arrows for the trolls. Taking the trapped paintings is easy; Rasaad does it, ignoring the traps with his magic resistance.
We send Lupa forward to the confrontation with Bodhi alone. She transforms into the Slayer and drives them off, then just stands there until we regain control.
The horns are returned to the minotaur statue, and Haer'Dalis reaches level 21. Facing a gauth, we send Rasaad forward to handle it alone - then get impatient and have Lupa backstab one of the accompanying minotaurs. She gets a Cause Wounds ray for that.
Then, it's the painting room. Rasaad takes on the ulitharid, easily beating it. He suffers a Detonate attack (ignores MR) and one melee hit, but still takes the monster down easily. The noble djinni activates early and starts throwing cloud spells around, so we send Rasaad in alone for that. The troll and umber hulk just get mobbed.
A stone golem brings Lupa to level 16 as a thief; she brings OL to 100, takes the third dot in daggers, and starts working on Detect Illusion. Then, it's a room with three clay golems. We prepare; Jan and Haer'Dalis outside the room, Cernd up front to tank as a werewolf, and the other three to hit from a bit of range with staves and fists. It works as expected; Cernd takes a cursed hit, but none of the others do. Since we have a Remove Curse prepared, we use it right away.
The boot machine gives us boots of speed and boots of the north, and we are finished with this level.
Next comes a gauntlet of riddles, answered easily. Completing it earns a large experience reward, and Jaheira is now a level 13 fighter. Due to rounding issues with haste, this doesn't gain her any more attacks as a werewolf - but at least it's a substantial boost to her saves.
That returns us to the asylum itself. Facing Irenicus aas we are would be unwise - so instead, we will recruit the inmates. The first obstacle is Lonk the Sane, who protects himself with Improved Mantle and PfMW... that should be illegal, or did one of those spells cancel the other? Either way, we're not fighting that. We duck out and wait for those spells to expire.
Then it's straight to the Irenicus fight with no time to buff. Rasaad gets imprisoned, Jaheira gets killes - eh, reload. I really don't like how Imprisonment just ignores magic resistance, or indeed any protection outside spell deflection/turning. And of course, there's a huge experience reward at the end of this fight I want my team together for.
The next time, Irenicus wastes his Time Stop on two Death Spells - when the only summons are our swarm of insects. A Sun Soulray interrupts whatever he was trying to cast after that, and again. Then it's Jan's turn with a Fireball.
Soon, Irenicus is out and it's just the surviving clones - which are really quite nasty to fight. After all, they're werewolves too. Rasaad tries to use his Lay on Hands ability and fails? I thought all of his abilities were instant and uninterruptible - oh well.
On the way out, we meet Saemon. Despite some misgivings, we accept his offer of a ship and a sword. The exterior and the coordinator's office are quick enough to investigate, and then we're done with this asylum for good.
In Brynnlaw, we sell our junk and excess ammunition (everything but arrows), steal the scrolls, and have a scribing session. Add on a bit of rescribing of the excess necromancy scrolls we've been carrying around forever, and Rasaad reaches level 20. Long sword proficiency, 95 stealth in human form, and 60 base magic resistance - which means that now he has the full 100 as a greater werewolf. All of his saves are 0 or better, his AC is -14, he's resistant to all elements and immune to poison, and he regenerates 6 HP per round. Our plan for the beholder lair is simple - send Rasaad in, alone. He can easily tank anything the beholders can throw at them, and hit back.
While we're at it, we buy a few more potions of genius and mind focusing. A third wand of the heavens is also bought, sold, and stolen to fully charge it.
Checking in with Saemon... he doesn't actually have a ship. We'll have to steal one. What about Golin? No, he can't help. He has a ship, but it's not going back to Amn. We're stuck with Saemon's half-baked plan. Rest until night, replacing Cernd's two Insect Plague memorizations with Chaotic Commands.
The rest brings another dream of the false Candlekeep, where the Bhaal essence appears in Imoen's guise. It gives us a gift - to transform into the Slayer at will, with only a small risk of losing control. A transformation that cannot be controlled is not something we wish for ourselves; we are unlikely to use this power.
The horn is easily procured, and we head down to the docks. A mob of pirates tries to capture us, but none of them are strong enough to matter. Naturally, Desharik wakes in time to oppose us, and we are forced to leave quickly to avoid a larger battle.
Then, shortly after setting off, the ship is attacked by githyanki. We kill several, but the commotion attracts sahuagin, and the ship sinks. We are captured, and brought to the sahuagin city. Lupa was mazed during the fight - will that affect anything?
Pickpocketing the king gets us the key to the treasury, and we loot it. Then, we talk to the high priestess; she tells us how to reach the rebels, and implores us to talk to them.
On the way to the key "Sekolah's Tooth", we encounter some traps, spiders, and a bone golem. They are easily handled. Then a group of imps; we play their game. Huh - the "famous big people" have imp portraits:
Then comes the Spectator; we have Cernd up front to talk since the key point is a wisdom check, but it's Haer'Dalis and Jan who pipe up with the insights.
Heading out... the first rebels we see attack us on sight. So much for hoping they were a better choice. One rebel priestess holds an extraordinary item - the Cloak of Mirroring. Lupa gets that.
We find a bloody pit full of undead, and decide to have Rasaad open with his Sun Soulbeam. It's hard to find uses for that party-unfriendly melee AoE, but this one works well. With the leader blinded, we can clean up the rest before the Sea Zombie Lord even goes hostile.
With all but the rebel-controlled areas clear, we return to the priestess of Sekolah. She'll buy all sorts of things from us, and at an excellent price. She also sells a good selection of scrolls, with which we fill in most of the low-level holes in our spellbooks.
Then, we enter the rebels' domain. We are still attacked on sight, until we reach the inner sanctum. And now, the prince wants to deal with us? No; he may be saner than the king, but I cannot see that as a good thing. He dies.
Returning to the king, we are given the one item that couldn't be gained another way; the gauntlets of crushing. Our monk may not be using his fists to fight with, but he wants that as an option. Also, we sell the six stacks of bolts of biting and the junk weapons dropped by the last group of rebels. The bolts are enough for nearly 17K gold on their own.
The experience reward grants Lupa's 17th thief level, for more Detect Illusion and a slight saving throw improvement. And with that, it's down into the Underdark.
The first people we meet after descending the ropes are a group of duergar merchants. Carlig's prices are far too high - the worst of any merchant in the game - so we steal his scrolls instead. Another tells us of a mage who was imprisoned nearby.
Investigating the area, we find several portals that repeatedly spawn elementals. We backstab the first few, then send in the werewolves. Once that's done, we use one of our Freedom scrolls to release Vithal. He seeks a treasure from the realms beyond those portals, and needs his book of rituals to find it.
The next target is the party of drow to the north - a fine target for backstabs. The first priestess dies in one hit, while a mage puts up a Mantle and a Stoneskin and the other two priestesses try to hit Lupa with Flame Strikes. She's wearing the cloak of mirroring, so those fail. The party tries to reveal her with an Oracle, but she's using nonmagical stealth and is immune. She goes right back in to backstab another, killing a second priestess in round two. Then a drow in round three, another in round four, and the last priestess in round five. Five hits, five kills.
At this point, only two mages and their Aerial Servant summon remain, so we send in the party. With their short-term combat protections down, they'll be easy prey. A Greater Malison/Chaos combination confuses Lupa and Jaheira, and then the enemy follows up with a Power Word: Silence on Jan. But then, we weren't casting spells anyway. Several stoneskins and mirror images later, the mages die. In retrospect, we should have just sent in Rasaad once it was down to the mages; they don't seem to have any offense that penetrates magic resistance. So there it is - one seven-member drow party destroyed, with no spells used and no damage taken on our side.
The myconids nearby notice us, and are quickly destroyed. We then get the opportunity to identify the loot; seven pieces of drow armor. The drow elven chain +3 is an improvement over Haer'Dalis' current Melodic Chain, so he makes the switch. Jan would rather stick with the Robe of Vecna, though. The drow full plate +5? Only Jaheira can wear it in our party, and she has no reason to. It's simply not good enough. Putting it on would force her to take off her current +2 protection item, and thus worsen her AC.
Rather than go to the svirfneblin village right away, we head to the southeast. The kuo-toans in the way deal serious damage to Lupa - enough so that she has to retreat - but are helpless before our werewolves.
We enter the easter tunnels - the illithid city. The party is captured and thrown in a cell, though with all of our equipment intact. Then it's an arena fight against three umber hulks. No damage taken, no party members confused. We are rewarded with five potions of extra healing - but since we already have stacks of 24 for each character, that's not a big deal.
The door to the next cell opens, and we speak to the githyanki leader Simyaz there. It seems they are from the ship that attacked us, and were captured as well. Our next fight is scheduled against them, and they have a plan for escape. It is the only chance we see, so we take it.
The opportunity comes, and we are returned to the arena. The illithids were lax about cleaning up after the last match, and several kuo-toa are still alive. We kill them and move on. The ogre jailer goes down, as do the inhabitants of the other cells. The sahuagin actually cause some trouble; their prince hits hard, and brings Cernd down to single digits.
Now, it's time to prepare for fighting illithids. First, three Int-boosting potions each, for 21-23 Int on the werewolves and 26 on the other three. We take the opportunity to scribe some scrolls while we're at it. Cernd uses his two castings of Chaotic Commands on himself and Haer'Dalis. Then, oils of speed for the non-werewolves. Finally, two potions of invulnerability each for Lupa and Jaheira, one for Rasaad, and two potions of stone form for Jan. Save vs. spell: Lupa -5, Jaheira -5, Rasaad -6, Jan -4. The whole party is immune to mind blasts and ready to fight. We have one in-game hour.
We make the control circlets, and open the first locked door. The githyanki teleport in to say that they've found their own way out and are leaving without us - cowards. The experience reward is enough for Rasaad's 21st level - base THAC0 zero.
The next room is a large group of illithids, teleporting around and using all sorts of tricks. We just attack in melee and win. Some incidental damage is dealt to Jan and Haer'Dalis by their Detonate and Ballistic Attack powers, so we drink healing potions.
Then, the brine room. More dead illithids, and a set of emergency backup psi-protection potions. We fight with no subtlety - just charge. Speed is of the essence.
And now, it's time for the master brain. Our protections are still up, so we simply charge in.
An ulitharid came in at the end there, and got a hit each on Cernd and Lupa. No big deal; they can take that. In retrospect, we took a lot more Int-boosting potions than we needed. No party member was ever under more than one brain-suck effect at a time. Also, the illithids get a nod to their intelligence in their AI; they don't even try the powers this party is immune to. Whether through Chaotic Commands or stacking save bonuses, you can't fool SCS illithids into using psionic blasts that have no hope of working.
Victory gains us some levels; thief level 18 for Lupa, and druid level 15 for Cernd. It's time for our first HLA. Now, the HLA shapeshift tokens will be part of our strategy as the game progresses; they hit as +4 and deal crushing damage, both of which are useful in some situations werewolf mode fails. Well, they should deal crushing damage; later observation found that they actually deal slashing damage like the other shapeshift tokens.
Fire elemental: Base AC -5, base THAC0 2, Str 22, Dex 25, 2 attacks dealing 1d10 slashing + 1d10 fire, fast movement, fire shield, immune to fire. Our go-to form for disrupting enemy casters.
Earth elemental: Base AC -5, base THAC0 2, Str 25, Dex 10, 2 attacks dealing 2d10 slashing, slow movement, +50% physical resist. Our go-to form for tanking physical attackers, when paired with Hardiness or Armor of Faith. Jaheira will be able to become immune to physical damage by combining both.
The earth elemental form also has occasional difficulties navigating; it's larger than standard humanoids, and can't get through some normally navigable passages.
Still, we're not taking elemental forms right away. First, we want a bit of security against party deaths. We have two rods of resurrection, but the only spell we can memorize for it is Jaheira's nerfed version of Raise Dead. She has better things to do with her two fifth-level slots. As such, Cernd takes Mass Raise Dead as his first HLA. I'm using the SCS component that turns HLA spells into 1/day abilities, so that's one chance per day to raise all party members. It's also available immediately, and can be cast even in shapeshifted form.
The beholders in the southern tunnels come next. This will play very differently; it's Rasaad's show, practically solo.
There are, however, two beholders in the first room we can't fight that way. They must be engaged with the full party at risk. They fire off a death ray at Haer'Dalis and a Flesh to Stone ray at Jaheira. Haer'Dalis saves with an 8 - his minimum. Jaheira blocks hers with magic resistance, but if that hadn't worked her save versus spell is 5. We also have both rods of resurrection and stone to flesh scrolls, so those were recoverable.
Rasaad gets backup for the first room; once the beholder goes down, we send in the other werewolves and Lupa to kill the drow warriors. This bunch come with +3 flails and +3 shields as well as +5 full plate - just a bunch of vendor trash.
Then it's the mind flayer/gauth battle. As long as the gauth are there, the mind flayers will keep using psionic blasts - which Rasaad is immune to even without help. The flayers go down one by one, and then so do the gauth. One of the gauth switches sides and starts attacking its old friends... I'm not sure why this happened, since Rasaad isn't using any reflection gear.
Up in the next room, there's a Hive Mother, added by SCS. We wait out its initial Improved Mantle and then send in Rasaad. I start estimating how much magic I have to deal with - it's listed as a level 20 generalist mage. There are potentially two ninth-level slots plus a chain contingency, and each stoneskin blocks ten attacks. I expect any triggers and contingencies to be defensive, as they haven't fired off yet.
Stoneskin #1 down... #2.... It helps that Rasaad hits on a 2, so it's less than four rounds to take down ten skins. #3... #4... this is a very long battle of attrition. #5... #6... the Hive Mother occasionally throws in physical attacks, and it hits hard when it does. Rasaad drinks a potion. Well, that saved his life; a 44-point crit drops him to 16. Stoneskin #7... OK, this isn't working. The Hive Mother appears to have unlimited stoneskins and self-heals, and it's not casting them from mage spell slots. Rasaad switches to the other beholders and gauths to clear them out, and eventually I decide to send in the whole party. Haer'Dalis eats a Death Ray. Lupa gets mazed. Jaheira gets dominated. Jan eats a Death Ray - but the Hive Mother falls.
Once the Domination wears off, Cernd casts that Mass Raise Dead - which should really be called Mass Resurrection. It raises and fully heals the entire party.
The party falls back, and Rasaad goes on to find the Elder Orb. It's more serious about casting spells than the Hive Mother was, and it opens with an Absolute Immunity. Well, that calls for a retreat; Rasaad goes and beats up beholders and gauths for a while. Also of note - the Elder Orb doesn't innately see through invisibility like the Hive Mother did, so Rasaad has the option of sneaking up to engage it in melee directly.
When we next engage, it throws a 2x Spider Spawn/Web sequencer at Rasaad, who takes some time to kill the spiders. Then he charges; the Elder Orb doesn't have innate stoneskins, so it goes down easily.
Then a second Elder Orb shows up. No big deal. Rasaad cleans up the remainder of the enemies easily, and we collect the loot scattered around the walls. Jaheira reaches level 14 in both of her classes, taking Hardiness and Mass Raise Dead.
So, that's how it goes against beholders. Everything up to Elder Orbs is trivial for a magic-immune greater werewolf, but a Hive mother needs more. Two magic-immune greater werewolves should be able to overwhelm its defenses, though - and we have plans to make that happen eventually.
Now that we're done with the beholders, it's time to get back to smacking drow. Lupa heads north to trigger the war party, and get a backstab in:
The priestess there was casting Invisibility Purge - not True Sight, so we don't have to waste a turn before backstabbing her. Of course, Lupa kills the one that followed her west first. Once no more drow are visible, we bring up the party to pick up the loot and handle any invisible stragglers - there aren't any.
I call the session to an end here, although not the in-game day. This party doesn't need to rest yet. Next, we will move on with the plot by visiting the svirfneblin.
To the northwest, a village of friendly gnomes greets us. They are not without their troubles, though - they have recently unearthed a terrible creature, and we must help put it down. In return, they will give us a gem to allow us to meet the guardian Adalon, who can aid us in escaping the Underdark.
Clearly, it is time for a fight. We prepare with Barkskin on Lupa, Armor of Faith on the druids, and Mirror Image on the mages. The beast is a Balor, and it opens with a Fire Storm. Jan takes a ton of damage, and retreats out of the area of effect. Then the Balor hits Lupa on a 2 - looks like the Barkskin (AC 3) was irrelevant.
We go for a Breach; not very effective. It doesn't stop the flame aura, and the Balor just puts up another stoneskin. Then it teleports into the back lines, and Jan gets chunked by the firestorm. "Don't forget to raise me" - well, there's only one way to do that. Reloaded.
The second time around, we put up all the fire protections we can. Three Resist Fire and Cold spells, Rasaad's Greater Sun, the ring of fire control, and two green scrolls of protection from fire. That's good for fire immunity on all four melee characters, and high resistances on the mages. We also cast the Breach first thing, and win quickly.
Some other equipment is changed; Jan now has a helm that blocks critical hits, and the Heart of the Mountain amulet. He can't cast spells in werewolf form, so he'll need to switch back whenever that comes up.
Back out in the main area, we run into Simyaz again, and take the opportunity to yell at him:
Over at the soulcatcher, we prepare a nasty trick: werewolf Jan under Mislead, for three backstabs per round...
The first to be released is the madman Aganalo, for which Jan isn't quite at the right angle. He repositions for the second, Raevilin Strathi. It's theoretically possible to heal him, but I've never found it worth the risk; the spell takes too long to cast, and he's likely to cast something back at you first. So then, we attack him instead, and... "Your weapon is unsuitable for backstab". So much for that dream; shapeshift tokens can't backstab, much like other items restricted to non-thief classes. Oh, well, at least the +4 THAC0 from Mislead invisibility works.
Third is a gith Riti, who attacks us and dies immediately. Then Jan says that he set a trap? Oh, that's the mislead clone, which can't actually do anything. A lich comes out next - Alchra Diagott. He may be a level 27 mage, but he starts out surrounded. Dead before he could cast anything.
Cernd gains another level; the wonky druid experience curve is in a fast part now. Druid level 16 is good for spear proficency, 2 to THAC0 and 1 to saves, spell slots in levels 1-3, and an Earth Elemental token.
The last two facets are non-hostile. Bedlen Daglefodd and Gont of Riatavin are released unconditionally. Returning to Therndle, we are rewarded with AC 4 bracers, and loot his scroll supply.
Next, we return Vithal's book of rituals. He opens the portal, bringing guardians - which have been considerably upgraded. Now each portal has a greater elemental with abilities and several elementals to support it.
The greater earth elemental opens with a stoneskin and an Earthquake, knocking out two of our party. Haer'Dalis responds with a dispel, removing both the stoneskin and the sleeping effect. It's a quick beatdown from there.
The greater fire elemental opens with a Sunfire, entirely resisted by our party. The experience from killing that group brings Rasaad to level 22 and his first HLA: Hardiness. That is, of course, intended for use with earth elemental form for 90% physical resistance.
The greater air elemental dies to a backstab before it could get off whatever its spell was.
Then it's Vithal's turn. He returns from his excursion, tries to stiff us, and we demand it all. Prebuffs go up, dispel goes out... no effect. A bad roll there, as a level 24 bard should dispel a level 22 mage 70% of the time. Jan switches to human and goes for a Breach - not fast enough to beat a Time Stop into double Imprisonment, then Time Stop into Horrid Wilting plus Symbol:Stun. Reloaded. This time, Haer'Dalis goes straight for a Breach. He re-buffs, Jan Breaches, and again it's not fast enough to beat the Time stop sequence. Round 3. This time he dies before his prebuffs activate... OK, that was too easy. Round 4. This time he somehow gets a Time Stop off before either Breach fires, and uses it to bug out. Round 5, and he dies before the prebuffs go off. I accept it this time, but also resolve to work on better anti-mage tactics. We can't rely on beating down the enemies first, and must see to our own defenses.
We get more scrolls, and a helm that casts Death Spell once per day. Well, at least there's something we can use right away. A scribing session follows, and we decide to give Haer'Dalis some level 7 spells even if he'll never have the slots to use them. The experience is enough for Jan to reach level 17 as a thief and for Haer'Dalis to reach level 24. Haer'Dalis takes two-handed style and Use Any Item, becoming our fifth werewolf. Jan invests in trap-setting and an extra 6th level spell slot.
As part of the upgrade, Haer'Dalis replaces his armor with a ring of protection and AC bracers. Sadly, we have no mage robes to give him just yet.
A milestone is reached: we have a party in the Underdark, and drow armor is simply not good enough for any of them. If any of them put on a piece of drow armor, they'd have to take off a ring/cloak of protection and would end up with worse AC.
Here's a portrait of the party as it stands now:
"All right, how did you two manage it? I've been trying to work out how to control the transformation for ages, and I'm still not ready!"
"Oh, you know what they say, my raven - music hath charms to soothe the savage beast."
"So, what, you sang the wolf a lullaby? ... Do you think that would work for me? SHould I take up an instrument?"
"No, 'twould be unwise of you to abandon your current path. You'll get there soon enough with your meditation. It takes a great deal of time and effort to master the ways of music - time you don't have."
"I see. And you, Jan? How did you manage it?"
"Did I ever tell you about the time a werewolf came to my uncle Spanky's farm? They got along wonderfully, until the food ran out. The whole turnip harvest, gone! And when..."
"Wait, you're saying that the werewolf ate the harvest? Werewolves like turnips?"
"Did I say that? No, the rabbits ate most of the turnips. Uncle Spanky and the werewolf were good friends by then, but she had to move on. They did have a nice rabbit stew before she left, and she promised to come back someday."
"I think I'm more confused now than before I asked you the question, Jan. Good night."
After resting, we get on with the plot... wait, what? Our sequencers disappeared? Arrgh. We prepare new minor sequencers, then do that rest.
Oh, and we take the boots of speed off Haer'Dalis. He doesn't need double-haste, and it's nice to have the whole party moving at around the same speed. I shuffle things around, and Jan can now wear boots of stealth for 73/63 scores - without a single point invested in the skills.
We talk to Adalon, who is a dragon with all the arrogance that comes with that. Ignoring our objections, she casts an illusion over our party to make us look like drow:
The paper doll effects also come out funny, making them look like they're wielding daggers - because the shapeshift tokens are implemented as dagger-class weapons.
And... oh, bother, BG2 crashed. I tried to move one of those tokens from an equipped slot, and the game just hung indefinitely.
I come back, and load the save... hung. It's fairly easy to diagnose the problem; combining the transformation effect of the tokens with the transformation effect of Adalon's illusion breaks the game. Since I have a save, I edit it in EEKeeper, removing the offending "Use EFF File" effect applied by SPIN825 from everyone but my protagonist (who can't use the tokens yet, and won't be able to until considerably later). That gets it to load, and those characters now look like werewolves instead of drow.
I test some item polymorph effects, and those work fine. It's just the continuous item-applied appearance changes on the shapeshift tokens that cause trouble with Adalon's illusion. While such effects exist in the base game (Iron Thorn ring in BGEE, Big Metal Unit in ToB), they're not available at this stage of the game without mods. This is, I believe, a bug in the game exposed by a mod rather than a bug that's properly part of the mod.
And with that, the party enters Ust Natha, already grumbling about that arrogant dragon ruining everything.
The first thing we do after entering the city is to visit the merchants and shoplift everything worthwhile. Haer'Dalis gets the robe of the evil archmagi, Lupa gets the +10 MR amulet, Jaheira gets the spear of withering and holds the +4 shield, and we have the Firetooth throwing dagger as a ranged option for anybody that wants one. At the moment, that's most likely to be Lupa. We pick up the rod of smiting as an anti-golem option; unfortunately, it's not usable by druids. The scrolls go into storage until our next scribing session.
We meet with Solaufein, and are directed to the city's entrance. We are charged by the Handmaiden there with rescuing Phaere, daughter of Matron Mother Ardulace. She has been captured by illithids near their city, and must be retrieved as soon as possible.
Scouting ahead, Lupa finds a new party of foes. She introduces herself by backstabbing their cleric Chandrilla (nat-19 critical, dead) and runs off to the west. The mephit Pitch chases here, and is the next to be backstabbed. Then it's the skeleton warrior Chandrilla summoned. The ogre Boz actually survives a backstab and the follow-up normal hit - but falls unconscious when his berserk state wears off. The goblin archer Simbja goes down in one hit, leaving just the mage N'ashtar and the thief Damien. Incidentally, Boz's unconsciousness is mis-reported by the game:
Then, the actual illithid encounter. We try a Death Spell - it should at least clear out the minions, and maybe the illithids are considered summoned... no. It fails completely. Worse, it angers Phaere. We can't keep going from that, so we reload.
That takes us to before the battle with the party outlined above, and things go a little differently this time. Chandrilla survives the initial backstab, and goes under sanctuary to use healing potions. What, does he not have any healing spells memorized? All but the thief and mage are brought down with backstabs eventually, and those two then get the full party's attention. The thief tries to backstab Jan, and misses on a 15. Ah, that wonderful werewolf AC. The mage's last act is to cast a Chaos - which affects one out of five party members in range. Even with -6 to save, this party has such good saves and magic resistance that we can mostly shrug off effects like that.
This time around, we just fight the illithids in melee, with no major prebuffs. Jaheira takes a stun - her save versus spell of 5 is weak by this party's standards - but nobody gets brain-sucked even once. That was a stun at range, and the rest of the party closed on the mind flayer in question quickly. Being able to wear protection items on everybody and have excellent saves all around is a huge perk of this setup.
Phaere is rescued, we wait for the stun to wear off, and it's back to Ust Natha.
We head to the tavern, and find that Phaere doesn't have anything for us to do right away. So, then, we amuse ourselves with the fights. Rasaad takes on Szordrin's beasts. The umber hulk can't do anything, the nabassu gets in one hit, the sahuagin prince is actually nasty enough that he retreats, regenerates, and finishes it in earth elemental form, and the beholder is utterly helpless against 100% magic resistance.
And then, I notice something. There's a display bug with the tokens, or presumably anything that sets AC and/or THAC0 and goes in quick slots. While the final numbers listed are accurate, the base numbers that are allegedly used to derive them come from whichever item in a quickslot has "priority" rather than whichever one is currently equipped. Some shots to demonstrate this:
Next, Sondal's fights. I let Jaheira handle the two warrior challenges. Swapping some equipment around, she gets the Visage, the Cloak of Mirroring, and some Boots of Speed. Lasaonar opens with a potion of magic protection - hah. We have no intention of using magic. The follow-up potion of strength 22 is more relevant, but not enough to stop her from tearing him up.
After a few rounds of regeneration, it's back to the pit for Chalinthra. She's a cleric, who comes with Free Action and Chaotic Commands prebuffs - irrelevant. She can't cast anything while being clawed, and she dies.
Then it's the mage challenges, and Jan's turn to use those same items. He prebuffs with a Stoneskin and an Improved Haste (from Haer'Dalis), then goes in. The first mage opens with an Improved Mantle - OK, instant Breach... eaten by the Spell Deflection. Then a trigger with a Remove Magic in it dispel's Jan's Stoneskin - in retrospect, we shouldn't have bothered casting anything with Jan. Shadow Door... dispelled passively. Power Word: Stun... the mage just stands there until the stun runs out, and then casts PfMW. Remove Magic, nothing lost. Minor Globe, irrelevant. PW: Stun, waited out. Symbol:Stun, saved. Improved Invis/Stoneskin/Mirror Image sequencer... illusions passively dispelled, but we have to beat down the stoneskins with werewolf attacks. Wait, Improved Haste only gets Jan to 4 APR from us usual 3? Waste of a spell. Slow, saved and resisted. Charm/Charm sequencer, resisted. The enemy mage finally starts taking damage. He puts up a Mirror Image at Near Death, so we stop attacking for a round to dispel that.
So, that's a mage duel, as I play it. Three spell slots used by us, for no real gain. No damage taken. Next time, we're not bothering with any spells.
The second mage duelist likes damaging spells, which are naturally completely ineffective. Acid Arrow, Shadow Door, Chromatic Orb, Chromatic Orb, Acid Arrow, Magic Missile, Mirror Image/Shield, Mirror Image - all ineffective or immediately dispelled passively. Well, the Shield at least gave him a bit of AC.
The third is the most effective - he starts with a Fireshield: Blue, and that damage gets through our MR and cloak of mirroring. Still, the spells like Slow and Greater Malison are resisted, the Animate Dead skeletons are killed, and the direct damage spells like Chromatic Orb and Skull Trap are ineffective.
So, then, that's how you win underdark mage duels without casting spells. Well, at least you can;'t win all three with a single casting of Mordenkainen's Sword any more.
We have some 7th level spells memorized, so Jan wishes for an adventure. Then he sets up a sequencer - Greater Malison/Confusion/Slow, to disable groups of enemies.
We talk to the patrons - none have any idea about Adalon's eggs - and Merinid tells a joke:
With that, we head out. The aboleth near the entrance threatens to expose us... oh well, we'll fetch the brain.
The servant mage at the entrance goes down quickly; not enough levels to put up an effective defense. Qilue herself flees; we will have to fight past more servants to get to her. Farther in we encounter more mage servants, and Qilue herself. As a priestess, she can't stand up to a pounding by werewolves, and it's just the servants (who can cast spells like Mantle, and last that way) that remain. One servant confuses two of our werewolves with a Chaos, but in the end? No damage taken and no spells used on our side. Rasaad did spend one use of Sun Soulray to disrupt a caster. Brain returned, done with that.
We meet a drow slave trader with a group of captured surfacers, but don't have the authority to do anything about that yet. It's marked, though.
Next, we head out of the city - there's one more area for us to cover. The western tunnels are inhabited by a variety of creatures. First, a beholder and a pair of gauths, which Rasaad takes out. Then it's kuo-toans guarding tainted tadpoles; we take some. Past an obvious trap that is still somehow undetectable, we find a shrine to Demogorgon. Awaken the fiends with a sacrifice so that we can kill them and take their stuff? Sure, we can do that.
Jaheira and Cernd use Armor of Faith, Jaheira and Rasaad use Hardiness, Haer'Dalis and Jan use Mirror Image, Lupa sets a couple traps. The wand of monster summoning provides some fodder, and we have demon knights to fight.
They open with a fireball, and... great, I forgot to have everyone turn back into werewolves. Cernd is badly hurt.
Jan dies to a PW: Kill. Well, we actually have more daily resurrections than restorations in this party.
The loot? A piece of enchanted full plate we'll never have a use for. A two-handed sword that's another +4 option for Haer'Dalis. Some +1 two-handed swords. And then, something we can actually use. The Girdle of Frost Giant Strength goes to Lupa, and now our entire party has strength 21.
The rest of the area is more kuo-toa. I drop the corrupted tadpoles in the pool to "weaken the adults", and... oh, hey, actually got a backstab on the prince there. Neat. It's usually very hard since the move fast and see through invisibility.
Back in Ust Natha, Phaere and Solaufein have shown up at the entrance. We'll cure the level drain, scribe the new spells, and rest before coming back. OK, only a few of the spells are truly new. We'll work through our stacks of stolen scrolls, then, to spend many of them for experience and clear the clutter.
Cernd reaches level 17, and makes a fire elemental token. The old shapeshifting HLAs could be taken multiple times, but not the new ones - and since they're one-time effects that make a token rather than daily abilities, that's it if you somehow lose the things. Our party can't ever make enough elemental tokens for everyone; we're stuck with at most four total.
After resting, we talk to Phaere. Our next task is to kill a beholder. So we head over, put Rasaad in position... and the very first action is a petrification ray aimed at Solaufein. His magic resistance doesn't work, and he fails the save. Dead. And... seriously, that's it? The whole city goes hostile for that? Reload.
This time, we send in the whole party so it has more targets. The beholder gets off one ray, a harmless anti-magic ray on Haer'Dalis. A complete log of the battle:
We take a detour to explore the upper reaches before talking to Phaere again. Nothing too special, but we did see some slaves get killed just for being in the way. The sooner we can be done with Ust Natha, the better - curse Adalon for forcing us into this!
We are sent to kill gnomes. Jan objects, but the orders are clear; only subterfuge can prevent us from following through. In the end, it is a simple subterfuge; we tell Solaufein he can go back and let us handle this ourselves, and we convince the gnome leader to hand over his helmet as "proof".
The next mission is to kill Solaufein... ah, no. He hands over his cloak as "proof" and offers a prayer to Eilistraee. The reward for giving the cloak to Phaere brings Rasaad to level 23. Our HLA is Whirlwind Attack.
Then it's time to speak to the matron mother. She wants bits from a "noble race". We could hand them over now, but we hold off. It's time for some sidequests.
Leaving the temple, we encounter a "merchant" named Visaj, who wants to sell us a rope belonging to the mercenary Jarlaxle. We talk him down to 500 gold, and enter the lich Deirex's tower. The rope doesn't do what he said it would, but instead diverts us to Jarlaxle's base. He calls on us to retrieve some gems that he claims hold the souls of his brethren. We have no way to verify such a claim, but eliminating a lich cannot be a bad thing.
For this lich fight, we go in with True Sight and Improved Haste active on Jaheira, plus Spell Deflection on Jan and Haer'Dalis. We knock him down to Badly Injured before his buffs go up - at that point, it's PfMW, Spell Shield, Stoneskin, and a fiend to distract us. Jan responds with a Spell Thrust, and we switch to attacking the fiend.
Time Stop into Imprisonment (Cernd) and Cloudkill. Fear Aura? We keep saving and resisting. Remove Magic from the lich - he dispels Jaheira's True Seeing, but not the Improved Haste. Now, that PfMW is going to expire before we can cast a Breach anyway, so we just keep attacking. Haer'Dalis fails a fear save... Symbol: Death, and Haer'Dalis saves... OK, we could have cast that Breach. Lupa fails a fear save. Horrid Wilting - everyone resists completely. Wait, is he flat out immune to +3 weapons? We try elemental tokens... No, that didn't help. His PfMW spell is just lasting forever for no good reason. All right, dispel that. And - wait, all of a sudden he's vulnerable! And the (zero) fire damage disrupted him!
Jan uses one of our seven scrolls of Freedom, and the rejoining message is ... not very context-sensitive.
We recover the gems, along with some scrolls and an irrelevant piece of armor. We wouldn't wear +5 studded leather even if it wasn't cursed. Naturally, Jarlaxle just wanted the gems for their value - but at least he pays us, and points toward further targets to enrich ourselves against. The lich's tower is first, with gems, scrolls, and useless magic items.
Then it's House Jae'llat. They're dangerous, with a lot of hard-hitting warrior guards. As such, we actually use Stoneskin on Jan and Haer'Dalis. The priestess Rilloa gets a lethal backstab, and the werewolves engage the mob. Cernd takes too many hits - dead. Right, time for Hardiness on the warriors. Haer'Dalis gets badly hurt, and we use a Defensive Spin to take him nearly to the AC cap. Jan goes down, and the remaining party members are guzzling healing potions to get through it. Eventually, the enemy forces are worn down:
The experience brings Lupa to thief level 20, and Haer'Dalis to level 25. Four dots in daggers, Detect Illusion maxed, and some additional stealth, while Haer'Dalis takes Enhanced Bard Song. Physical attackers are this party's primary weakness, and that +4 AC/hit/damage will be incredibly useful. The immunities are great too - immunity to normal weapons remains relevant surprisingly long, and stun/confusion immunity makes it a lot easier to ignore mages.
Leaving the tower, we run into a priestess, who demands we eliminate a heretical Ghanadaur cult and their oozes. Refusal is not an option.
The priest leader goes down immediately to a 124-point backstab, and battle is joined. Another priest gets off a Silence, which hits Haer'Dalis and nullifies his song. The mage makes more of a nuisance, summoning up various monsters we have to put down. Still, none of these enemies are truly dangerous.
Then we notice that our sequencers have been forgotten; at least some of the abilities are there, but the sequencer itself is empty. Annoying, but all it costs us is a re-memorization. Jan switches his minor sequencer to Blur/Mirror Image, and both casters create a 25% HP Stoneskin contingency. Then we rest at the tavern, so Jan can recreate his Malison/Confusion/Slow sequencer.
We turn in the items. The experience boosts Cernd to level 18 - 10% elemental resistances, Summon Deva. Then, Phaere has a scheme with fake eggs, and so does Solaufein.
As for Adalon... it's time that arrogant dragon got what was coming to her.
Then Rasaad leaves the party to fight on Adalon's side. Oof.
Rewind... Rasaad expresses misgivings, and we tell him he doesn't have to be part of this. He's temporarily left outside the cave.
The second time, we take a dispel, and Lupa dies to the cold damage breath weapon. The third time, we dodge the initial Remove Magic (targeted on Adalon herself, to get any foes in melee) and go stragith to the beatdown.
Fighting Adalon loses us about 70K experience per character and the +3 crossbow we never would have used, but gains the siver dragon blood. That will be used to craft the one piece of enchanted armor this party wants.
Rushing to the exit in the western tunnels, we get there before our buffs run out - and are torn apart by stun effects.
Fighting the drow on the way up brings Jaheira to level 15 as a fighter. Spear specialization taken, along with our party's second earth elemental token.
Then, we go back down, to sell our junk and drow gear to Carlig. While drow gear has very low prices by the usual standards of magic items, selling 150 pieces of it still results in a good chunk of change.
There's one more little thing to do now - that little nook north of where we entered the Underdark. Rasaad, Jan, and Haer'Dalis go in here, with equipment shuffled to provide saves of 1 or better and helms of charm protection. Rasaad takes a Ballistic Attack and a brain-suck, but no lasting harm. Three mind flayers down, and now we leave the Underdark for good.
At the exit, we are greeted by elven soldiers. Irenicus has taken the artifact that lights the way to their city of Suldanesselar, and we must recover it from Bodhi in order to enter the elven city and defeat him. Still, we have many other things to do.
On the way to Lupa's keep, we encounter Drizzt and his party, and Jan has a wonderfully fitting line:
Two tax payments have piled up, but no next mission... all right, time to force things and spawn the runner.
Lord Roenall wants this castle - and, as he says, next time he comes back it will be with an army.
We rest outside, looking to trigger the next event in Jaheira's quest. And - yep, here come Dermin's party. We start casting, expecting a fight. It comes, and Dermin dies in moments - before our casting of Insect Plague even starts.
Back in Athkatla, the githyanki wild mage Kruin demands the silver sword blade back, and brings a party to attack us. Counterattacking as the gith emerge, we take down most of the spellcasters quickly. Rasaad duels Kruin, and two fireshields against each other... well, it's bad for Kruin.
A Horrid Wilting hits Haer'Dalis for 67 damage - not quite lethal. The other party members in range resist it completely. Then I withdraw everyone else and let Rasaad do the job. Lots of spell failures, and Kruin eventually goes down. His PfMW lapsed long enough for Rasaad to get in a bit of physical damage, but the fireshields were a much bigger deal.
And, next target: The Cult of the Eyeless. We stash all sorts of magical items for later sale, and potions we're not using, since we don't need to buy anything right now. Then we mistakenly head to the bridge district instead of the temple district, and who pops up but "Terminsel"? Well, Jan yoinks his bling, and we have a full set of six +2 protection items now. Also, Jaheira has a new amulet:
In the sewers, a group of goblins goes down so fast they don't even get any arrows off. Then we meet Keldorn. We don't need him right now, so we send him back to base. Down we go.
Oh, that's something new; the first ambush group has been upgraded from ettercaps to hell hounds. They're no threat to a party of this level. Then an Ooze Mephit comes in from behind and throws its Stinking Cloud. Save vs. death at +2? Out of our whole party, only Jan and Haer'Dalis have even a chance of failing that. Forward it is, and a few more shadows killed.
For the wheel room with the vampiric mists, we send in Jan and Cernd (under NPP). They kill the mists, Jan unlocks the door, and they're out - not that a cloudkill is any problem for this party. Three of our party are outright immune, and the others have magic resistance and regeneration. We head back in, not waiting for the cloudkill to expire, and unlock the other door to speak with the cult leader. He's just as creepy as we could have expected.
The path forward holds several spectral undead, including two wraiths that can drain levels. Jan takes care of them, with aid from Jaheira once the level-drain threat is gone.
Down below is an ancient ruin, populated by all sorts of monsters. We keep poking at the screaming statue - Bard Song protects us from most of the Wandering Horror's tricks, and the Sword Spiders are no threat.
A few rounds of that, and Rasaad levels up to 24. Short Sword proficiency, Find Traps, and Greater Whirlwind. And that's the last round; no more monsters come.
We answer the riddles to open a path forward, and Rasaad goes alone. Gauths and beholders, then shadows and shadow fiends - hey, this looks like a good time for a Sun Soulbeam.
Then we enter the temple to face the empathic manifestation. Following the hint, we must heal it - Cernd takes human form and uses a fast-casting Neutralize Poison spell (instant with the Amulet of Power). That deals with it, and frees the avatar of this place's god to speak to us. He will give us his half of the rod, so that it can be weakened - and then returned, and destroyed. Jan takes the opportunity to tell one of his best stories:
We go up, and speak to Sassar again. He tells us that we must travel through the Pit of the Faithless to the beholder lair below to find the rod's other half. We speak to Tad and go down. It is a one-way trip; we won't be returning by the same path.
Battles against the many undead here bring Cernd to level 19; Aura of Flaming Death taken, and his THAC0 and saves improve by 2.
Haer'Dalis is the next to gain a level (26), inside the hut. He takes his first instance of Spike Trap.
The random undead inside the hut, at this difficulty, don't include a lich. It's just greater mummies and bone golems, which we handle easily. Jan gets hit by a mummy and suffers their disease, but even with no Stoneskin up, he regenerates quickly. Seriously, this is a party in which the high-level arcane casters don't bother with Stoneskin most of the time.
The reward for that? Some gauntlets we have no use for. Our entire party has better Dex than that anyway.
Then it's on to the beholder lair. Rasaad deals with the assorted gauths and beholders, then the whole party goes for the priests in the center. Killing the first gauth brings Lupa to level 21, improving some saves and her stealth ability. There's a bit of a surprise as a new beholder/gauth group spawns in after the priests die, but we're aware enough for only Rasaad to engage them.
Finding the last rift device piece brings Jan to thief level 18; more Set Traps, and an extra level 7 spell slot. He equips the rift device, as we've moved the wands out of the quickslots for now.
The Unseeing Eye appears right on top of us, and Jan wastes no time using the Rift Device.
We emerge near Sassar and the lich's tomb, and go down to return the spent device. We are rewarded with... a shield. Oh, joy. That does remind me to improve the shield Jan has in one-handed mode. He upgrades to the Shield of Harmony there, passing the +1 buckler to Cernd - not that Cernd will ever bother with a one-handed weapon.
We talk to Sassar, and then go to confront Gaal. A small buff before the battle; Armor of Faith for the druids. It isn't really needed, but we've got plenty of castings. Gaal is a mage, but of far too low a level to matter; he can't even dispel Jaheira's buff. All he manages is a Chaos that confuses Jaheira; we move away from her and wait it out. Gaal drops one useful item: the girdle of fortitude. Several characters can make good use of it in this party, but we choose Haer'Dalis. That puts our least useful belt back in the bag - the strength 19 girdle.
We loot the side rooms, and that leaves only one remaining task down here: facing the lich. We lay traps, prepare spell defenses, and summon a deva - and then, release the lich.
Oh, and a fun fact. Lupa is a level 21 thief. The level 21 version of the thief trap would have dealt 20 poison damage instead of the fire damage, and the lich would have been immune. But, as an innate ability, it's based on her average level 17 instead. She won't get the poison version until thief level 28 or 29.
Up on the surface, morning has come. Our reward from the temple is a mace, which - seriously, has anyone ever used this thing?
While we're here, we visit the Radiant Heart. Their support for the battle against Bodhi is secured. Then it's off to the Umar Hills, to see about getting our new armor made. We stop off at the keep along the way to check on things, but there's nothing new. The armor will be ready in four days.
Returning to Athkatla, we visit the docks, and the Shadow Thieves. They, too, would like another chance at Bodhi.
Then it's down to a trapped door we never opened before, and a crypt within. This is where Kangaxx rests - a being of power, who needs his bones returned to awaken. We will do it - not because we trust his promise of reward, but because it is an opportunity to destroy a gread evil for good.
The Bridge District is next, where the second of these liches lies. On the way, we meet a destitute man named Vittorio, who asks for our aid - why not? Still, the lich comes first. We set our traps, and the six normal traps kill it before the pit trap can even go off.
Then it's off to help Vittorio and Captain Dennis. We are tasked to recover a gong that was stolen and sold. Back to the sewers we go, to talk to the fence Roger. He, ah, "donates" some potions of magic protection to the cause, but the gong is not here. The nearby temples add some scrolls of protection from undead, and we're ready to try this one. We visit Cromwell and forge the Equalizer; no use in this battle, but the rest refreshes our traps.
Kangaxx's first phase falls to traps, but takes a round to notice. His second phase takes two hits from Jan before putting up a PfMW.
My buffs for this one include potions of magic protection and Resist Fire/Cold all around, spell deflection and abjuration immunity on the mages, Shield of the Archons and Armor of Faith on the druids, and the Ring of Spell Turning for Rasaad.
Defensively, Kangaxx follows that PfMW with a Spell Shield - so, while Haer'Dalis is casting Breach, Jan adds a Khelben's Warding Whip.
I get a "Spell Ineffective" message, but also a "Spell Protections Removed" message. Then, it's a Time Stop. The only offensive part of it is a Sphere of Chaos; our defenses are holding. There's a bit of a hassle - the earth elemental forms are too big to move freely in the crypt - but soon we get everyone on him. A second Breach removes a second PfMW, and the gang's all there. Time for a GWW from Rasaad:
PfMW #3 comes up, and it's time for an instant Breach from Jan.
Jan even gets the final blow in:
The ring goes to Lupa, and now every single member of the party has a save vs. spell of 1 or better.
We head out to the Druid grove; Grae is beaten on and then killed (Rasaad used fire elemental form to break her regeneration), and we trade the four-charge wand of frost we bought from "Adratha" for the gong. Back in Athkatla, we return the gong and get a returning throwing dagger in return. It's not worth using, but the experience is nice.
Then it's time to visit the city gates. Rasaad finally gets a lead - a cloaked figure that tells him where to find the heretical Twofold Trust. We also rescue a merchant from a bully, and shoplift his scrolls. Inside the Crooked Crane, we rest, then head through the secret door to take on the lich.
He starts with Abjuration immunity and PfMW, and summons demons from there. Then a Prismatic Spray petrifies Jan and we don't see a statue... reload.
he second time around, while the second PfMW is up, we pick up Daystar and use its Sunray. Lich... immune to damage. It must have had Protection from Magic Energy up too. We keep killing the summons and tanking the wand hits; eventually, the lich runs out of PfMW spells and dies. Cernd gets the killing blow, and reaches level 20 from it. He takes dart proficiency and Implosion.
Aulava and Tiiro are talked into... you know, it might not have been a good idea. They really are bad influences on each other.
Then it's off to the abandoned amphitheater. We refuse the offer of a shady "merchant" and disarm the traps laid across the path. Then he sets his wolves on us. Werewolves are better. Lupa deals with his invisibility potion with Detect Illusion, then backstabs him down.
Then we join the meeting, where Rasaad meets one who was once his friend - Hammerhelm. In the end, his convictions lead to battle.
We are accosted on the way by a group of "Tears of Selune". They accuse Rasaad of murder, but can be talked down. We are then rewarded with a cloak, although not one we have any real use for.
We arrive at the Twofold temple just before dawn. When the sun rises, its dome is a grand sight in the morning light. The same, however, cannot be said for the sect's practices. They are cruel through and through, torturous with no greater purpose. And it all comes back to their leader's edicts. Collus Darathon must be cast down, for the good of all those who have come to follow him. We easily talk the guards into opening our way, but explore first before entering.
Near where some new disciples were being pitted against animals, we find a strangely articulate bear, apparently named Wilson. We talk the animal keeper down from his initial demands, and free Wilson for a token sum of 25 gold - or maybe nothing, since it didn't say we lost any gold.
East of that, we find a group of former Sun Soul left out in the sun as "training". We convince them that this cruelty is too much, so that they free themselves.
Collus is inside, and he tells us of the trials ahead. First, pain. Lupa is beat to less than half of her HP (shouldn't it be Rasaad?), and then rewarded with a helmet that provides +1 AC and a number of special abilities. Eh, it's better than the Skull of Death.
Next, the Blinding Sun. Lupa gets a Barkskin (AC 1) and a bit of healing, then enters. With that aid, she easily defeats the Invisible Stalkers and earns a Gem of Seeing. Rasaad holds that. Then, the Bright Moon. Lupa walks the path, tells a "secret" that far too many know already, and earns a pair of gauntlets. With their passive combat benefit, Jan puts away the last of his personal equipment.
Finally, the trial of penance. We tell of the monks outside, and that they spoke to us - but not that they left. The reward is the Cloak of Atonement, which goes into the bag.
After the trial, Rasaad is greeted by the former Master of Combat at the Sun Soul, and by grim news. The followers of Shar come. Our party buffs up - iron skins and stone skins, Armor of Faith and Mirror Image, Shield of the Archons and Spell Deflection, a potion of invulnerability and Greater Sun.
Against all odds, Rasaad was right - Collus was Alorgoth. Now we must face the Sharrans. We open with an Insect Plague and a True Sight (from the Gem of Seeing), while Lupa drinks a potion so she can backstab a Sharran Priest. 89 points isn't quite enough to kill him, and she retreats to hit other targets. Still, it's an easy battle; the enemy mage is the last to fall, because of his combat protections (they ran out before the Breach finished casting). With our Enhanced Bard Song active and the enemy assassins neutralized, I don't think we lost any allies.
The quest reward, at least, is good for Rasaad. He reaches level 25 for his final fist upgrade, and a second instance of Hardiness.
A visit to the keep, a rest, and Rasaad finally takes the plunge. A committed relationship!
Then, after the battle, the conversation turns to doubt.
This bug comes from a scripting mistake, and is likely to be patched out at some point. Might as well enjoy it while you can.
On the way out, we pick up Wilson. I've installed his mod; might as well play with it for a while. He starts out with a dialogue rather quickly. There's what looks like a long timer variable, but on closer inspection it's a reasonable real-time timer variable. We head over to the Hidden Refuge so Zaviak can meet him. Wilson has things to say about the forest, too.
Haer'Dalis is left behind so we can bring Neera, and a scribing spree gives us a few levels. The low-level monsters are easy to handle, the traps are annoying but easy to disarm, and we reach the refuge itself. After meeting Zaviak, Wilson asks for help with traps and locks... from Imoen, who he's never met. Uh, we've got Jan and Lupa right here who could teach you. Why not them?
We run the rest of the errands, all the while advancing the friendship talks. Then it's a trip to Trademeet and Vyatri's pub for the next one. Fatigue leads to a rest, and Wilson has something to say... wait, why does this result in a double rest?
We head over to Athkatla, where we pick up Mereth's hairband and then steal a fish for Wilson. He gains 1 Dex - oh, joy. It's not enough for any actual bonuses.
We get ambushed on our way out by shapeshifters who take our appearance - and, oddly enough, Wilson takes the opportunity to boast about fighting corrupted ducklings.
A rest, and Jan has something to say about a racial ability:
We travel some more, come back... still the same dialogue. OK, he's not coming back if he leaves like that. It's great for his personal development, terrible for parties that want to make use of him long-term. With that, I erase this session and return to my save back at the beginning of the Twofold Temple.
Some thoughts on the Wilson Chronicles: it seems quite well written from what I've seen. I didn't go far enough for the exceedingly powerful items, but they're in there. I would recommend it for anyone that's interested in playing with Wilson.
I also have another companion mod installed - Yeslick. He's a lot more problematic, mostly due to how he starts. He's found in Trademeet, with initial stats that just don't fit BG2. Level 4/5, with 27380 total XP? Every other PC or recruitable NPC starts with at least 89000 XP. Then, to compound this, he doesn't get the standard "catch-up" experience other companions do. If you want him to have enough experience to fit the party, you'll have to apply that yourself. Without editing, he's kind of broken.
His stats get boosted for BG2, but only those that don't matter - up to 11 Int (from 7) and 12 Cha (from 10). Since I specifically installed the mod planning for an all-illiterate party, that's annoying.
And then, his starting stats? They're illegal in other ways. He has six total proficiency dots, when a fighter/cleric of those levels should have five. He has too many HP; 43+13, when the legal maximum is 40+13. The cleanest fix I can think of for that is to increase his starting XP to 89000 and levels to 6/6, while giving him no base HP and no proficiencies for the added levels.
With all those issues, I haven't actually played with him beyond adding him to the party briefly as a test.
Now that it's been a few days, we head to the Umar Hills to pick up our new armor.
We sell some junk, and then it's time for a new main quest. The Windspear Hills await.
Upon entering, we encounter a group that appears to be prejudiced against us. Odd - such words seem more likely from humans.
Garren Windspear comes, and he reveals that he saw us as ogres. No monsters now? Thank you for your consideration.
Then Garren's son is kidnapped. His rescue is our priority now.
We meet a party of fighters fighting gnolls - and then, after the battle, they change. They were werewolves in truth, ones that had embraced their worst aspects. We kill them.
Soon, we come to an ostentatious entrance. This must be Firkraag's base. An orc chieftain tries to leave after rallying his troops, but takes a backstab before he can get away:
Engaging the vampiric mists... their attack doesn't count as a magic weapon. Enhanced Bard Song trumps them. Haer'Dalis reaches level 27, and takes a second Spike Trap.
Going farther in, we are greeted with a trap room, in which galleries of archers fire from behind hidden and locked doors. Lupa detects and unlocks them, and the werewolves follow to attack. Despite nearly emptying them earlier, our bags are now full from the junk the many orcs have dropped. We stash much of that back in the cavern from before.
Next, it's two stone golems and a juggernaut golem - the latter is something I haven't seen before. Highly resistant to damage, but not as dangerous as the adamantite golems I've come to expect.
A few more orcs go down, and then it's on to the undead section. Four elder vampires... no success at domination, no level drain taken. Our forces are really amazingly tough by now. Lupa reaches her next level, and takes more stealth. The wraith room is equally helpless, and we retrieve the key.
A woman named Samia offers a key for a side path, but we'll skip that for now. When we do take it, we should remember not to trust her. We face wolves and wolfweres, then orogs and golems; Firkraag certainly has a wide variety of monsters serving him.
A helm with elemental resistances? Probably better than the +1 AC Jan's currently using.
The wolfwere ambush fails against logic. Farther forward, there's an adamantite golem - and its poison cloud is strong enough to beat werewolf regeneration, cince it hits more than once and stacks with itself. Jan needs both a healing potion and a Neutralize Poison spell to survive after a hit. He does level up; level 15 mage, extra level 8 spell taken.
Then it's time for the maze. The first guardian gets a 258-point critical backstab - that's what a boost from Enhanced Bard Song can do.
The shield and sword are of little interest to us, and we turn back. Then Samia's party shows up; they intend to attack us for the items. She is the first to die.
On to the last wing. Tazok survives a 124-point backstab and gets two strong hits on Cernd, dropping him below half health, but Jaheira finishes him with a 41-point crit.
Taar warns us against Firkraag, but our strength should be able to handle practically anything now. Still, we'll see about getting the key an easier way.
The truth is revealed; Firkraag is a red dragon, one that had a grudge against Gorion for actions long ago. The key is held by the mage Conster, so we go up to deal with him first. The only combat protections he puts up are a fireshield (blue) and a stoneskin, so we just attack to take him down.
Then Taar decides to leave... by the path down into Firkraag's lair. Uh, wrong way, dude.
Now it's time for the dragon. This party, with four spellcasters, has cast exactly one spell all dungeon - because clawing things to bits was a better use of their time.
Incidentally, one buff we didn't include was anything for Lupa's AC. It's not like it would make much difference anyway. Firkraag's opening dispel removes Jaheira's iron skins, and she gets hit hard in melee. Breach... ineffective. We didn't see his Spell Deflection there. Let's try a Haer'Dalis dispel... fire breath now:
Exiting the dungeon, Rasaad voices his concerns. Lupa promises never to abandon him - to be a pillar of strength until the end.
With Remove Magic learned, Haer'Dalis adjusts his memorization. Those third level slots aren't all Dispel anymore; they're split between Dispel and Remove now. Valygar joins us, and Jan heads back to Athkatla. I equip Valygar with Celestial Fury and Kundane, with short sword specialization to boost the off-hand attacks.
After opening the sphere, we stash Valygar in the map room and bring back Jan. The sphere's exit path is really a pathfinding nightmare, by the way; it stacks people up all the time. The party rests, and enters to join the adventure in earnest.
Lupa takes out a clay golem while Rasaad provides a hard-to-hit target, and then we initiate planar travel. The sea room north of the knights is easy as usual; a backstab takes out the baron, and the rest fall easily to our claws.
Then it's the halflings. We easily overwhelm the normal warriors and backstab Togan, but the next group is more dangerous. Still, despite some mage spells, Kayardi doesn't have a stoneskin up - and that makes him easy prey.
We must complete a golem to move forward. There are more halflings in the way, and this group has two powerful mages. Still, Mantle isn't enough of a defense against our party now; no spells needed to take them down.
After activating the furnaces and killing the fire elementals, the next room has two stone and one juggernaut golem. The golem head is recovered, and we proceed. Rasaad charges ahead to beat up the Elder Orb even before the golem arrives, and gets the kill.
Activating the runes... we use the fire-immune Jaheira for that. She makes some mistakes, but doesn't take any damage for them.
Now, for the confrontation with Lavok, we pick up Valygar. Cernd is temporarily left behind. Lavok goes with Improved Mantle, Spell Shield, Spell Turning, Globe of Invulnerability... OK, that might actually be more than we can easily crack. I try a dispel anyway... and that works. Important note: Globe of Invulnerability doesn't protect against Dispel Magic. Lavok is not the great evil that Valygar feared; instead he is a shell of a man, long possessed by a malevolent force. We will grant him the peaceful death he seeks.
We swap Cernd back in, and head out to take a demon heart. We might as well clear all the fiends in the local area, too.
Lupa gets paralyzed by Lea'liyl, and we use Methild's Harp to clear that up... oddly, it doesn't do anything about the icon over her head.
Rasaad reaches level 26 somewhere in here; his magic resistance is maxed out, and he's up to 85 Find Traps in werewolf form. Greater Whirlwind #2 taken.
The small rooms past Lavok are dealt with, and then it's down to the engine room. Can I handle Tolgerias and company unbuffed? Well, it would help if Haer'Dalis didn't get hung up on the wall before he could cast his dispel. Tolgerias gets off a Time Stop, but merely adds more spell protections. Then he goes with more summons - must be a Conjurer. We kill them before they can do anything, aside from one of his initial djinni that used gaseous form to get away.
Next, the ice room. With Snow Trolls here, Rasaad switches to fire elemental form. Jan trades his Dragon Helm in for the Helm of Defense; better saves are always welcome.
For the fire room, we open with a critical backstab on the greater fire elemental. The Noble Efreeti drops a Fire Storm on Lupa, and only succeeds in harming its allies.
In the engine room itself, most of the golems are easy to deal with, but Jan takes some nasty hits and has to retreat. There is also a Clay Golem, which hits Lupa twice. We use our daily casting of Remove Curse on that.
Jaheira reaches fighter level 16, taking Fire Elemental Token. Haer'Dalis reaches level 28, taking warhammer proficiency and Evasion.
Wait, what? There were two Bala's Axes in that container? That's odd.
Her skill points are invested in stealth, bringing her up to 145/145.
We have one last thing to do - to bring Lavok out to die on his home plane. Valygar is brought in for Cernd, and we do that.
And now, it's time to face Bodhi. We visit a merchant to sell the junk we picked up, visit Cromwell to assemble the Gesen Bow, and it's off to the graveyard.
Bodhi tries to take Rasaad - but he has an answer to that:
And... Cernd is fatigued? He was supposed to be rested from Cromwell. Oh well, I guess we'll rest once we've cleared the above-ground portion. Full daylight is better for the assault anyway.
It's hard to keep my party from running around like complete idiots chasing the vampires, and Lupa is drained two levels. Still, we clear them out easily enough. Fatigue spreads to the rest of the party (including Con-drained Jaheira), and we rest at the Copper Coronet.
Then it's back to the fight. We arrive for the final attack on the morning of day 60.
The first room has paladins, but no vampires to fight.
The next room... Lupa gets dominated, Drizzt's companions get slaughtered, and Lupa herself is nearly killed by Drizzt before we can land the Dispel.
Tanova is easier; our werewolves deal with her minions while she focuses on defense, and then we take her down with brute force. A Fireshield (Blue) isn't much discouragement for this party.
Before continuing, we use a Heal on Lupa. The guard for the spike room uses a PfMW, so we Breach that. We pick up the Legacy of the Masters gauntlets, and Jaheira takes them for now.
Not having Imoen here is a bit off - we would have picked her up if Rasaad hadn't defended himself earlier - but we'll make it up to her after the battle.
Eventually, the end comes. Jaheira gets the killing blow, and we suffer no level drain in this battle.
We picked up several pieces of unique gear from Drizzt's companions, and Malchor Harpell comes for them.
The blindness on Lupa and Haer'Dalis seems to be of pretty long duration, so we dispel it. It takes two attempts to do so.
Now, we clean up a few character bits. We pick up Nalia to follow up on her quest, and she is immediately arrested upon leaving the Copper Coronet. The game tries to be tricky about things, and spawns Khellor Ahmson in an odd place - he must be spoken to in order to progress.
Shuffling some equipment around, this is what Lupa looks like:
This also marks the end of the session, as my computer crashes. The latest autosave is at the entrance to the council building before that last level up, but we're making the same choices when we reload.
We briefly recruit Imoen (in Rasaad's place), and have her fill her spellbook with our many stolen scrolls. That's nearly 70K experience to the team. She doesn't, however, have anything to say about getting her soul back. That only comes up if she's in the party at the key moment.
Then we let her go again, bringing Rasaad back in. He has something unpleasant to say - he's putting the romance on hold in favor of revenge. No amount of pleading can dissuade him.
Small Teeth Pass is a very unimpressive place, and we simply swarm the few monsters with our werewolves. The North Forest has some vampires that show up at night - except that they also show up before the sun sets, and go bat if that happens. I reload and waste a couple hours to deal with that.
Oh, and double-haste (Lupa's boots plus werewolf speed) is really ludicrously fast. I'd take off the boots, but I still want her moving fast when she's carrying the staff for backstab mode.
And... oh yeah, here's a portrait of the pack:
We engage the group of mists without fear; our party is immune to vampiric mist attacks. The mercenaries aren't much trouble; their mage goes with Mantle, so Rasaad switches to fire elemental form for him. The thief is the last to fall, drinking multiple invisibility potions to hide from us. At least we get a Time Stop scroll out of it.
And finally, the forest of Tethir. We find a rabbit and play with it a bit; it finally gets nervous and bolts when we move to surround it completely. Eh, we've got plenty of food in our packs. No need to hunt right now.
And then we meet an old "friend". Coran, I hope you'll be less trouble than last time.
It is, but at least Coran isn't in on it. Safana is working with the wolfweres. It's pack versus pack now.
Then, some wyvern cultists; there's a mage that casts Mantle, so he gets fire elementals.
Some more random monsters, and I test something out - what does Defensive Spin do for Haer'Dalis? A 10-point AC bonus... improves him from -22 (with Enhanced Bard Song running) to -24. He's only two points away from the cap in normal play. The rest of the party ranges from -15 to -17 with the song up, with various type bonuses on top of that.
The last spot here is a cave full of kuo-toa. Their wizard goes with a fireball at melee range... our party are all highly resistant, and many of the kuo-toa have negative resistances. That was stupid. Our party takes a total of 4 damage (Jan, reduced by 70 FR and saving with a 0), while the kuo-toa take a total of 137 damage. One warrior dies outright.
Up next, the Hidden Refuge. Neera joins, and Haer'Dalis goes off to the Five Flagons. With the annoyance level of the traps here, I switch Lupa and Rasaad to trapfinding instead of hiding. A gnome Quaid babbles about "a fortnight" - he was an illusion.
Then, since we've had a lot of travel, we rest, and Neera scribes. Cernd reaches level 23, taking Globe of Blades. The rest attempt spawns a large group of panthers, who are clawed into bite-size chunks. Seriously, not even one identifiable corpse.
Then another round of panthers; at least these left corpses. The third time finally lets us rest.
There are enemy groups with spellcasters sprinkled around, presumably for the sheer annoyance. Our werewolves are fast enough to get to the first hobgoblin shaman before he can cast anything.
Incidentally, Neera is using the Sling of Arvoreen +4, with +2 bullets and the belt of Frost Giant Strength, plus boots of speed. We can afford to do that, because none of that is important equipment for anyone else in the party.
Many low-level monsters are killed and traps are disarmed. One wild tiger explodes in ice - Jan got the killing blow with the bonus damage from the Aln Zekk gauntlets.
And then, it's on to the hidden refuge itself. We talk to the wild mages, pick up their errand quests, and let Reginald swing and miss at Lupa's -12 AC a few times.
For the cats, I employ a little trick - equip the food on a non-protagonist character. When cats escape, they escape from the protagonist who stayed behind in the corner, and are easy to round up later. Double-hasted Jaheira covers the ground extremely quickly, but four cats still escape, and we have to return for more cat food.
Kirik is retrieved, and it's off to the other locations. First, Trademeet. We sell junk, buy Mironda's beer, and rest there. A stop at the keep to deal with the dikes, collect the taxes, and buy a pair of Talos' Gift boots from Bolumir. Then it's Athkatla to pick up the hairband, and the Twofold temple for Wilson. Neera goes back to the Hidden Refuge, as do we.
We pick up several rewards - a sling that doesn't do enough to offset its low enchantment, a tankard that heals the user, and a +2 protection amulet. Of course, with six other +2 protection items, we don't have much use for the latter.
Then it's one more trip to the Bridge District, for Daxus. Neera buffs with Chaos Shield, Stoneskin, and Minor Spell Deflection. Daxus isn't very cooperative:
We head back to the Hidden Refuge, only to find it in ruins.
Then it's time to get the door open. Neera starts with a stoneskin... oops, sex change.
Farther in, we meet Fadell Ironeye, the mercenary commander. She says things are bad - perhaps she could be convinced to turn against Lanneth? There are caged slaves - who are stuck in a loop of "Help us... please" and "Get me out of this hellhole" whenever we get close. Ghallus, at least, has something useful to say - he'll fight if we can free him.
Mironda at the bar helps us out - we buy some drinks, and the mercenaries revolt.
So we're stuck waiting for the confusion to wear off - and when it does, some of the remaining mercenaries go hostile. Oh well, we didn't really care about them. We free the gladiators, wait for the last of the mercenaries to wake up from their Emotion spell, and talk to Mironda. That experience reward brings Lupa to level 25, and Assassination.
For the battle ahead, we buff and bring some summons. Jan goes illusion-heavy, with Blur, Mirror Image, and Mislead - Red Wizards are conjurers, so they don't get an easy dispel. Fadell yells drunkenly, Ghallus brings guards, and the fight is on.
That puts us back to the entrance. One difference - this time, we buy the wand of spell striking instead of stealing it. It has so few charges anyway. Also, we don't bother with Stoneskin on Neera until the fight in the bar. Cernd still takes a Chaos in the bar fight; 40% chance to resist and 70-80% chance to save just isn't enough, apparently. We do manage to avoid killing the mercenaries this time, at least.
This time around, we add Magic Resistance and Resist Fire and Cold to Neera's buffs. Hopefully, that'll help her live through the fight. Also, no summons in advance. Instead, we'll open with an Insect Plague. Lanneth goes down before she can get away, killed by an Amnian Legionary:
We stash and sell, then head to Trademeet. Hayes is confronted and killed.
Upon returning to the refuge, the experience is enough for Jan to reach thief level 20. He maxes trap-setting (in werewolf form) and starts working on stealth. Also, he takes long sword proficiency and another Spike Trap.
While we're there, a messenger arrives from the keep - the Roenalls are mobilizing. We must respond quickly.
Oh, and one ridiculous thing: how to achieve the AC cap in SoA using no limited buffs whatsoever. I've posted this picture before elsewhere, but here it is in proper context.
A Fire Elemental token for base AC -5 and Dex 25. Heart of the Mountain amulet for -2 AC. Enhanced Bard Song active for -10 AC. The Guard's Ring for another -2 AC. The Cloak of the Sewers for the last -1 AC, reaching the cap of -20. Then the Dex modifier of -6 is added, for the best possible overall AC. Activating Defensive Spin would not improve his AC at all, and would only result in rooting him in place. The only way to improve AC farther is to apply type modifiers.
And the thing is? That's almost the same as what I use all the time. I swapped a ring and cloak with Jan and switched a werewolf token for an elemental token, but the rest is the same.
Anyway, off to the keep. There's a scripting bug in the Roenall fight; the mage guard doesn't go hostile. I force attack him, then.
First, we have one more dragon to kill. We travel back to the ruined Amaunator temple. After applying some basic buffs - stone and iron skins, Shield of the Archons and Spell Deflection, Armor of Faith and mirror images, Hardiness and Greater Sun for Rasaad, party-wide NPP - we attack.
Thaxll'ssillyia opens with a PfMW contingency. She gets a Breach from Jan in response. Haer'Dalis joins the attack now that his song is in effect, and very quickly the dragon is nearly dead. A breath weapon has no effect except to briefly blind the party; everyone has NPP, and everyone saved.
Back in Athkatla, Cromwell forges armor from the shadow dragon scales. A fine set of studded leather, but not something anyone in the party needs.
We check out the secret door in the Sea's Bounty - pirates! A completely unremarkable fight, in which the mage wasted his time on a Chaos while we had the bard song up.
Then it's the temple district sewers, and the area hidden by the key we found in Firkraag's lair.
"A powerful psychic force lashes out at you, preventing you from moving" - nope. Haer'Dalis was singing, we were immune.
The enthralled humans in the first room - well, they're a little short on magic weapons, and thus unable to hurt my party.
Then in the next room, ulitharids manage to stun Lupa despite the bard song being active?
The second time around, it's Cernd and Jan who fail their MR rolls against the Greater Malison. I'm only carrying three potions of invulnerability, but that's enough for ulitharid immunity for five out of six party members. Everyone but Haer'Dalis gets either a potion or a Chaotic Commands.
The alhoon in the final room is fond of summons, and ends up lasting quite a long time with multiple PfMW spells. We eventually break its defenses with a dispel, and swarm it. Incidentally, it disabled its brain-suck attack by casting Black Blade of Disaster. For all that - lots of defenses, 9th level spells - it's only 10K experience, less than a random ulitharid. The Wand of Wonder and the Hammer of Thunderbolts are ours.
Now, a bit of character questing. We pick up Keldorn, dropping off Cernd to head back to the Druid Grove for a while. We visit his family, who he has been neglecting... so much that his wife has been spending time with another man. Then it's off to confront Sir William. We head to a reconciliation, and leave Keldorn there. Pack is family, family is pack. His place is with his wife, not with us.
Then it's Anomen's turn. He seems strangely reticent to talk, at least compared to his usual boasting. Another item crafted - Crom Faeyr. We don't have much use for it, but we didn't have much use for the component parts either.
Well, OK, a few days of pointless travel ran out the timer. Anomen is called to his family's estate. We convince him not to seek revenge, then talk to the magistrate. Then it's time to forge another item for the free rest - Wave.
The next step in his quest is another substantial timer, so I'll try to multitask. It's Mazzy's turn. The first thing she does upon joining is to engage Jan in conversation:
Oh, huh, Dorn's standing there? The way he stormed off when we dismissed him, I would have thought he was gone forever. Noted for future playthroughs; you don't necessarily have to keep him permanently.
Anyway, that's it for companion quest. Time to pick up Cernd again. Back in Athkatla, we craft another item - the Silver Sword. And now, it's time to face the last big fight of chapter 6 - the Twisted Rune. We drop off the non-stolen Rogue Stones and enter. Buffs all around, a deva, and go. Both Jan and Haer'Dalis are using the Spell Deflection/SI: Abjuration combo for immunity to targeted spells, exploiting the AI's unwillingness to simply overwhelm spell defenses.
Shangalar opens with 2x Mord's sword and an Incendiary Cloud - but our party is basically immune. He also goes with PfMW, Stoneskin, and a host of elemental protections, but no deflection/absorption spell. He's breachable.
And now Layene is down. The prince summoned was Sunnis.
Now, the overall feel of that fight? They had enough defenses that it took a while to wear them down, but they had a lot of trouble hurting my party. The only thing that really connected was one Horrid Wilting, which two of my party members didn't stop with magic resistance. That's because the Twisted Rune is full of mages, and this party is really good at tanking mages. With mages so good at defending themselves and so bad at hurting us, the pack's new tactical plan against parties is clear: kill the mage last.
We're wrapping up loose ends, so it's time to sell our collection of magical items and buy a few things of interest. While we're sorting through our stash, Cernd speaks to Lupa; he has sensed something off. It is the taint of Bhaal, and she willingly explains to her fellow pack member.
Our stash runs to over 400 items. This could take a while.
I take my first trip outside to sell things, and see someone new - Gorf the Squisher has appeared. OK, I guess I'll have to pick up Mazzy again. Ribald's special stock is where we sell, except for most of the ammo, but what to buy? The Helm of Brilliance, yes. Warblade's not worth it when we've got better swords. The scrolls aren't worth it since Jan doesn't have 9th level slots yet; he'll just steal from Lazarus later. Deidre buys my ammo, and sells the Harp of Pandemonium and Vhailor's Helm.
With the second round of sales to Ribald, we're up to two thirds of a million GP. There's a bit more from topping off our wand collection - three wands each of the good ones - and we're set. We buy a few pieces from Joluv - Ninjato of the Scarlet Brotherhood, Sling of Everard, Defender of Easthaven plus Azuredge from Ribald - and we're done with shopping for chapter 6.
Picking up Mazzy, no new quest right away. But then, heading back to the Copper Coronet leads to the confrontation with Gorf the Squisher.
Reflection Shield, The Victor, AC 3 bracers purchased. Gems and jewelry sold, bringing us up to 770K gold. One last scribing spree brings Jan to mage level 16 and Haer'Dalis to bard level 30. Improved saves and level 8 spells for Jan, two instances of Set Time Trap. The Spell Trigger ability will finally give us the option of breaking mage defenses in werewolf form; I'm going with Pierce Magic/Lower Resist/Breach.
And with that, Chapter 6 is done. Suldanesselar awaits.