Holy symbols and Cloaks player handbook
 ShadowM
Member Posts: 575
ShadowM
Member Posts: 575
Added all the player handbook holy symbols.
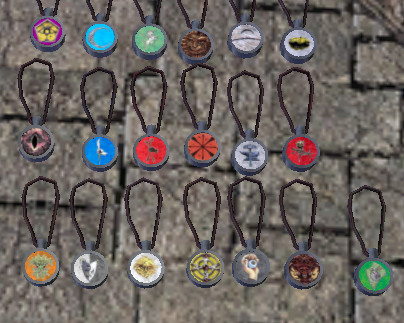
Working on cloaks of all the Deities also.
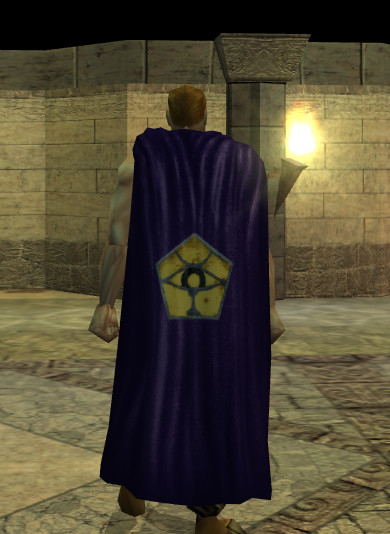
Working on cloaks of all the Deities also.
Post edited by ShadowM on
7
Comments
TR
Yeah I built mine off his. I did not like how the medallions did not have metal casing around them so added that. I also wanted add the casing so I can put circle runic symbols on them. I connected the ropes. I set up a layer system that easy to make a bunch easy. I might do some others. I also want to do some really detailed one that are model out like the unicorn and others.
1. Colors are too bright,, looks cartoony. They need some photoshop grunging or texturing,
2. The symbol on the cloak seems low. An alternate idea, how about making the clasp on the front the symbol (maybe a bit larger).
3. Perhaps a little danglymesh on the cord .. (or reshape the cord a bit to make it seem like its dangling)
Great stuff tho ! Keep em' comin..
Thank you @T0R0 for the feedback also. These are all work in progress and I have my normal job so things are not going as fast as they would if I were off, like the runes have not been added either yet.
On the suggestions.
1. They look kinda bright up close, but If I darken them or smudge them then average distance make them hard to see. I think about some grunging.
2. I debating on the height location, up higher look (by the shoulders actually look kinda dorky like superman cape. I like the idea of the clasp with the symbol (like both the clasp and on back) I look into there might be some limitations with the parts base item.
3. The whole symbol model has danglymesh on it, so it does move about the same amount as the ones from CCC. You cannot see that in the picture. The reason I kept it not so tight is I was testing it with fingers hands version (which are out there and like Aribeth) so I have to go back look where the rope show up in there hands, but I more then likely tighten it up so it look like it has more weight.
TR
I did both.
Well my initial plan was to add them to almost every type of cloak, but if you look at them it comes down to compatibility with some of the cloaks already having colors assigned. I would have to have parts of the cloak share the same color as art on the cloak and limit variety in the cloak. If BD open cloaks to also accept tattoo 1 and 2 and hair and skin on the cloaks or add more layer options like cloth3, leather3, metal3 then that would open more options for color art combinations. I will look at more cloaks and see if I can add the symbols to them like hooded.
You may have old version that does not work anymore. I think I'm using symmetric plug-in and he still around working with blenders so he can be ask any questions about crashes. I'm not sure it been awhile ago when I installed it.
Here the link
LINK
I was thinking about making a video for youtube on it, but it pretty easy now with gimp's grouping.
I will come back with some images to help.
1. Grab the base cloak file and save it out as you new base one (like cloak base basic) or something like that then add guide lines top mark off the top and sides of the image (basically a box where your texture going to go so you have uniformity with your cloaks designs (they all the same height on the cloak and width)
2. Grab your design image and cut it into layers for each cloak layer (if your image has three different colors then cut though into three separate layers.
3. Create a group and move all the layers into that group and chain link them.
4. Grab the group folder and hold down control and drag it over to you base cloak file. Now you have all your layers in a group that you can resize and move together but still have control of each layer under that group. So you resize it and position it where you like inside your guide lines.
5. Now duplicate the group/layer. One is going to be integrated into the cloak image and the other going be use to re-cut out each layer.
6. Hide the cut out layer
7. Change the opacity of the integrate layer to 50% and merge down into the cloak image.
8. Now highlight a cut out layer (for say cloth or leather etc..)
9. Click layer / transparency / alpha to selection (this will outline the cut for the main cloak.
10. Hide the cut layer and click on the main cloak layer and cut out and then paste and you have your layer all set for putting into cloth, leather, metal
11. Repeat for each layer and then merge them down into each cloth, leather or metal layer.
12. Delete the leftover cut group/layers and then export out as your new cloak texture.
TR
fancy border added
LINK