Solo Improved Anvil v6
 ed_boy
Member Posts: 142
ed_boy
Member Posts: 142
In this playthrough, I will be doing a solo run of the Improved Anvil mod (referred to as IA).
About Improved Anvil:
History of IA and solo runs:
About this playthrough:
The challenges that will be faced:
About Improved Anvil:
The best way I find of explaining IA is to first talk about Kangaxx. Before TOB was released, Kangaxx was probably the strongest foe in the game, and served as a bonus boss. Lots of players when they first encountered him found themselves unable to beat him conventionally. BG2, being a game with a lot of options, offered a lot of ways to make this fight against such a terrifying foe easy, such as:
Sikret was a modder in the mid 2000s and the creator of Improved Anvil. Of the mod creators, he had probably the strictest interpretation of what was considered a cheesy strategy, and was not afraid to implement it in his mod. Others have disagreed with his determination of what is and is not a cheesy strategy, and the internet being the internet, these discussions were rarely civil. Notable things that Sikret considered cheesy include:
This is not to say that IA is a bad mod - quite the opposite. If you are happy to play within the constraints of what you are considered cheesy, you will find that it is a very well-made mod - it provides a great feeling of progression and it provides encounters that remain challenging all the way to the end of TOB. It does require some degree of power gaming, and certain classes (notably thief) are pretty much dead weights, and this ends up adding a puzzle element to the game - at any given point you will have a number of strong encounters potentially blocking your advancement, and the puzzle element will be which encounters will provide loot that lets you beat other encounters.
- Use a scroll of protection from undead so Kangaxx cannot target your character while your character chips away with a powerful magic weapon
- Use a scroll of protection from magic on your character so Kangaxx can cast his spells but your character will be unaffected
- Use a scroll of protection from magic on Kangaxx so Kangaxx will always fail when casting his spells
- Hit him with the improved mace of disruption until he happens to fail his saving throw and is destroyed
Sikret was a modder in the mid 2000s and the creator of Improved Anvil. Of the mod creators, he had probably the strictest interpretation of what was considered a cheesy strategy, and was not afraid to implement it in his mod. Others have disagreed with his determination of what is and is not a cheesy strategy, and the internet being the internet, these discussions were rarely civil. Notable things that Sikret considered cheesy include:
- Project image and similar spells
- Hit and run tactics
- Spells or abilities that will disable an enemy (even if they require a saving throw)
This is not to say that IA is a bad mod - quite the opposite. If you are happy to play within the constraints of what you are considered cheesy, you will find that it is a very well-made mod - it provides a great feeling of progression and it provides encounters that remain challenging all the way to the end of TOB. It does require some degree of power gaming, and certain classes (notably thief) are pretty much dead weights, and this ends up adding a puzzle element to the game - at any given point you will have a number of strong encounters potentially blocking your advancement, and the puzzle element will be which encounters will provide loot that lets you beat other encounters.
History of IA and solo runs:
Back in the 2000s, I used to visit the Bioware forums (that unfortunately are no longer up). These forums had regular no-reload threads. Most of the no-reload participants would run vanilla or SCS for their difficulty, but there was one person named saros_shadow_follower who would run solo no-reload IA on insane difficulty.
Saros had quite a few solo noreload runs of IA, and beat it several times with different classes. There was a lot of friction between Saros and Sikret - Sikret considered a lot of solo strategies to be cheesy (and in some way the concept of soloing a party game to be inherently a bit cheesy), and declared that Saros's strategies were either cheating or had been falsified.
I started following this events at the time that IA was on its fourth version. Version 5 was released when I was following events, and despite Sikret declaring the it was more challenging and unable to be soloed, Saros still posted a few solo no-reload playthroughs. This went on for some time, and finally in early 2010, Improved anvil version 6 was released.
At the time of release, IAv6 was by far the most controversial mod of BG2, and it may still hold that title (depending on how some of the more questionable romance mods are considered). The website hosting it (Black Wyrm's Lair) was having funding problems, and it was initially behind a $30 paywall. It was leaked and later made public, but the content of the update was not well received. A lot of the changes between version 5 and version 6 were explicitly anti-solo scripts - if the player was playing with four or fewer members of their party, then the game would change - enemies would use their most powerful abilities more often, important loot would not drop, and at one point in early TOB the player character would be straight up killed.
Saros was indeed unable to do a solo no-reload of version 6 of the mod, and instead did a no-reload with a full party. In the decade since this has happened, Sikret has retired from modding and Saros has retired from IA runs. Another member of the BWL forums, Critto, has taken over development of IA since the retirement of Sikret. Critto's changes have included EE support, and crucially, removal of the anti-solo scripts. Although the anti-solo scripts have been removed, I am not aware of any solo playthroughs of IAv6.
About this playthrough:
Although Saros did no-reload runs, I will be reloading in this run. However, I will try to only use strategies that would be safe for a no-reload run, so this may be considered a route for anyone who does want to no-reload IA. I will likely retry each encounter a few times once a strategy is found to make sure it is no-reload safe, so there may be minor inconsistencies in the screenshots I provide.
I will be playing through BG2ee version 2.6.6.0, with the following mods:
Tweaks Anthology:
Improved Anvil 6.52:
IA Tweaks:
In addition to this, at the start of the game I will be giving myself the tomes that are obtainable in a BG1 playthrough, and two bags of holding for inventory management.
I will cover the unmodified parts of the game extremely briefly, and focus on the new improved encounters.
I will be using imgur to document my progress - each update will consist of one or more imgur albums that cover the encounter(s) in the update.
I will be playing through BG2ee version 2.6.6.0, with the following mods:
Tweaks Anthology:
- Weapon Animation Tweaks
- Icewind Dale Casting Graphics
- Disable Portrait Icons Added by Equipped Items
- Icon Improvements
- Force All Dialogue to Pause Game
- Make Magic Shields Glow
- Unique Icons
- Remove Blur Effect from Items
- Separate Resist Fire/Cold Icon into Separate Icons
- Multiple Strongholds (No Restrictions)
- Remove Experience Cap
- Multi-Class Grandmastery
- True Grandmastery
- Triple-Class HLA Tables
- Max HP at Level One
- Maximum HP on Level Up
- Maximum HP for All Creatures in Game
- Bottomless Bags of Holding
- Unlimited Ammo Stack Size
- Unlimited Gem and Jewelry Stacking
- Unlimited Potion Stacking
- Unlimited Scroll Stacking
- Give Every Class/Kit Four Weapon Slots
Improved Anvil 6.52:
- Improved Anvil
IA Tweaks:
- The Gypsy questline and the Limak encounter are available for non-mage protagonists
- The Shimmering Light and The Good, the Bad and the Ugly quest lines are available for non-ranger protagonists
- Non-essential class- and kit-based drops are available to all protagonists
- Mage- and ranger-specific rewards and crafted items are available for all protagonists
- Enable the hardest versions of XP-based encounters in Chapters 2&3
In addition to this, at the start of the game I will be giving myself the tomes that are obtainable in a BG1 playthrough, and two bags of holding for inventory management.
I will cover the unmodified parts of the game extremely briefly, and focus on the new improved encounters.
I will be using imgur to document my progress - each update will consist of one or more imgur albums that cover the encounter(s) in the update.
The challenges that will be faced:
A good example of an IA enemy is the coin golem:
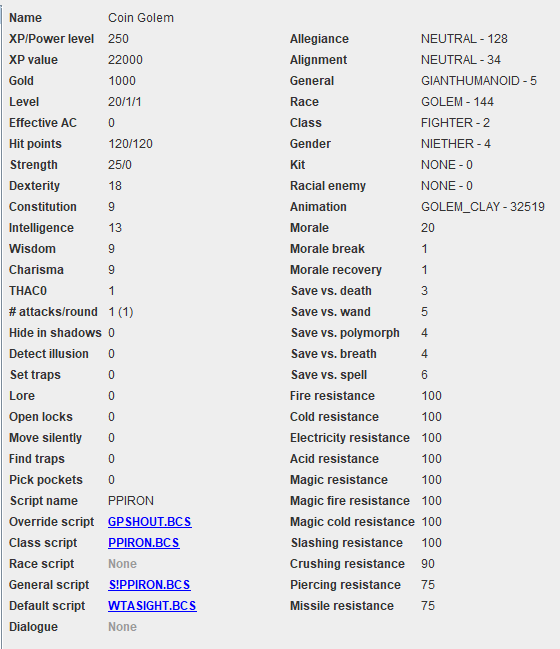
As terrifying as its base stats are, it has equipment on top that that make it scarier. It is under a perma-haste effect that means it attacks three times per round for 5d10+14 damage that attacks as a +4 weapon. It has an effective THAC0 and -10 and AC of -4, and needs +3 or better weapons to hit. It is immune to any spell that would disable it. This is considered a mnior golem by IA standards - we will fight lots of them, and they will always be part of a group. Later fights in the game will spawn these as reinforcements.
In order to destroy the coin golem, we need arcane protection spells - Stoneskin will completely block the damage that it deals, and PFMW will provide four rounds of protection. In that time, our best damage output will be to attack it with piercing weapons, which it will only take 25% damage from.
In vanilla BG2, the arcane caster was the strongest class in every aspect - the best buffer, the best debuffer, the best crowd control, the best DPS and the best tank. IA enemies are a lot harder for a mage to deal with offensively - for a coin golem, it would take most of a mage's spellbook to take out one, and they never travel alone. The mage does remain the greatest defensive class in the game, though, and in order to survive the game we will need access to arcane buffs. The classes that we can use are:
Our early game will revolve around doing as much unmodded content as possible. We will use potions, scrolls, and other consumables to allow us to beat some of the modded encounters. At 2.55m experience we will gain access to level 6 arcane spells and at 3m experience we will gain access to HLAs, and these two power spikes will herald us entering the mid game - we will have a somewhat standard set of buffs, and out strategy for most fights will be seeing if we can keep this set of buffs going long enough to beat the fight. The late game comes when we assemble our endgame equipment and become resistant to dispelling, with each equipment-sourced buff being a power spike.
Things to watch out for in IA include:
As terrifying as its base stats are, it has equipment on top that that make it scarier. It is under a perma-haste effect that means it attacks three times per round for 5d10+14 damage that attacks as a +4 weapon. It has an effective THAC0 and -10 and AC of -4, and needs +3 or better weapons to hit. It is immune to any spell that would disable it. This is considered a mnior golem by IA standards - we will fight lots of them, and they will always be part of a group. Later fights in the game will spawn these as reinforcements.
In order to destroy the coin golem, we need arcane protection spells - Stoneskin will completely block the damage that it deals, and PFMW will provide four rounds of protection. In that time, our best damage output will be to attack it with piercing weapons, which it will only take 25% damage from.
In vanilla BG2, the arcane caster was the strongest class in every aspect - the best buffer, the best debuffer, the best crowd control, the best DPS and the best tank. IA enemies are a lot harder for a mage to deal with offensively - for a coin golem, it would take most of a mage's spellbook to take out one, and they never travel alone. The mage does remain the greatest defensive class in the game, though, and in order to survive the game we will need access to arcane buffs. The classes that we can use are:
- Mage: Fast leveling up and access to arcane spells, but very weak offensive options against enemies like golems
- Bard: Great levelling and the best class for winning dispel wars. Spell slots stop at level 6, but that is not a major restriction, as levels 4-6 are the most important spell levels. Unfortunately, its offensive capabilities are only slightly better than a pure mage - it does not gain the APR from grandmastery or the APR from being a warrior class. It has access to UAI, which is a plus.
- F/M: A very strong option, both dual and multi class. Unfortunately, in the late game we will encounter enemies that use "purge magic", an unresistable, unbeatable dispel. For these encounters, we will need to rely on item-based buffs, which are undispellable, and the best of these are not available to a F/M
- F/M/T: Like the F/M, but with access to UAI. The thief slows down the level progression with mostly useless levels, but it has unparallel late game, and there are certain late game fights that will require every ounce of power we can bring to bear. We will therefore be going for a F/M/T.
Our early game will revolve around doing as much unmodded content as possible. We will use potions, scrolls, and other consumables to allow us to beat some of the modded encounters. At 2.55m experience we will gain access to level 6 arcane spells and at 3m experience we will gain access to HLAs, and these two power spikes will herald us entering the mid game - we will have a somewhat standard set of buffs, and out strategy for most fights will be seeing if we can keep this set of buffs going long enough to beat the fight. The late game comes when we assemble our endgame equipment and become resistant to dispelling, with each equipment-sourced buff being a power spike.
Things to watch out for in IA include:
- It is common for an enemy to be weak to one of piercing, slashing or crushing damage. Our weapons of choice will therefore be shortswords, longswords and flails.
- Equipment that used to set an attribute to a fixed value now typically provides a boost to that attribute instead.
- Access to certain arcane spells like improved haste is extremely limited in IA, and this will dictate a lot of the fights we can do.
- It is common for mid to late game boss enemies to summon minions that provide additional experience and loot when killed. Since we will want to squeeze every drop of XP possible out of this game, we will want to ensure that each round of minions is summoned before killing the main boss enemy. This typically tops out at six minions summoned.
- When a boss enemy is triggered, area transitions are often disabled and door closing is often disabled until the boss is beaten
- Weapons that do small amounts of elemental damage on each hit have been changed so they instead have a 5% or 10% chance of doing a lot of elemental damage. In theory the DPS is the same, but due to how rounding works in the game, it is a nerf to DPS. The major result of this is that disrupting mages under stoneskin is a lot harder.
- The thief's detect illusion does not work against SI:Div.
- There are a few "ambush" fights where the party is auto-dispelled. The areas we access in the early game will be based a lot around avoiding these fights.
- A lot of IA enemies have regeneration, and some of them will have fast enough regeneration that keeping up our DPS will be a big issue.
- Some enemies can only be hit by equipment of a high enough enchantment level - getting our first +3 piercing and +3 crushing weapons will be big power spikes.
- Gold will be a concern in this game, as all our equipment upgrades will get expensive. The only infinite gold sources left in the game that I am aware of are the fighter and bard strongholds, and those we will not gain access to for a while.
- Our first priority for thief skills will be pickpocket, then open locks and find traps - Pickpocketing we will use mostly for generic loot and money in the early game, as we will pickpocket everyone we can safely pickpocket. The locks and traps we encounter will be okay sources of experience, and we can easily buff them in the short term with things like DUHM. Move Silently and Hide in Shadows will be mostly useless to us, detect illusion and set traps completely useless.
- Our first HLA will be UAI, and our second HLA will either be an extra level 6 spell or assassination (as a super critical strike against certain enemies). We will spend most of our HLAs on critical strike, and will probably max out at 20 of them eventually.
- If the player's reputation ever drops below 5, it will trigger a variable that permanently treats the player as non-good, even if their reputation increases above 5.
- Chain Contingency cannot be cast more often than once every 24 in-game hours.
- The more powerful wish options are only available to single-class mages. Wish resting will not be an option if wish has been cast in the last 24 hours, but since it is locked to single class mages that won't affect us. We won't be casting wish naturally, but one of the endgame weapons casts is with 2% change on hit so we will get a few wishes in the late game.
- Silence is a very powerful effect - dragons and some liches have access to an unresistable form of silence. We will fortunately avoid this by obtaining the amulet of power extremely early on
Post edited by ed_boy on
7
Comments
The gender has no mechanical implication, so I will be choosing Female as that has the best portrait option in the game.
Here it is - I am a sucker for purple.
For the race, we have two options for a FMT - Elf and Half-Elf. A half-elf is quite boring. An elf has two notable changes - a bonus of 1 to THAC0 for bows, short swords and longswords, and trading one point of constitution for a point of dexterity. I'll get into this in more detail later on, but we pick half-elf primarily because of that point of constitution.
As I explained in the original post, we will be picking FMT.
A lot of the IA scripts require good alignment. Ideally we'd pick lawful good for the starting 12 reputation, but that is not an option, so we need one of neutral or chaotic good. Neutral provides us with 2 DUHM but chaotic is 1 DUHM and 1 Vampiric Touch, so I pick Neutral good.
Now come the abilities. We'll explain each one in detail.
First up is strength. We will want to have a high strength even while dispelled. Most ability-setting items have been changed to instead boost abilities, so we will want a high innate strength. Since we will be using the BG1 strength tome, we can hit 19 from the start, so we don't cate about the exceptional strength roll.
Second is dexterity. In the mid to late game, anything that wants to hit you will hit you, so AC doesn't matter. Anything dangerous is effectively immune to missile attacks, so ranged THAC0 doesn't matter. Thieving abilities get boosts from dexterity, but this is more of a quality of life change than a serious boost. We will start with it maximized to help our early game and get a small defensive boost in the mid game. If we had chosen Elf, we would have gotten only the thieving bonuses - our unbuffed AC bonus would be still -4 and AC bonus under DUHM would still be -5 (at least until we hit level 12, and are into the mid game)
Third is constitution. The math on HP for a triple class character can get a bit complicated, but it works out that if we went for Elf, we would have lost 9 HP in total (1 for each of the fighter level ups to level 9. It is a bit painful to see the shorty saving throw bonuses that we won't be able to get for this class - if there we no racial restrictions, then dwarf would be the best choice.
For intelligence, we could in theory stay on 18 intelligence (17 before applying tomes), but the 19th point adds a bit of quality of life in lore modifier. Spell scribe success rate is a mechanic, but not one that I enjoy and I will not be using it.
Wisdom is almost useless for our character. The only mechanical impact it has is when wishing. We won't be wishing until late game when we will have a total of +3 modifiers to our wisdom (+3 tomes, -1 spellhold, +1 Machine of Lum), so in theory we can have our unmodified wisdom at 15, but for east of use I will up it to 18 for the lore bonus.
Finally, Charisma, which will be our dump stat. I'll put whatever leftover points are in here, and reaction and buying adjustment are nice, so I will roll a bit so we have a good number of leftover points to put here.
After rerolling a bunch, this is the final stat block we'll be working with. The exceptional strength roll would normally be really nice, but the tome will shortly make it not matter.
We have 5 weapon proficiency points and 165 thieving skill points to spend.
For the weapon proficiencies, I put 2 in two weapon style, 2 in longswords and 1 in shortswords. The planf or subsequent proficiencies is to get 2 pips in each of our three main weapon types (longsword, shortsword, flail) then start raising them all to 5 pips (first flail, then longsword, finally shortsword).
We then assign our skill points. When pickpocketing, your percentage chance of success is your pickpocket skill minus your target's pickpocket skill. Most targets have a skill of 0, but some have higher (with I believe the max being 100 on characters such as Aran Linvail), so our goal will be to his 200 pickpocketing and 100 open locks/find traps. We can boost with buffs like DUHM and potions of thievery, but the closer we can get our base thieving abilities to this level the better for convenience purposes.
The five level 1 spells we learn are Friends, Identify, LMD, MM and Shield. We will normally stick with MM and LMD as our main spells, as they provide good interruption potential, and MM provides surprisingly good additional DPS.
For level 2, we learn Blur, Resist Fear, and Vocalize. Vocalize is one of the extremely rare spell scrolls, but it only has value as a crafting ingredient - I mostly pick it to fill out the spellbook since the others we will get much easier access to.
For third level, we pick remove magic and wraithform. Remove magic is one of the most important spells in the game, and is somewhat rare to find. Wraithform is there to help us against some early game threats where the enemy does not have magic weapons.
We round off by picking our appearance. I try to match the portrait.
Finally, the character name. I choose Othala.
With that, we are ready to set this game off.
Insane difficulty, of course.
The cutscene I'm sure we're all so familiar with starts.
As Imoen joins us, we get a message that the item randomizer has successfully initiated, which tells us that it is now safe to save and quit.
One quick EE keeper later, and our inventory is looking a lot fuller. We have two bags of holding (pink for items we want to hold onto, blue for items we want to sell), and eight tomes.
We have also changed our appearance from "Fighter Female Elf" to "Mage Female Elf", as it looks a lot better when we will have robes equipped.
We read the tomes and boot Imoen, Sorry, but it's a solo run.
Part 001 - Chateau Irenicus:
In the last part, we created our character and sorted out our inventory and tomes. Now it's time to shoot through the dungeon.
At the start of each update, I will give a look at our character record and our inventory. Right now there's not much to see in the inventory.
No pantaloons for us.
Minsc and Jaheira give 3000 experience each when freed, but only if you let them into the party. I let them join then immediately give them the boot. Some might argue that this means this isn't a solo run, but I consider these characters joining the same as I treat Imoen joining at the start.
All this escaping is enough for us to hit fighter level 6, which comes with an additional proficiency point in short swords.
We have our initial gear ready for our first combat encounter. For now we're focusing on that sixth fighter level we just gained.
The lightning machine spawns up to six memphits. We let them all spawn before we disable it.
There is a bit of an engine quirk - when we cast DUHM, our constitution increases to the point where we start to regenerate. If we start to rest at this point, our regeneration rate is counted for the duration of the whole rest, essentially giving us a full heal in a single rest. Although this sounds like a big exploit, it isn't really - any scenario where we can rest once we could rest loads of times to fully heal anyway.
For Aataqah, we choose to press the button as the ogre mage we fight is worth more XP than the four gibberlings if we chose not to press it.
Although we could kill the lesser clay golems now, they are a bit too strong to do so comfortably. We'll clear out a bit more of the level first and try to hit a couple level ups before we take them on.
The Otyugh in the centre of the map is a remaining enemy that we can cheese, as it cannot move close enough to attack us. Unfortunately, it is immune to missile damage. Fortunately, wraithform protects us from its attacks.
For Ilyich, we prebuff with DUHM, blur and wraithform.
Under wraithform, the only duergar that can do anything to us is the mage, so we prioritize him first.
This is enough for us to hit Mage 6 and Thief 7.
One of the traps here needs us to DUHM to boost our find traps to 70, and even then we need a couple attempts to disarm it. For those taking this as a guide, find traps should be prioritized more than I have.
The dryads can be pickpocketed for antidotes and potions of healing. There is a chance to critically fail pickpocketing which turns individuals hostile. Therefore, for the no-reloaders, I would suggest that you only pickpocket those who you don't mind turning hostile, and in areas with no passer-bys to also turn hostile. I will only give updates on significant pickpocket targets in the future - either ones with notable loot or ones that you might miss as pickpocketable.
After giving the bottle to the genie, we have a major fight - the lesser clay golems. We can fight them here and now to only fight one at a time. I prebuff with blur, DUHM and an oil of seed. In hindsight I should have taken mirror image as a level 2 spell known. Unfortunately, wraithform will not help us here.
When fully buffed, we have 81 HP, AC -6, THAC0 8, 3 APR and do 13-20 damage on each hit. The golems have 72HP, AC9, THAC0 4, 2APM and 9-23 on each hit. Although we in theory beat them on every front, we still want to take them out now individually instead of both at once - a couple critical misses can spell disaster.
While the oil of speed is still up, we take out the cambion. This is a much grindier matchup - it has AC -3, 72HP, THAC09, 2APR and hits for 11-17.
Some of the traps in this room require a find traps of >=70 (in our case, requiring DUHM) to disarm. If I'm doing this again, I would want to boost my base find traps to 70 or so to avoid problematic traps like this.
Yoshimo offers no reward for letting him join, so we do not let him join.
The memphits in the memphit room offer no XP for killing them, so we just kill the portals as fast as possible.
To maximize XP, we try to get the killing blow on the assassin before killing the escaped clone.
Near the end of this corridor is the first new IA enemy we will face, and effectively the boss of Chateau Irenicus. It is a lesser spirit spider. As the name implies, it is the least powerful of the new spiders added in IA, but for where it is it is quite scary.
It has 54HP, -8AC, and rapidly regenerates health. It attacks 4 times per round with 8 THAC0 for 2-5 damage. It strikes as a +3 weapon, so wraithform does not help. Fully buffed, we need to roll a 16 or more to hit it. Beating it in a straight up fight wont be possible, as it will regenerate faster than we can damage it without using limited resources.
Instead, we do something that will be very unusual for this run. If we take off our armour, it enables thief abilities. Our dexterity gives us a base 25% hide in shadows and move silently, so we can keep hitting the button until it works.
Opening a door or failing a stealth roll gives us twelve seconds of invisibility, which is more than enough to get through this door and close it behind us.
In the trap corridor, we disable all the traps so the duergar don't set them off and rob us of XP. Make sure to identify all the wands, we'll need them soon.
This brings us to fighter level 7. The level up screen does not show the most important part - an additional 1/2 APR.
We play the gullible role and free Frennedan so we can kill him for XP.
In this room, Ulvaryl attacks some thieves. If we can kill her, we get 8000XP. We can do this by prebuffing with DUHM and an oil of speed. We can cast a magic missile every round, using auto-pause to know when are ready to cast the next. We want as many of the thieves left alive as possible, as they will turn hostile and we can kill them for more XP.
While still under the oil of speed, we can head to this room, where another lesser spirit spider lives.
We can lure both spiders to the same room.
They can both be beaten by using the potion of fiery breath from Frennedan's room and the wands we have picked up - fire and lightning (frost will not work). While using the wands, we want to kite them to avoid taking any hits. The second wave of damage from the fire effects can be used to determine when the round is over and the next wand can be fired. When using the lightning wand, trying to get multiple bouncing hits is a big plus.
Ultimately, if the fight goes awry, the spiders can at least be shut away - they only give 4500 XP each, which is not a lot in the grand schema of things. For a no-reload run, I would suggest just leaving the spiders locked away - the chance of things going wrong compared to the small experience boost just makes it not worth it.
This allows us to hit Thief 8 (the thieving skills look higher than they are because of DUHM).
That is all there is of note in Chateau Irenicus, so it is now time to get going.
Another familiar cutscene plays.
We get a good chunk of experience and will end this part here.
Part 002 - The Promenade:
In the last part, we cleared out Chateau Irenicus. There were a couple times when we lamented minor things about our build (should have taken mirror image, should put mote into find trap), but we got out without any major roadblocks (the spider can be easily avoided). In this part, we will be going through the Promenade before meeting Gaelan Bayle.
This is our starting loot from Chateau Irenicus. The bow is there if we every get a sitting duck target, which is admittedly very unlikely. Even after we deck ourselves out with magical weapons, we will hold onto two nonmagical weapons so we can hit mages through PFMW. The Helm of Balduran will be our regular headgear for a long time. Currently we tend to use arcane buffs before combat and put on the armour before entering in, but that will change before too long. Elven chainmail comes rather late in the game for how good it is, and we will soon have spells that give us better AC than chain could anyway.
In Arnolious's shop, you can pick all the locks for experience, but opening the containers will trigger the guards.
The only notable pickpocket target is Ribald, who has a long sword + 2. It looks like you no longer can get the ring of regeneration from him in IA. This is at least an upgrade to our current weaponry, but I miss the ease of use the ring of regeneration offers.
With nothing else left to do, we enter the tent.
Answering the riddle means that we have hit mage level 8. We have two level 4 spell slots, but no known level 4 spells. I will hold off on buying scrolls, however, as we want to save our money for something important.
The werewolves are illusionary - if we do not attack them they deal no damage to us. They drop no experience or loot, so there is no point in attacking them. The shadows are real, and they are worth attacking.
Facing Kalah, we make sure to kill off the shadows before Kalah himself. Quayle is in no real danger.
With nothing left to do in the promenade, we go to the slums to meet Gaelan Bayle.
Chapter two starts.
It is possible to sell all our loot and pay Gaelan immediately, but I checked and there is no reward for doing it earlier rather than later.
We'll end this part here.
Part 003 - Athkatla (Vanilla Parts):
In the last part, we finished off chapter one, and started chapter two. We're still in the very early stages of the game when levels are coming in thick and fast, so we should see a few levelups soon.
We have some nice equipment, but our armour is lacking. We still have to do arcane buffs precombat, then put on the armour to actually fight.
In this part, we will try to do as many of the "boring" parts of Athkatla as possible - either things that do not involve fighting, or only involve easy fighting. We want to gather as much XP and loot as possible before we get to the hard parts of IA.
Picking locks and disarming traps in Gaelan's home brings us to thief 9. We dump most of our points into find traps, since open locks and pick pockets are easy to buff with potions.
We make sure to say the angry option to Cohrvale.
We pick a fight with Amalas.
We pick up a couple important locations - the windspear hills and the de'arnise keep.
While pickpocketing, we get good loot off Lehtinan - valuable gems and scrolls. We will be able to get those later when he dies, but for now at least it's a good bump in our finances.
There's some good loot to be had in the back rooms. As we loot, we pick up the teddy, but we will not be returning him for a while - there's no way to return from the graveyard district without triggerring an IA improved ambush.
We don't go into the other part of the back rooms - the slaver fights are IA improved, and we're not ready yet.
Our second location is the government district. Not all Athkatla area transitions are safe in IA, so I try each transition a few times to make sure it's safe.
The Viconia fight is vanilla, so it is not much of a problem, especially if we cast wraithform first. We just need to make sure we get all the killing blows and focus down the spellcaster first.
In the government park we find Delon, who tells us about the Umar Hills.
Inside, we talk to Tolgerias. Unfortunately, there are no good pickpocket targets anywhere in the building.
From the government district, we can safely travel to the docks.
We enrage the cleric outside Renal's building for a bit more XP.
We head inside and get the quest from Renal. He has some good loot in his containers, but when it comes to pickpocketing, there is only potions and vendor trash.
We won't be doing the main part of the quest for now, since it is has some IA improvements, but we will take advantage of our potion-enhanced thievery abilities and sort out all these locks and traps.
This is enough for us to hit Fighter 8, a relatively boring level.
Next up is the Temple district, but we cannot head there directly, we have to head there via the slums to be safe.
We get the unseeing eye quest. Most of our temple looting is unable to proceed without triggering theft scripts (which are otherwise extremely scarce in BG2).
We head to the High Hall of the Radiant Heart and pick up the fallen paladins quest.
Our next destination is the city gates, which can safely be traveled directly to.
Flydian gives us the directions to Trademeet.
We make sure to interact with the east border of the gates, to unlock the areas as travel destinations, but in reality we will be traveling to the bridge district.
We'll be spending more time here than we did in the other areas, there's more going on for us.
This house here contains interesting loot - the silver horn of Valhalla.
This is it in its base form, but it can be upgraded twice in vanilla and once more in IA. The upgrades aren't enormously useful, but it is still nice.
We talk to Rampah and Rose to solve the skinner murders.
We pay five gold to watch the local theatre troupe and pick up another quest.
We want to return to the eastern edge of the bridge district for two reasons - to continue the fallen paladins quest and to continue the skinner murders quest. However, we have to be careful to not trigger the Neera encounter - we want to save that until later on.
If we travel to the gates and back, we safely get transported to the right hand side of the map. We can see some of the people involved in the Neera encounter, but we do not get close enough to trigger it.
As long as we're careful not to head any further to the left than where we spawn in, we can safely talk to the Lieutenant.
Carrying on round, we have our first encounter with the fallen paladins where we eagerly help them by stealing their kills. We prebuff with DUHM and an oil of speed for maximum DPS.
We get a few kills in before we are sent to retrieve the cup.
Oil of speed lasts for an hour, so that is enough time to head to the temple district and back before it wears off. We also set up blur, DUHM and wraithform before heading back, as we will need it in this fight.
Anarg has 40% physical damage resistance, 90% magic resistance, 108 HP, and slow regeneration. Fortunately he is the only one with a magic weapon, so wraithform means we only have to worry about Anarg.
Anarg himself is worth 10k experience, and he takes the title as our most powerful vanquished. Two of the paladins outlast the wraithform, but they are not much of an issue.
This is enough to hit mage level 9. We unlock 5th level spell slots, but we don't have much to do with them just yet.
By carefully moving around the buildings, we make it to the tanner shop without triggering Neera.
We stop at this level to get the body, but specifically do not go further - there is an IA-improved enemy down there that we're not ready to face just yet.
We head to the government district (via the gates) and hand over the inspector's body. We get 500 gold, a point of reputation, and a hefty 45000 experience points.
This experience brings us to Thief 10.
We head to the temple district (again via the gates district) and finish up the fallen paladins quest. We get 17500XP and another point of reputation, and with that we will end this part.
The character creation I go into a fair bit of detail. Parts 1-3 are probably a bit boring - apart from two monsters in part 1, everything is vanilla, and I did say I was going to cover vanilla content extremely briefly. Next part will probably be the TG questline, which is a mixture of vanilla and enhanced material, and should be more interesting.
I have been deliberately avoiding the nighttime encounters, and probably will continue to do so for quite a while.
Pickpocketing has been less useful than I thought it would be - I have been pickpocketing every possible target, and there has been only one (Ribald) where the loot is anything other than potions or low value vendor trash. Parts 2 and 3 seem a lot shorter than they were because a lot of it was off-screen pickpocketing for no real reward.
If I was going to do this again, I would not bother with pickpocketing at all - I would get find traps and open locks up to 100, then probably set traps and detect illusion, as even though their use is extremely minor it's still more than pick pockets and doesn't need to be boosted to 200 to be safe. I would also take mirror image over resist fear - I was worried we would have to deal with mages casting horror, but that has not happened yet.
In the last part, we cleared out the vanilla Athkatla quests we could do, bringing our XP from about 300k to about 525k. We are reaching the end of what we can do without running into IA-modified content, however. The mage spell progression has an interlude between spell levels 5 and 6, and we will need to hit mage level 12 before we get level 3 spell slots. Our thief and fighter levels are similarly uninteresting for a long time, so any major progression we get before then will be equipment-based.
Speaking of equipment, this is what we're currently on. We could use some upgrades.
Looking in near infinity, we find some good news - If we side with the Shadow Thieves, we will not miss out on any of the night-time encounters. Even better, the vampires will attack us instead of avoiding a confrontation.
Incidentally, Ama is the fake shadowmaster used in the TG stronghold questline.
We want to sell the loot we have accumulated so far. I have a lot of extra gold to spend just be selling generic loot since I have done a lot of pickpocketing. For a non-pickpocket run, this might be a tighter budget.
For those on a tighter budget, IA does not give any XP for scribing scrolls, so any spell scroll that is not planned to be cast should be saved and solt for money instead. It may also be necessary to sell the potions accumulated - by selling my potions of healing and extra healing, I could have gotten an extra 6500 gold. A lot of the unique items (eg sword of chaos) could be sold for money, but I hold onto them because I want to.
I tried casting friends beforehand and it didn't alter how much money I was offered. Sale price is affected by if the merchant has an item in store, so you want to sell infrequently in large chunks to the merchant with the smallest inventory. I chose Hes in the promenade (travelling via the gates).
Valen approaches us as soon as we have sold our loot and asks us to visit Bodhi.
As soon as she leaves, Brus makes an appearance.
Now is the big choice moment of chapter two - do we go with Bodhi or Aran Linvail? Let's compare them:
* The total XP of the main chapter 3 quests is higher if we side with Aran Linvail, as vampires are worth a lot more than shadow thieves
* Siding with Aran gives slightly earlier access to the amulet of power
* Siding with Bodhi gives better loot, including some elven chain that would vastly enhance our current combat abilities
* Aran's quests are a lot more challenging than Bodhi's quests, so we will have fewer options for gaining XP in this chapter
* Siding with Bodhi locks us out the best form of the nighttime encounters
Overall, Aran comes out ahead. The fist bullet point alone is probably enough, the rest is just gravy.
While we're here, we talk to Maheer to upgrade the horn of valhalla. We'll need a Beljuril to upgrade it again.
We head to the slums and Gaelan (this time heading directly, going to the gates is dangerous from the promenade). We hand over the gold, get a key to Aran, and 45k XP.
We head to the docks (directly) and check out the main shadow thief lair.
There's not much of interest in the map except for Aran's room.
We get given a ring of protection +2 and the amulet of power. The amulet of power is incredibly useful - permanent negative plane protection means we have a chance against vampires, and the casting speed bonus means that certain spells like stoneskin and PFMW cast instantly and without the chance of interruption. The IA version does not have permanent vocalize, but it has upgraded versions that do.
Pickpocketing the man himself gives us a light crossbow + 2, which is useful only for selling.
We head to the adventurer's mart (via the gates) and pick up some important scrolls: Haste, Mirror Image and Improved Invisibility.
Our standard memorization setup is currently:
4*Magic Missile
1*Mirror Image, 1*Blur, 1*Luck
1*Ghost Armour, 1* Haste, 1* Wraithform
1*Improved Invisibility, 1* Stoneskin
1*Oracle
We will try to go into any encounter with a pre-rest stoneskin also cast. We also have MGOI known, so we can swap to that. The Oracle is there because scrolls of breach are expensive, and we will hopefully find one before we need it.
We stand rest up in the Crooked Crane, stand by the door, and buff.
Our standard buff list is:
Ghost Armour (50 Rounds)
Blur (4 + 2*lvl = 22 Rounds)
Mirror image (3 + 1*lvl = 12 Rounds)
Haste (3 + 1*lvl = 12 Rounds)
II (3 + 1*lvl = 12 Rounds)
DUHM (10 Rounds)
Luck (3 Rounds)
Aside from luck, we have essentially 10 rounds of peak combat performance from the point when we stop buffing.
If we wraithform, that has to come last and it lasts 2*lvl rounds.
This is how we look fully buffed. AC-10, 4APR at THAC0 5 and 15-22 damage. This is pretty sweet.
The reason why have chosen the Crooked Crane is because we want an Indoor location that we can rest at and then buff ourselves that is as close as possible to the spawn point of a nighttime encounter. The Crooked crane is the best solution to this.
We also make sure that it is between midnight and dawn. CTRL+T is useful for this - it advances the in-game clock by an hour. Although it is technically a cheat key, I don't consider it as such when used out of combat - it just saves me having to leave the game idle to advance the in-game clock.
Hareishan is attacking some shadow thieves. To maximize XP and loot, we wait for her to hit one, then hit that same one ourselves to steal the kill. After killing them all, she turns hostile and attacks us, but she is not IA improved and goes down easily.
Due to how the haste and APR system works, when dual-wielding our 4 APR is 2 with the main hand weapon and 2 with the offhand weapon. If we were to single-wield, we would get 3 with the main hand weapon. Vampires require +2 or higher weapons to hit, which means we get higher DPS by single-handing. If we were not playing a pickpocket character, we could have potentially bought a +2 weapon, cast enchanted weapon, or used the sword of chaos we picked up in Chateau Irenicus (the lack of proficiency will be made up for by the buffs).
This first encounter drops important scrolls like spell thrust and contingency.
The second encounter is Salia recruiting two potential candidates. We cannot kill the vampire, but the candidates are worth good XP each.
The third encounter is Sansuki who is being pursed by Del and two nameless vampires.
This is a scary fight. Dell is the most physically threatening of them, and needs to be taken out first. The other nameless vampires will start trying to dominate us if the improved invisibility wears off (which is auto-lose for a soloer if it succeeds), so we need to win quick. Fortunately, they can all by hit by +1 weapons, so we go back to dual wielding.
In order to make it reload-safe, I had to drink a potion of storm giant strength. Most potions of giant strength are not that useful (our DUHM brings us to 22, and it will soon bring us to 23), so normally only storm and cloud are worth holding onto.
In a pinch, the player can retreat into the Crooked Crane - the IA scripts that prevent area transitions during big fights do not include the nighttime encounters.
The fourth encounter is Parisa dominating a thief. Both Parisa and the thief attack us, but they are not that scary. Parisa needs us to single-weapon again.
The fifth and final encounter will be more difficult, so we need to prep.
A daytime encounter here is the bullied merchant. He is notable in two ways - he is our cheapest source of a breach scroll (1450 instead of the standard 1650), and he is the only remaining merchant I know of that can be stolen from (for those buffing pickpocket).
We also do some more shopping elsewhere. We travel directly to the promenade to get a scroll of enchanted weapon from Ribald and head back via the docks.
Our spell prep changes - we use our fifth level spell slot of phantom blade (which should have been dropped by the first night-time encounter) and go in with a precast enchanted weapon longsword.
We equip the enchanted weapon sword offhand and do the same precasting, except phantom blade goes before DUHM.
The final encounter is Tanova and two generic vampires. This is like the Del fight, but scarier - Tanova needs +3 weapons to hit, which is why we have the enchanted weapon and phantom blade. She also has 20% damage resistance, but seems to be easier to hit.
I tried it a couple times, and I never got into the danger zone of domination attempts. A no-reloading might want to also potion of strength here to be safe - the earlier Del fight we could also use the phantom blade/enchanted weapon strategy, which might make that one safe to do without a potion.
This is the last of the night-time encounters, though, and we will be free to walk around Athkatla at night.
We perform the prebuffs at the Sea's Bounty (except for luck) and go to Mook.
Our buffs tick down during cutscene time, but they are still active when it comes to fight, and forcing Lassal to retreat is no problem.
Aran give us a chunk of experience and sends us to the second mission in the five flagons, which we won't be going to for a while.
We will end this part here.
These are all either vanilla or only slightly improved encounters. The game has opened out a bit which means we are able to get a buffing routine going on. I could have adopted the buffing routine earlier to preserve some potions, but it's not the end of the world.
At the end of last update, I thought that we could do the Mae'var quest, but Rayic Gethras is too much of a brick wall for us, I cannot find a reload-safe strategy to beat him.
The plan for the next parts will probably be to partially clear some of the areas outside Athkathla:
I did a noreload IA before, with a party though, and an earlier version of IA. I found it taxing due to the sheer amount of summons and buffed creatures with attack effects. My way around it was a second party that practices each fight to get to know the responses and then plan around that knowledge with the noreload party.
Do you have already some knowledge of all the tougher fights? There are a few threads in the BWL forum that might help.
Also, JD is a warrior only weapon which is exempt from UAI. you could mod it the weapon restrictions of course.
Good luck to you! I will be sure to follow the run.
I've played a bit of v5 and v6 with both a party and a solo. For most fights the full six party members is a bit easier (because of higher DPS and action economy), but playing solo is definitely less of a mental load - for instance, IA vampires dispel NPP on hit, so fighting IA improved vampires with a full party requires extremely careful management. When playing as a solo, I can just whack the amulet of power on my character and now the entire party has undispellable NPP. Since solo bears party defensively, it means that extracting all waves of reinforcements from enemies will be easier solo than in a party.
I have done most of the SOA content and none of the TOB content. The fights that I am expecting to be the hardest are:
- Dracolich
- Green Wyrm
- Supreme Leader
- Ancient Dragon
- Demogorgon
I have heard that the EDE is the highest fight in a vacuum, but at that point I should have so many resources available (i.e. barbarian essence potions) that it will be long but hopefully not too dangerous.I'm essentially doing the shadow party thing, except I'm using one save for both and I am doing it fight by fight instead of shadowing all the fights at once.
It was exempt from UAI in version 6.0, but I believe all the UAI prevention scripts have been removed as of version 6.5. I believe version 7 of the mod is planning to get rid of UAI entirely, so if/when that comes out (it has been over 10 years since v6, but the most recent commit on git for version 7 was two months ago) it will probably mean solo IA runs will no longer be possible.
Ah, that's quite annoying, I'll redo the parts I've done so far uploading them to the forum posts. Is there a time limit to forum uploads? It looks like imgur goes away after six months.
Demogorgon is tough. The vargouilles (spelling?) are really nasty things. I don't remember how I made it through that fight.
Supreme leader I agree with as well. The dragons should be possible solo.
I read about v7 and with patch 2.6 on bg2ee I am waiting a little bit before restarting as a druid.
I do not think pictures attached to posts disappear.
Incidentally, does anybody know where exactly the logic that dictates being waylaid lives? I've been able to determine experimentally that some area transitions are safe or not, and looking in near infinity I can see that I am being sent to AR0045 instead of my intended destination, but I can't find the logic that sends me to AR0045 instead of where I want to go.
For the ambush sites I have no idea either. I am always cautious and prepared if I travel between maps.
Rayic is tough solo early on. It is easier to tell him you will leave and then you have a round or two to prepare something. With a party I always use normal weapons and all prepared from fire, and as best as possible prepared for disablers. Then you can get rid of his stoneskin relatively quickly and manage him in melee.
For mage solo you probably need to wait until you can survive his spell responses or until you can dispel his Invisibility and protections. You would need to check in the creature which level of dispel magic you would need if you want to do it that way.
I do not recall whether thief detect illusions helps in this encounter, but I think not.
In theory, I could win, but it would require more potions of magic shielding than I'm comfortable with using.
My general strategy that I will be using for mages that are more powerful than me in IA:
- Prebuff before going into the fight (including some sacrificial buffs)
- Attack the target that I want to prioritize (which may or may not be the mage)
- Wait until the mage starts to casts a spell. Use the visual and audio indicators to determine if it is a spell that I want to negate
- If it is a spell that I am happy to let go through (for example, I will likely prebuff with improved invisibility to get an extra round by making the opponent cast true seeing), I am free to cast a spell/activate an ability/drink a potion of my choice
- If it is a spell that I am not happy to let go through that can be negated, negate it by either equipping an item or casting my own preventative spell
- Repeat until one side is dead
A typical example of this is:- Combat starts. I am buffed with II and SI:Ab.
- Enemy mage wants to get rid of my II first, so starts casting true sight. I activate critical strike or cast PFMW to get some fast damage output.
- Enemy mage wants to get rid of my SI:Ab, and starts casting Ruby Ray. Again, I am happy to let this go and can spend my action freely.
- I see the enemy cast an abjuration spell, which is almost certainly remove magic. I don't want this to land, so I use the time it takes for the spell to cast and the projectile to move to do my own prevention (most likely another SI:Ab), taking advantage of my decreased casting time from the amulet of power. The enemy's spell fizzles.
- The enemy wants to get rid of my SI:Ab, and so starts to cast RR again.
In this typical case, I can ignore the mage completely for the first two rounds, and then I only need to spend part of each second round thereafter, until either I run out of SI castings or the enemy runs out of remove magic/RR. This is also a pretty consistent strategy, and quite reload-safe (at least, the mage part of it is, other enemies in the encounter may be less reload-safe).The problem is that my anti-mage strategy revolves around having access to spell immunity. Spell immunity is a hard to find scroll in IA, only appearing in the following areas:
- Pai'Na in the graveyard district
- Bodhi's lair after the underdark
- Pirate coordinator in the docks (if the player is not a fighter/mage dual/multi)
- Elemental golem in the elder brain fight
The only one of these that is viable is the Pai'Na scroll. The problem with picking it up is that it will spawn the spider queen in WK level 1, which we won't want to fight for a long time, so we will want to clear out WK level 1 first. In order to beat WK level 1, we will need to be able to beat an improved golem group, which means that we need either level 6 spell slots or enough scrolls of PFMW to power through (+3 weapons are nice, but we can use conjured weapons instead).While we're talking about rare scrolls, the other major rare scroll is improved haste:
- A house in Suldanesselar
- The rescue quest in the drow city
- The planar warden
- The slaver wizard in the slaver ship (can be used if we don't take him out fast)
- Riti, one of the trapped souls in the underdark
- The elemental golem in the elder brain fight (if there is a ranger in the party)
The mostly likely source of our improved haste scroll will be the slavers. There is a major piece of equipment that we can forge that requires three improved haste scrolls, so unfortunately we will not have is available for the underdark fights (including the dracolich).Those boots are always a late game item for me so I always memorie the first scroll of improved haste that I find.
For spell immunity you could consider the pirate coordinator behind the thumb, looking at the restrictions that work.
We're almost at fighter level 9, and that will be our last level on the hitdice. Out HP will slow down a lot from this point.
Casting enchanted weapon is giving us a flexible +3 weapon slot. For now, we are going to swap out our four first level spell slots for burning hands - we have a sewer troll coming up, plus lots of trolls in the de'Arnise hold.
I realize that we left one area of (mostly) vanilla Athkatla alone - the sewers. We've going to be covering the vanilla parts of it now.
The sea troll does not need significant preparation as long we we have fire spells prepared.
The mercenary group here only gets triggered if you approach from the rfight, so it is possible to find and unlock Mekrath's hideout entrance now (though we won't head in there)
Our kill-stealing extends to Keldorn, and we head into the lower part of the sewers.
We have left the mercenary group in the top corner, Mekrath's lair, the rakshasa in the centre and the illithid hideout for later. Much later.
Vampiric mists can be found here. They are annoying enemies - They drain like a vampire when they hit you (so the amulet of power is important), they like to turn invisible, and when they hit you they slow you. When properly buffed they are not a threat, but they can be a big pain if unexpected, and they can force a few oils of speed to counteract the slow effect.
Also make sure to buff up before this shadow/ettercap ambush.
Heading into the centre of this room causes the doors to slam and two vampiric mists to appear. Make sure to fully buff, including enchanted weapon offhand and phantom blade mainhand. The horn of valhalla can be used here - the AI likes to target the warrior (as it does not have NPP), and using the horn is at least something to do while the mists are invisible.
We get given the next part of the unseeing eye quest.
The final thing on this map is a group of shadows and shadow fiends. Once again, a full buff is recommended to make sure it stays an easy fight.
This is as far as we will go in this part, however - the next level down is too much for us to handle.
Part 006: Copper Coronet Sewers
In the last part, we cleared out the two easy levels of the sewers. Unfortunately, the level below with the temple has both oodles of XP and enemies that we are not ready to fight just yet, so we will have to go elsewhere.
The horn of valhalla has come in a surprising amount of use - since the warrior does not have NPP, he is a favoured target for enemies such as vampiric mists.
There is another sewer area for us to cover, however - the Copper Coronet sewers.
As with the first Otyugh we faced, this one can be wraithformed.
The nearby hobgoblin shamans can get a lucky hold person it, but it should last less time than wraithform. To be safe, the horn of valhalla can be used.
The myconids can use confusion, which would normally be a massive reload risk, but improved invisibility means we won't get targeted and they will engage us in melee (which is much safer).
The kobolds are not much of a threat, though we can make things easier by using the horn to summon the warrior on the other side of the water.
There is one last Lilarcor ingredient left - the blood of Quallo's friend. In IA this is a greater crawler that is immune to all magic, has 75% immunity to all damage types, requires +3 weapons to hit, AC-5, 108HP (with fast regeneration). It attacks with 4 APR, THAC0 -4, 13-19 damage. We're gonna have to come back here later, we do not have a reload-safe way of dealing with it, so we will end this part here.
In this part, we partially clear out a couple more Athkatla areas that have vanilla or slightly improved content that I missed last time.
Planar prison is probably be best source of boots of speed. I will definitely be memorizing the first scroll of improved haste that I get, it's just a bit annoying that the boots of the ranger lord cannot be forged pre-spellhold - they are tied with memory of the apprenti (which can be forged pre spellhold) as the most powerful items in the game.
I should have worded things better - the pirate coordinator scroll needs the player to be not a fighter or not a mage, therefore any dual/multiclass involving both fighter and mage disables the scroll. Even if I could get the pirate coordinator scroll, that would be harder than doing the first WK level before Pai'na - gem/coin golems are actually quite easy for a solo character once PFMW is available.
In the last part, we cleared out some more vanilla Athkatla areas. There are one or two spots left vanilla, but nothing significant.
We have a slightly improved encounter ahead of us, one that we can handle easily.
We buff up and enter the jail cells of the copper coronet.
The buffs we have are:
Stoneskin (cast pre rest)
Enchanted weapon (cast pre rest)
Ghost Armour
Mirror Image
Blur
Haste
DUHM
Improved invisibility
Our remaining prepared spells are:
4 * Magic Missile
1 * Mirror Image
1 * Haste
1 * Stoneskin
1 * Breach
We make sure that we are not in the centre of the room when conversation starts with him. This is because two groups of guards spawn (one at each end of the room) and we want to make sure that we do not trigger two of the groups at once.
Each of the two groups of guards has a fighter and a mage. The mage is the one we want to target first.
If the mage sees us, he will put up his prebuffs which include stoneskin and MGOI. He will then start casting save-or-die spells like chaos that we have no current easy way to beat.
Since we have the partial visibility of improved invisibility, his first action is to cast Oracle (you may be able to make out the divination animation). He does not have his buffs up, so we can interrupt him by casting magic missile and hitting him with our swords.
Once we have interrupted his prebuff, his protections go up. All he can do while we are under II is cast a couple summoning spells, neither of which cause us any concern. He is an 11th level mage, so his stoneskin has five layers, compared to our four APR, so it won't last long.
He has a couple defensive spells that he will cast next - improved invisibility or fireshield. If it's fireshield, we can breach him once he's finished. If it's II, we just keep hitting him with our sword.
We can try to take out the other guard while our buffs are still active, or we can be extra safe and run to Bernard to rest up and refresh our spells before taking out the second caster. The reload-safe strat is to rest up.
There is a winter wolf in the pits we can fight to clear the way to the beastmaster, but the beastmaster himself is a bit beyond us.
Part 008: De'Arnise keep (initial visit)
You may recall when we first came to the bridge district, I was keen to not trigger this encounter. We're triggering it now.
This is the reason why.
Travelling between Athkatla areas can trigger random encounters, which we want to avoid for now. Some transitions are always safe, some are never safe, and some are sometimes safe. Unfortunately, leaving Athkatla to go to an area outside the city falls into the "sometimes safe" category. I've not worked out a reliable way to leave the city without potentially triggering a fight.
Neera's encounter appears to break this rule - you always get a random encounter with Neera after leaving the bridge district (taking priority over other random encounters), and from Neera's encounter you will not trigger another random encounter. This means that Neera is a one-time free pass to leave the city.
Arriving at the keep, we reset all our level 1 spells to Burning Hands, and start hunting trolls. Loose around the map, there is one troll and two ice trolls, and since they appear alone they are not much of a threat.
Inside on the ground floor, we have a few more isolated trolls.
This room has a killer spider, which is more dangerous than the trolls and will need a full prebuffing to be safe.
We make sure to leave via the southwest door. There is a neo-otyugh here who we want to avoid for now, and we can use our bow for the first time to pick off the dogs from our starting point without triggering the neo-otyugh.
The enhanced editions added a quickloot button, which has the advantage of letting us loot the dog's corpses without having to go over and trigger the fight.
We make dog stew (which we will keep in the bag of holding for a while) and this finally tips us over 750k XP.
We hit fighter 9 and mage 10. We also get our first proficiency point in flails.
We can clear some of the upper levels, but not much. Clearing more would require us to do the library fight, which is a nasty one involving a killer spider and a yuan-ti mage. This is where we will end this part.
In the last part, we cleared out the vanilla parts of the de'Arnise keep, but are blocked by some nasty yuan-ti fights. We'll need to move on and come back later.
Next up is the Umar Hills.
Since we did the tanner quests, we can buy a copy of History of the Zhentarim, and give the codename of Darcin Cole. There's no reward for this, but I do it anyway.
We get the quest to talk to Madulf.
We talk to a romantic and get a quest for mimic blood.
We buy the kids swords and ale. We're such a good influence.
Jeb gives us a hook on the beljuril, which we pick up to upgrade the horn of valhalla later on.
Brokering this deal nets us 27500 experience.
Finding Mazzy's note is worth another 22500 experience, which sends us to Thief 11.
Our thief levels are quite boring now - each one is, in descending order of importance, 1 hitpoint, 3 lore points, and 25 skill points.
Inside Umar Cave is a mimic. We need to give it a single attack once to make it reveal itself, but one it's revealed the reload safe way is to pink away with a bow while ducking in and out of range.
In the back of the cave are two umber hulks. Improved invisibility stops them using confusion and makes this reload safe.
On the way to Valygar's cabin are some rangers. Killing them costs us 1 reputation, but nets is 11400 experience. It's not much experience, but we will be reputation capped eventually, and there are very few opportunities in the entire game to trade reputation for experience.
The final thing we do in this area is return the mimic blood. We buff up beforehand to make it a safe and easy battle.
Part 010: Temple Ruins (Initial Visit):
In the last part, we cleared out the Umar Hills, which somewhat unusually for the IA mod, is an area that we can fully clear at this level (at least, until the expanded ranger stronghold comes into it).
This is how we currently look when fully buffed. It's a big upgrade over a few parts ago, which is quite nice.
We'll be making a brief stop in the exterior of the temple ruins. It'll be a brief visit, but the shadows near the entrace are some easy experience.
Letting Anath live is worth no experience points. Killing Anath is worth 2200, and is a tricky enough fight that we will want to prebuff.
When we get to this area, we run into a bunch of shadows and shadow fields that drop XP. The shadow fiends are higher priority as they can hold on hit - the reload-safe strategy would be to bombard them with things like fireball. If things go hairy, it is always possible to retreat to Anath's cave.
When we align the mirror, it triggers a new wave of enemies that are worth XP. They will approach us, and if they get too close to the gem they will be killed by it and deny us XP. We therefore activate the mirror from as far away as possible, and run away from it before we lure any enemies into it.
That is all there is to do in this (very short) part.
Part 011: Windspear Hills (Exterior):
In the last part, we killed a bunch of shadows for experience. We're almost at 900k total experience.
The last part was very short, and this part will also be very short. We're going to the windspear hills.
This fight can be made easy with wraithform.
This fight has three mundane characters and a cleric. The rest before this fight makes things awkward. The cleric likes to open the fight with greater command, so want to get down improved invisibility as fast as possible after the rest, which will turn off all her spellcasting.
In this area are fighters who are attacking gnolls. When the gnolls are dead, they turn into werewolves and attack us. Instead of trying to killsteal and get the gnolls ourselves, we prebuff and focus down specifically the top left fighter.
Killing the top left fighter breaks the dialogue so they no longer transform into werewolves. Not only are the fighters worth a lot more XP (2400 vs 420), they can be blocked by wraithform.
Finally, we hand over the acorns from Chateau Irenicus, and end this short part.
We did the first part of lots of areas, which are easy but don't offer a big reward - our most powerful vanquished is still Anarg from the bridge district.
Coming up next is Trademeet and the druid grove. This is likely going to be a big moment in the run for us - there is a group of improved spiders that we may need to bypass, but we should be able to get a very important piece of loot - the shield or harmony. Obtaining the shield of harmony means that we are able to tackle a lot of enemies in a reload-safe manner - we can deal with chaos and charm effects in a way that doesn't consume any resources, doesn't use our action for the round, and involves no random element whatsoever.
In the last part, we cleared out the windspear hills and got close to 1 million experience. The next two parts, we are going to try to get over that threshold.
Our next destination is trademeet. We will try to killsteal the animals on arrival.
The northeast entrance to Trademeet includes a lesser spirit spider that we will want standard prebuffs before fighting. This one is considered a random spawn and the anti-grind scripts mean that it drops no XP.
The tents in the southeast corner of the map house the Dao djinn. Let's do some maths:
- XP from killing the Dao: 15000
- XP from killing Ihtafeer and friends: 18000
- XP from completing the mission for the Dao: 10000
- XP from Guildmistress Busya for getting rid of the djinn in any way: 0
The only mutually exclusive rewards here are 1 and 3 - the maximum XP approach is to kill both the Dao and Ihtafeer. (Technically it's even as the outside Dao is worth 5k and can be killed before finishing the mission). Killing the Dao, however, means that we can gain access to the shield of harmony much quicker than we would otherwise.We will fight the Dao now, buy important potions from Iftafeer, then kill her. The shield of harmony will be a massive asset for us through the rest of the game.
There are three djinn for us to fight. One of them is alone outside the tent - Taquee. He knows some nasty targeted spells such as flesh to stone, so we prebuff with:
Stoneskin (cast before resting)
Enchanted weapon (cast before resting)
Ghost Armour
Protection from petrification
Fireshield: Red
Mirror Image
Blur
Haste
DUHM
Note that in the screenshot above I had up MGOI and improved invisibility instead of protection from petrification and fireshield - In my test runs I always killed Taquee before he had the chance to cast it, so I assumed it was because of my improved invisibility, but it turns out that the djinn can see through invisibility.
He starts with no buffs, and so some good damage can be done on him quickly. He can stoneskin, but is vulnerable to breach. I find that he often gets morale failure and runs away, and with his fantastic move speed it can be hard to keep up. Hopefully the militia won't killsteal if this happens.
During the fight, I like to keep my action free for magic missile to disrupt any spells he might try to case or in case he runs away.
We have the same buff routine and run into the tent. We want to take out Faafirah on the left before Khan Zahraa because otherwise Faafirah will disappear without giving us any XP.
These guys have simple logic. Under alacrity, they cast (in order):
- Haste
- Stoneskin
- Flesh to Stone
- Invisibility
After which they engage in melee.They only have caster level 7, so the stoneskins only have three layers. Casting breach probably isn't worth the cast time, but remove magic may work as we are three caster levels above.
The only loot that gets dropped is Rashad's Talon.
Busya gives us no experience, but does give a lot of money, gems, and the shield of harmony.
It offers immunity to Charm, Confusion, Domination and Hold - four status effects that we will have to combat for pretty much the entire game. Gaining this shield is a major power spike for us.
While we're here, we talk to Coprith and Cernd to get the location of the druid grove, then end this part.
Part 013: The Druid Grove:
In the last part, we did some more vanilla stuff, and tipped ourselves over the milestone of 1 million XP, an achievement that has zero in-game significance.
We picked up one of the most important bits of equipment in the game - the shield of harmony. When we are buffed with Ghost Armour, Blur and DUHM, we reach a hefty -13 AC.
In this part, we are going to actually complete one of the major SOA quests - the druid's grove.
Along the bottom edge of this map is a dangerous spider group - three sword spiders, one killer spider, one spirit spider and one lesser spirit spider. We might be able to take them out now, but not in a reload-safe way. Fortunately, we can chug a potion of invisibility and walk right past them. We will come back to them later, when we have access to PFMW.
A little further on, we find a party of humans attacking a group of trolls. Whoever wins will attack us, so we will try to slaughter them all to gain the most XP.
The two biggest threats are the mage and the druid, who are protected by stoneskin and iron skins respectively. We breach the mage and start to focus her down.
The mage does down easily, and as long as we spend our action each turn disrupting the druid with insta-cast magic missiles we are in no danger.
The next encounter is a group of shadow druids, led by Kyland Lind. If we cast improved invisibility before going in, they will cast Chant, Defensive Harmony and Bless before doing absolutely nothing as we cut them down. The fight will not start until we see Kyland Lind, who is on the northeast corner of the group.
When Kyland Lind gets to low health, he will start a brief dialogue and all the druids will leave. Therefore, it is best to kill the other druids first and save actions when attacking Kyland Lind to magic missile to finish him off (or in the screenshot example, get a lucky critical hit to bypass the HP range where his dialogue triggers).
There is a group of trolls in front of the ogre's tower where belm is. We can take out the trolls, but we do not enter the tower as the guardian is an improved spider we're not ready for yet.
We pop into Adratha's and check out her potion stock, but there is nothing that we want.
Just beyond are the spore colonies. There are two versions of the spore colony in nearinfinity - one of them spawns fungi three times, the other spawns fungi six times, then they do nothing. We want to get the maximum XP, which means waiting out all the spawns.
The shield of harmony makes this fight reload safe. I spent the fifth level spell slots on animate dead since they're not doing much else in this fight.
The visual effects come on thick, but we're not in much danger. If things did go dodgy, we could run away and rest up.
We have one final fight before we get to the grove itself - Dalok, who is joined by an Adherent and a Shadow Druid. We go in with a standard buff package, including improved invisibility.
The shadow druid starts with a bunch of protective buffs, and he can cast some annoying spells. THe msot dangerous one is call lightning, which is why we have II'd, and he should spend most of the next few rounds trying to summon backup. His summons give no XP when killed, so he becomes our prime target (as he poses more threat per hitpoint than the other enemies do).
He also can try to cast divination spells to get rid of our II, but between hitting him with our swords and instacasting magic missile, he can be easily interrupted and finished off. The order of subsequent targeting is the adherent and Dalok.
He drops the flame tongue sword. This (along with the sword of flame purchasable from Bernard or Ribald) is one of very few weapons left in the game that do elemental damage on hit and are therefore very good for disrupting mages under stoneskin. I don't know if the IA team missed this or if it is deliberate. It also happens to offer big quality of life convenience when killing trolls.
We get ready to start the Faldorn fight. We have as prepared spells:
This fight goes quite straightforwardly, as we are both casters. I make sure to start casting my spells the smallest amount of time after she starts to cast hers. The first two rounds are pretty consistent:
- She casts iron skins. I would cast breach, but she is immune, so I cast animate dead next to her and move to punching range.
- She casts acid shield (cast time 4). I respond with acid arrow (cast time 2) to interrupt her. I spend the rest of the round punching her - there is a quarterstaff on the ground, and using it would offer us better damage but worse THAC0 due to proficiency penalties. I'm happy do deal her nonlethal damage myself, the skeleton can do lethal. Getting closer also means we have a bit more generosity with timing the magic missiles.
On subsequent rounds, she will do one of the following:- Cast an evocation spell (purple animation). This could be flame blade (casting time 4) or Creeping doom (casting time 9). I interrupt in either case. If we get the timing wrong she could flame blade, but that's not disastrous.
- Cast a necromancy spell (green large circular animation). This is probably regenerate, which is bad news. I interrupt.
- Cast an enchantment spell (green small circular animation). This is defensive harmony, we let it go and do another summon.
- Cast an alteration spell (green symbol similar to the vocalize icon). This is refreshing iron skins which is somewhat annoying to us, but we can't do much, so we do another summon.
- Cast an abjuration spell (tall orange symbol). This is armour of faith, which we cannot interrupt, so we do another summon.
- Cast a conjuration spell (tall green symbol). This is a summon spell, which we will definitely want to interrupt.
Whenever I interrupt, I look up what casting time I expect, and I cast the slowest spell that I feel comfortable beating. Whenever I summon, I first cast animate dead, then spider spawning, then haste once I have fully summoned.When she dies she drops 14k experience, and finally dethrones Anarg as our most powerful foe vanquished.
We immediately run to Verthan as fast as possible and begin the great druid challenge.
The fight is against a Great Auramaster. This fight is somewhat similar, except that our enemy has an increased casting speed of 2. Fortunately, since we started the new fight right away, we should have some summoned backup to help us out.
Since he is an auramaster, a new IA kit, he has access to the auramaster spells. Notable new ones include Aura Cleansing (Alteration, base cast time 7) and Perfect Camouflage (Abjuration, cast case time 5) that we want to interrupt. His faster cast time is why we wanted to save our faster casting interruption spells for now.
The only other thing to watch out for here is that he hits pretty hard in combat, and his staff has a decent range - he can hit you over the top of some of the summons. Also, try to make sure that your character is facing him as much as possible. If you cast magic missile while running away, your character has to turn before casting, which takes an extra fraction of a second.
The minions are never attacked by the Auramaster, so they will build up as long as we keep interrupting him (we always summon round 1 as the Auramaster opens on iron skins). A no-reloader can make this extra safe by going in with a contingency active (from scroll).
The Auramaster is worth 18k experience, quickly dethroning Faldorn as our most powerful vanquished. As an extra bonus, we get 20k quest experience, 10k gold, and another ring of protection + 2.
We get the first spirit of the grove quest. Unfortunately, we will not be able to do this without triggering the improved spider group from earlier, so we will have to leave it for another time, and that is where we will end this part.
Part 014: Hero of Trademeet
In the last part, we got our first stronghold, and quite a lot of XP. It was a fairly long part, but there are still parts of the druid grove we're not ready to face yet - we'll be back when we have access to PFMW and can take out the improved spider group.
We got some upgrades to our gear - we now have two rings of protection +2 (IA allows +2 or less protection items to be worn simultaneously) and a sword that does elemental damage on hit.
We talk to Logan and get named heroes of Trademeet. This is worth 43250 experience, 12750 gold, and a point of reputation. We get a quest hook for the dueling families of trademeet, but that is a quest we will save for later.
Outside, Jenia starts the final part of the skinner questline.
We run aound Trademeet for a bit, but there's only one fight (this one). It's not very scary, and we get plenty of opportunity to prebuff.
Finishing this quest is worth 30k experience and a point of reputation.
Finally, we take a look at our fancy new statue and end things here.
We got a lot done in this part and earned a lot of experience. Getting the shield of harmony is really good for us, as it allows us to handle notable enemies in a reload-safe manner. These enemies include vampires (with domination), mist horrors (with chaos) and minotaurs (with hold).
The auramaster fight is probably the toughest one yet. It's a preview of what most of our caster fights will look like - as soon as we see what school of spell is being cast, we either interrupt it, negate it or take the opportunity to cast our own unrelated spell. There is a bit of a break after faldorn where the noreloaders will want to assess how confident they feel - if they were unable to get any summons at the end of the fight, or if they spent too many interruption spells, they may want to abandon the plan and come back to this fight either fully rested (and maybe with contingency) or come back much later in the game.
The next part or two will probably be relatively simple - now that we have the shield of harmony, we will clear up a few of the encounters we skipped before, and then we will find ourselves at one of the hardest points in the game - before we get access to 6th level spells and after we have cleared up the easy XP. After clearing up the miscellaneous encounters, the ones I will consider are:
We are at 1.2 million XP, halfway to when we hit sixth level spells.
We're going to cover some EE content now. Since IA 6.0 predates EE, this should all be vanilla. We start with Neera's new area, the wild forest.
This map is one massive wild magic zone, and we cannot use any of our spells in a reload-safe manner. Instead, we just equip some armour and do things the old fashioned way. We have a bit stock of potions to keep us going, Even though the hobgoblin shamans have access to hold person, we have the shield of harmony that can protect us.
There is one dangerous enemy here - a lesser spirit spider. It can hold on hit, so we want to equip the shield of harmony. Additional potions such as haste and giant strength can make this fight easier, but at our current level winning is pretty certain, it is just a question of how many healing potions are needed.
As we approach, we are told that we cannot get in without Neera. I'll pause here for now, as advancing requires Neera to be in the party.
This part does kind of bring up the question of what is considered a solo run and what is not.
In the strictest sense of solo, no run is solo as imoen joins at the start and there is nothing that can be done to prevent it. Furthermore, every companion has an associated quest, and some have romances that provide additional XP and loot. These each require the companion to be in the party - either being in the party for a certain amount of time, or bringing the party member to a certain location. There are a few ways of tacking this:
- No companion may be allowed to join the party at any point
- Companions may be allowed to join the party, but must be removed before unpausing
- Companions may be allowed to join the party and time may be passed, but they must be removed before doing anything else
- Companions may join the party, spend time and move between areas for the minimum amount of time required to trigger quests, but must be removed from the party immediately after the relevant quest is triggered and before any encounters
So far, I have been following rule 2, which has put me up 6k XP over rule 1 which means they are effectively identical. I will try to follow it for as long as possible, but I may find myself unable to proceed in a reload-safe manner without gaining more XP and loot. In this case, I will compromise on the solo rule before I compromise on reload safety.My only gripe currently is that even if you publish the screenshots, the quality is not that great. You can't read the content inside, the text is blurry, so ... publishing them in their current status is akin to not publishing them according to me.
If I was in your place, I would go a step further and actually cut the relevant portion of the screenshots you want to show us.
Thanks for the run.
Edit: Turns out you can right click the images, and open in a new window to have a better quality. :P
Increasing by 1:
Which of these works best for you?
Part 016: Return to Athkatla:
It's finally time to go back to Athkatla. We left it in part 8 when we had run out of encounters we could safely do. We're coming back now with near double the experience and the shield of harmony, so we will try to do a few more encounters in Athkatla.
Our first stop is Maheer, to upgrade our horn of valhalla. It summons a ninth level warrior, which at this point in the game is a decent summon, as it matches our fighter level of 9, and it comes with some decent immunities. It will join our standard buffing routine.
Our first stop is Kangaxx's house. We do our arcane buffs in the Sea's Bounty, And cast DUHM jsut before entering.
Inside are three minotaurs. Minotaurs have a big of a buff in IA. On hit they have a chance to apply "Grappled", holding us, or "Charged", knocking us unconscious. Although they have quite short durations, we still equip the shield of harmony to protect against being grappled.
Our first action is spend using the horn of valhalla. Subsequent rounds are spend either refreshing stoneskin/mirror image, or casting magic missile. Fortunately, IA logic means that unconscious enemies are considered lower priority than conscious enemies, so having the warrior from the horn active means we can always retreat outside if things get hairy. I often find myself having to retreat and rest up one or two times in my practice runs, and the no-reloader will want to be very quick to retreat.
Each minotaur drops 7500 experience and a battle axe + 2.
We also start the Mae'var quest.
We head to the temple district via the gates district to avoid triggering Suna Seni. Picking up this necklace is worth 20k experience.
We also talk to Dawnbringer Sain to start the illithium quest.
Returing directly to the docks, we hand over the necklace is worth 29.5K, a huge amount for such an easy job.
This is enough for us to hit mage level 11. One more level to go.
The ground floor of Rayic's house contains a bunch of memphits. They mostly do fire damage, so we can add protection from fire to our standard buffs and focus down the two ice memphits before the others.
The floor above has two stone golems. These have the golem slow ability, which means that we go in with one haste active and two more ready to cast.
They are worth 5k XP each and are not much of a threat, but this is as far as we will be going with Rayic so far. So far Rayic's house has required retreat, but when we get to the top level we will have to beat him before heading downstairs.
From the docks we head to the government district (directly), talk to Sarles, then head to the promenade (via the gates) to talk about illithium.
Normally this quest is a difficult choice for the player - the player can give the illithium to the temple, but that means that the mace of disruption cannot be upgraded, denying the player a very powerful anti-undead weapon. The temple can instead be given the illithium alloy, giving a somewhat worse reward to the quest, but allowing for the very powerful improved mace of disruption.
In IA this is not a problem - the mace of disruption has been nerfed, and the higher level undead (such as demilichs) are immune to its instakill effect. Therefore, giving the illithium to the temple is pretty clearly the best result, and we have no use for the alloy.
We buff up in a nearby temple of helm, then confront Neb. We make sure that we have Oracle prepared in our 5th level spell slots and Detect Invisibiltiy prepared in our 2nd level spell slots.
Neb is a 16th level thief (with a 5x backstab modifer) and three potions of invisbility. He will try to turn invisible and backstab us, but a combination of Detect Invisibility, Oracle and Stoneskin will protect us.
He summons a bunch of child spirits. We can kill them for 1500 XP each, or we can ignore them and they each reward us with 2500 XP when Neb dies. Neb himself is worth 3500.
We can head directly to the government district to hand over Neb's head for 2500 gold and a point of reputation, but no experience. Handing over the illitium to Sarles is with 21750 XP.
Returning to Sain gives us 2500 gold, 20k experience, and the Periapt of life protection.
We head directly from the temple district to the docks, and Prebek's home, doing our nearby prebuffs in Valygar's house, including MGOI and improved invisibility.
These mages only have one offensive spell that gets over MGOI - confusion. The shield of harmony protects us from that, which makes them no threat to us. Sanasha has spell thrust, so if we see her trying to cast an abjuration spell we can interrupt her with magic missile.
From the docks, we head directly to the slums and the copper coronet sewers. From Quallo's room, we summon and buff up (spending all three fifth level spell slots on animate dead), saving haste as the last buff to make sure it also hastes the team.
At the other end of the hallway are three vampiric mists and three mist horrors. We are protected from the vampiric mists worst effects by the amulet of power, and protected from the mist horrors worst abilities by the shield of harmony. The skeletons are immune to both naturally, and the horn of valhalla warrior is immune to the mist horrors naturally.
We focus down the vampiric mists, as their envelop ability that slows is the most annoying of the remaining abilities. We can use our action each turn to magic missile for additional DPS.
That is where we will end this part.
In this part, we return to Athkatla. We do some content that the shield of harmony enabled, but most of it is quests that we could have done a lot earlier (such as the Neb quest).
In the last part, we cleared out a bunch of Athkatla areas. We have had a bit of a shadow looming over us so far this game, though - Suna Seni and her ambush. Now is the part where we will finally confront her.
The thing that makes this fight so difficult is that since it is considered an ambush, we get dispelled as soon as the fight starts, whereas the enemy starts prebuffed. We have one way to not be completely surprised - we can set up a contingency. Although we cannot cast it naturally, we at this point will have picked up two scrolls of contingency, so even though one has been scribed, the other can be cast. We will choose to cast improved invisibility on ourselves when we see an enemy.
We can also have our enchanted weapon prepared, which we will do so.
In addition to that, we will prepare with:
The reliable way to trigger the Suna Seni encounter is to travel the the graveyard, then immediately travel to anywhere else.
While normally I don't bother to swap the belt out, this time I deliberately use Elves's Bane (3 AC vs piercing) instead of Destroyer of the Hills (4 AC vs crushing). This is because Suna Seni attacks with a short sword.
We also make sure to have a potion of invisibility prepared, and we equip the shield of harmony for a bit more AC.
The encounter starts. The enemy party consists of a wizard, a cleric, three fighters and an assassin.
The cleric likes to lead the fight with a greater command, and the wizard has other nasty disabling spells. Since we are trying to find a reload-safe strategy, we want to avoid making these saving throws. Our way to avoid them is with improved invisibility.
Improved invisibility has a base casting time of 4 (3 with the amulet of power). Greater command has a casting time of 1. Ideally we would our contingency to trigger immediately, before the cleric can cast greater command, but unfortunately that is not reliable. Therefore, we want to take advantage of this auto-pause to drink our potion of invisibility, which will instantly make us invisible.
We reliably have about half a round before the enemy AI kicks in. The wizard and cleric prebuffs fire. The fighters track our position and follow us around, but only Suna Seni can see through invisibility and attack us. Suna Seni has 3 APR and with the damage doubling from insane difficulty hits us for about 20-30 at a time. The cleric will try to cast true sight, where the mage will do nothing. The cleric starts to cast true sight that we want to disrupt.
We have two methods of disrupting the cleric - hitting him with our sword, or casting magic misile.
Since the cleric has an AC of 0 and we have a THAC0 of 4, each time we swing our sword we have a 85% chance of hitting the cleric and disrupting his spell. We have 2 APR (3 when dual wielding), so we Our plan A will be to hit him with our sword. If we do, we effectively get an extra round this combat, as our second action can be used in a defensive spell (detailed below).
Because we reliably have a gap between when we drink our potion of invisibility, it means that we reliably have our second action back before the cleric can finish casting true sight. This means we can use insta-cast magic missile to disrupt the true sight. We can spend the time between castings to run around trying to make space between us and Suna Seni, though we try not to get too far from the cleric so we don't have a significant travel time on the magic missiles.
For the sake of reload safety, I am demonstrating the backup strategy where we have to magic missile when we miss the 85% attack chance twice.
This is the tricky part done. From here, the two casters are useless, and we have about 12 rounds before the improved invisibility wears off. We want to take out the casters before then.
For safety, we carry on running around while we cast stoneskin and ghost armour, then start attacking the cleric then the wizard. If we were able to disrupt the cleric using weapons, then we can stoneskin as our second action and ghost armour as our third action.
Although the inventory screen says we have -10AC, we actually have -14 due to improved invisibility, and -17 against Suna Seni since she uses a piercing weapon. The enemy fighters (Eldarin, Slaver, Suna Seni) all have 3 APR but their respective THAC0 are 5, 6 and 1, so they need 19, 20 and 18 to hit us. Casting blur makes it so they all need a natural 20. We could replace the shield with another sword to increase our APR 50%, but that would more than double the chances that our foes can hit us.
Our order of priorities here are:
One important thing to not is that they are under haste which was cast by a 8th level caster, whereas we are under haste which is cast by an 11th level caster, so their haste will run our before our haste or even our improved invisibility runs out. Furthermore, we have two additional hastes to stay speedy, plus potions of speed. None of the enemies have resistance to missile weapons, so it is an extremely safe (if tedious) strategy to stay speed and kite the enemies.
We want to kill the assassin first (as he is the squishiest and we don't want to risk accidentally running out of stoneskins and being backstabbed), then Suna Seni, Slaver and Eldarin in that order as they are similarly defensive but have damage output potential in that descending order. They have potions of healing which extends the process somewhat, but they should not be able to be too much of a threat.
I prepare two breaches to be safe, but its biggest use is clearing the stoneskins from the enemy mage. It might be viable to swap out the fifth level spell slots for other things (I like to use animate dead since extra summon spells can rarely go wrong)
This tends to be a long, grindy fight, and it's very likely that we will run out of spells and our buffs will expire while there are still one or two foes left. Since the longest lasting buffs we have are AC related (ghost armour at 50 rounds and blur at 26 rounds), we will likely find ourselves fighting enemies in a mundane way, relying on potions to keep us topped up. That is the reason why we save Slaver and Eldarin for last - they are the ones that are least difficult to fight when we are tapped out of resources.
We get a semi-important bit of loot from the fight. In theory it's a sword with half the shield of harmony effect, but in practice it's the worst half of the shield of harmony effect - charm and confusion are much more common than hold and paralysis. We'll still hold onto it and use it for the cases that demand it, and it's a nice option to have.
We will end this part here - It doesn't have very many images, but there was a lot of planning that went into this. Since this is such a big fight, making sure it is consistent was my biggest priority.
This was a fight that I have been dreading for a while - every single time I left an area in Athkatla, I had to ensure that it was not going to trigger this, and it completely blocked off the graveyard district.
I mention plan A in this part (where we can disrupt spellcasting with weapons swings), but I spent most of my time ensuring that plan B (where we disrupt using magic missile) was reliable, as that ensures that this strategy is reload-safe. The screenshots show the magic missile plan.
This is the grindiest fight we've had so far this run, but despite it being long, pretty much all the danger is in the first four or five rounds, before we set up our defences. Once we run out of buffs, the damage output of out enemies won't be able to keep up with out potion chugging, and we have over fifty of the things. If things to start to go dodgy, we can always retreat - the only unique loot is Arbane's sword, and missing that is not a major obstacle for the run.
In the last part, we finally beat one of the most annoying fights in the game, the Suna Seni ambush. In this part, we're going to be doing another ambush.
I ended the last part in the docks district, and from there the next ambush can be reliably triggered by heading to the promenade.
We get another dispel when we enter this part. I have prepared with only enchanted weapon, no contingency this time as this fight isn't as hard. If someone wants to do this fight with more caution, then contingency for improved invisibility can be done again, but I feel it is unnecessary.
There are three scrolls of contingency that can be obtained in the game, all fortunately quite early:
- Nighttime ambushes
- Jermien's cabin the the Umar Hills
- Mekrath's lair in Athkatla sewers
This means that we can save one for scribing and use the other two for scroll casting before we hit level 6.The auto-pause will reliably fire before the fight and the conversation starts. We chug a potion of invisibility and head to the top right corner of the map.
The enemies will track us, but they buffs will not have fired yet, which means they are using basic walking speeds. When the cleric gets in range, he will start to cast true sight, which we can disrupt with magic missile.
This sends us visible, which triggers the fight and the enemy buffs kick in.
We run around the map trying to avoid getting attacked by the thugs. We can just about take one hit from them, but not two.
The mage will get to cast a spell, and as long as we do not have the shield of harmony equipped, that spell will be Chaos. After the mage has started casting but before the spell projectile hits us, we can equip the shield of harmony to negate it.
The thief will try to backstab us for quintuple damage, but even under the double damage from insane we can tank one of those hits. We can then chug another potion of invisibility as soon as our action comes round to go invisible again, and the cleric has no true sight for us.
Unlike the previous group, nobody in this group can see invisibility. They will track us, but it just means they will stand aggressively near us.
Our potion of invisibility lasts 12 in-game hours, which is 600 rounds. We are safe for now.
IA does feature anti-kiting strategies - if the enemy has not seen you for long enough after the fight started, it will reset its starting buffs and cast spells. Being completely invisible for long enough will trigger this, but the partial visibility of improved invisibility will not.
The script triggers when we have been completely invisible for ten rounds. Therefore, to be safe, we want to go on the offensive in the next nine rounds, but to be extra reload safe, we'll do it after eight actions.
The plan for our eight actions is:
- Chug a potion of healing
- Stoneskin
- Ghost Armour
- Blur
- Mirror Image
- Haste
- Improved Invisibility
- DUHM
Once all that is done, we can swap back to dual wielding and go on the offensive. We focus down the cleric first, then the mage, using one of our actions along the way to breach the mage.The fight from here is pretty trivial. What's more, this fight is pretty reliable round by round (we reliably spend three rounds setting up invisibility, then eight rounds prepping while invisible), so our enemies will have their buffs running out shortly after we go on the offensive.
There is no notable loot (unless you count Renfeld himself).
We talk to Rylock, Xzar and Rylock again. Since we have already cleared out Prebek's house, we go straight in.
In the harper building, we get our first oil of resurgence. This is an IA-added potion, and we will hold onto it as it is the best potion-based healing in the game.
On the upper floor of the harper building we have spectral harpists. If we get the harper amulet we can avoid a fight, but avoiding a fight means that we miss out on XP. They at least stick around meaning we don't have to prebuff before going upstairs.
For this fight we want to include resist fear in the prebuffs, as they have a panic effect. Other than that, this fight is straightforward.
Killing the spectral harpists and getting Montaron is enough for us to hit fighter level 10, a thoroughly boring level.
We want to prebuff before returning to Xzar.
It's possible to kill Lucetta, though it's difficult - she has a lot of HP and runs away as soon as her dialogue is done. Using the horn of valhalla and attacking her as soon as she spawns (before the dialogue starts) will be necessary. She only offers minor rewards if killed, however - 4k XP and no real loot.
We are not quite done with this part, we have one more ambush to clear.
There is one last ambush encounter, and it is reliably triggered by heading from the graveyard district to the city gates.
This last ambush we get dispelled on entry like the others. Unlike the others, this consists only of orogs and fighters with no magical support.
This is a trivial encounter - The fighters can only hit us on a 20 when we have up ghost armour, blur and the shield of harmony. They are unhasted and so cannot stop us from kiting or going invisible while we set up buffs. The orogs need a 20 to hit us when we have ghost armour up, and are completely blocked by wraithform.
With this part, we are done with ambushes. There are still waylay encounters, but after the first three they are the the same encounter repeated. That encounter gives no XP and drops only a scroll of oracle that cannot be sold, so we will just run away each time. With the repeatable encounter, a caster likes to cast greater command as the first action. we can normally get to the edge of the map before it hits us, but for maximum reload safety, casting invisibility before overland travel will make it so the caster leads with true sight, giving enough time to get away. This is possible as the repeating encounter does not have the dispel on start that the other encounters have.
I previously mentioned that pickpocket has not been as useful as I had hoped. Having played this part, I have deemed that if I were to do this run again I would start by pump detect illusion, find traps and open lock to 100. This is because it is possible to detect illusion while invisible, so in this fight (and probably other similar fights) detect illusion would have enhanced our plan of "go invisible and buff while invisible".
I usually drink an Invisibility potion, run north east, then summon something and head into it. You are more brave in this encounter.
In curious about other improved fights.
The only thing that I disrupt is the TS - if we can disrupt that, then neither enemy caster will do anything for the rest of the fight. Unfortunately, running away means letting the TS go up.
One thing that I have noticed that is quite promising is our saving throws:
Since we have gotten rid of the Dao in Trademeet, it means that the smithy there sells the robe of the good archmagi. The good robe can be obtained much earlier than the neutral or evil robes, and it gives us a bonus of 1 to all our saving throws. Even better, it gives us a bonus of 5 to our amour class, which means that we can buy it before the Suna Seni fight for added protection during the rounds we are getting attacked before setting up our ghost armour. Buying it isn't cheap (30k), but we have over 40k gold without even getting into our sell pile.
Cloaks are a somewhat hard to find resource in IA - if running a full party of six, it will probably be quite a distance into the game before all six of your characters have their cloaks of protection set up. The locations of early-ish cloaks of protection are:
- Copper Coronet Beastmaster
- Slaver ship
- Pai'Na
- Shadow thieves (if sided with Bodhi)
- Gracien (de'Arnise keep)
- NPC quests(Jaheira, Dorn, Neera)
We will probably pick up our first cloak from the Beastmaster.In addition to that, we can use the following buff spells:
We can combo robes, cloak and buffs to have a save vs spell and death of 1. Since critical failures/successes are not a thing on saving throws, it means that we will have permanent immunity to anything that requires us to fail an unmodified saving throw.
The key word there is unmodified - a lot of the spells that IA casters like to use (like chaos) carry a save penalty (commonly -4) and a lot of IA casters like to use greater malison on top of that, so this won't help us against most IA caster fights. It will be most useful against monsters that have spell-like abilities - for instance, bone golems have a "hideous laugh" ability that forces us to make an unmodifed saving throw to avoid being stunned. As we have no way of negating the stun effect, a saving throw vs spell of 1 is needed to make this reload-safe.
As monsters get more IA-improved, the saves vs their effects have more of a penalty (for example, the spider queen has a -6 save penalty against her improved web), but there is some staggering as the enemies get toughter - for example, whisper spiders we will need to get over a -2 penalty, greater bone golems have a -4 penalty.
In the last part, we cleared out the slightly improved ambuses and the unimproved harpers. In this part, we will be doing more bits that are slightly improved or not improved - the east parts of the graveyard district.
We head back to trademeet to pick up something that we should have picked up earlier.
Once we have become the hero of Trademeet (just beating the Dao isn't enough) the Smithy opens up and we can buy the robe of the good archmagi. It costs a fair chunk of money, but it should be obtainable without dipping into the sell bag.
We also head to the promenade and pick up a scroll of spirit armour from Galoomp.
The robes offer us a bonus of 5 to AC, and 1 to all saving throws. This means that with blur up we will pass every unmodified saving throw.
Casting ghost armour will give us an additional 3 bonus to AC and spirit armour will give us an additional bonus of 4 along with a save vs spells bonus of 3. However, ghost armour is a 3rd level spell and spirit armour is 4th level. Ghost armour has little competition from other 3rd level spells, whereas there are a lot of other 4th level spells that we want. The majority of the time we will be casting ghost armour, and preferring an extra casting of stoneskin over the 1 AC that spirit armour provides. There will be times where we want to buff our save vs spell - if we use spirit armour, blur and improved invisibility, we will be able to guaranteed make every save with a penalty of -4.
We hand Wellyn's bear over to him for 15500XP.
The graveyard conveniently offers uninterrupted sleeping in the city. One quick nap later, as we talk to the parents for another 5k XP.
Risa is an orphan, and setting her up with the paladin Kamir is worth a total of 15250 more easy XP.
Nevin wants help killing his uncle Lester, so we load up with as many offensive buffs as possible.
It is also useful to draw him over away from Lester's spawn point so we have a bit more time to attack him.
Lester has a hefty damage output and over 200HP, so killing him is difficult. He's only worth 1k XP anyway, so there's not even that much benefit, but we might as well try.
We start the kidnappers quest.
There are a few minor undead fights in the minor tombs - we don't go into the main part of the tombs for now. Properly buffed, these undead are not a problem, and this is enough for us to level up.
We have hit Thief level 12. I start dumping points into detect illusion, as it has slightly more than zero use, which is better than the other thieving skills.
We head to the bridge district to finish the kidnappers quest.
We buff up in the house. The kidnappers don't run away until we leave the building, which gives us plenty of time to fully buff.
Finally we head upstairs and free the kidnapping victim. We do not have the golden pantaloons and so cannot forge the big metal unit, so there is not point getting the silver pantaloons, so we just get a bit of XP instead and end this part.
A short part here, just clearing up vanilla encounters. The graveyard tombs I'm hesitant to do, as they have a few improved spider groups - I can beat the improved spiders, but I have yet to find a consistent strategy. From here I want to see what opens up now that we can guarantee pass saves vs spells.
In order to make the run reload safe, we need every saving throw we encounter to be one of the following:
In the last part, we cleared the easy parts of the graveyard district. We hit Thief level 12, and our next level up won't be for quite a while, when we hit 2.4 million XP. This means that the screaming statue is probably going to be off limits for this playthrough.
I've talked about how Rayic Gethras is a roadblock for a long time in this playthrough, but there was an easy solution I've missed up until now. Here we see his base stats - Mostly uninteresting, but being a 15th level mage he has access to much more powerful spells than us, plus we will lose any dispel wars with him.
These are his prepared spells. If we won't stop him, he will hit us with a greater malison before casting things like finger of death. He can also dispel our protections, meaning a single hit from his backup golems puts us in danger of his power word stun, which will be instant death for us.
This are his initial buffs. He is protected from magic weapons, plus all spells of levels 4 or lower. In theory we could try to burst him down with normal weapons (and in a party game that would be the plan), but his seven layers of stoneskin mean that we would have a very hard time doing to reluctantly.
To hurt him magically, we need a spell that is level five (as we cannot cast higher than level 5 spells) that can be cast without a target and does not give the enemy a saving throw to negate, and has a short enough casting time that we can cast it faster than the spells that we are trying to disrupt..
Fortunately, there is exactly one spell that solves this problem, and it can be bought from Lady Yuth at the adventurer's mart.
It is level 5, which gets over GOI. It has a casting time of 3 (2 under amulet of power). It affects any character close to the caster, whether they are under improved invisibility or not. It allows for a saving throw, but the saving throw only reduces the damage to half, which due to the way damage rounding works means that any spellcaster that is not immune to fire damage will be disrupted.
Cone of cold is another option, but it has a longer casting time (base 2).
We prebuff (Precast Stoneskin, Blur, Ghost Armour, Mirror Image, Haste, Improved Invisibility, DUHM) and head up. We make sure that we have regained our spellcasting action before heading up.
When we head up we are given two conversation options. One of them starts the fight immediately, and the other gives us two rounds before hostilities start, but we don't want to use those two rounds for anything, so we start the fight directly.
The stairs down disable, and will remain disabled until Rayic is killed.
Rayic turns invisible. and summon in two golems - a clay golem and a stone golem. They are not IA improved, but we still focus on them for now.
You can see in the screenshot that I have normal weapons equipped - we use normal weapons for attacking Rayic and magical for attacking the golems. The clay golem has golem haste and the stone has golem slow - golem slow is more annoying, so we focus on the stone first. We also lose a point of reputation here.
Rayic going invisible means that we cannot see what he is doing until he casts a spell that is considered hostile enough to turn him partially visible. It's important to pause often and listed for audio clues - as soon as we hear him casting a spell (which should be true sight), we cast our own sunfire.
You can see us casting sunfire here while Rayic is still invisible. We are also able to get a few early hits in on the golems as they are gating in, before they can do anything.
And here, immediately after, we see the spell land and disrupt his spellcasting, even though he saved vs spell. We can also see the golems take a bit of damage, which is a nice bonus.
The clay golem is a bit more annoying - it is immune to slashing, piercing and missile weapons, and nonmagical crushing weapons. I conveniently had a +1 flail in my sell bag, but no-reloaders will want to double check before starting this fight. It is also possible to kill the clay golem with elemental damage from spells like sunfire (that we have conveniently prepared three copies of).
Rayic has nothing to do with his true sight disrupted, so he attacks us with his staff. This is convenient as it breaks the first layer of his invisibility without us having to do anything. Him doing this makes the encounter a lot easier, but it is still perfectly possible and reload safe even if this did't happen - we would just have to wait out his improved invisibility (18 rounds) and spell immunity (15 rounds) with multiple copies of our improved invisibility (14 rounds).
With his golems down, all Rayic can do is refresh his stoneskins once before being hacked to bits by normal weapons (magical once his PFMW wears off).
The rest of the quests go straightforwardly. The reload-safe way of dealing with Marcus will require at least 16 strength and at least 10 charisma - even if we started with 3, the BG1 tome and the friends spell puts us just over the limit. Also, note that killing Embarl is worth 750 XP and sparing him is worth 0 XP.
It's now time to storm the guild.
The top two levels are not much concern. The top level contains no enemies, and the second level contains only Anishai and a small number of shadow thieves.
The ground floor contains a large number of low level thieves to kill. Sunfire will com in handy again here, and buffing is necessary for reload safety. Rayic's house also contained a wand of fire that can be convenient. As long as stoneskin is kept up, there should be no real danger.
We perform our standard buffs, ending with improved invisibility and wait for our action to refresh before heading in.
As we approach, Mae'var shouts to us. He can see through our invisibility, but nobody else can.
He has a cleric who can cast true sight. We can disrupt it with a magic missile, or we can take advantage of a room full of enemies and no nearby innocents to disrupt it with sunfire.
We follow our habit of prioritizing casters over non casters and take out the cleric. For safety, we keep our action free for refreshing mirror image or stoneskin. The stairs out have been disabled for this fight, so we have to fight to the end.
None of them are real threats as long as we keep up stoneskin and mirror image.
Finally, we return to Mae'var and claim our reward. For the reward, we want to note a few things:
- If we take the guildhouse, the training doors in the new interior cannot be picked/disarmed again for XP
- There is no quest XP for any of the quests once we are guildmaster
- There is a total of 3600XP for killing enemies in the guildmaster quests
- There is no notable loot for killing enemies in the guildmaster quests
- As part of the anti-infinite-money design of IA, the subordinate thieves that generate us gold get killed off one a week, starting around week 20
Therefore, accepting the guildhouse offers us only 3600 XP and a finite amount of gold.By turning down the guild, we instead get this as reward. It doesn't have any useful attributes beyond being a +3 short sword, but that is itself quite useful. We already have access to a +3 weapon through casting enchanted weapon, but now we can dual wield +3 weapons, and when we get our next +3 weapon we will be able to stop preparing enchanted weapon, which will make things a lot more convenient.
And on that bombshell, we will end this part.
Under IA, thieves are probably the least threatening class. Pretty much all of them have a simple AI - Identify a backstabbable enemy, drink a potion of invisibility, backstab, repeat. A stoneskinned character is not considered backstabbable, and so does not prompt potion drinking. If we ever have our stoneskins drop during a fight with thieves, they will all be saving their actions and immediately drink potions of invisibility, so it is very important in fights against thieves to save our action for refreshing stoneskin if it ever falls.
This strategy to disrupt True Sight with Sunfire feels quite strong, and I can see us using it a lot in the future. We could have used this against Rayic right from the promenade, and on a rerun of this playthrough I would have definitely done all this before leaving Athkatla.
I initially thought I would use potions of magic shielding to get past the save-or-else spells that Rayic and other mages cast. I have decided not to do that, however - I want to have my plan A for each fight be to not use these potions. Since their numbers are limited, I would want to save them as backup strategies for noreloaders. There are three that can be easily bought from Roger in the sewers.
I mentioned earlier the screaming statue challenge. This is new in IA 6. In the abandoned temple layer of the temple sewers is a statue. Four waves of enemies must be fought, consisting of IA improved vampires and mists. If all four waves are beaten, then the reward includes the following notable items:
- A potion of barbarian essence (undispellable 20% physical resistance buff)
- A Permenancy scroll (a crafting ingredient)
- A scroll of minor disruption (a new IA spell)
There are all valuable items, but we will be able to go without them. We wouldn't ever cast minor disrupion, the character build we are going for is light on permanency scrolls (at least while they are rare), and we will have found more potions of barbarian essence by the time that we want to use them.Once the challenge is started, the map cannot be left until all four waves are beaten. Resting will reset to after the first wave is beaten. Although we could probably beat the first wave safely, the later waves will definitely require PFMW to beat reliably. The challenge cannot be started unless the protagonist has less than 2.35 million XP, which will be before we gain sixth level spell slots, so we are very unlikely to be able to beat this challenge.
There is what is probably an oversight in the IA scripts - IA tries to get rid of all infinite XP methods. Although the vampires in rounds 2 and 3 of the screaming statue challenge do not give XP, the horrors that are spawned do give XP. It is therefore possible to repeatedly rest after beating wave 3 to reset progress and earn more XP, which is an infinite XP loop. If we were able to do the screaming statue challenge I would restrict ourselves to five restarts (to match the rule of six for other repeating IA spawns), but since we cannot do the challenge it is not massively relevant.
BG2 does feature some elements of dynamic encounters. At some points in the game the strength of the character (normally the XP of the protagonist, sometimes the level or number of party members) is checked, and the enemies generated change based on this. The stronger the protagonist, the stronger the enemies that are generated, and the better the XP rewards. As these scripts tend to run on entering an area, we will want to hold off entering these areas until we are at the maximum tier for the highest level spawns.
The summary version of which areas we will want to gate by XP is:
Five Flagons upstairs
2 Million:
De'Arnise Keep
Temple level below sewers
2.35 Million:
Mekrath's Lair
Planar Prison
Torgal
Planar sphere
3.05 million:
Firkraag's Maze
Shadow Temple
Spellhold
4.86 million:
Watcher's Keep maze level
The more detailed breakdown is below.
The first level of Watcher's Keep is a massive source of experience, and unfortunately we will not be able to get the full effect of it. The variable "StartMP" is 1 if we have a TOB start, 0 if we have a SOA start (though I'm not sure why it has that name, the name sounds more like a multiplayer start). As this is a solo run, it might appear that the number in party is a requirement that we won't be able to fulfill, but this check allows for dead party members, so some may consider having a full party of dead party members acceptable. LevelPartyLT will first take the highest level of dual/multiclass characters, then take the average level of all party members (I'm not sure if it counts dead ones or not). We will meet this requirement at 3.24 million XP.
I will probably have to take the easier version of this area - as this area is effectively a blocker for getting spell immunity, I very much doubt we will be able to reach 3.24 million XP before reaching it, and even if I do, I feel a bit uneasy about recruiting dead party members. The statues we miss out on fighting are worth 20k XP each plus some generic magic items, and the spawn points are probably easier (though I'm not sure exactly how).
AR3016: Watcher's Keep Chromatic Demon Level:
I took the time to look at the spawn points, we have:
It is worth noting that these elemental golems are "S!ELEGRA". Some IA creatures are implemented multiple times, and there are multiple versions of elemental golems which are slightly different behind the scenes. "S!ELEGRA" spawns "S!COINRA" and "S!GEMRAN". All three of these are worth 0 experience, as they are considered random encounters by IA (They have the suffix RAN or RA).
Fortunately, the "False" clause on line 12 means that this will never fire. I'm not sure if this comes from IA or IATweaks.
AR4500: Pocket Plane:
There is some complex logic for the pocket plane challenges. I'm not sure what effect it has, but it will probably be sufficiently late in the game that it shouldn't matter at this point.
S!PYRAN: Somewhere in the fire giant area:
In the fire giant area we will end up facing three XP-less elemental golems instead of two elite fire giants that drop XP. This is a good way into TOB, so again we should be happy enough that it won't matter.
AR3007: Watcher's Keep Maze:
We will want to have our highest class be at least level 16, which is at 4.86 million XP. Since this is after the chromatic demon, we will be well past this point.
AR3012: Watcher's Keep Maze:
Once again, this will not be a problem for us.
There is an identical check in AR3013.
AR5200: Fire Giant Area:
Once again, we will be high enough level by this point that it should not matter.
AR0410: Planar Sphere Lavok's Room:
We will want to be at least 2.35 million experience to get the best version of this fight. This is something that we will not have to worry about, as we will want to be casting PFMW before we get into the planar sphere.
AR0511: Five Flagons Upper Level:
This script comes into play when doing Aran's tasks. In theory we want 850k experience, but we again we will have lots of experience before we even get close to this area.
AR0516: Planar Prison:
In theory, we can get a few thousand more gold from the planar prison by going there before 2.35 million XP. The planar prison is something that we will consider doing relatively early - it does have some important loot, such as an improved haste scroll and boots of haste. Gold will not be much of a constraint for us, however, so this is not worth factoring into our decisions.
AR1303: De'Arnine Upper Floor:
These spiders are part of the Glacian fight. Although we have already entered the map, we will not have triggered this part of the script. The XP gain from the de'Arnise keep areas that we did is minimal, so a no-reloader would be perfectly good to completely skip it until later.
AR1401: Shadow Temple:
This is part of the ranger stronghold quests. We will have well over 1m experience at that point.
AR1512: Spellhold Labyrinth:
Missing out on the necklace is not a significant effect. I'm not sure what IAPCTOOHIGH does, but I suspect it makes the random spawns (e.g. asylum golems) harder, which isn't a good thing as they drop no XP. We'll be well over 2.35m XP at this point anyway.
AR1513: Spellhold Labyrinth 2:
In theory, if we thread the needle on XP, we could get an extra three whisper spiders to kill. In practice, we will always hit IAPCTOOHIGH and miss out.
AR4000: TOB Starting Area:
There is an encounter that can get harder if we have 3m experience going into TOB, which will always happen.
LAVOK01: Lavok Fight:
Being at least 1.7 million points means another gem golem to kill.
MOUTHTRAP: Screaming Statue:
As mentioned earlier, this challenge is something we will probably have to pass up.
OBSDEM01: One of the demons in the planar sphere segment:
We will want the hardest encounter, which means 2.35 million XP.
S!BOLICH: Spellhold Library Lich:
Once again, we will be hitting IAPCTOOHIGH.
S!SHADEL: Shade Lord:
We will want to be at least 3.05 million before we fight the shade lord. Having access to a +4 weapon (especially a +4 crushing weapon) will be very useful before this.
S!SPYRAN: Planar Prison:
Once again, we want 2.35 million XP before the planar prison
S!TORGAL: Torgal:
We want to make sure that we are at least 2.35 million XP before we fight Torgal.
S!UMAR: Umar:
We will want to be 3.8 million XP before fighting Umar.
SPWNBEH: Beholder spawn temple level below sewers
We will want to have 2 million XP before entering this area.
SPWNDEAD: Spawn in shadow temple and spellhold:
The best version of this fight is when we have at least 3.05 million XP. The chapter doesn't matter - two skeleton warlords together are worth 33500, the same as a lord and a grandlord.
SPWNDROW: Drow spawn in underdark:
In theory we want to be over 2.7 million XP, but that will not be a concern.
SPWNGOL: Golem spawn used in sphere entrance, sphere engine, firkraag maze, Suldanesselar
We will want to be at least 2.35 million XP.
SPWNMIND: Mindflayer spawn in Underdark
We will want to be at least 2.35 million XP.
SPWNMON: Generic monster spawn in Planar Prison, Mekrath's lab, Spellhold labyrinth:
We will want to be at least 2.35 million XP.
SPWNRAK: Rakshasa spawn used in Suldanesselar
We want to be at least 2.35 million XP, but that won't be an issue.
SPWNTOA: Kuo-Toa spawn used in Underdark.
We will want to be at least 2 million XP.
SPWNTROL: Used in de'Arnise keep ground and upper floor, Mekrath's hideout, and Spellhold labyrinth
We want to make sure we have at least 2 million XP.
This playthrough has been a bit inefficient in this regard - going to the de'Arnise keep early has denied us of the optimal XP routing with the troll spawns. For any subsequent playthrough, I would recommend leaving the de'Arnise keep completely alone until reaching 2 million XP.
The optimal XP for a troll spawn is 46500, and we would have gotten 12200 from the early trigers. This is a loss of about 60k (30k if we only triggered one of the troll groups like this), which is obviously not good but not enough to make me want to retcon or start over.
SPWNVAMP: Vampire Spawn used in Bodhi's Lair chapter 6 and Firkragg's maze
We will want to be at least 3.05 million XP.
SPWNWOLF: Werewolf Spawn used in Firkraag's maze
We will want at least 2.7 million XP.
In the last part, we finished the thieves' guild missions. Having done a lot of analysis of the random spawns in the game, there are two major take aways for now - we want to hit 2 million experience before going to the temple area underneath the sewers, and we will not be penalized for going early to the graveyard lower tombs.
I previously mentioned the improved spider groups down here and how I was worried about them. Let;'s analyze them in detail. The consist of:
They each attack with piercing weapons.
This is how we look when fully buffed. Note that although it says our AC is -11, it is effectively -21 - the Belt gives -3 against piercing weapons, Blur gives -3 to attack rolls, Improved Invisibility gives -4 to attack rolls.
If we review this in context of the enemies above, we get:
Since each of them can only hit us on a natural 20, we will attack them in decreasing order of squishiness - the ettercap and vortexes first and the spirit and mutated last.
When we dual wield, due to how haste is implemented, we are effectively trading one main hand attack for two attacks with the offhand at a -4 (20%) penalty. Since our main hand attack chance is above 40% in all cases, we damage output will always be greater. Since they only hit us on a natural 20, dual wielding is all upside - if any of them had a THAC0 better than -1 we would have to consider the trade off.
We make sure to not use piercing weapons - they tend to have bigger resistances to piercing weapons than other damage types.
We summon the skeletons and the warrior because they provide a little extra safety by distracting some of the spiders, and we aren't using the fifth level spell slots for anything else.
It may be that the buffs run out before the spiders are fully dealt with - it is fairly common for the mutated spiders tobe the only ones left, as they have the most HP, the best regeneration, 60% physical damage resistance and 100% elemental and magical damage resistance. This is okay - the fight can be easily retreated from to the outside.
After resting up, the tombs can be entered again and the rest of the spider group fought. Repeat as necessary.
No-reloaders will want to make sure to keep some antidotes or elixirs of health in the bag of holding just in case - mutated spiders also have a nasty poison. They are far more annoying than the 9k XP would suggest.
As we approach Pai'Na's lair, two killer spiders and a spirit spider spawn. We don't actually enter the lair, however. This also triggers a web effect, which we equip the Shield of Harmony to negate.
There are three groups of improved spiders, plus a group of shadows and Pai'Na's guardians. This area may requrie a lot of resting and retreating, but it will be safe.
In the next area, we find the least of the IA improved vampires - the vampire bride. In isolation is is not threatening as long as we have the amulet of power, but more powerful vampires like to spawn lots of these.
The rest of this map is vanilla, though worth decent XP. We will end this part here.
During these fights I noticed the mutated spiders were able to hit me on a 16, when they should have been only able to hit me on a 20. Am I getting it wrong and counting blur/improved invisibility/girdle as stacking when they shouldn't be?
In the last part, we cleared out most of the rest of the graveyard district. There is an important consequence to this - we finally hit 2 million experience, which means that we can tackle certain areas where that is the XP threshold for the highest levels spawns.
There are two such areas - the de'Arnise keep (which we have already cleared) and the temple of Amaunator in the sewers. We messed up a bit and went to the first prematurely, missing out on 30k-60k experience in the long term. The other is untouched,
If this is being followed as a guide and some XP is missing, we should be able to repeat the strategies from the last part to clear the spider encounter in the druid grove area. That, plus the druid stronghold quest that follows, should be enough to get over the threshold.
The first fight here is against three vanilla huge spiders.
We do not trigger the screaming statue fight by clicking on the question mark button. We do loot the container in them middle of the screaming statue, however. We make sure to walk across the front of the statue to this part of the map to properly trigger the spawn of the next encounter.
We summon minions, buff up and head forward into our first group. It consists of five yuan-ti (2 APR, THAC0 3, AC -4, 108HP) which aren't much of a threat, and one yuan-ti mage (Level 14/14 fighter/mage) who is a threat. Notable aspects of the mage are:
We make sure that we enter the vision of the group while under II before any of the summons do. If the mage sees any of the summons, then the prebuffs will fire. If we are first, then the mage will attempt to cast true seeing and not fire prebuffs until the true seeing is interrupted or complete. We will obviously opt for "interrupted", and can achieve that with magic missile - the prebuffs with MGOI won't go up until the magic missile has landed and interrupted.
Our prebuffs are:
The early screenshots of this fight are from before I worked out the full buff list and are incomplete, trust the text over the screenshots.
The mage's prebuffs fire. We won't be able to hurt him for a while, so we focus down the mundane yuan-ti first.
The mage fires confusion, emotion and slow at us while we are partially visible, which I suspect it shouldn't be able to do. These spells have negating saving throws at -2, -2 and -4. While fully buffed, our saving throws vs death and spell are -3, so we will auto-pass these, though our minions will probably not be as lucky.
We listen out for a necromancy spell being cast (they start with "Vita-Mortis"). This might be death spell, and we want to make sure it takes out only one of our summons in that case. We do this by telling the summons to scatter while it is being cast. If it is animate dead, then that isn't much of a concern.
The mage will cast PFMW whenever it is unprotected, it has a free action, and it detects a hostile in melee range, As long as one of the summons (or Othala) is next to the mage, it will use its PFMW after its fourth round of combat.
With all this done, the mage cannot do anyting else to us magically. It will prefer to target the summons instead. We can get a bit more mileage by kiting any summons that have aggro so the yuan-ti target Othala instead - mirror image and stoneskin mean that we can tank a lot better than any summon.
We can tell when the Yuan-ti mage is targeting one of the team members if they track the member as they move round the mage. In this case, we have identified that the mage is casting a necromancy spell at the warrior, so we have him run away in case it is death spell so our skeletons are not affected.
By the time we are ready to fight the mage itself, we will have gotten through both PFMWs. Since we are at least eight rounds into the fight, some of our buffs (such as DUHM) may run out and need to be refreshed. The protection from fire is important so we can chew through the stoneskins without killing ourselves on the fireshield.
Our improved invisibility will wear off before the mage's, and in this case we may be breached. We do not want this to happen, and in this case it's probably best to retreat and come back after resting. We can avoid this my making sure we have a second copy of improved invisibility to cast before the first one expires. Our first one should last 14 rounds, so we will want to refresh it around the 12 round mark for safety.
As a backup scenario, if we don't want to retreat, we can always use the three important truths:
Sometimes the mage will completely ignore invisibility and breach anyway, in which case retreating should definitely be the plan. It may pursue up the starts, but heading up and down repeatedly should lose it, leaving enough time to rest up, rebuff and reengage. The second time round we will be able to take it down with no problem since there are no other yuan-ti to distract.
Further on is a group of unimproved undead before the bridge.
Reforging the bridge gives a lot of experience, but the route ahead contains some nasty enemies - three beholders and two gauths. Although the beholders are meant to be the bigger threat, in practice I find the gauths to be the major obstacle. They can cast three cause serious wounds per round, each of which does 34 damage (with the insane difficulty damage boost).
We will abuse the environment here - the beholders are too big to get over the bridge gap, but the gauths are not.
This encounter is Jayes. He sells two scrolls of Summon Nishruu.
Although this is a level 6 spell, we can scrollcast it. We prepare our spellbook with:
We start by casting cloudkill at the bottom of the stairs to get their attention.
We can use the horn to get a body behind us to help track when the Gauths are near.
The warrior has enough HP to tank for a while. This gives us enough time to summon the Nishruu.
The gauths see the Nishruu's magic resistance, so the only beholder ray they fire is the occasional anti-magic ray, which only heals the Nishruu. The Nishruu can't be killed by the Gauths, but it can't do any damage to them either.
Beholders have a death ray which auto-kills summoned creatures, so we can only use this strategy against the gauths, which is why we take advantage of the narrow bridge to separate them from the beholders.
While the gauths and the nishruu are occupied with each other, we cast another cloudkill. In IA, enemies in a cloud spell like this will seek out the player unless they have someone to attack. In this case, attacking the nishruu takes higher priority over escaping the cloud. The nishruu is immune to the cloud's damage, while the gauths get whittled down.
We can cast multiple clouds to speed up the process. We can also duck briefly into vision to cast magic missile or similar, though we don't want to spend enough time in vision for them to launch a damaging ray at us.
We can repeat the process with the beholders at this part of the gap. Note that the beholders are quite tanky, and it is quite possible to spend an entire spellbook on fireballs and cloudkills without them dying. However, it costs nothing to rest up and try again, and there is zero risk involved if we do not give the beholders a window to shoot rays at us, so we can just keep trying until all three go down.
We have to watch out here - if we pick up the hammer from this container, it will spawn a ghost spider, yet another encounter that we will tackle after being able to cast PFMW.
Finally, we make it to the temple.
A single CLW is enough to heal the emphatic manifestation, and we will end this part here.
I'm quite pleased by this part - during my early playthroughs of BG2 I liked the look of the Nishruu and Hakeashar spells, but always found their actual performance disappointing. This time round, it ends up being the crucial part for beating an encounter in a reload-safe way.
Therefore, we will have to beat an enemy to gain a PFMW scroll from them. Furthermore, since enemy mages like to use the PFMW scrolls defensively, we will have to beat them fast enough (and probably using normal weapons) that they do not have the opportunity to use their scrolls.
The enemies that we can fight to get a scroll are:
There is a bit of a problem here - the vast majority of these scroll locations require us to beat a fight that requires PFMW. The only ones that I think will be possible will be:
Also, let's talk about the planned equipment upgrade path we want to take:
Robe of the Apprenti:
Requires 3 scrolls of memory boosting and the robe of Vecna. The robe is randomized, but it will hopefully be one of the last items we pick up before spellhold
(Improved) Boots of the Ranger Lord:
Requires two boots of speed, three scrolls of improved haste, and the boots of the woodland. The boots of the woodland are from the green wyrm in Watcher's Keep.
Girdle of Lordly Might:
Requires five girdles. One of them (fortitude) is randomized between three difficult pre-spellhold fights and another (golden) is well into Watcher's Keep.
Paws of the Furious Cat:
Requires us to beat the beastmaster and the final basement of the skinner house. We can currently beat both in an inconsistent manner, I want to wait until we can do them consistently. We could technically craft them before UAI, but we won't be able to use them until UAI.
Scarlet Ioun Stone:
Requires the ruby of the gods, which is obtained around Suldanesselar. This will be part of the super late game equipment.
Improved Ring of Gaxx:
Essentially a combined ring of protection + 5 and ring of regeneration. There's not much competition on the ring front. It requires beating Kangaxx and the WK demilich.
Cloak of Arcane Immortality:
Essentially a cloak of protection + 3 with some regeneration stapled on.
Amulet of Hades/Lord of the underworld:
The most difficult part will be the scroll of vocalize. The shadow dragon has one if the protagonist is a pure class necromancer. For all other classes, Firkragg is the only source.
Flail of Defending and Wounding:
Requires beating the WK demilich or Saladrex for the Defender of Easthaven. Best blunt weapon in the game.
Phosphorus:
This is important as a +4 weapon that can be crafted early. Even better, it shares proficiency with flails and is a crushing weapon (the most important damage type). The awkward parts are the scrolls of permanency - Phosphorus itself only requires one, but we also need two morning stars +3. They cannot be found early (Limak, Gromnir, TOB stores), so we will need to craft two, each of which require a permenancy scroll. Since it sets strength to 24, it makes for a great offhand weapon.
Cutthroat/Improvised Blend:
The one-handed piercing weapons are not very exciting. Short swords are preferred over daggers for one major reason - early access to the short sword of the short sword of backstabbing. Improvised Blend has slightly better on-hit abilities than the Grandfather of Assassins, but worse static abilities.
Judgment Day:
The flat out best weapon in the game. This requires us to beat the Supreme Leader fight, and shortly after crafting it we will need to beat the Judgment day fight.
In addition to the above, we have the low priority upgrades that are situationally useful:
The important items to craft require the following IA-added rare crafting ingredients:
These can be found in the following locations:
- Spellhold dungeon
- Watcher's Keep Chromatic Demon level
- Yaga-Shura's Camp
- Shangalar
- Lavok
- Pirate Coordinator
- Spellhold book challenge
- Ancient Lich (guarded compound)
- Archpriest Nulonga (Demogorgon)
- Hybrid Tiefling (Watcher's Keep maze level
Permanency:- Jamis Tombelthen (Oasis fight)
- Screaming statue challenge
- Slaver Ship
- Illithid hideout in the sewers
- Spellhold dungeon
- Jae'llat's house in Ust Natha (If the party contains a single class swashbuckler)
- Sahuagin City
- Watcher's Keep Chromatic Demon level
- Yaga-Shura's keep
- Draconis
- Shadow Dragon
- Abazigal
- Ancient Dragon
- Saladrex
- Gromnir
- Berenn (Yaga-Shura's keep)
- Layene (Twisted Rune)
- Missing boy in Ust Natha quest
- Planar Warden
- Belcheresk (Demogorgon)
- Ancient Golem (Beholders in Underdark)
- Noble Efreeti (Ust Natha)
- N'ashtar (Solaufein quests)
- Karun the Black
- Thelynn'ss (Sendai's Enclave)
- Lashar'ra (Sendai's Enclave)
- Shadow Dragon
- Tor'gal
- Kuo-toan prince
- Yaga-Shura
Manual of Elaboration: